A WooCommerce Mix and Match Free Plugin lets customers build their own personalized box by selecting items from a set of available products on your store. In this article, we introduce the WooCommerce Mix and Match Free Plugin, which helps you create anything from simple custom boxes to advanced product bundles with flexible options.
If your products can be combined to form attractive bundles, you can easily set them up using the WooCommerce Mix and Match Free Plugin and offer customers a more interactive, customizable shopping experience.
Table of Contents
- What is WooCommerce Mix and Match Products?
- Create WooCommerce Mix and Match Product
- WooCommerce Mix and Match Free Plugin
- Video Tutorial
- Examples of WooCommerce Mix and Match Products
- Bundle Discounts
- Gift Products
- Product Boxes
- How to Create WooCommerce Mix and Match Products
- Create Mobile Bundle Discount in WooCommerce
- Step 1: Install WooCommerce Product Bundle Free Plugin
- Step 2: Create Regular Products
- Step 3: Create a Product Bundle in WooCommerce
- Step 4: Add Bundle Items
- Step 5: Customising WooCommerce Product Bundle
- Step 6: Set a price for the Bundle Product
- Step 7: Configure the Plugin Settings
- Final Result for Mix and Match Products in WooCommerce
- How to create mix-and-match product bundles with variable products
- 📽️Video tutorial
- Optional Items in WooCommerce Product Bundles
- Offer BOGO Deals in WooCommerce
- Offer Multiple Gift Products in WooCommerce
- Create Configurable or Personalized Products in WooCommerce
- Shortcodes
- Articles
- WooCommerce Mix and Match Free Plugin FAQ
What is WooCommerce Mix and Match Products?
A WooCommerce Mix and Match product is a product that allows customers to create their own personalized boxes from individual products available on your site. Customers can select different products and set the quantity for each item, then mix them to build a custom bundle.
This type of product helps store owners offer flexible bundles that encourage customers to purchase more items in one order and increase Average Order Value (AOV).
Create WooCommerce Mix and Match Product
To create a WooCommerce Mix and Match products, you can use the Easy Product Bundles for WooCommerce free plugin. This powerful plugin lets you build everything from simple mix-and-match boxes to advanced mix-and-match scenarios with flexible product selection and quantity control.
It’s an easy and reliable solution for creating customizable bundles that improve the shopping experience and help increase your sales.
WooCommerce Mix and Match Free Plugin
Unfortunately, it is not possible to create a mix-and-match product with WooCommerce core. The good news is that Easy Product Bundles for WooCommerce is the best WooCommerce mix-and-match free plugin that allows creating mix and match products easily.
Some of the WooCommerce mix and match plugin features:
- Bundle item discounts: Apply discounts to individual items inside the mix and match bundle.
- Fixed-price mix and match products: Sell the entire bundle at a fixed price, regardless of which products the customer selects.
- Automatic price calculation: Dynamically calculate the bundle price based on selected products and quantities.
- Optional bundle items: Allow customers to skip optional items while building their custom box.
- Multiple layout styles: Choose from beautiful Grid and List layouts in small, medium, and large sizes.
- Rule-based product selection: Force customers to follow a specific structure, such as selecting one product from Category A and another from Category B.
- Flexible product sources: Offer products based on specific products, categories, or tags.
- Quantity limits per item: Set minimum and maximum quantity limits for each bundle item.
- Advanced shipping control: Decide whether shipping costs apply to the whole bundle or to individual bundle items.
Video Tutorial
Examples of WooCommerce Mix and Match Products
Mix and match products work by allowing customers to select individual products they’d like to purchase and add them to a gift hamper, product box, or bundle.
Some of the popular examples of WooCommerce mix and match products are:
- Bundle Discounts
- BOGO deals
- Gift products
- Customizable products or Product boxes
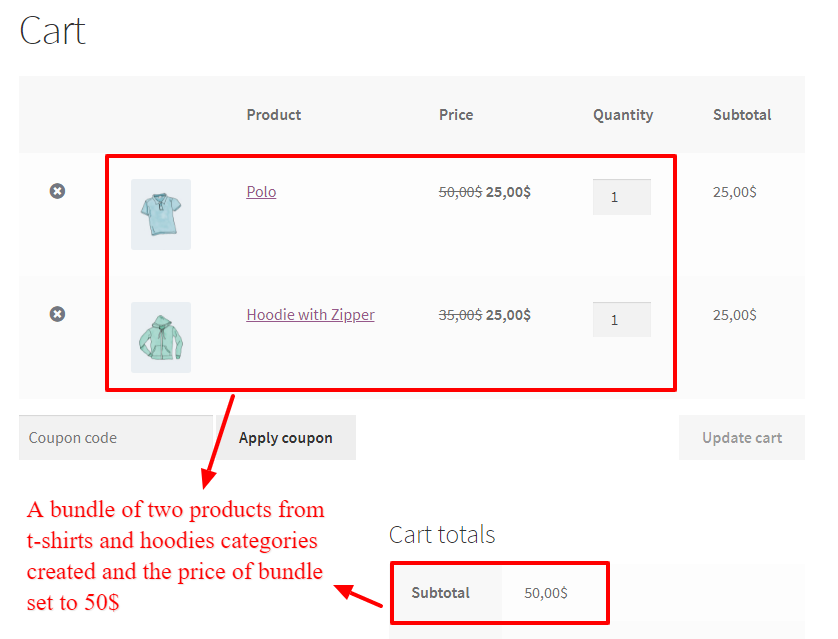
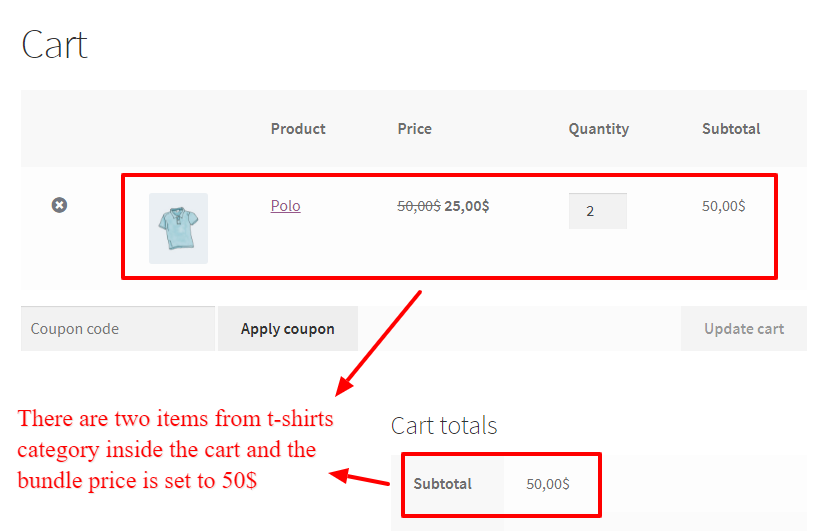
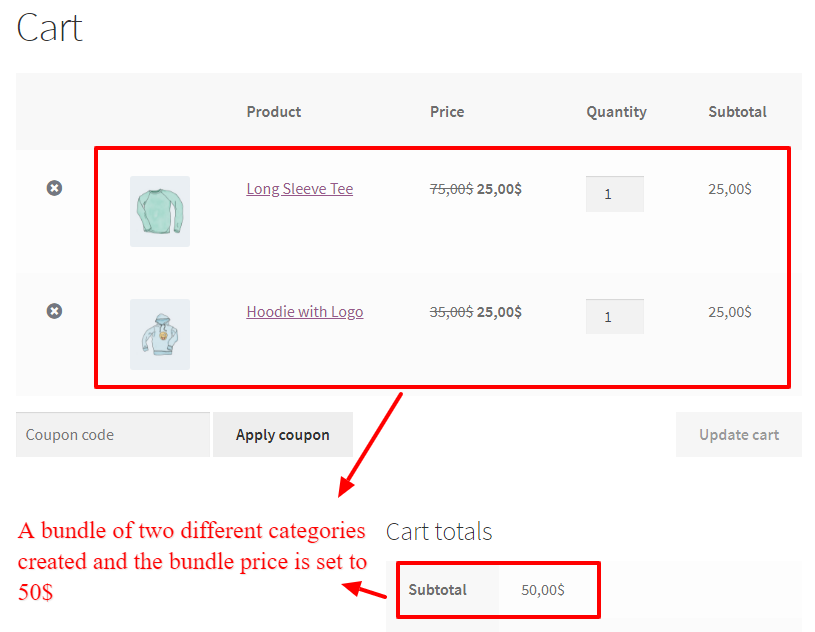
Bundle Discounts
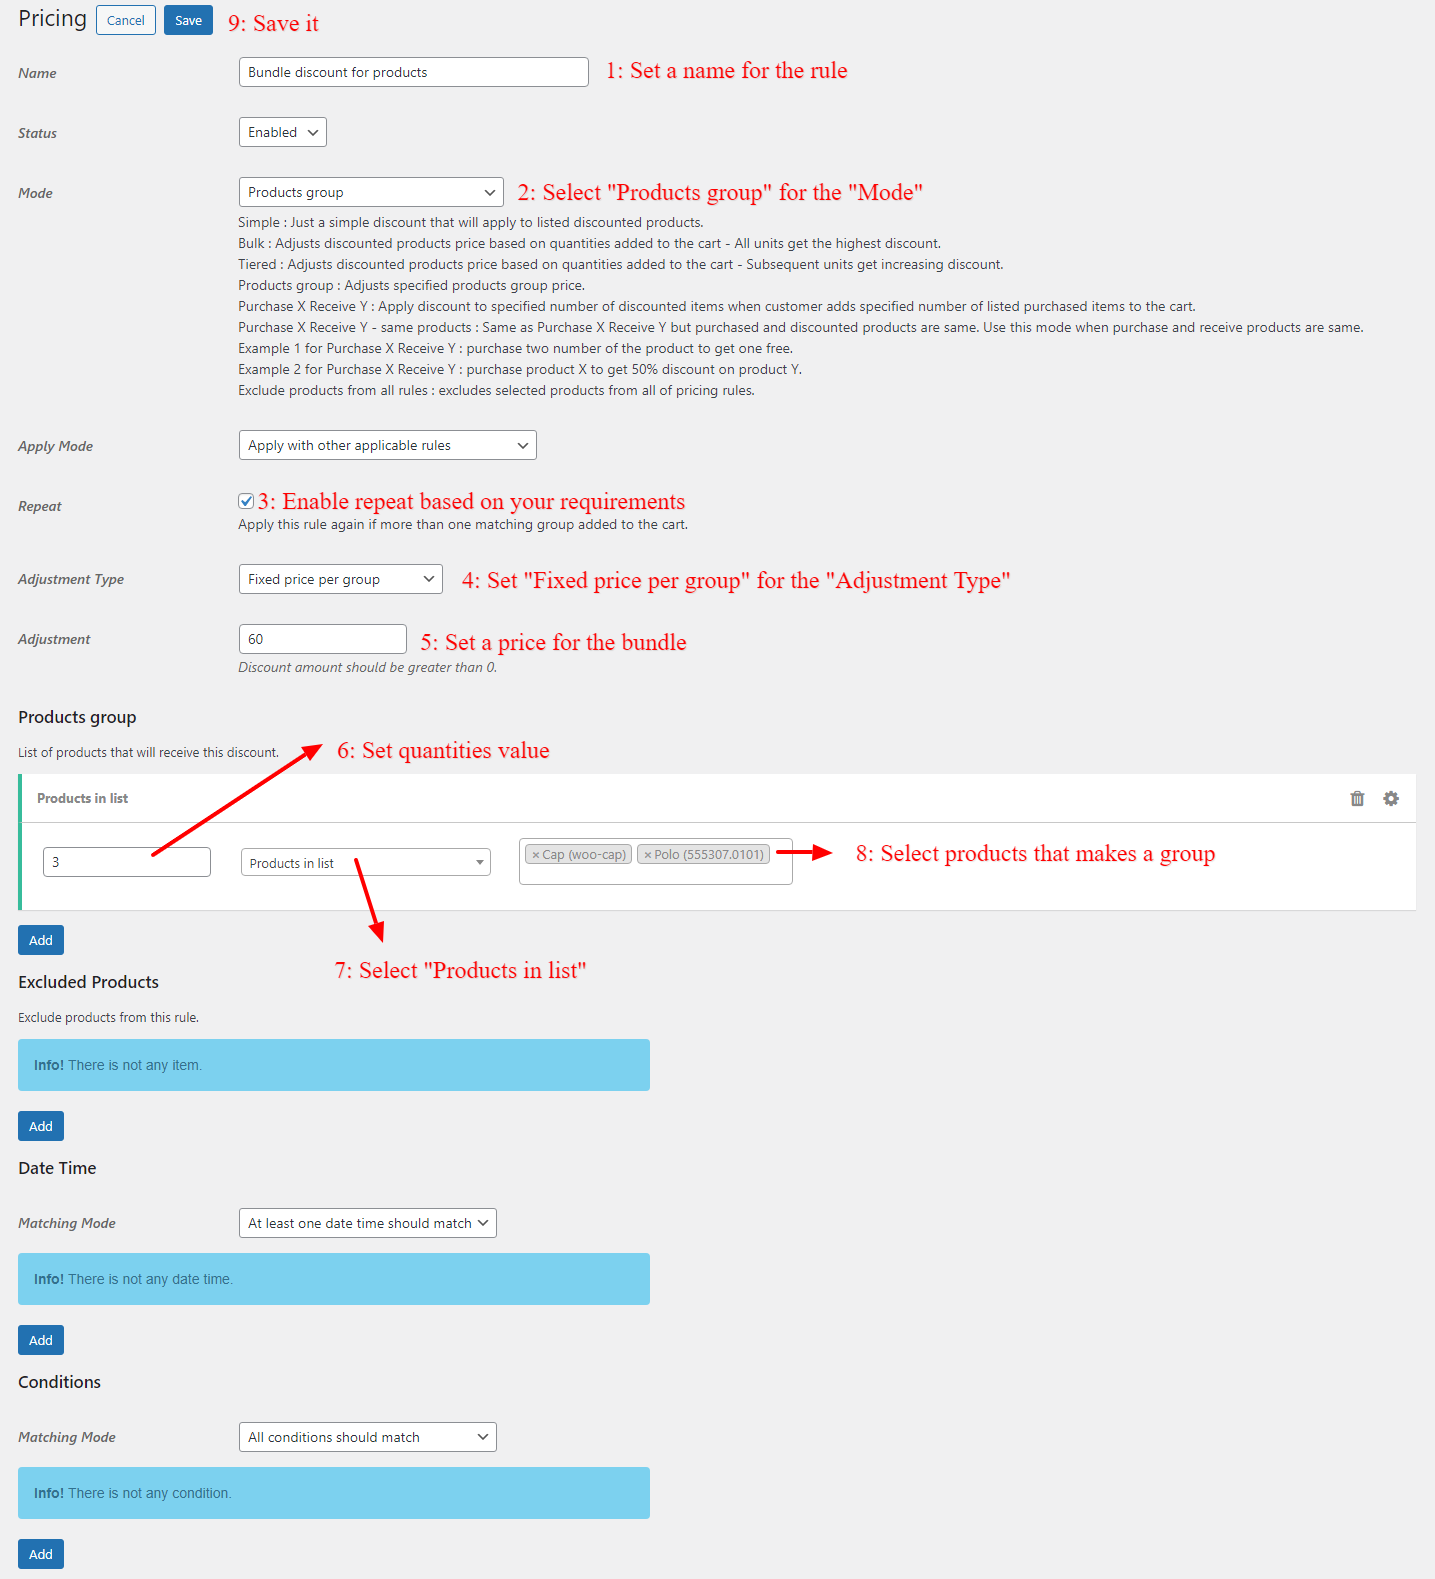
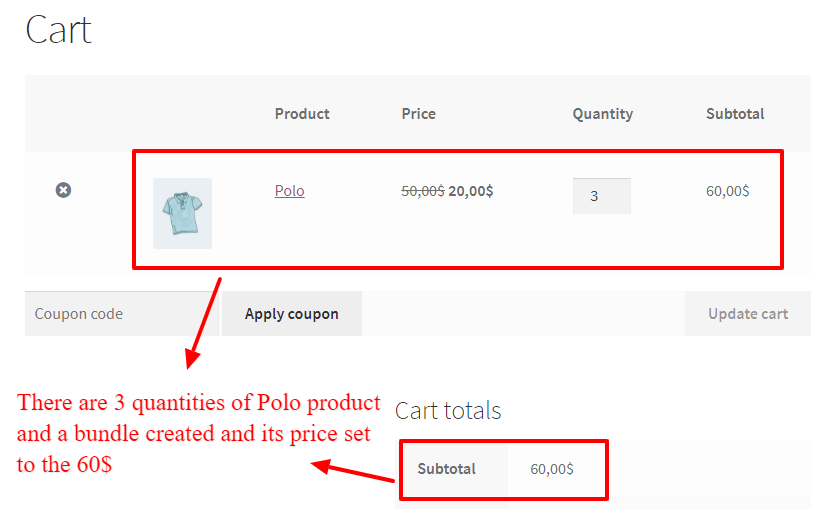
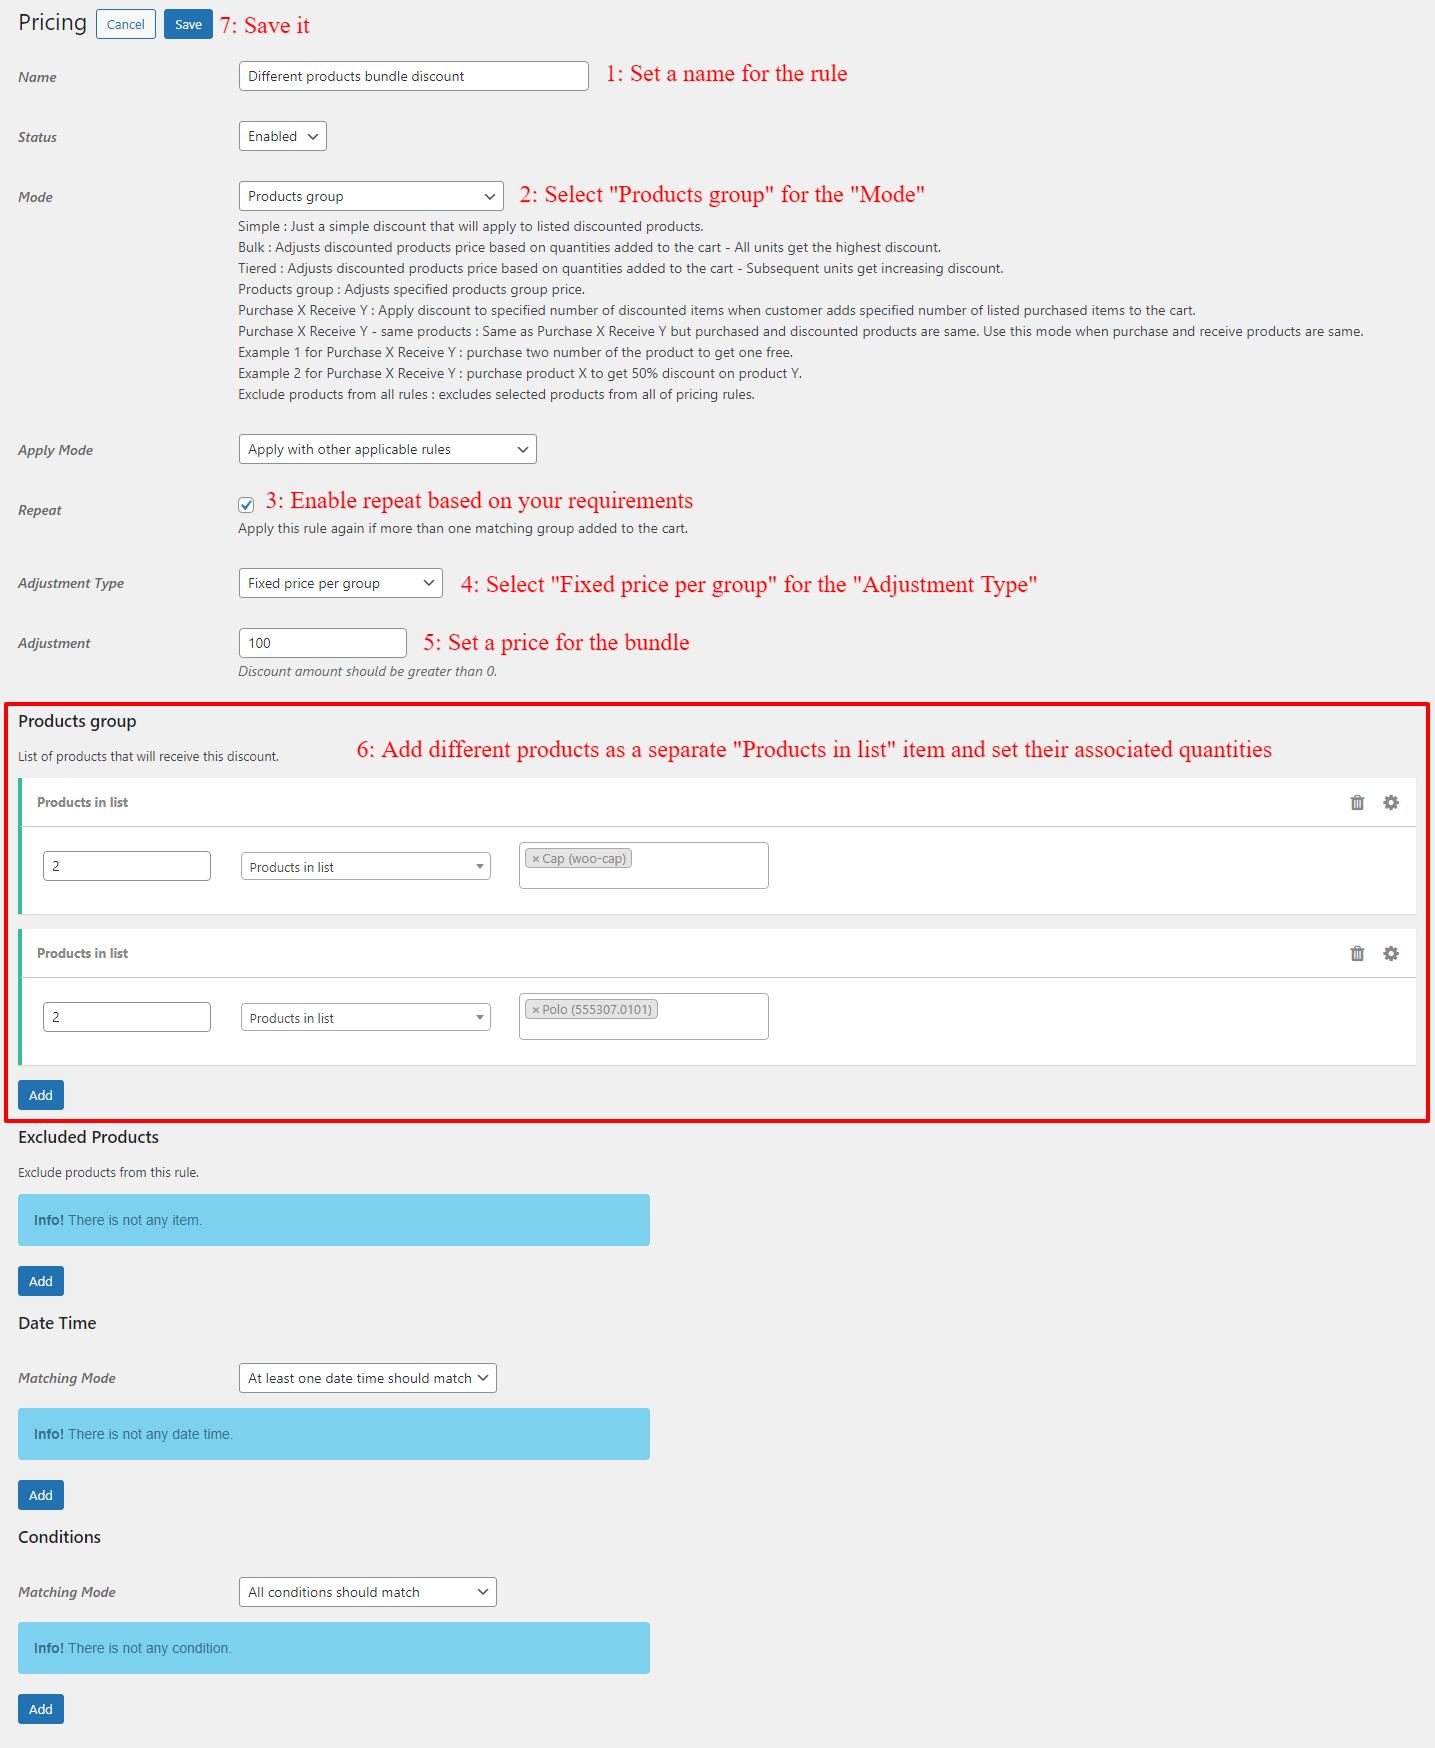
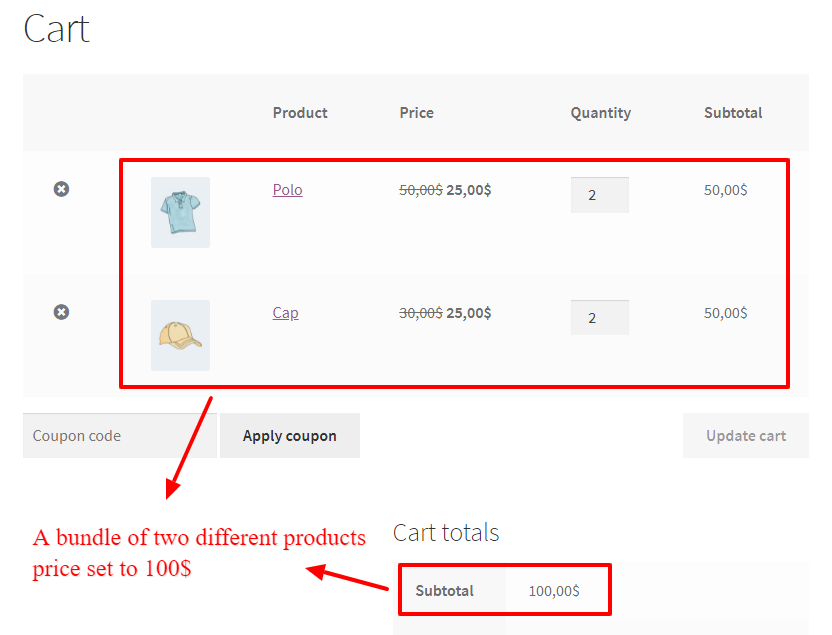
To increase Average Order Value (AOV), you can combine related products into a mix-and-match bundle and offer them with a discount. Providing a better price for the bundle encourages customers to purchase multiple items together instead of buying a single product.
For example, if you sell mobile phones, you can create a bundle that includes the phone along with a protective case and a screen protector, offered at a discounted price compared to purchasing each item separately.
Gift Products
You can build customer loyalty and encourage customers to buy more by offering gift products with selected purchases. For example, you can automatically add a free product when a customer buys a specific item or qualifies for a special offer.
With WooCommerce Mix and Match, you can also let customers choose their own gift from multiple available products. This flexibility creates a more engaging shopping experience and makes bundled offers more appealing.
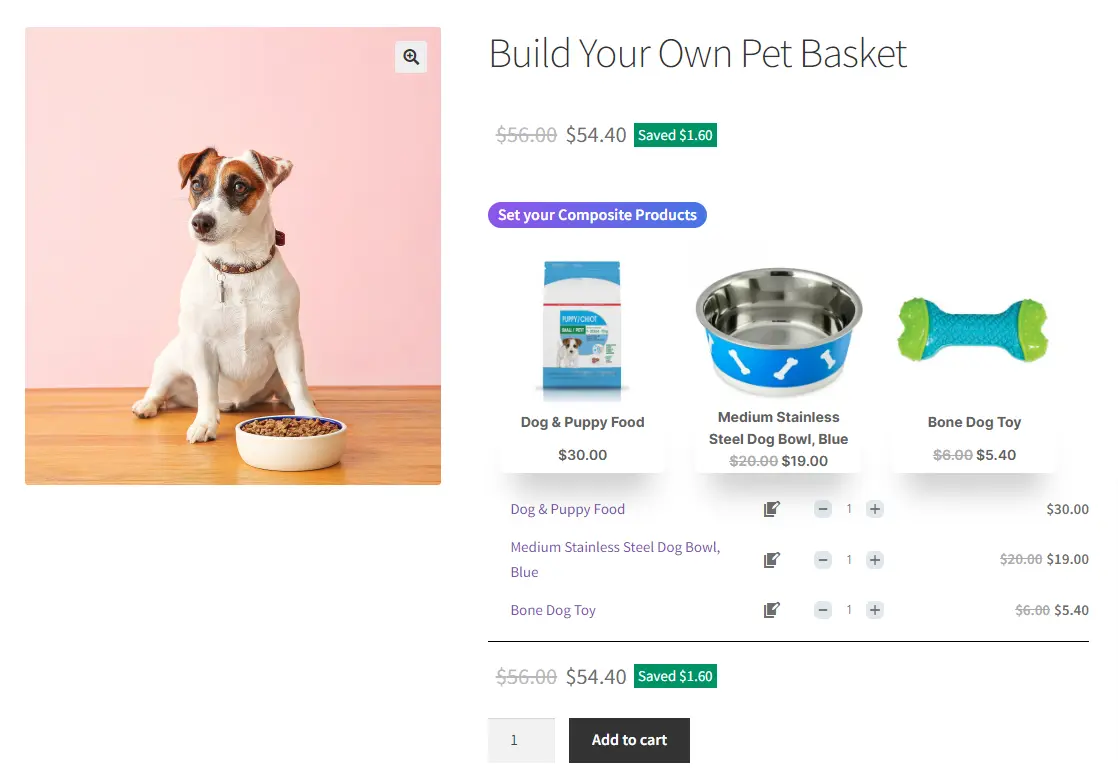
Product Boxes
You can allow your customers to build their own boxes using Mix and Match products for WooCommerce.
Customizable foods like sandwiches, pizzas, and salads can be offered as product boxes. Customers can configure products and build their own delicious foods by picking food items.
How to Create WooCommerce Mix and Match Products
In this guide, we’ll show you practical examples of how to create Mix and Match products in WooCommerce.
In this tutorial, you’ll learn how to set up the following examples:
- Mobile bundle
- How to create mix-and-match product bundles with variable products.
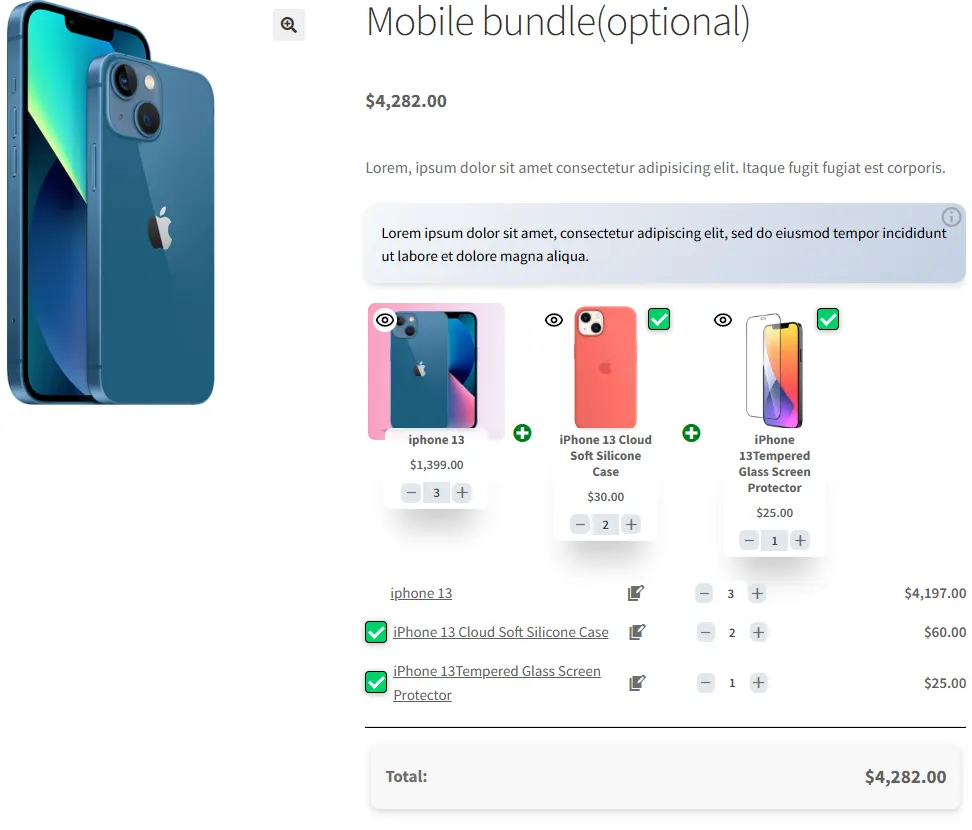
- Mobile bundle with optional items
- Offer a gift product (BOGO deal)
- Offer multiple gift products
- Men’s clothes as a configurable or personalized product
Create Mobile Bundle Discount in WooCommerce
If you have a mobile store, then you can increase average order value by creating and offering a mobile bundle discount in WooCommerce.
Follow these steps to create a bundle discount in WooCommerce.
Step 1: Install WooCommerce Product Bundle Free Plugin
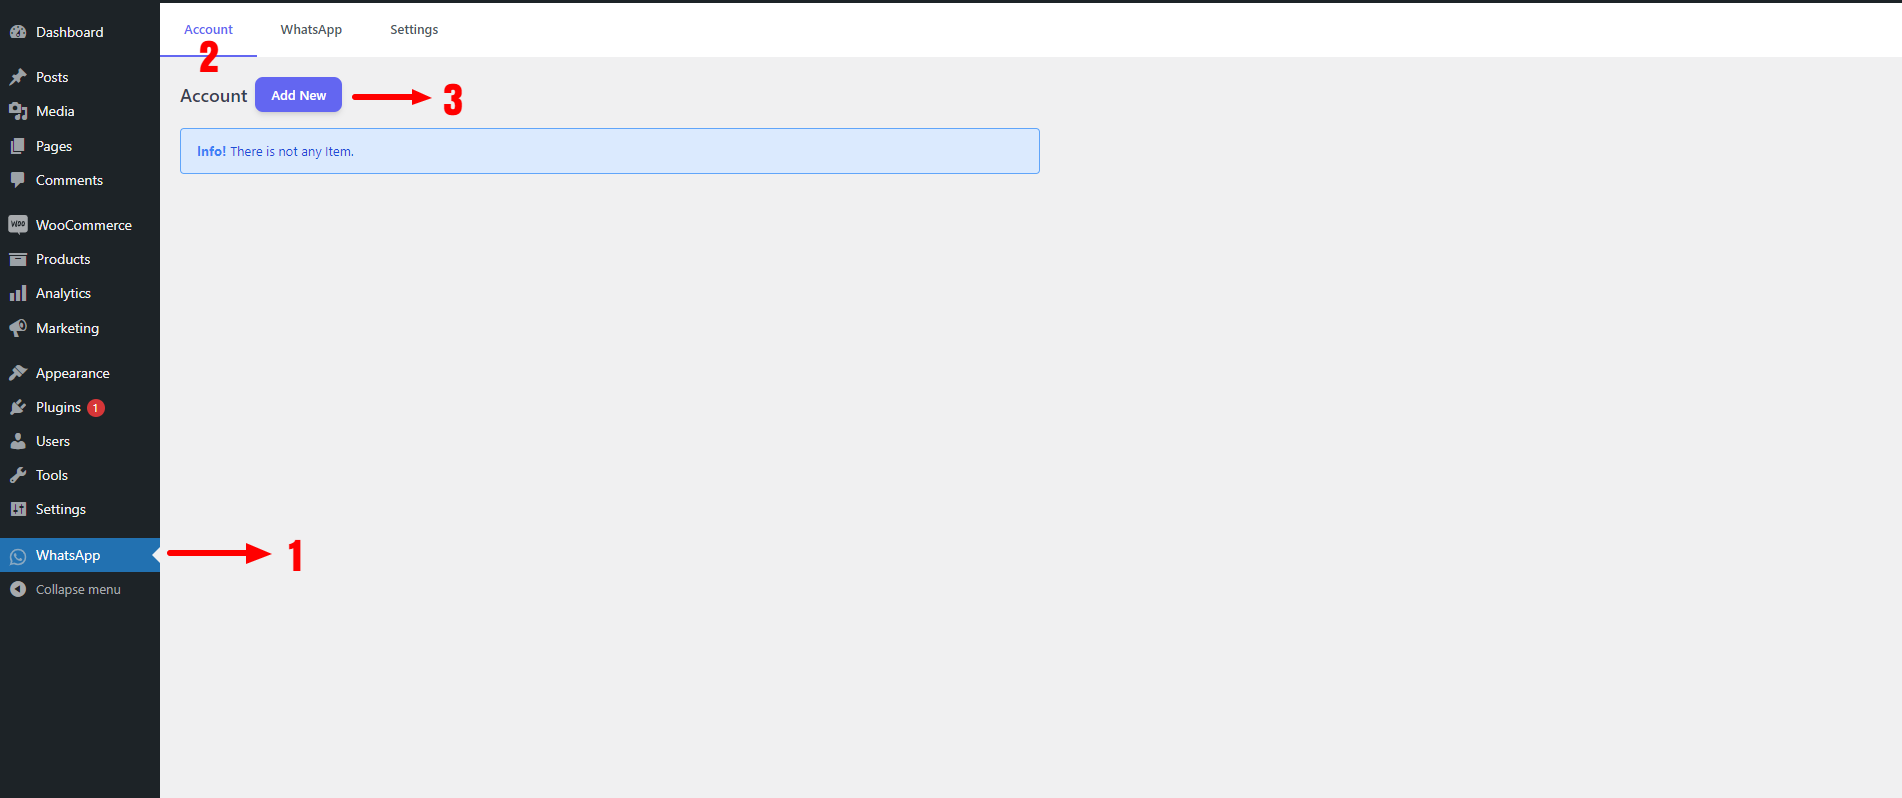
To install Easy WooCommerce Product Bundles, follow the below steps.
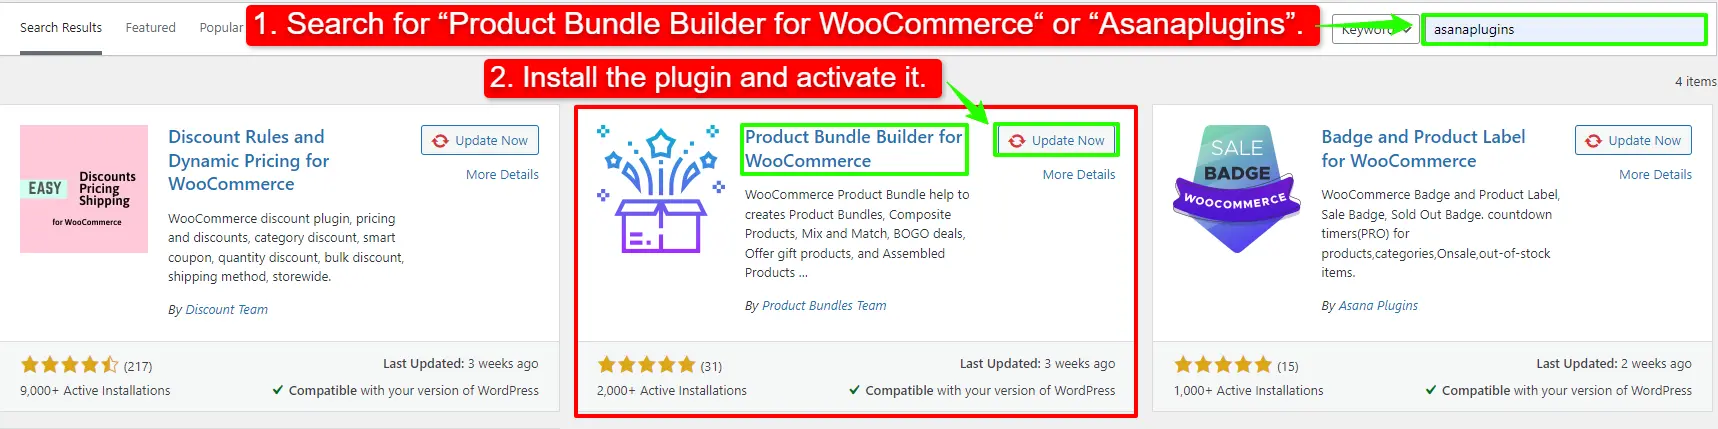
- Navigate to the Plugins >> Add New menu on your WordPress website
- Then search for “Product Bundle Builder for WooCommerce“ or “Asanaplugins”
- Find the “Product Bundle Builder for WooCommerce”
- Install the plugin and activate it.
Step 2: Create Regular Products
First, you should create regular products in WooCommerce for mobile, mobile cases, and mobile glass covers.
To create a simple product in WooCommerce read this article in addition you can read create variable products in WooCommerce to create a variable product.
Step 3: Create a Product Bundle in WooCommerce
Now you should create a product bundle that bundles mobile, case, and glass covers with a discount or without.
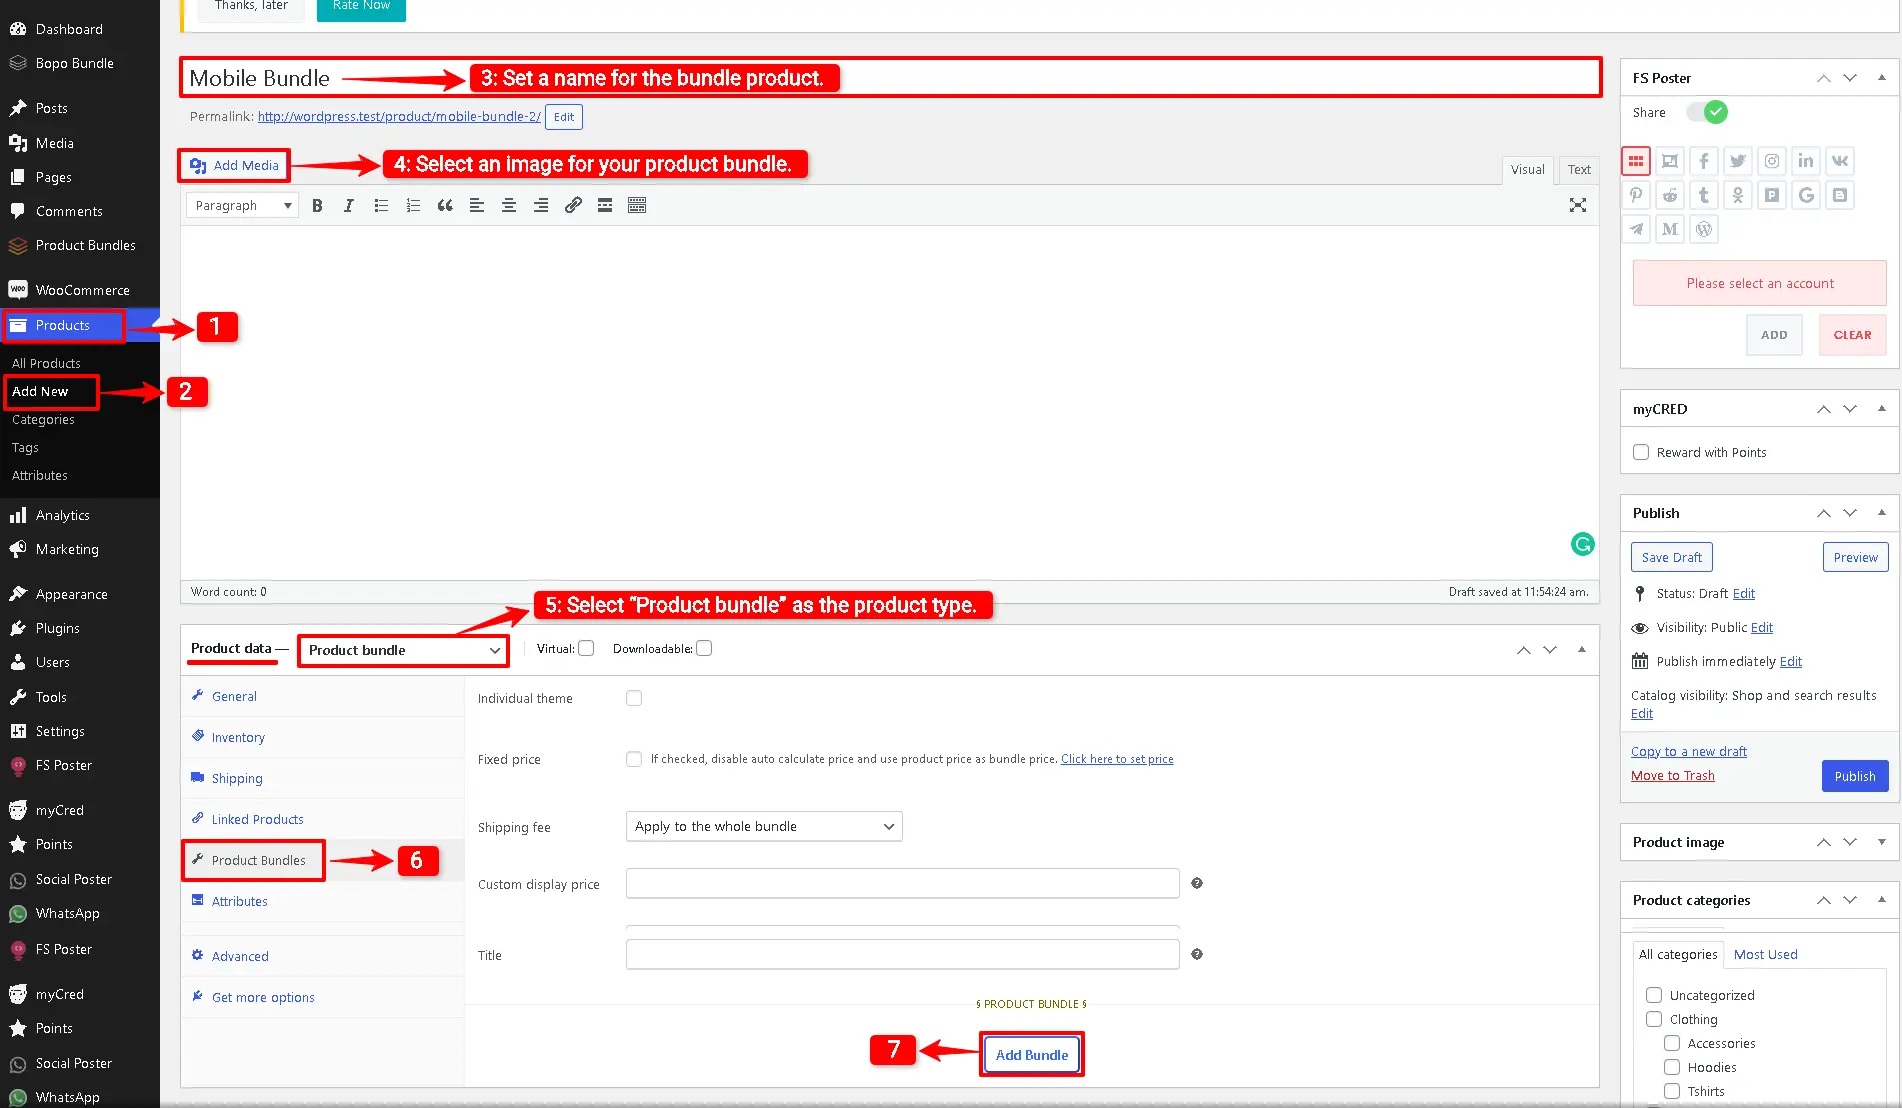
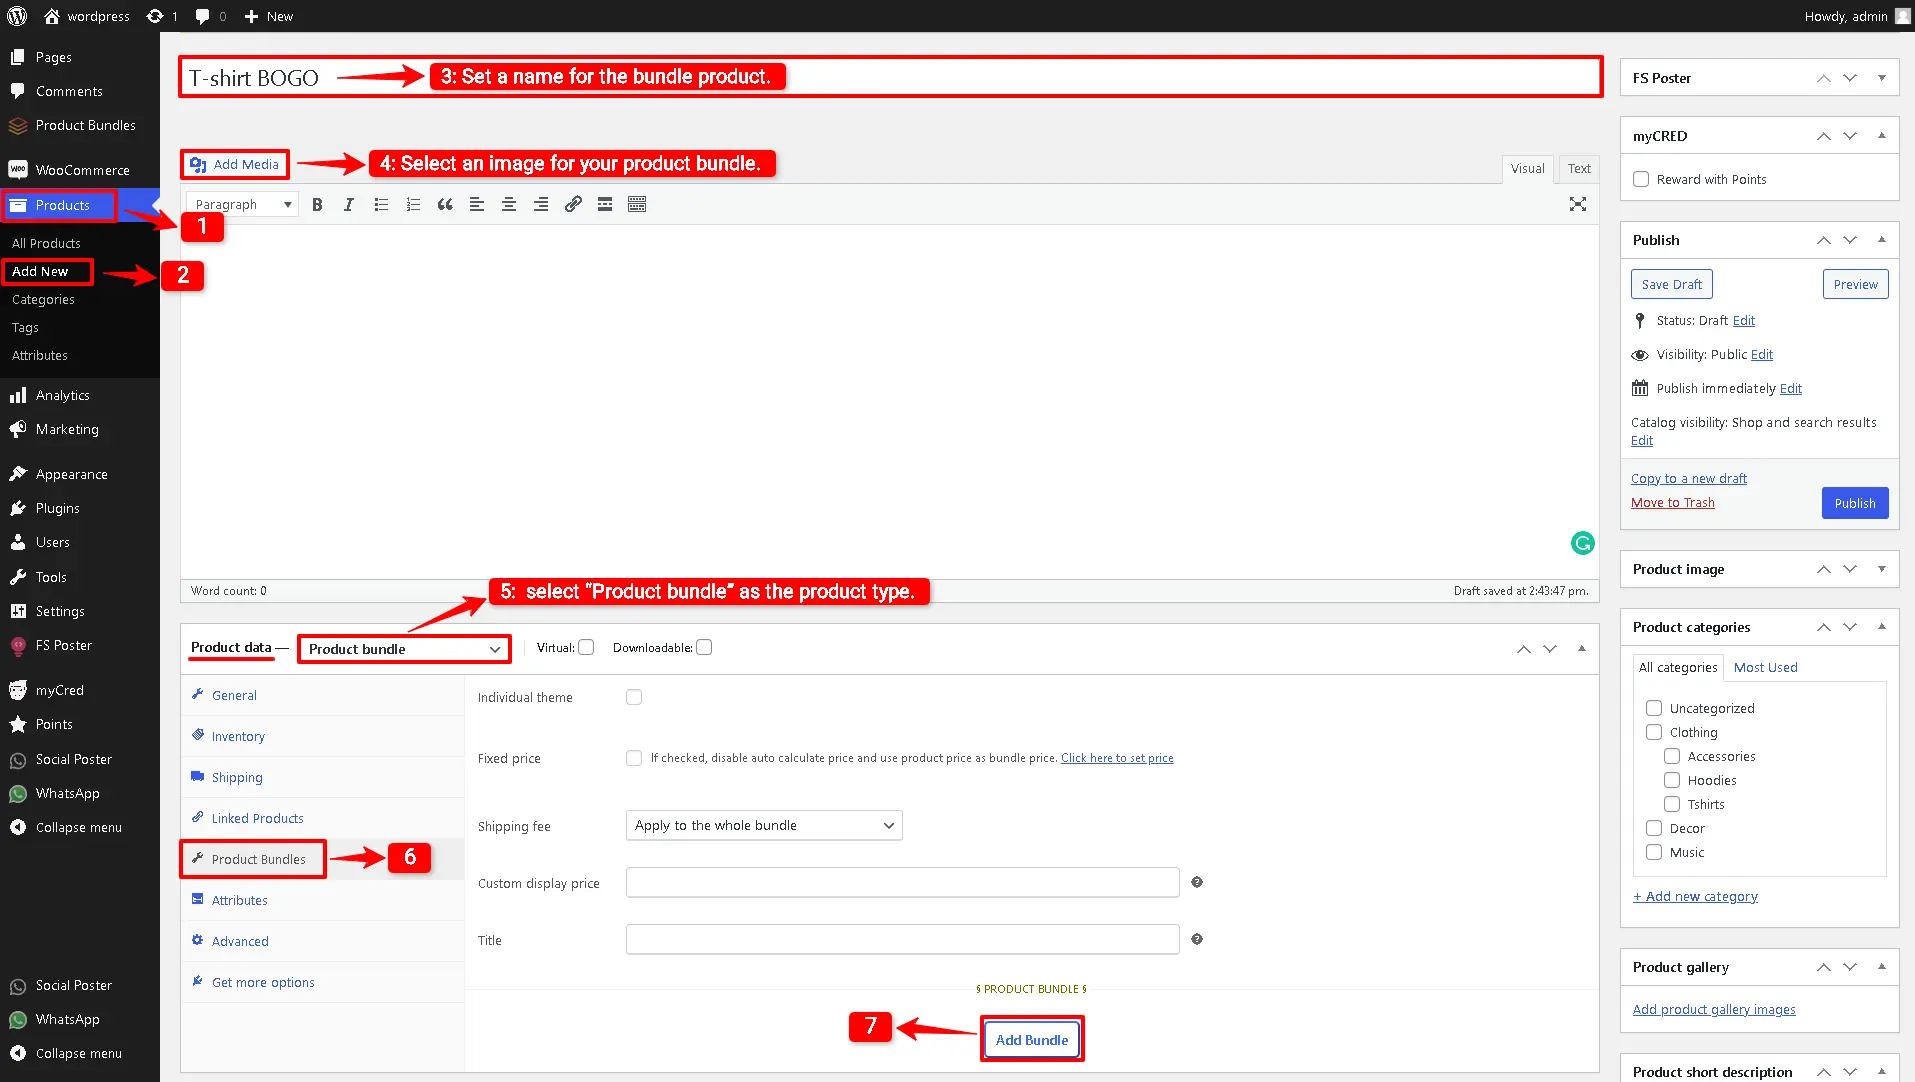
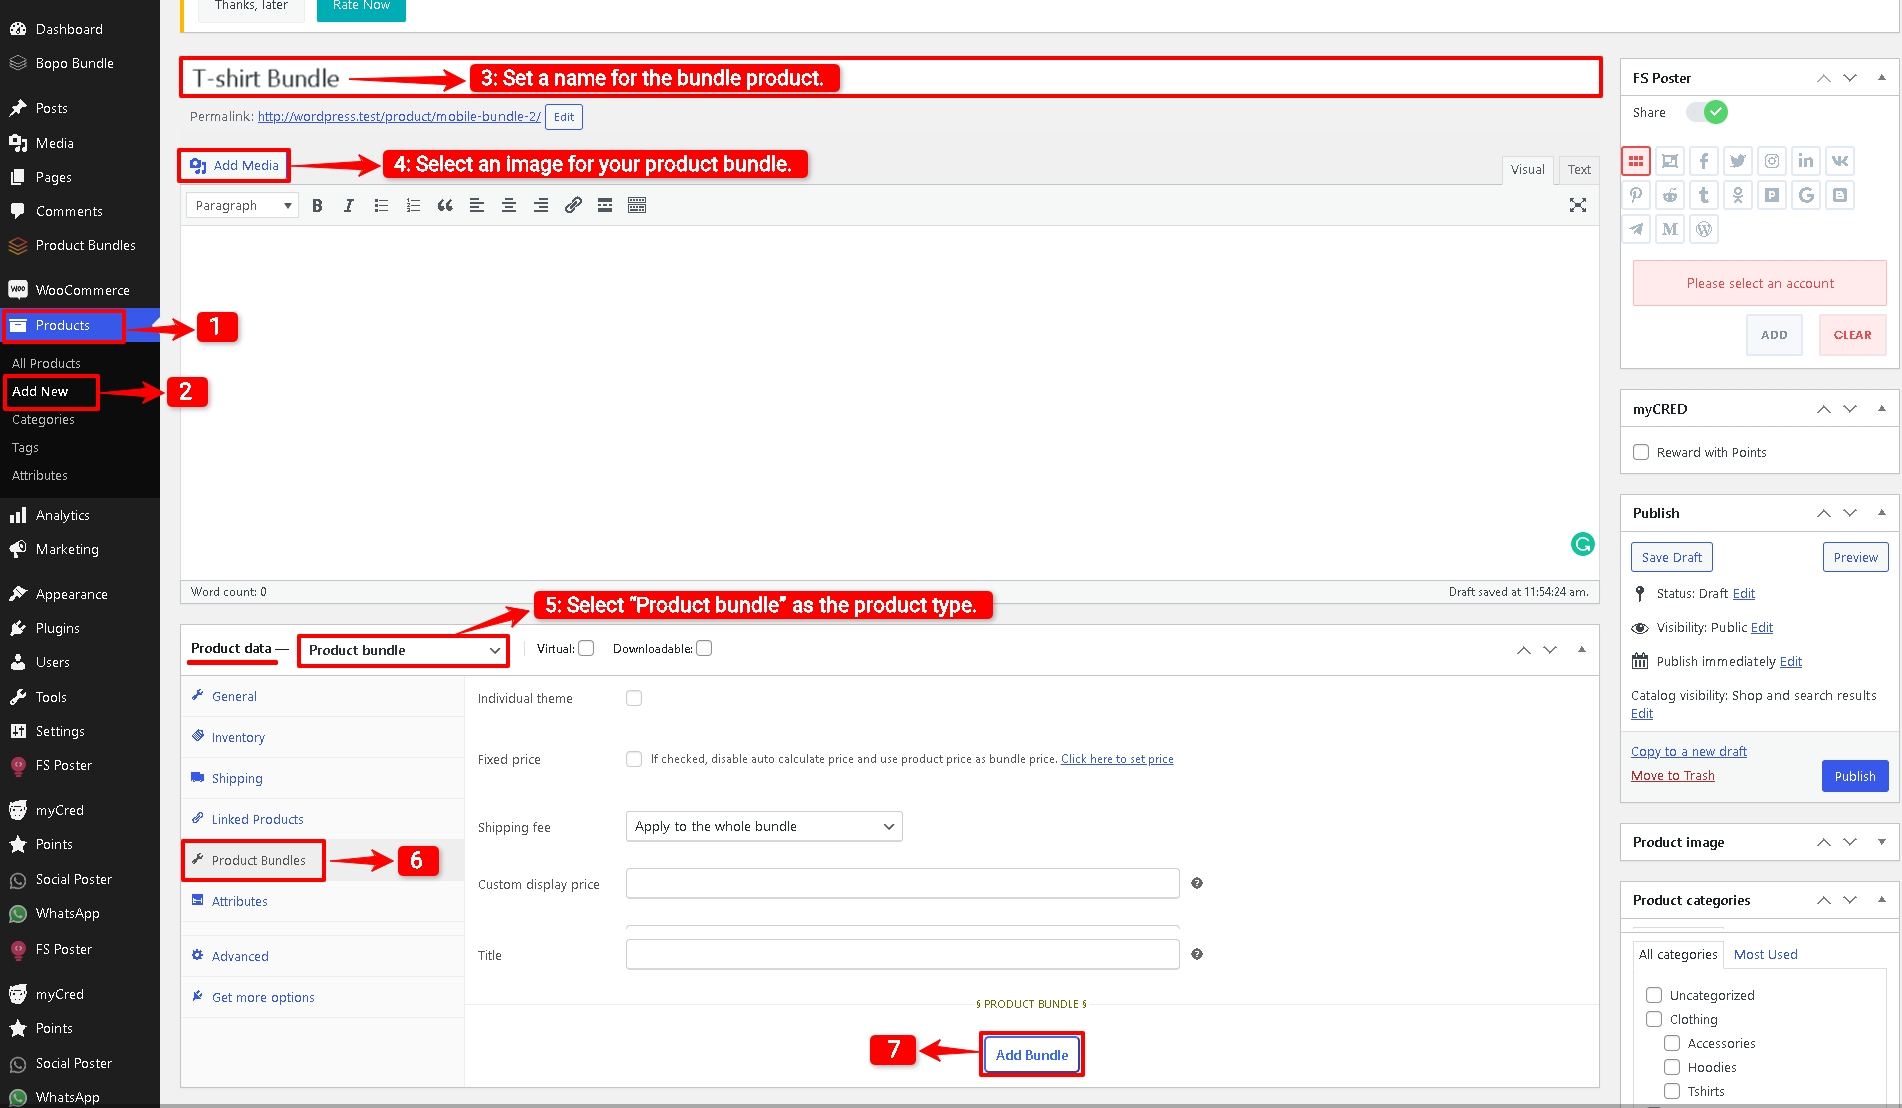
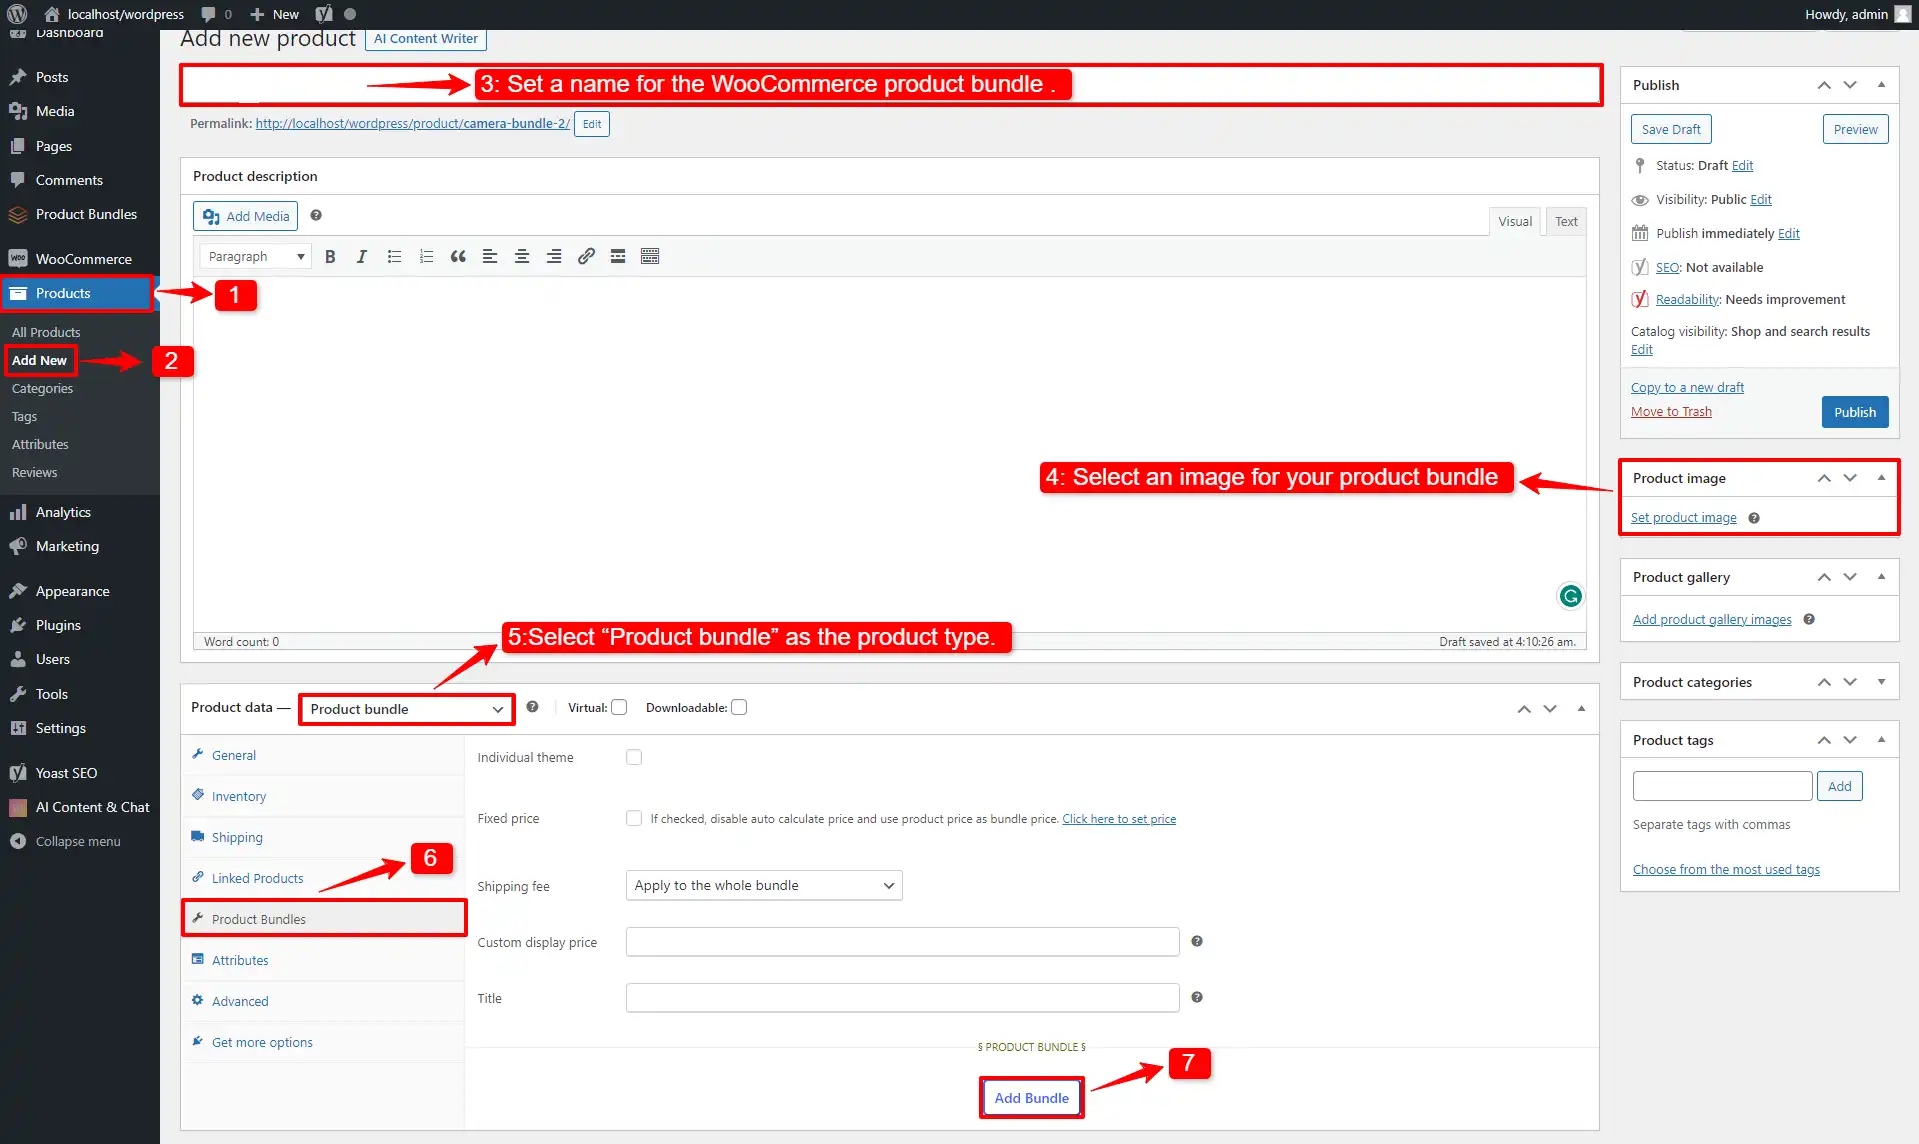
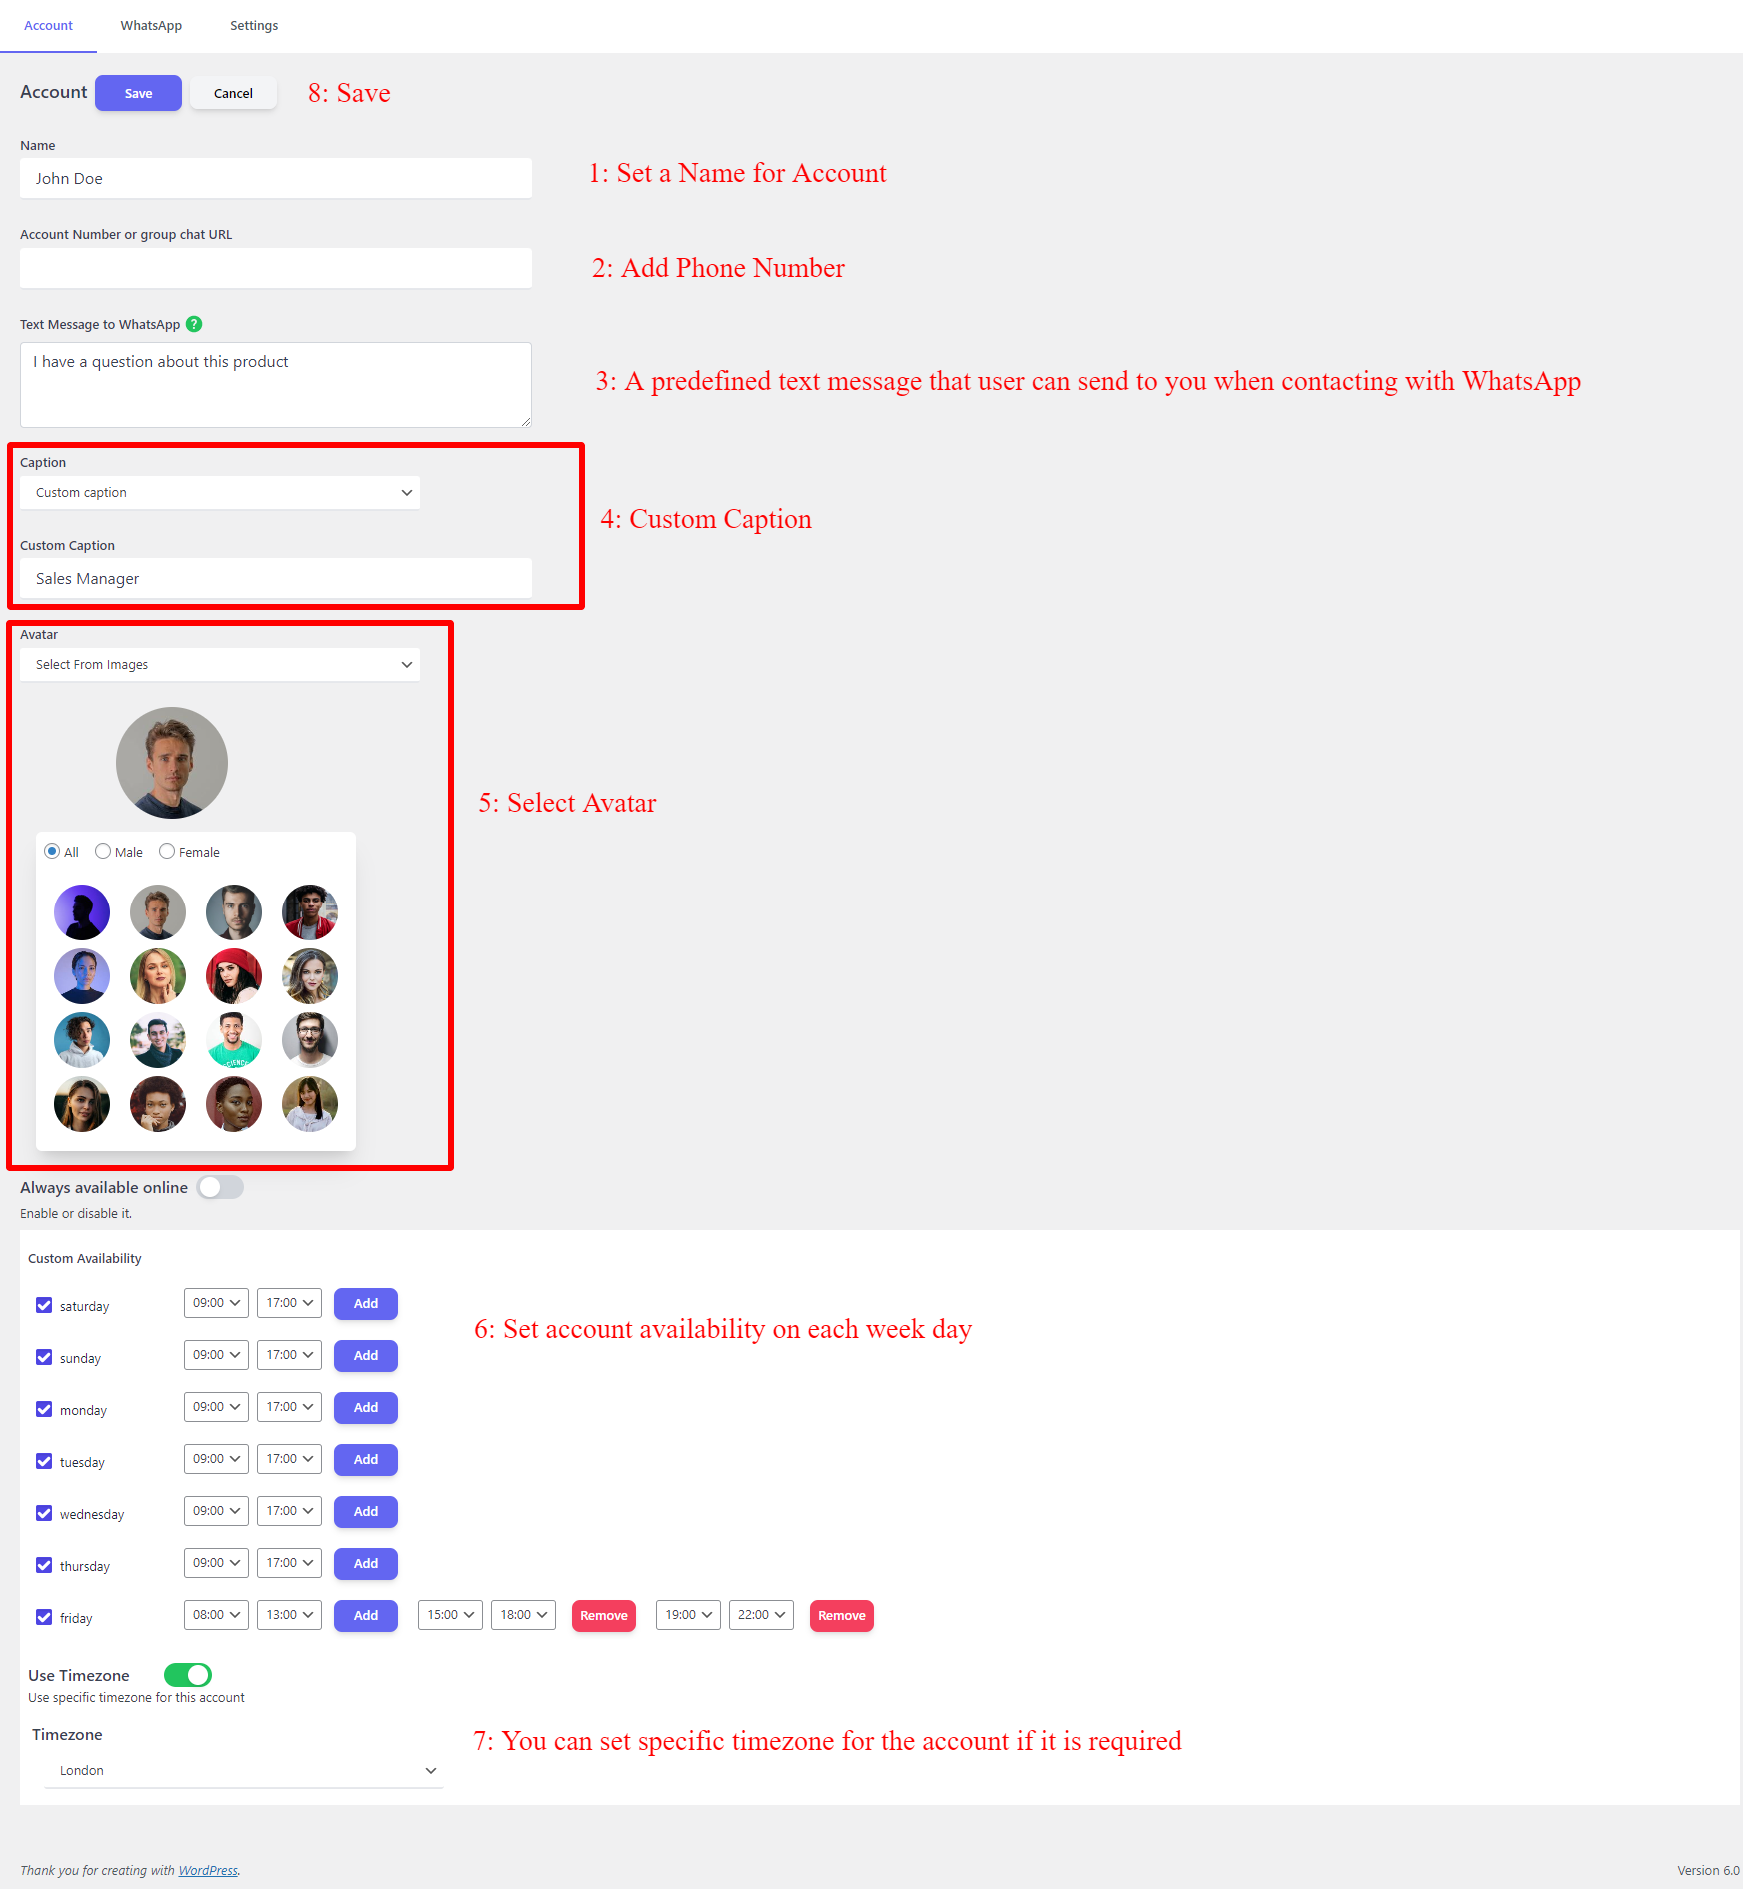
1. Navigate to WooCommerce Products >> Add New product to create a new product.
2. Set a name for the bundle product, for instance, “Mobile Bundle”.
3. Click “Set product image” from the right sidebar and select an image for your Product Bundle.
4. Now navigate to the Product data panel, and select “Product bundle” as the product type.
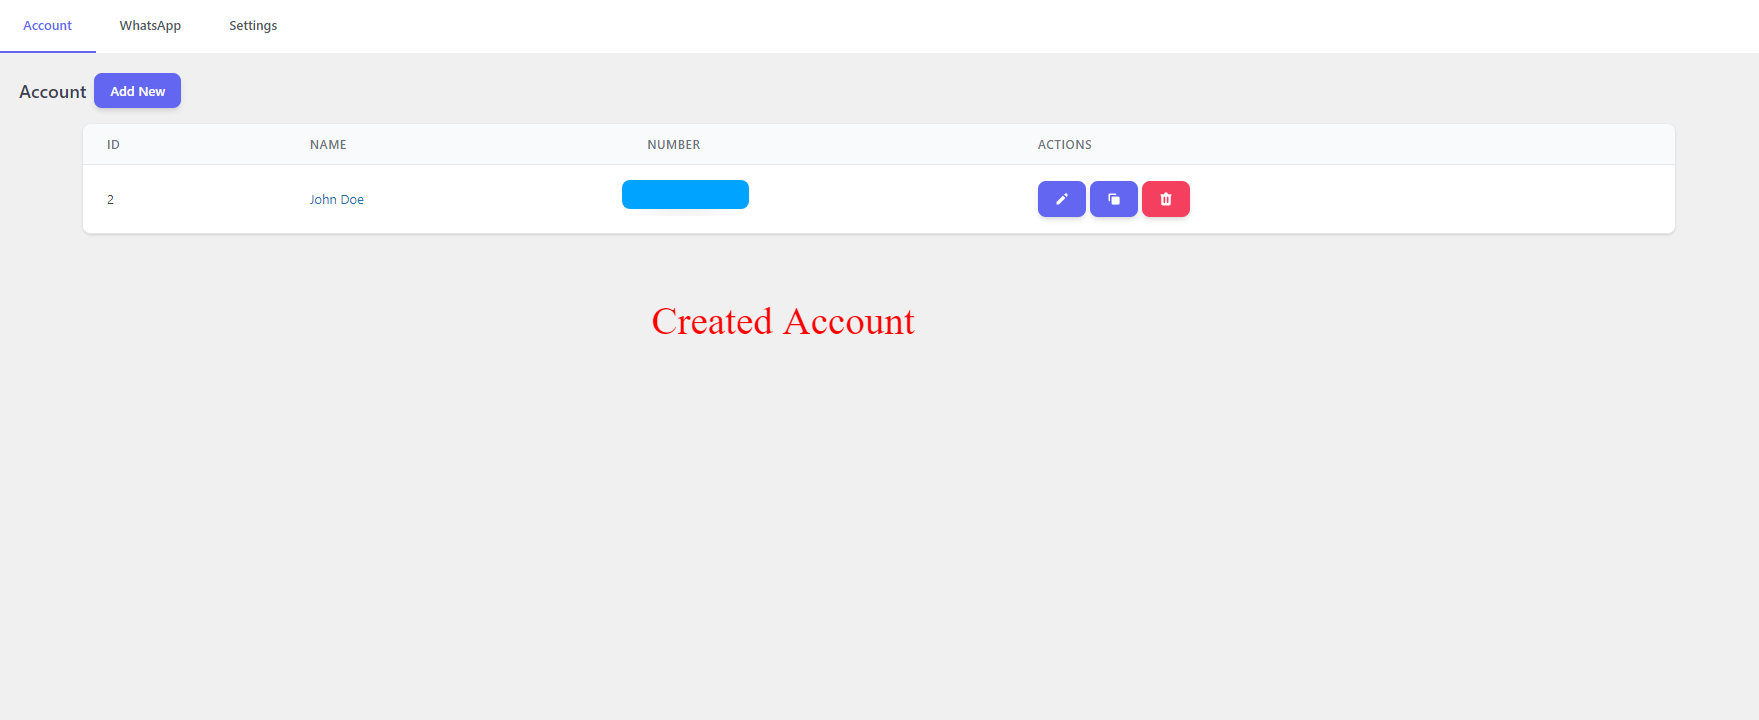
Step 4: Add Bundle Items
5. After selecting “Product bundle” as the product type the “Product Bundles” tab will appear in the product data panel.
6. Click on the “Product Bundles” tab.
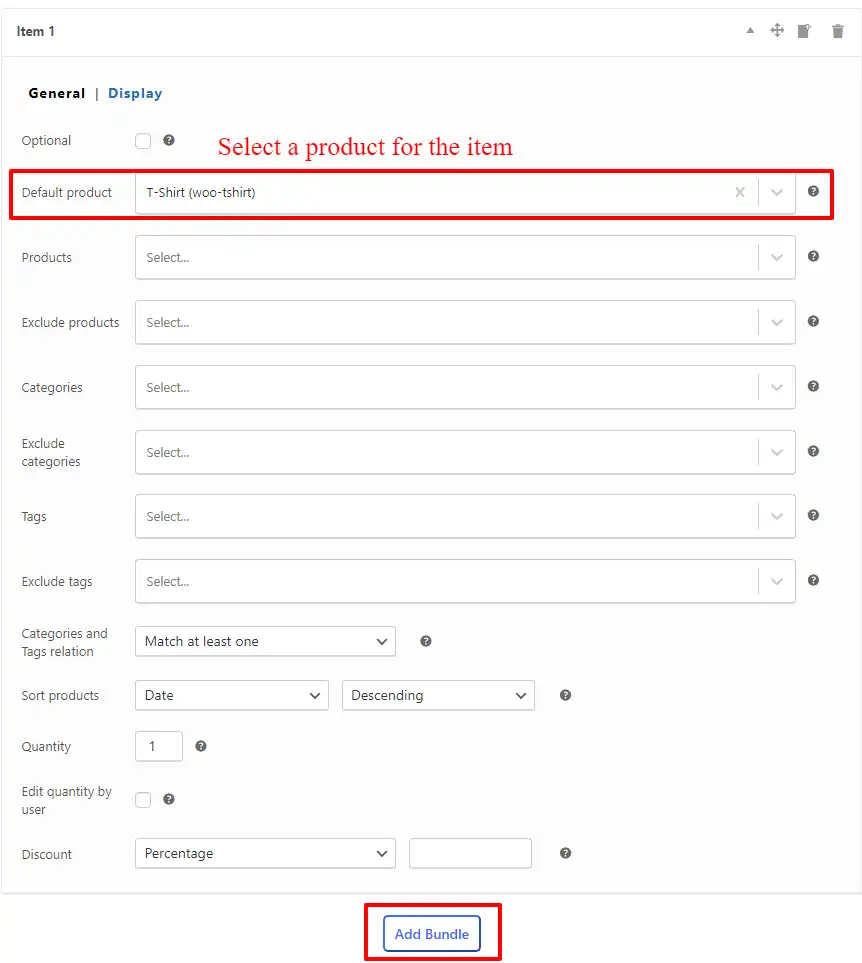
7. Click the “Add Bundle” button to add a new bundle item to the product bundle.
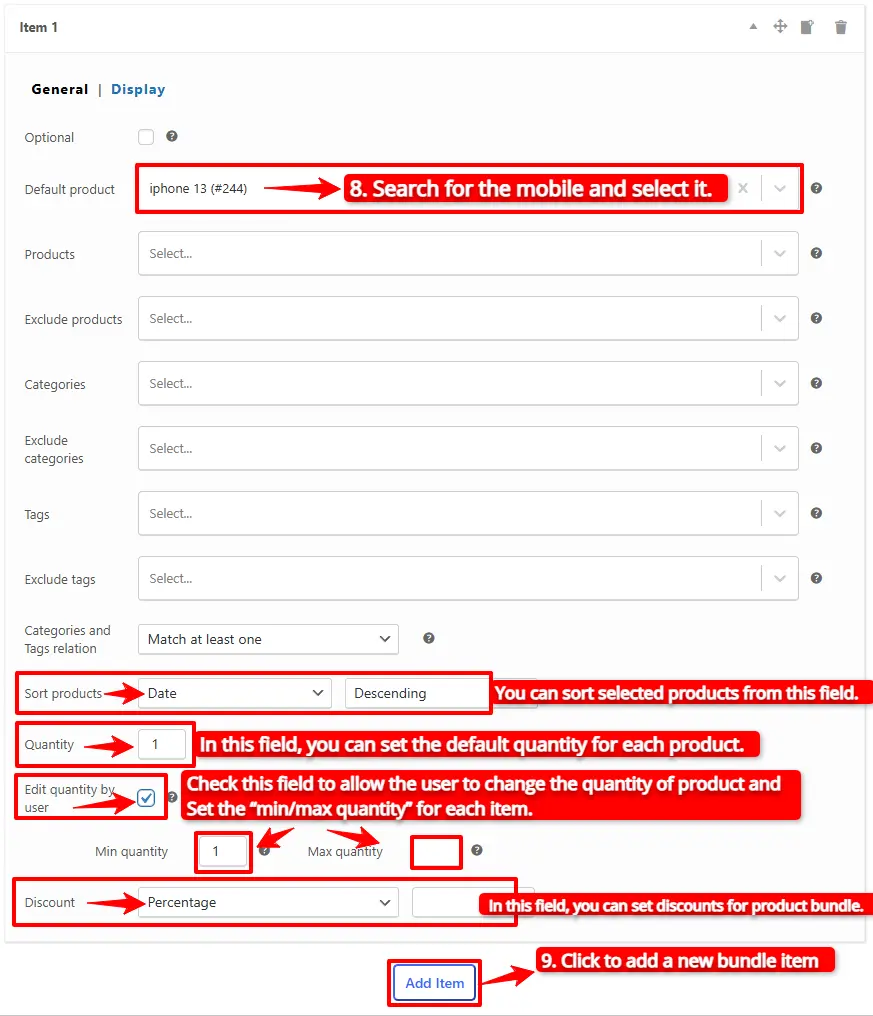
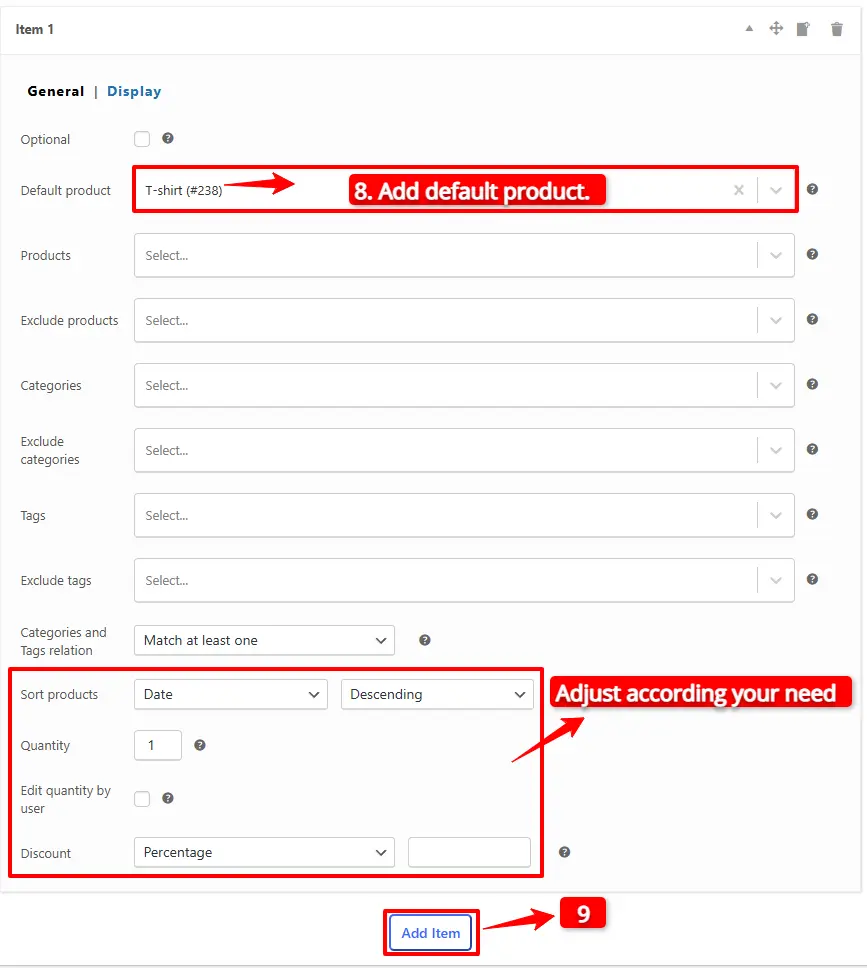
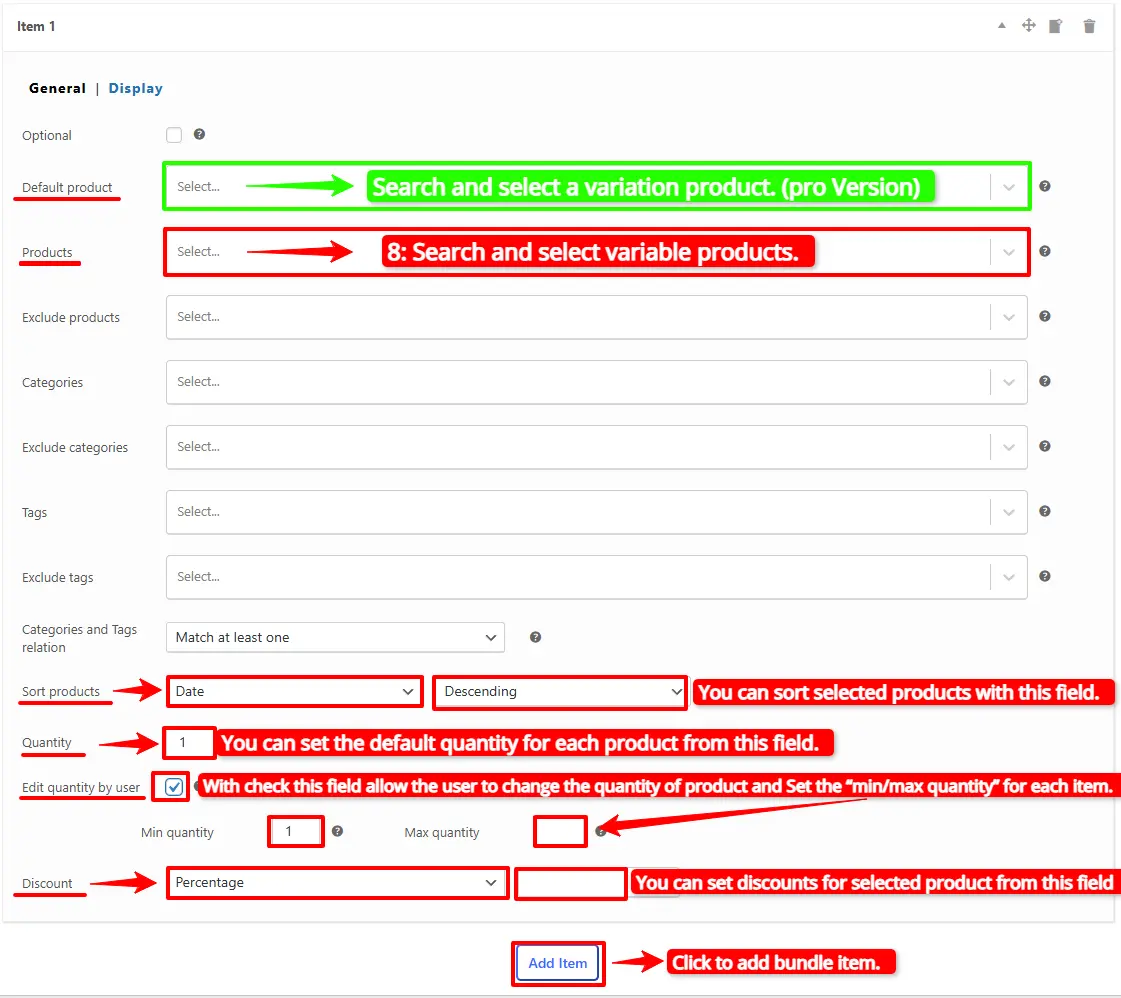
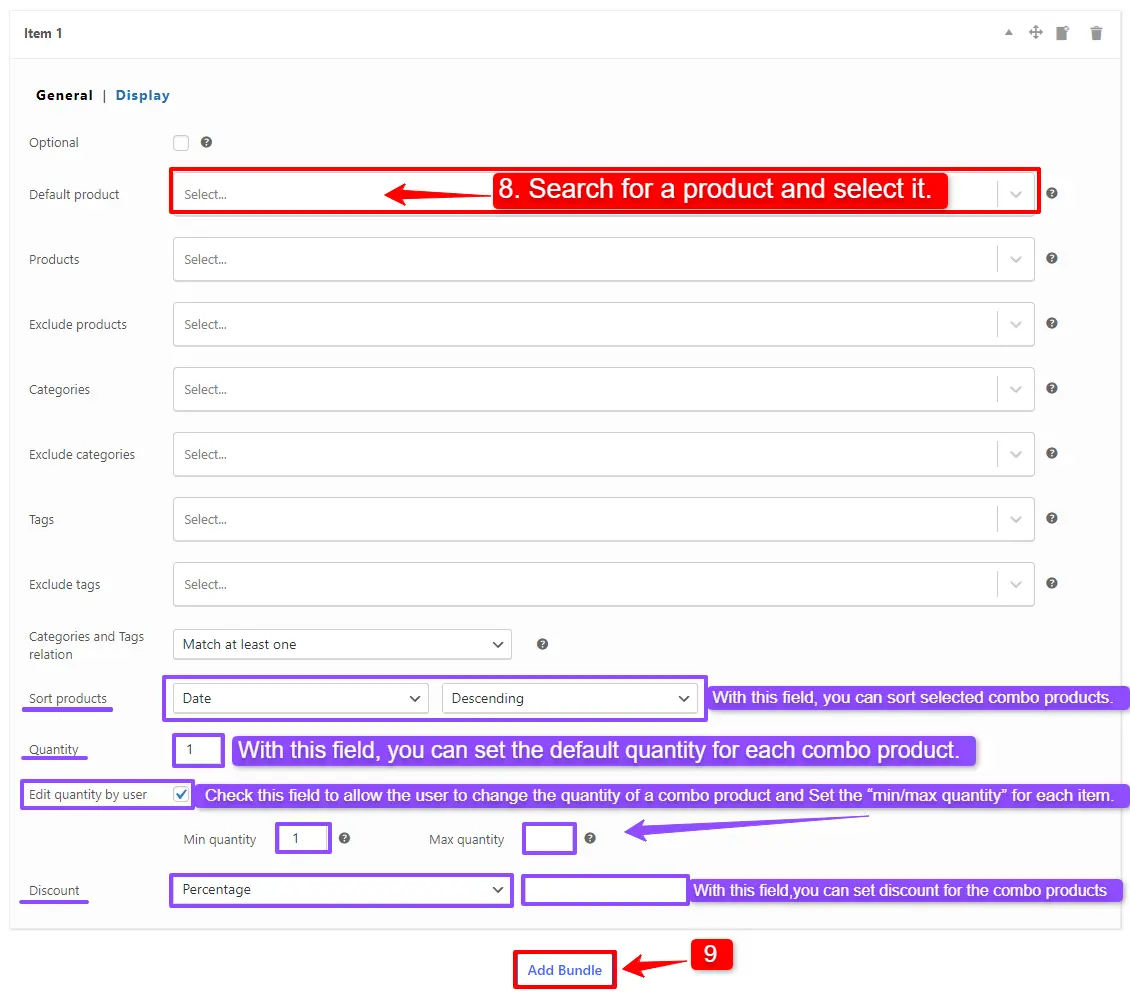
8. Now, in the “Default Product” field, search for the mobile and select it.
Step 5: Customising WooCommerce Product Bundle
You can also configure the below settings to your WooCommerce Product Bundle in the item field:
- Sort products: With this field, you can sort selected products by “ID”, “Title”, “Menu order”,” Date”, “Price”, “popularity” and“Rating”.
- Quantity: In this field, you can set the default quantity for each product.
- Edit quantity by user: Check this field to allow the user to change the quantity of product and Set the “min/max quantity” for each item.
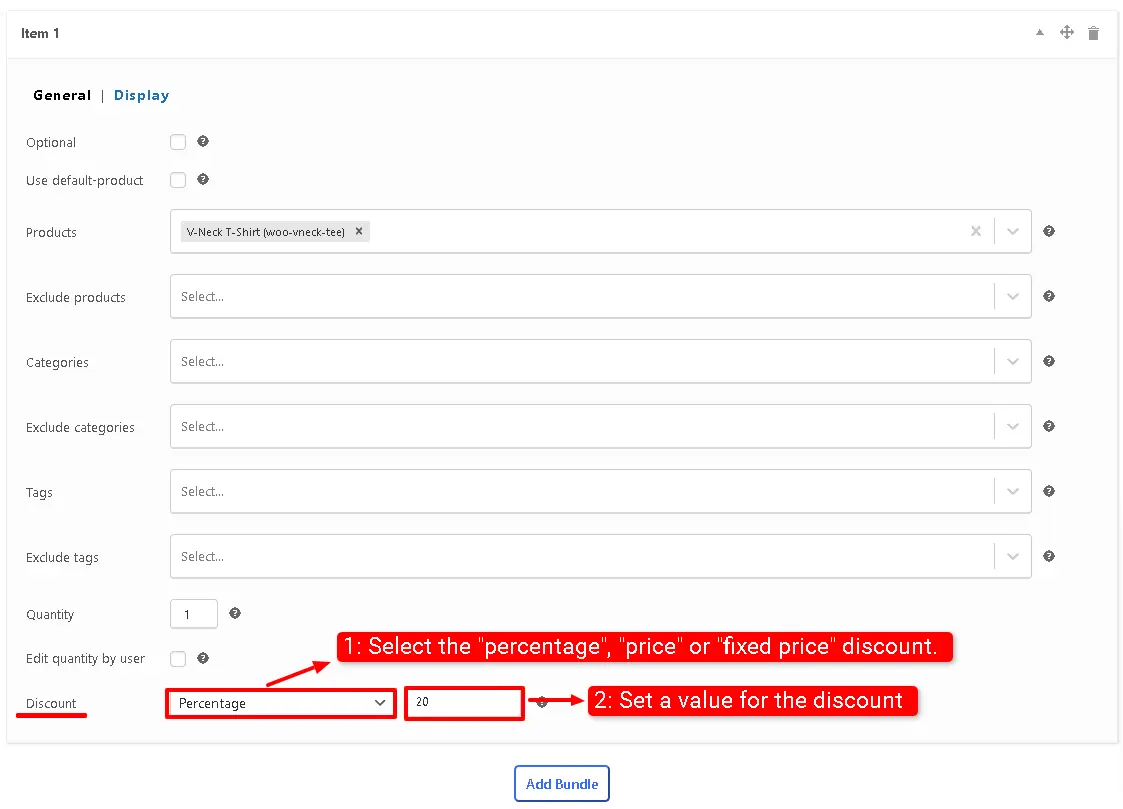
- Discount: In this field, you can set discounts for product bundles by percentage, price or fixed price.
Now you can go to the “display” tab of the item and configure the following sections:
- Overwrite bundle item title.
- Overwrite bundle item short description. (Show when the mouse hovers over it)
- Change the title of the bundle’s empty item.
- Change the product list product selection title.
- Change the pop-up header title.
- Set an image for the empty item.
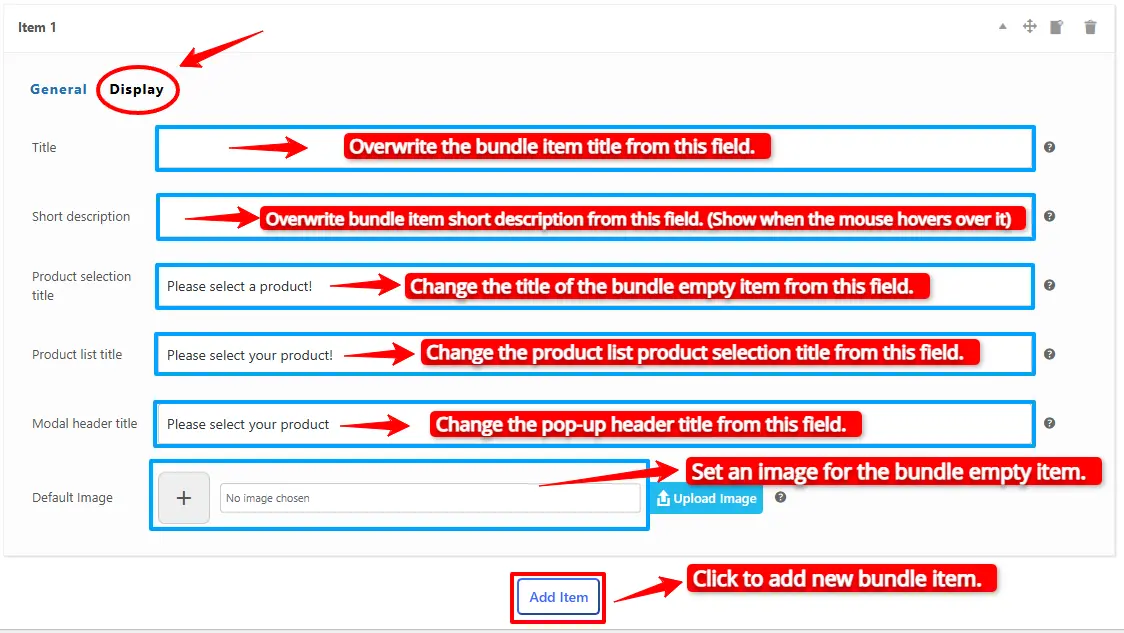
9. Then click on the “Add Item” button to add a new bundle item for the mobile cases.
10. Now, in the “Products” field, search for mobile cases and select them. You can add multiple products in the “Products” field.
11. Click the “Add Item” button to add a new bundle item for the mobile glass covers.
12. In the “Products” field, search for the mobile glass covers and select them. You can include multiple glass covers; therefore, the customer has multiple choices.
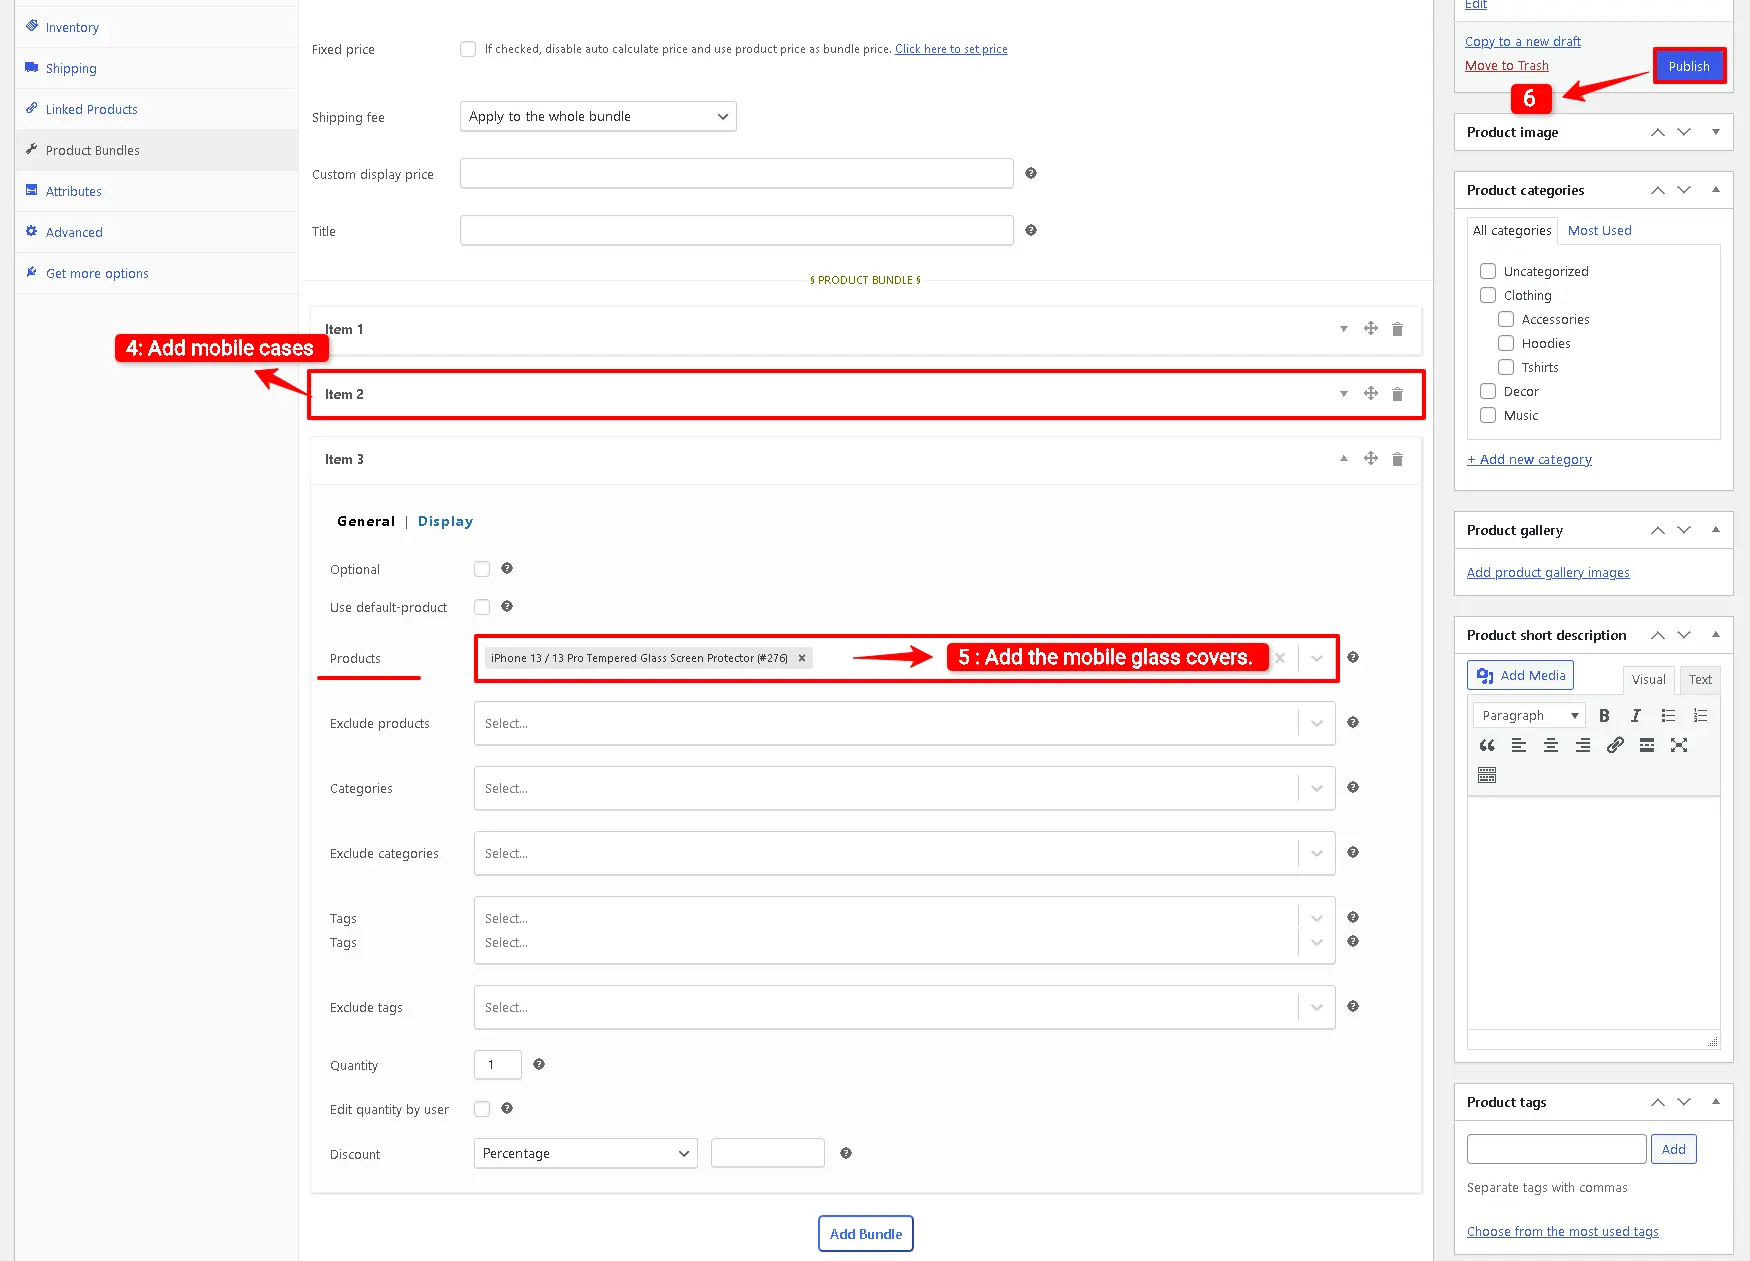
13. Now you can publish the Mix and Match product bundle on your website.
Step 6: Set a price for the Bundle Product
The Easy WooCommerce Product Bundles free plugin offers two pricing strategies.
- A fixed price for the whole bundle product
- Auto-calculate the price based on selected products
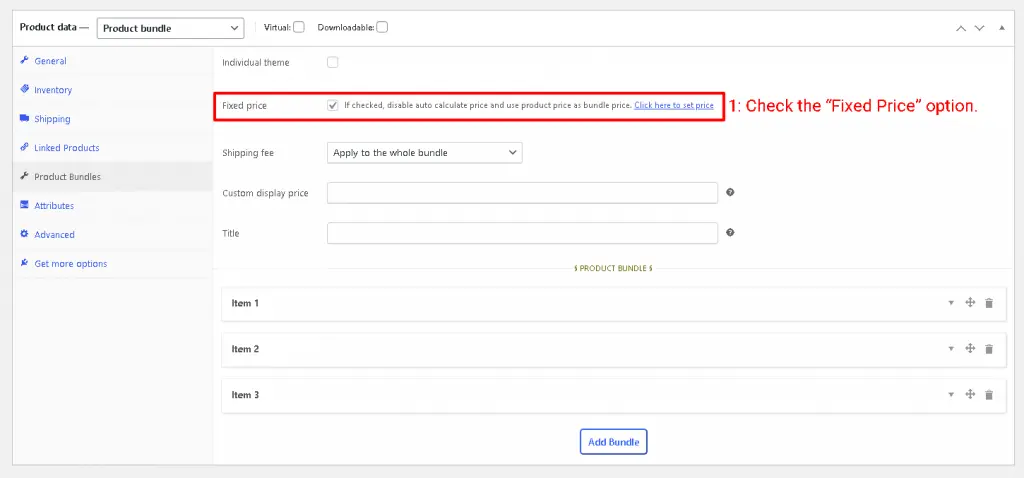
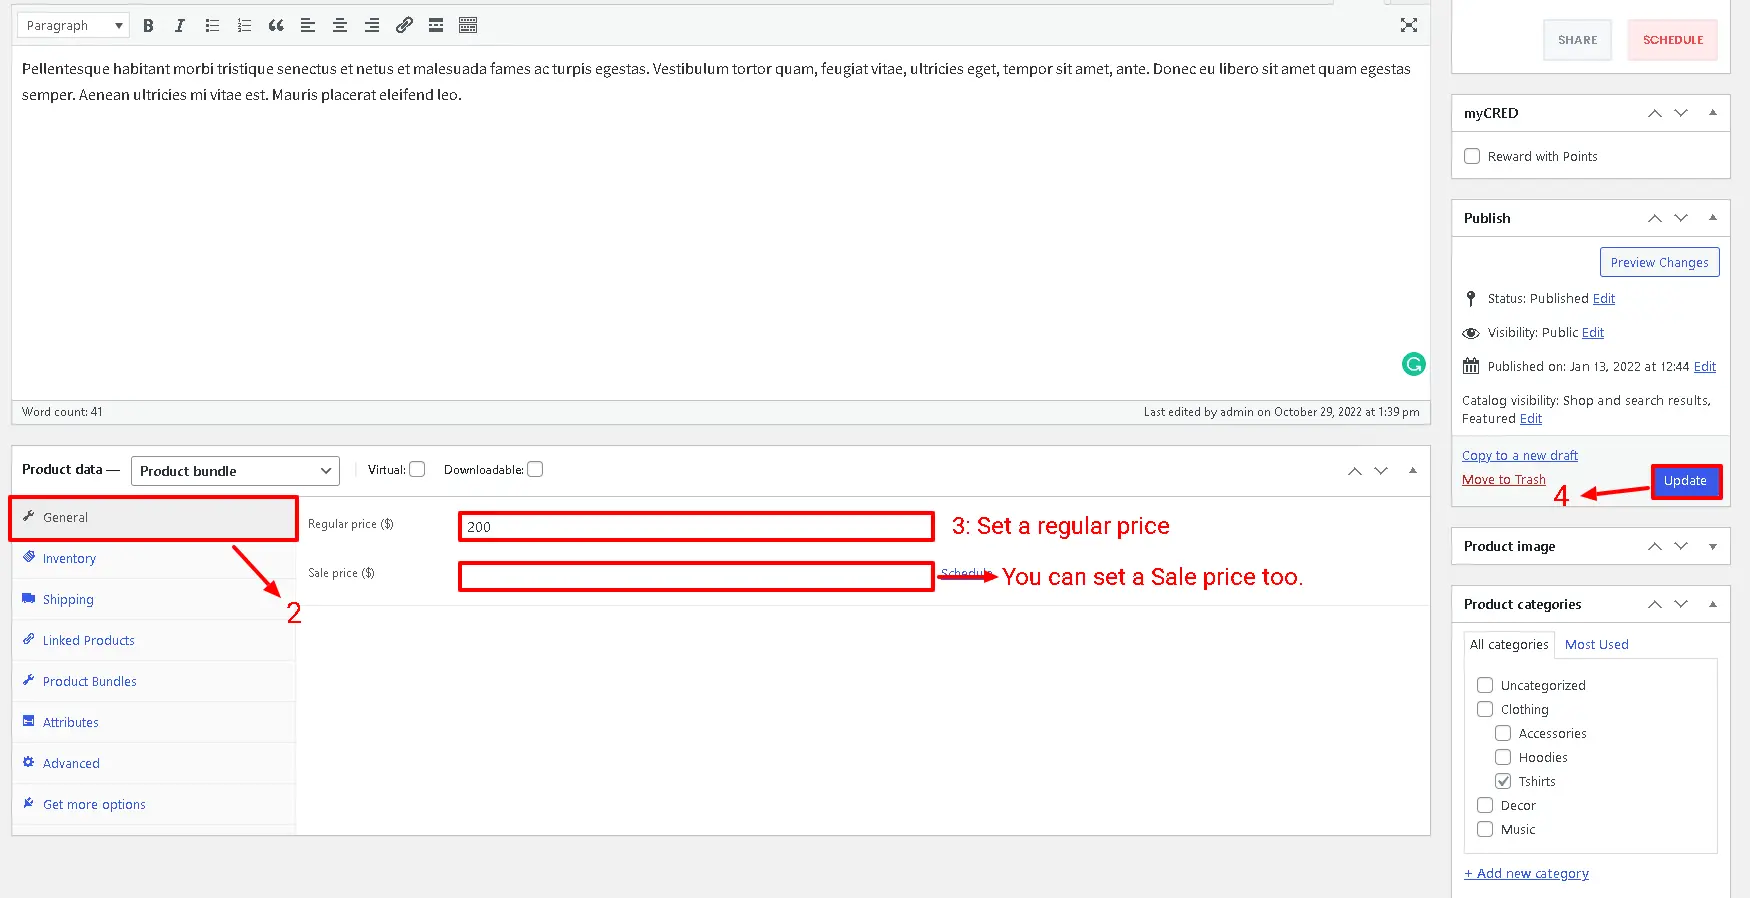
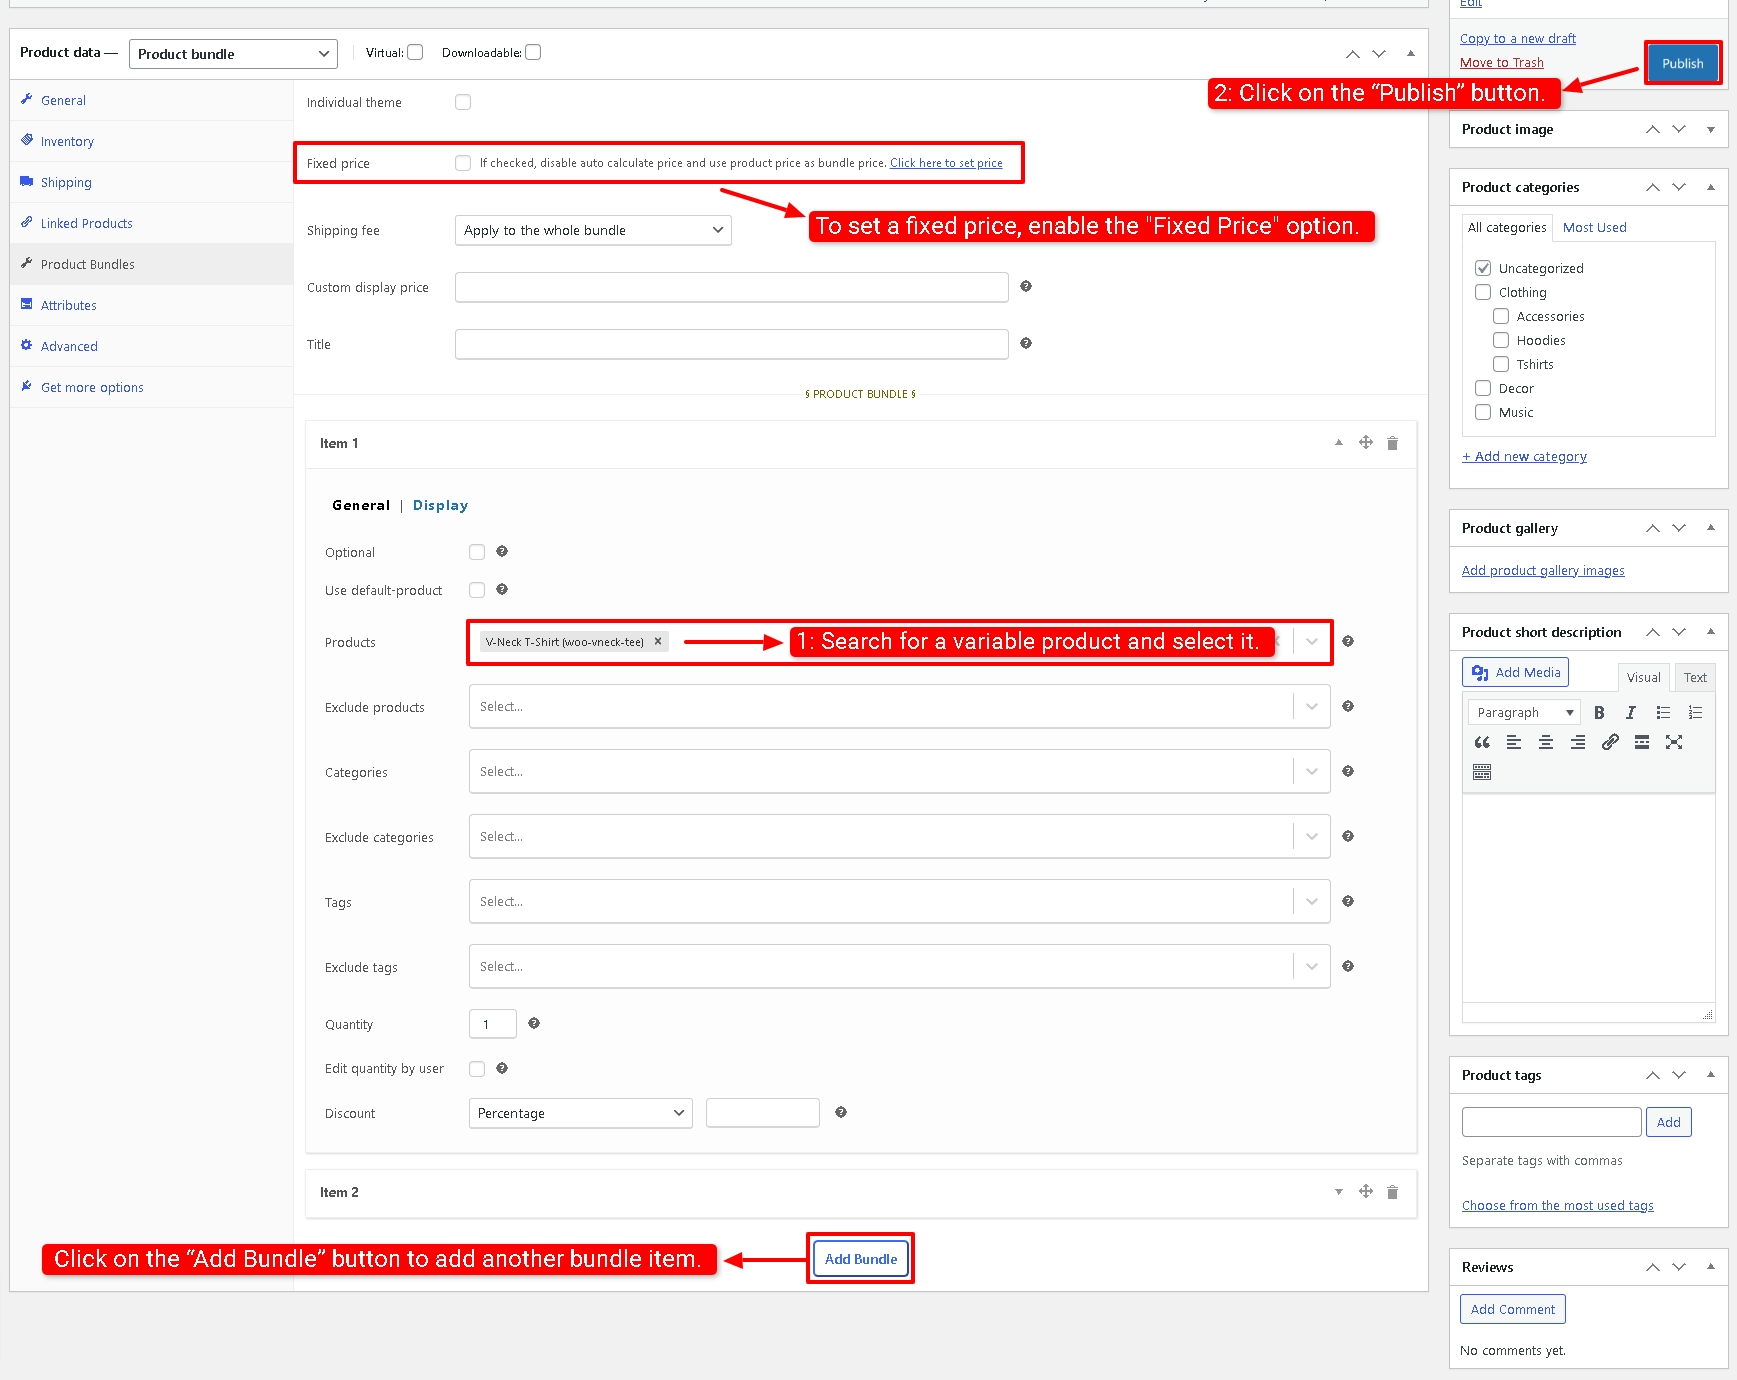
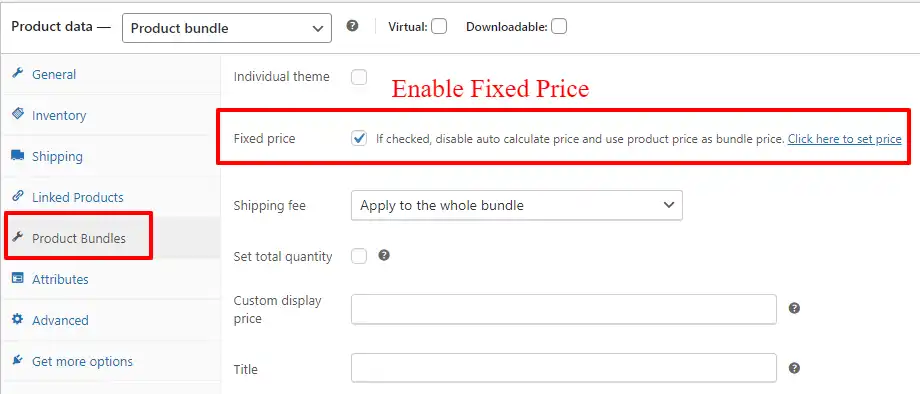
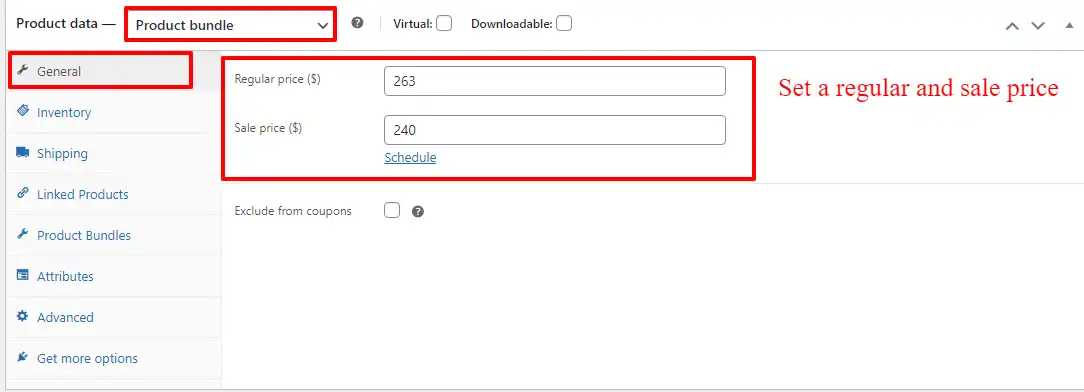
1. Fixed Price
If you would like to set a fixed price for the whole bundle product, then check the “Fixed Price” option.
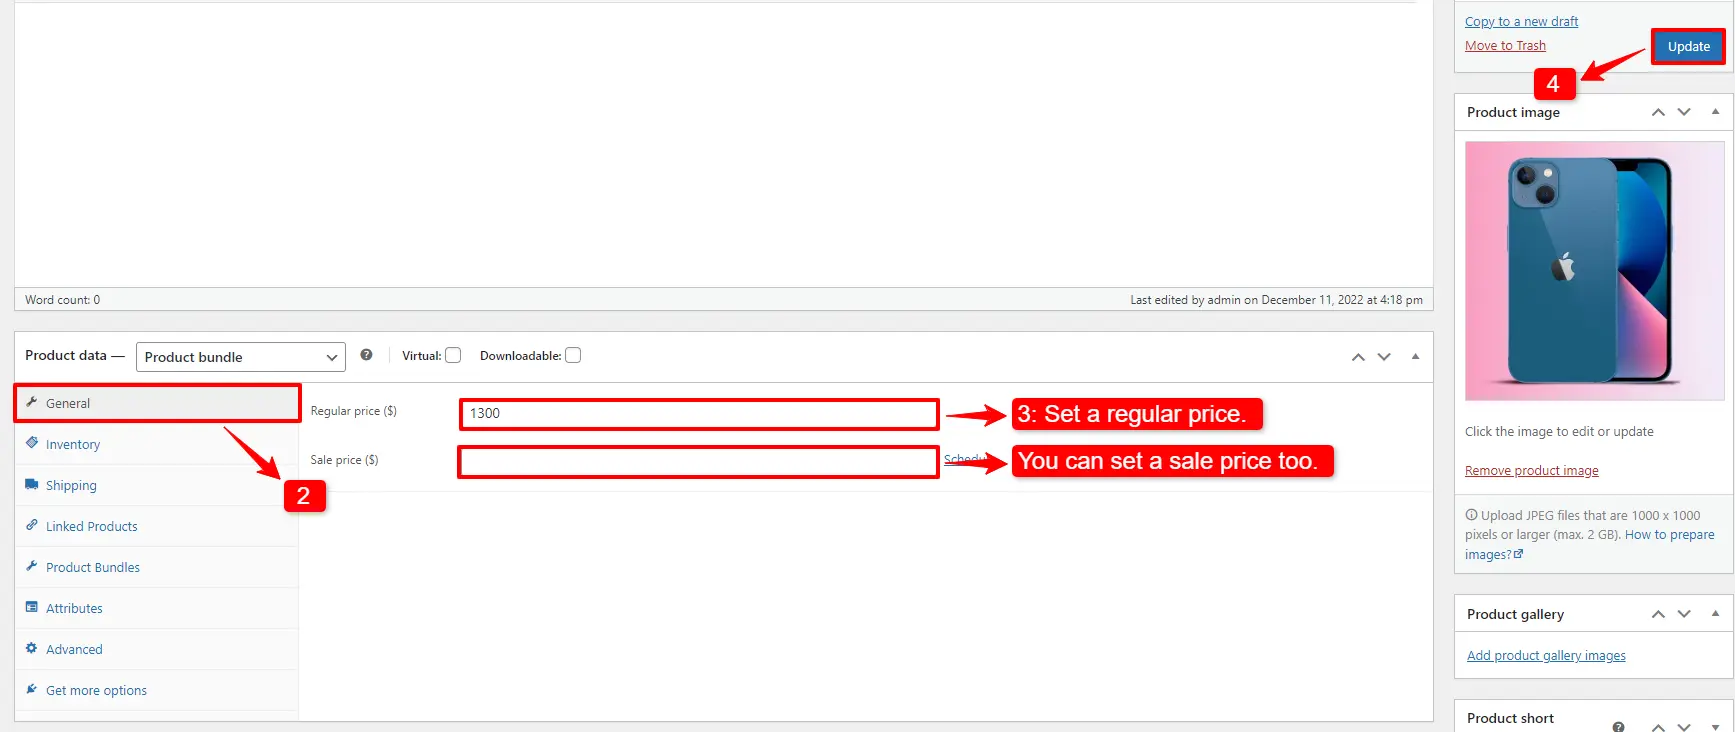
Navigate to the “General” tab and set a regular price for the Product. You can set a Sale price too.
After setting a price, update the product.
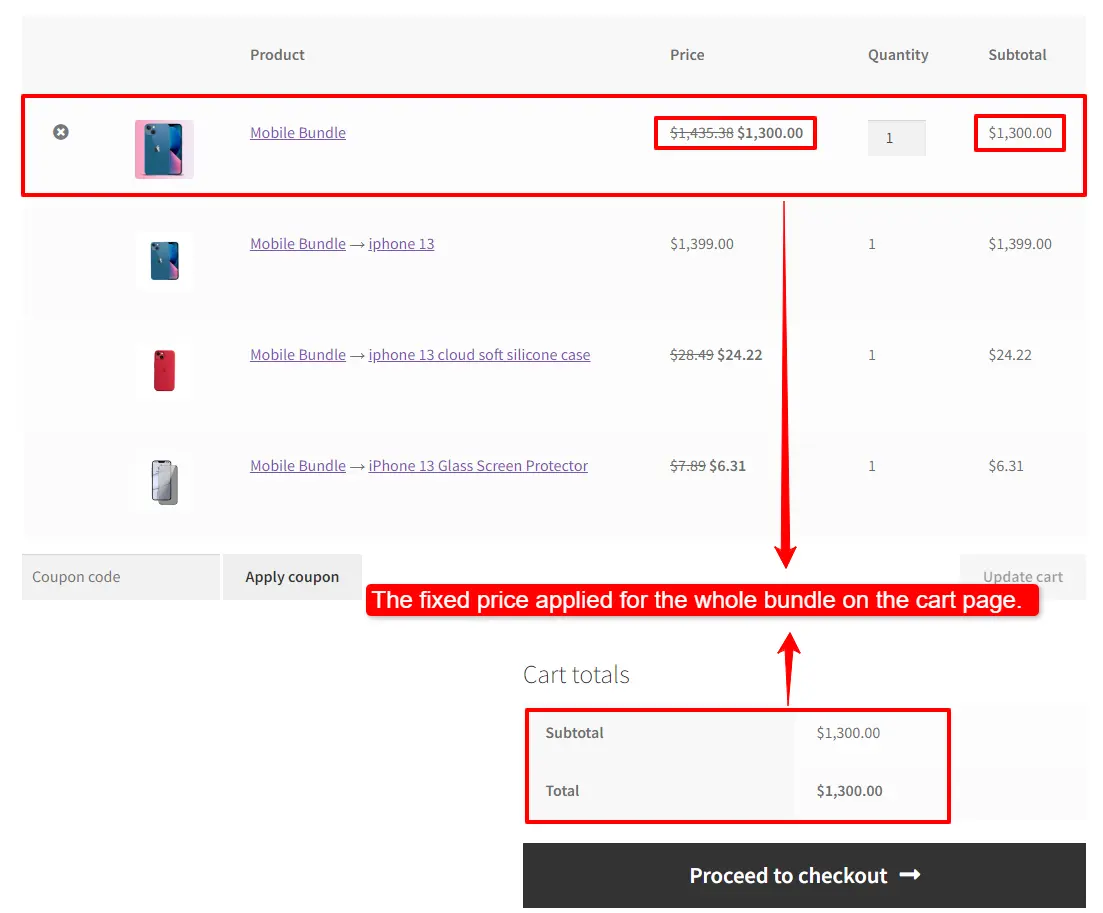
A fixed price product bundle applies to the bundle total price.
An example of WooCommerce mix and match product bundles in the cart.
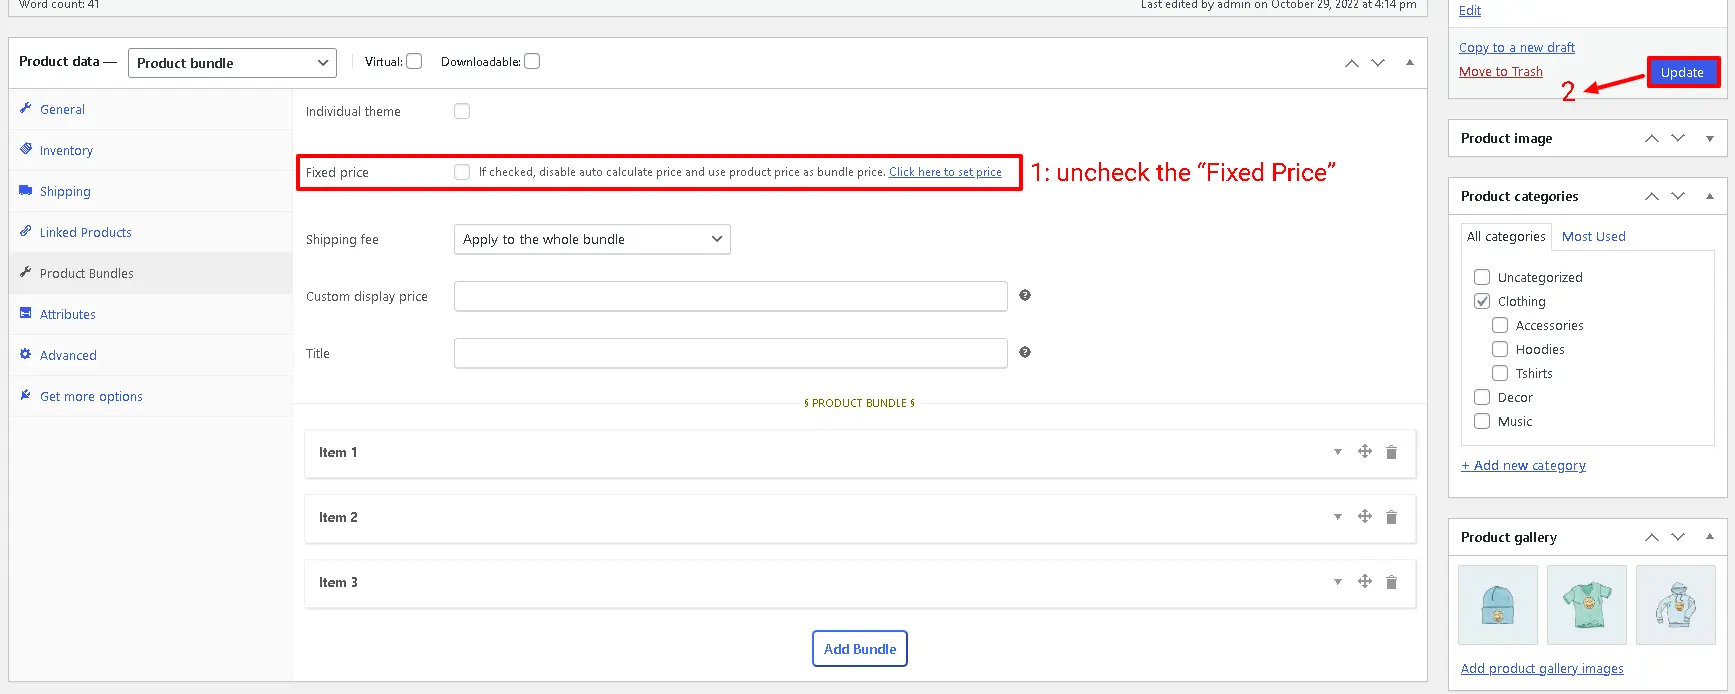
2. Auto Calculate Price
Auto-calculates price helps set a dynamic price for the product bundle based on the selected items.
To use the auto-calculate price feature, uncheck the “Fixed Price” option and update the product.
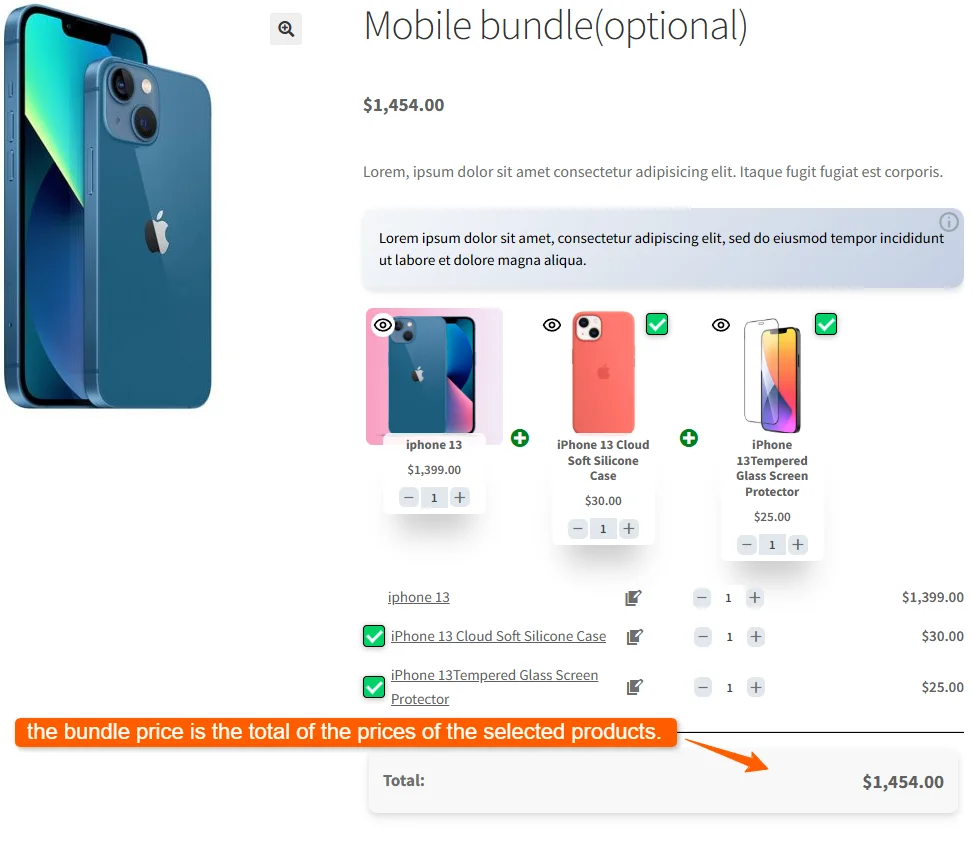
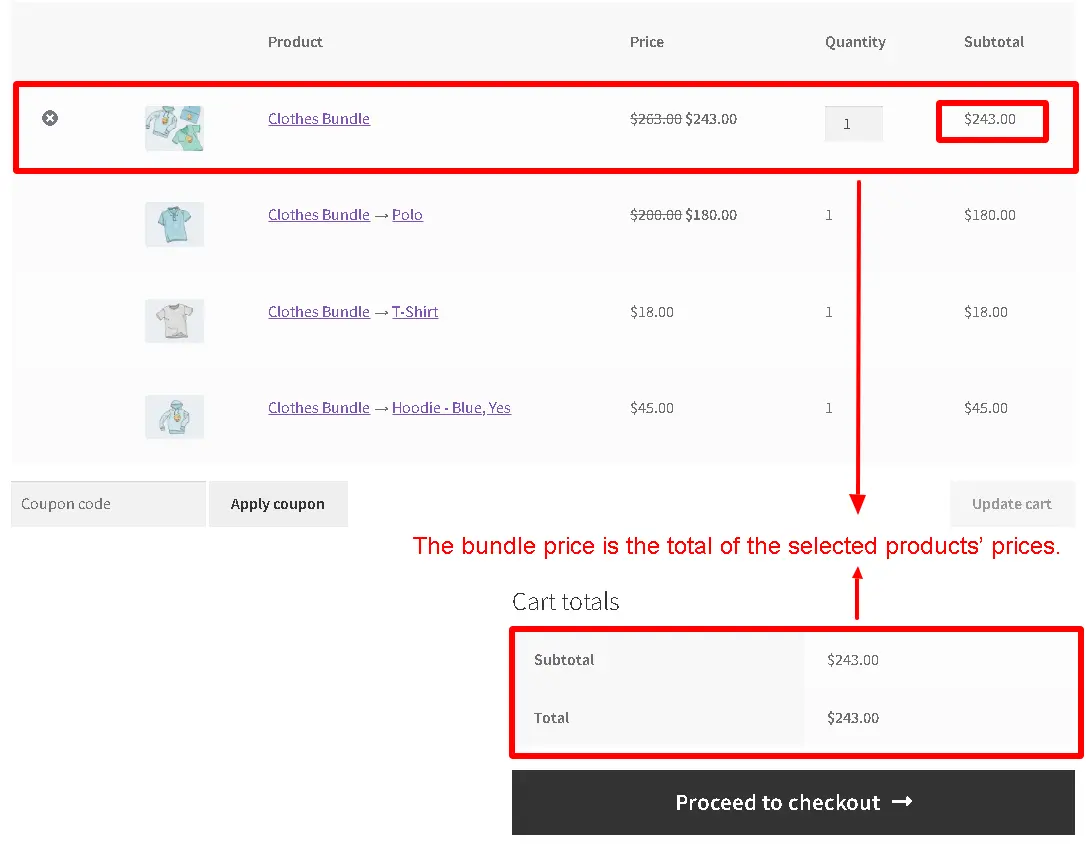
As you can see in the image below, the bundle price is the total of the prices of the selected products.
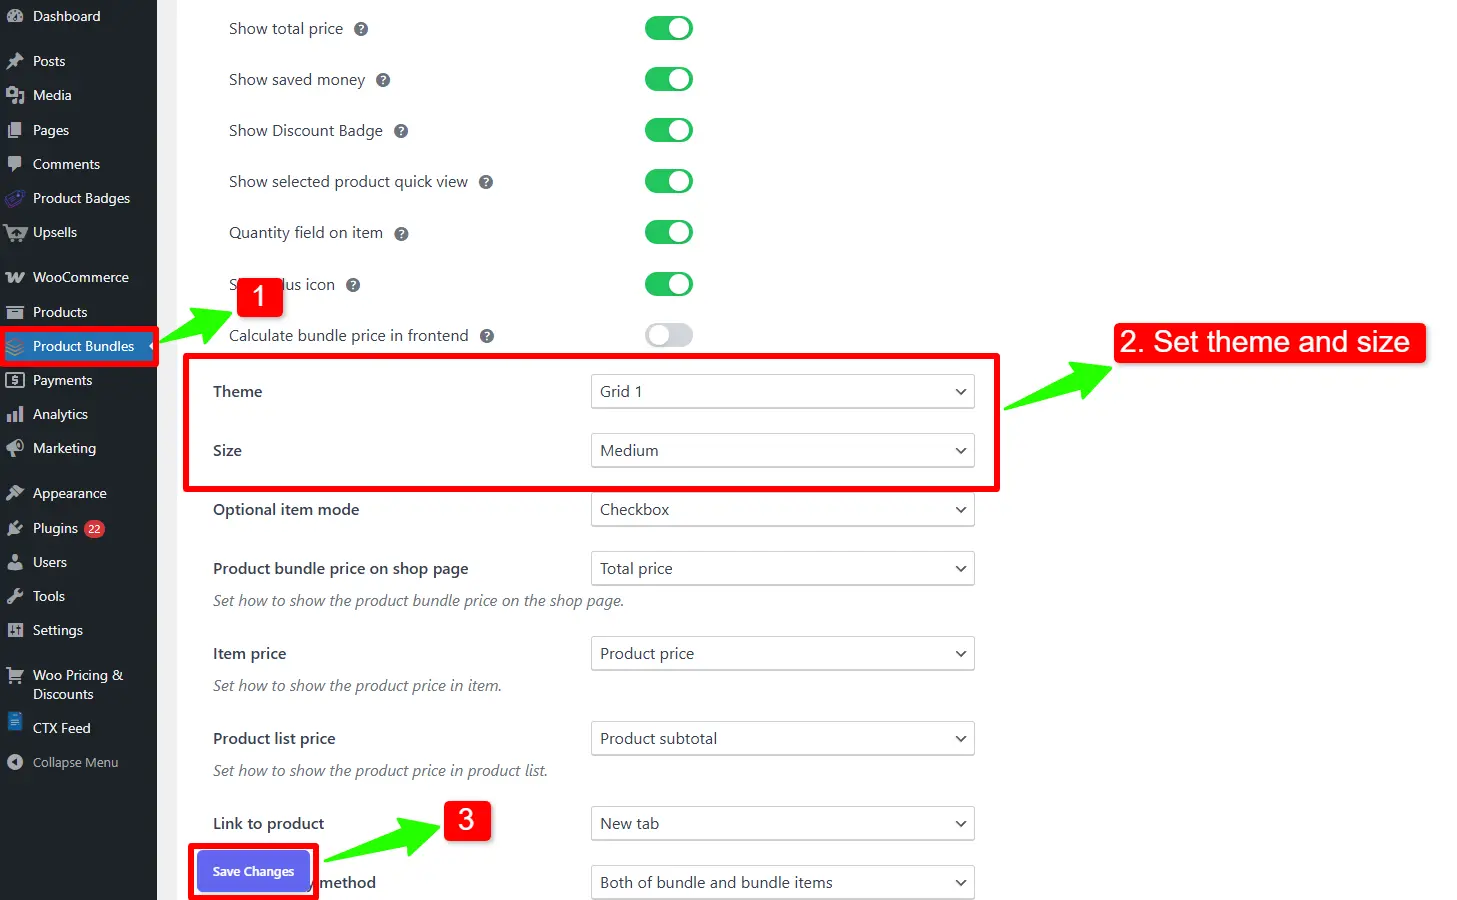
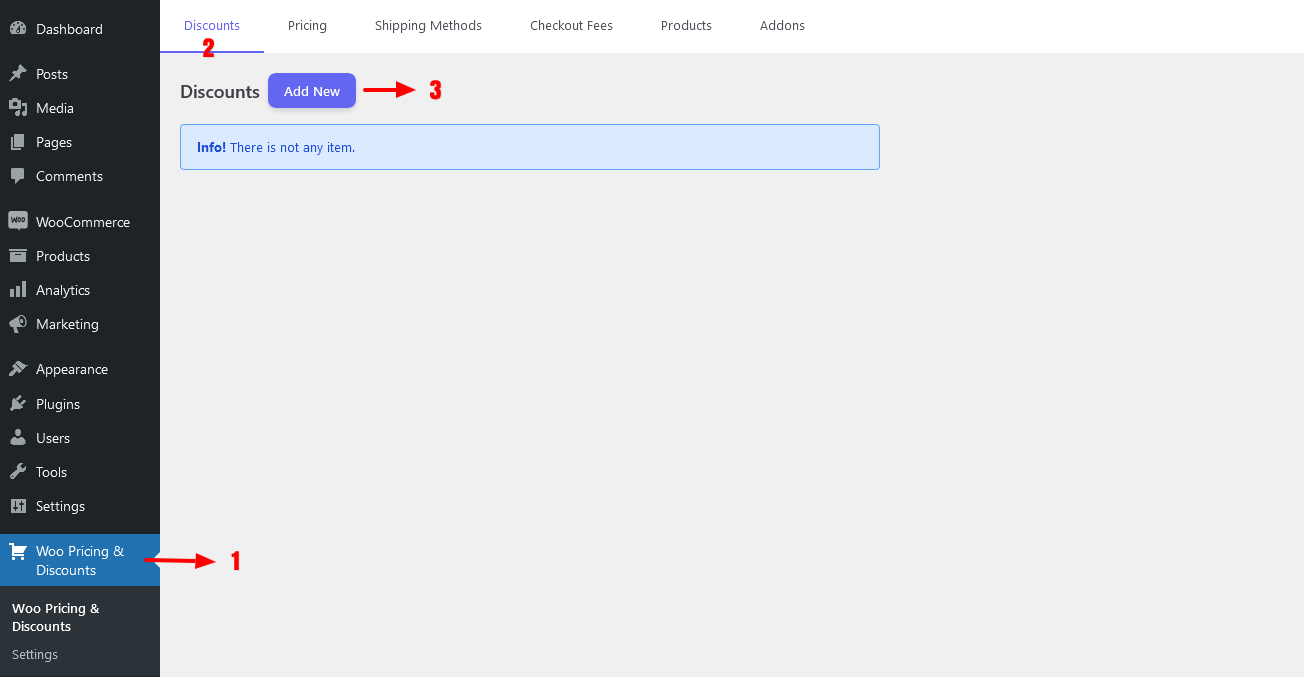
Step 7: Configure the Plugin Settings
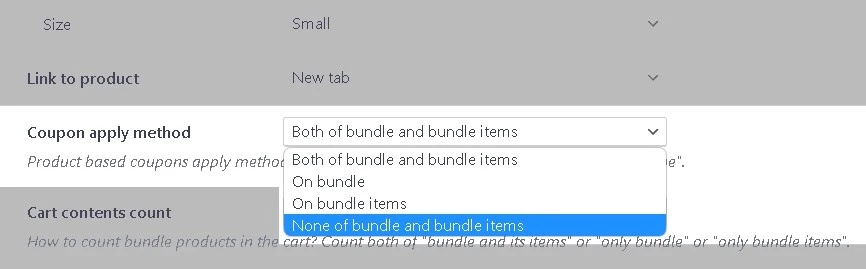
All the plugin settings you need can be found on the “Product Bundles” tab in the WordPress dashboard.
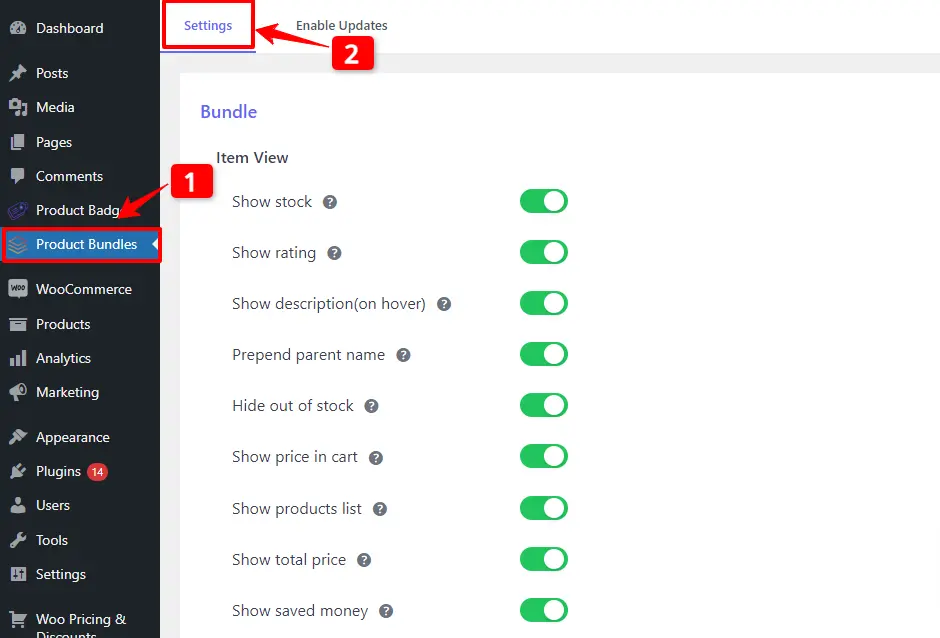
Settings and customization are available on this page:
- Item View:In this section, you can configure various settings, such as displaying stock availability, showing product ratings and descriptions, adding a quantity field on item pages, displaying a plus icon for items, setting the theme and size options, positioning product bundles on the product page, defining custom CSS selectors, specifying the product price selector, and many other customizable options.
- Change product popup: In this section, you can configure popup settings.
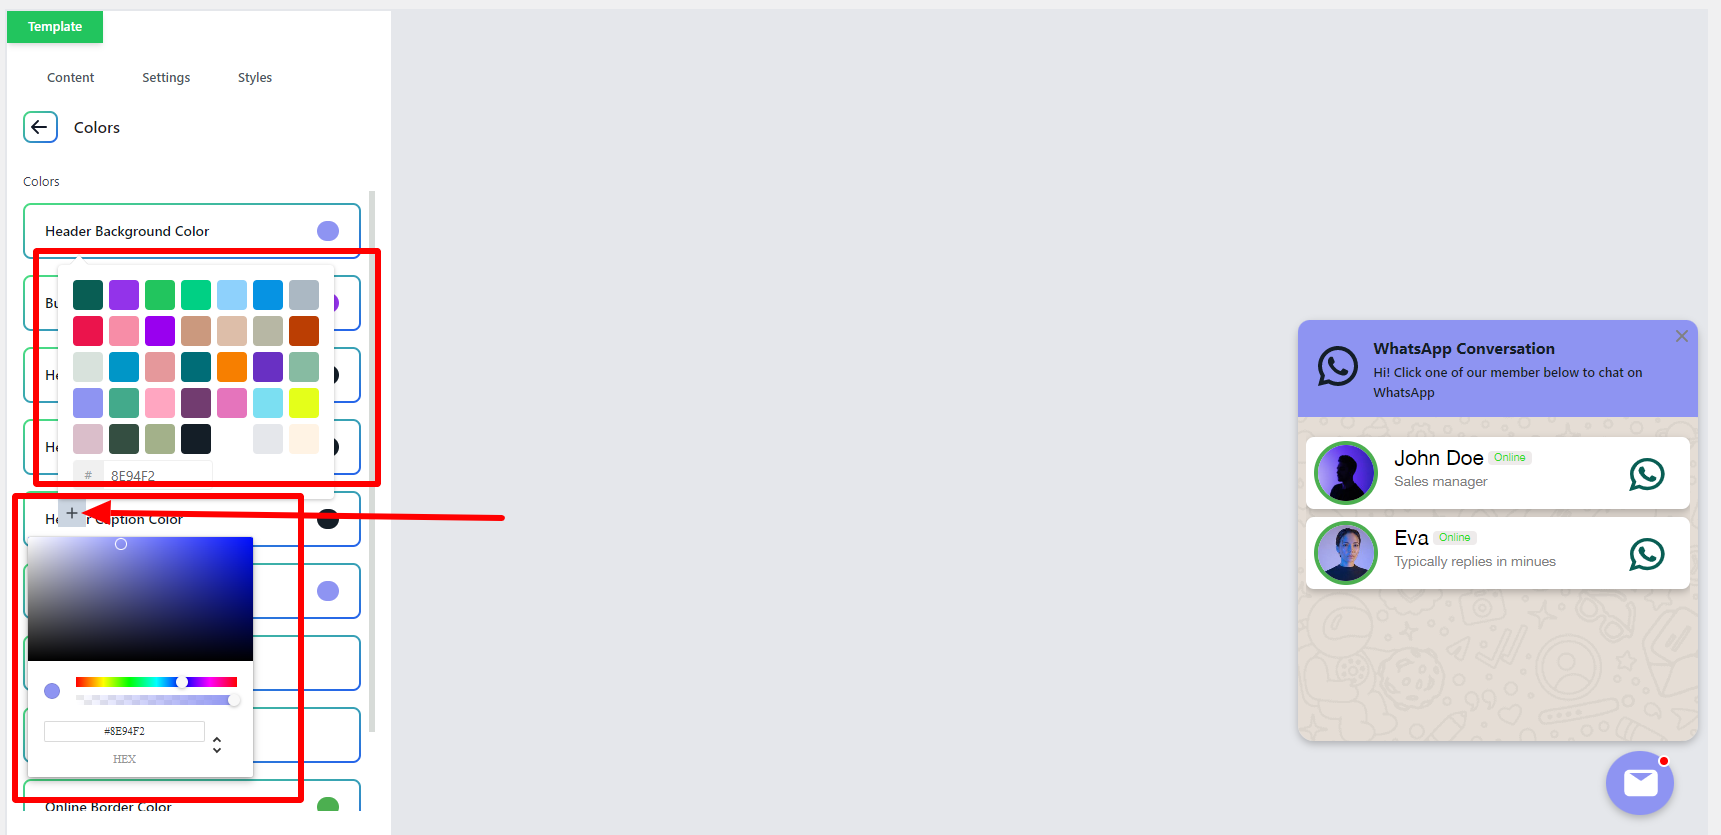
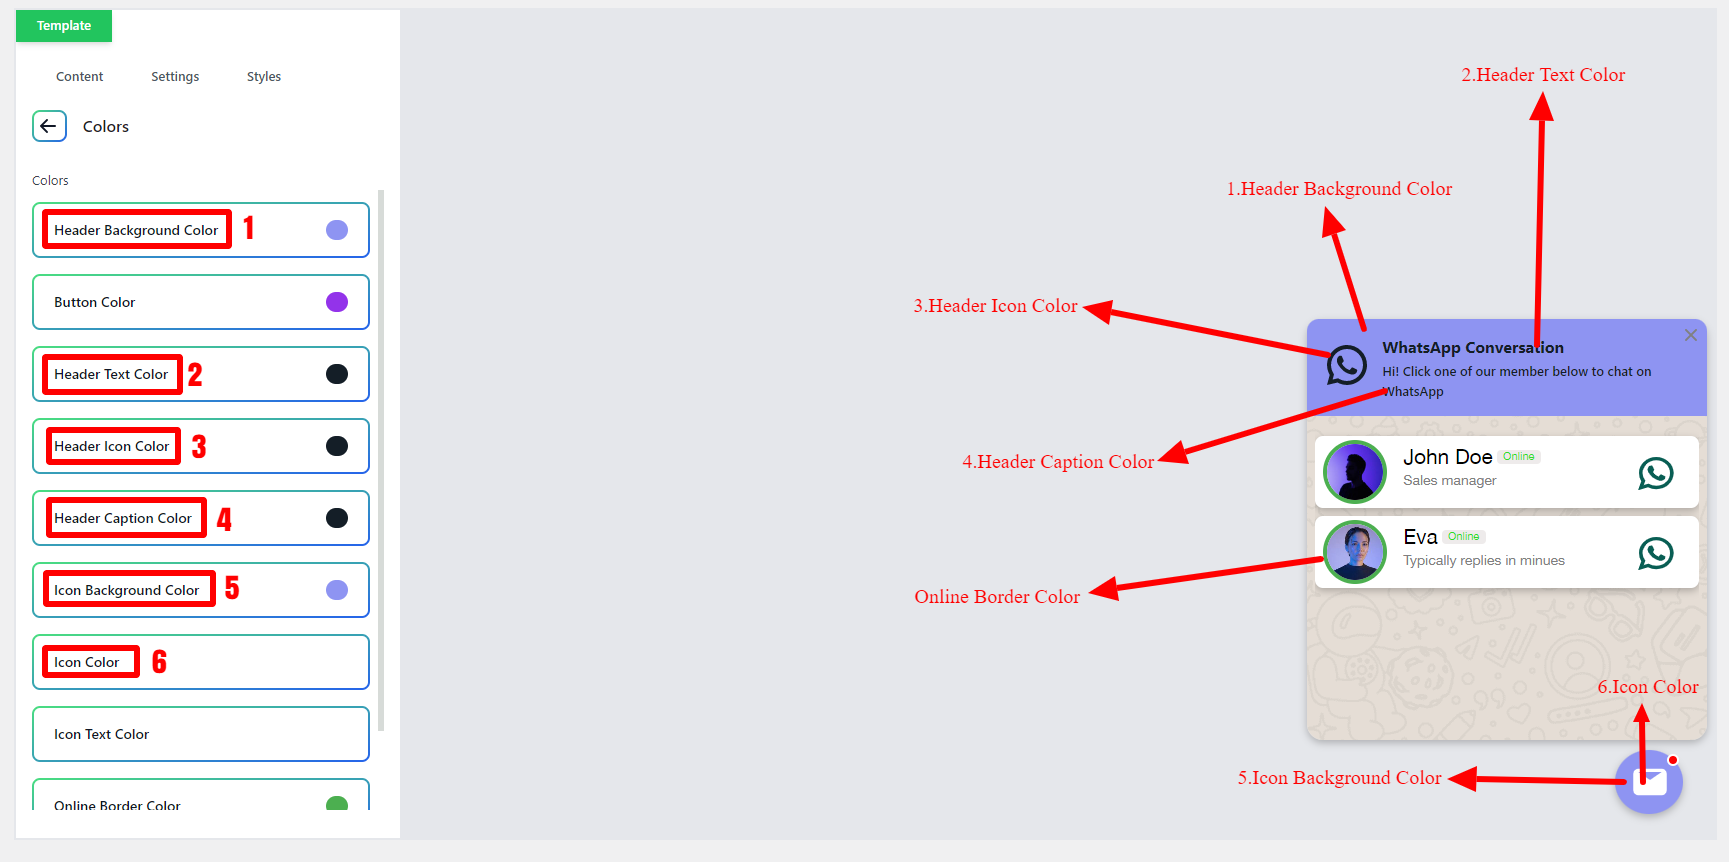
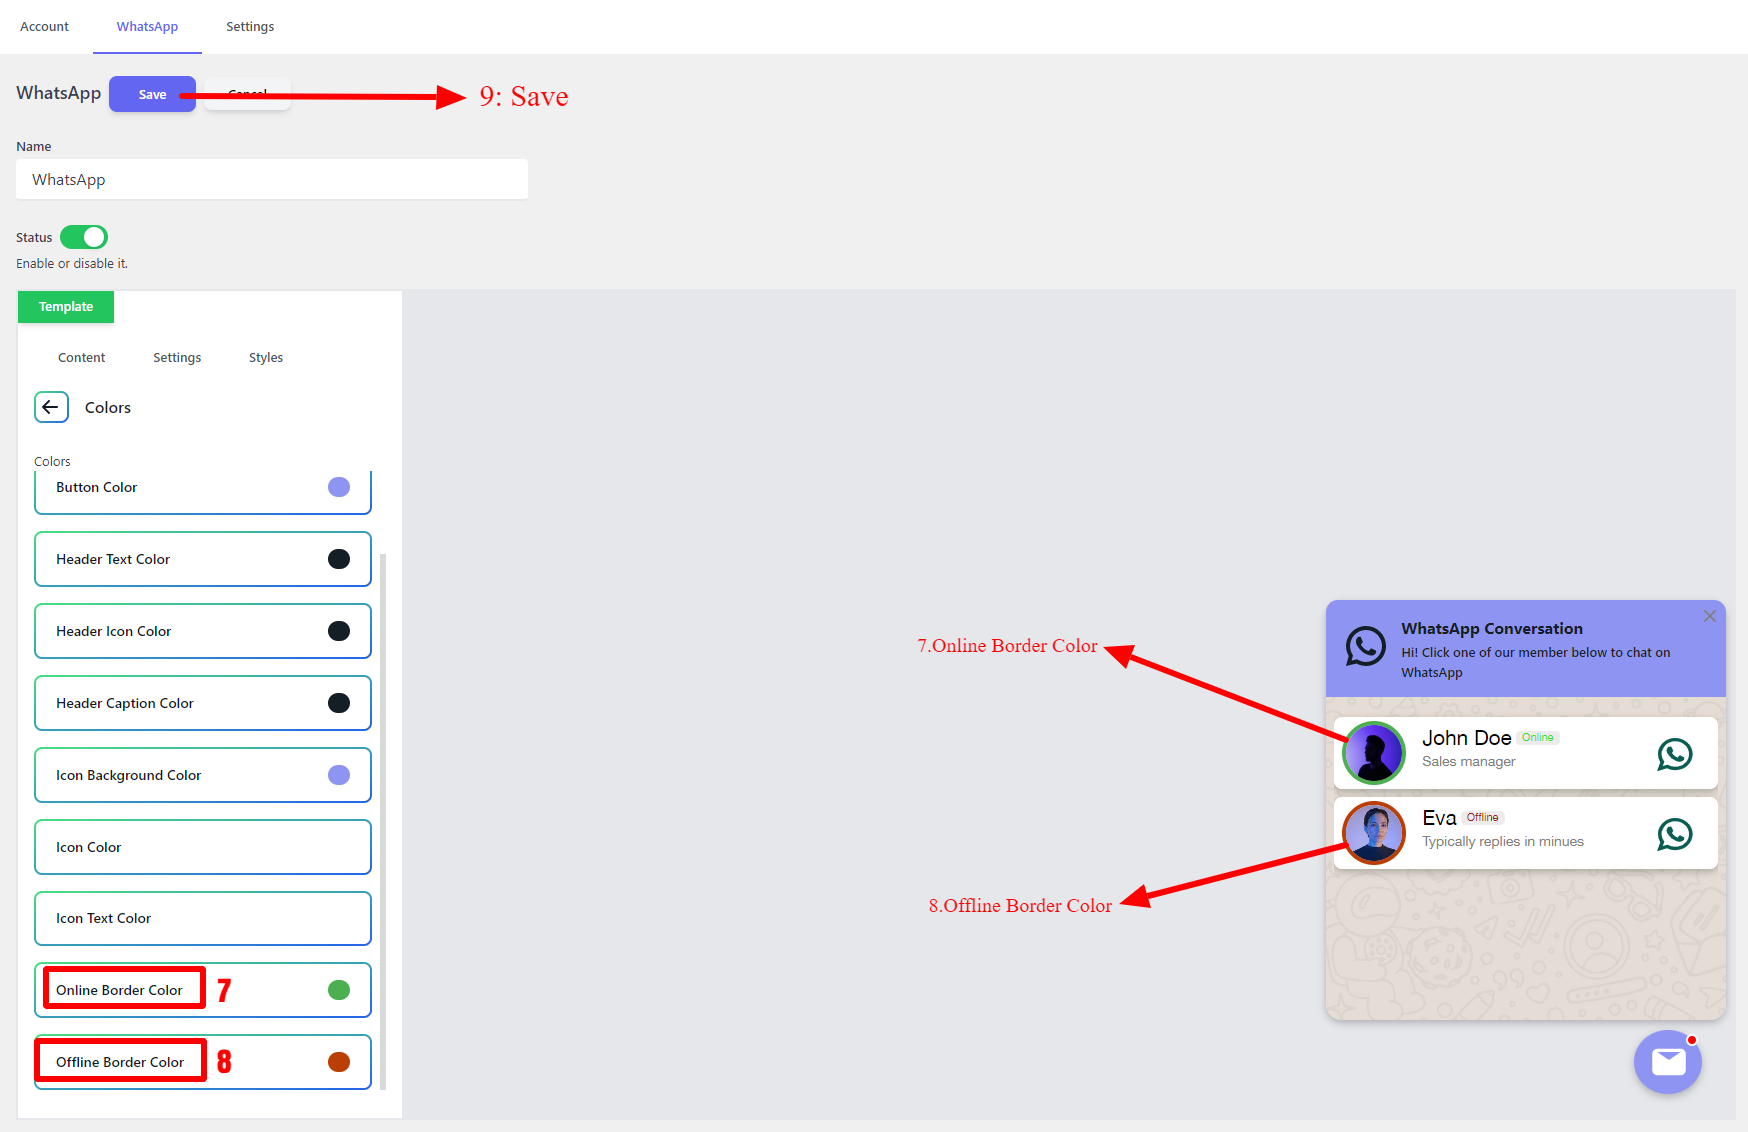
- Styles: In this section, you can customize the colours of different parts of your bundle and set the product image object-fit CSS.
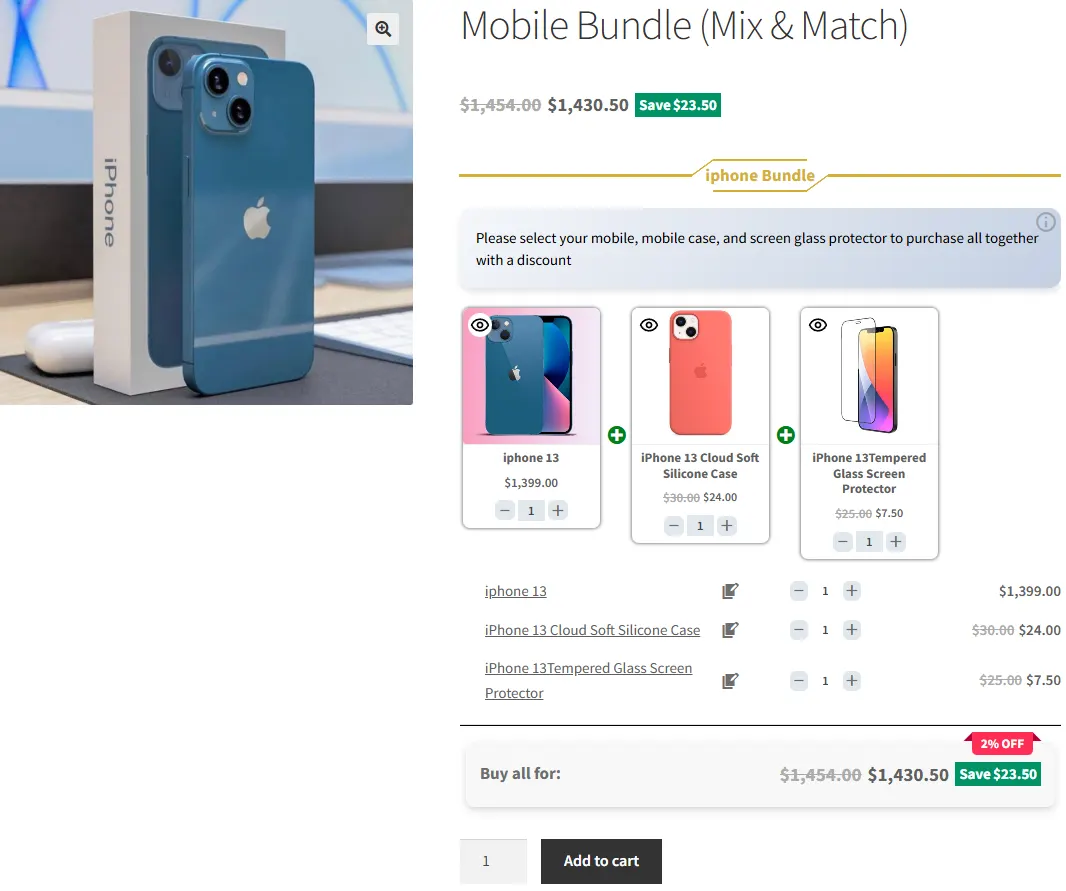
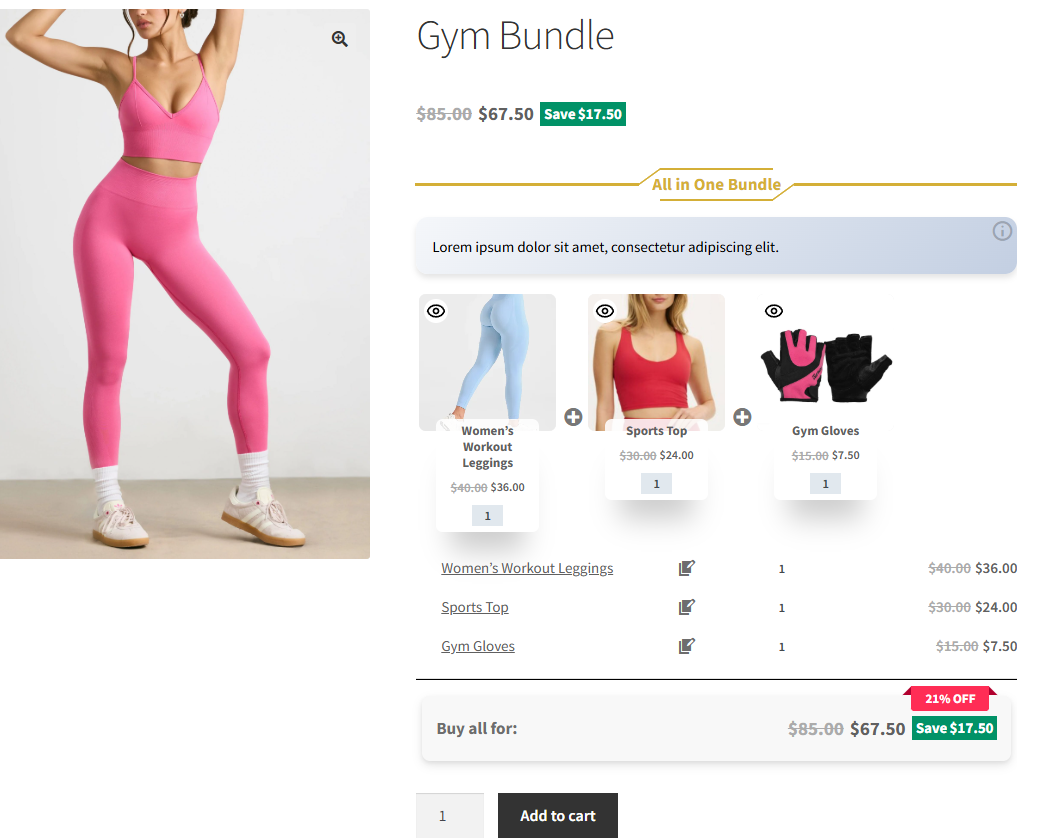
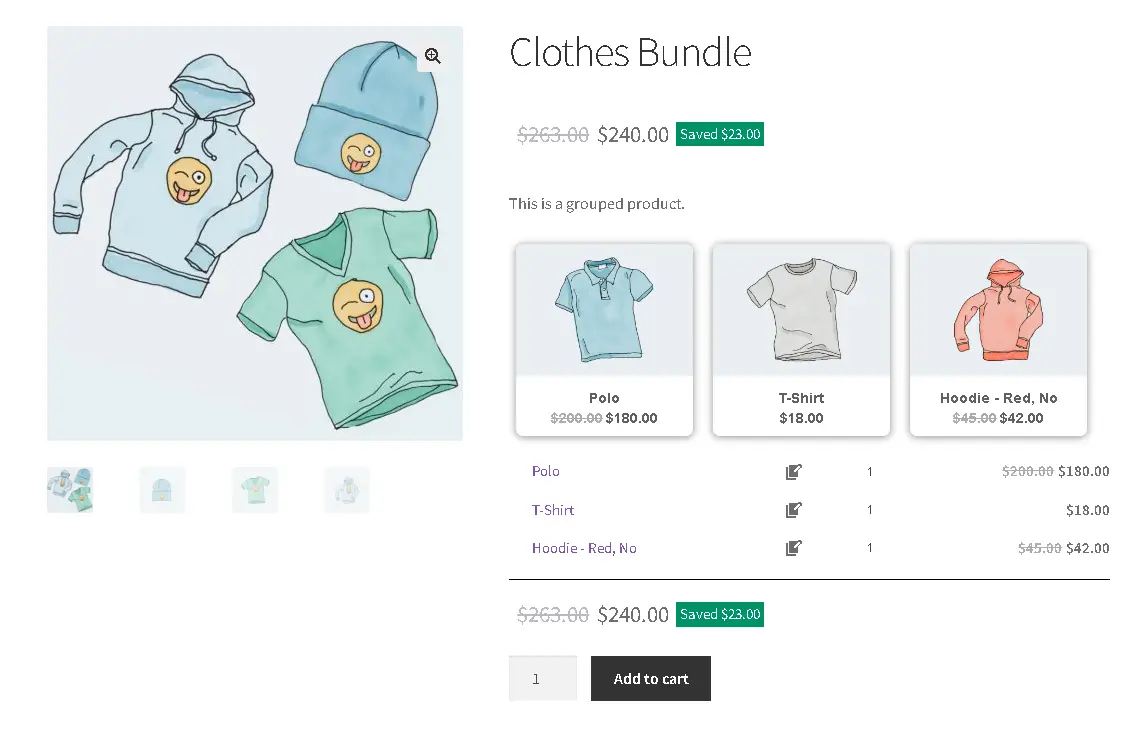
Final Result for Mix and Match Products in WooCommerce
WooCommerce Mix and Match Product will be shown on your site like this
How to create mix-and-match product bundles with variable products
To create mix-and-match product bundles with variable products, follow the steps below:
📽️Video tutorial
Step 1: Create mix-and-match product bundles with variable products
1. Navigate to the “Products” section in WooCommerce.
2. Click on “Add New” to create a new product.
3. Set a name for the mix-and-match product bundles
4. Click on “Set product image” from the right sidebar and select an image for product bundles.
5. Navigate to the Product data panel, and select “Product bundle” as the product type.
6. After selecting “Product bundle” as the product type the “Product Bundles” tab will appear in the product data panel.
7. Navigate to the “Product Bundles” tab and click on the “Add Item” button to add a new bundle item.
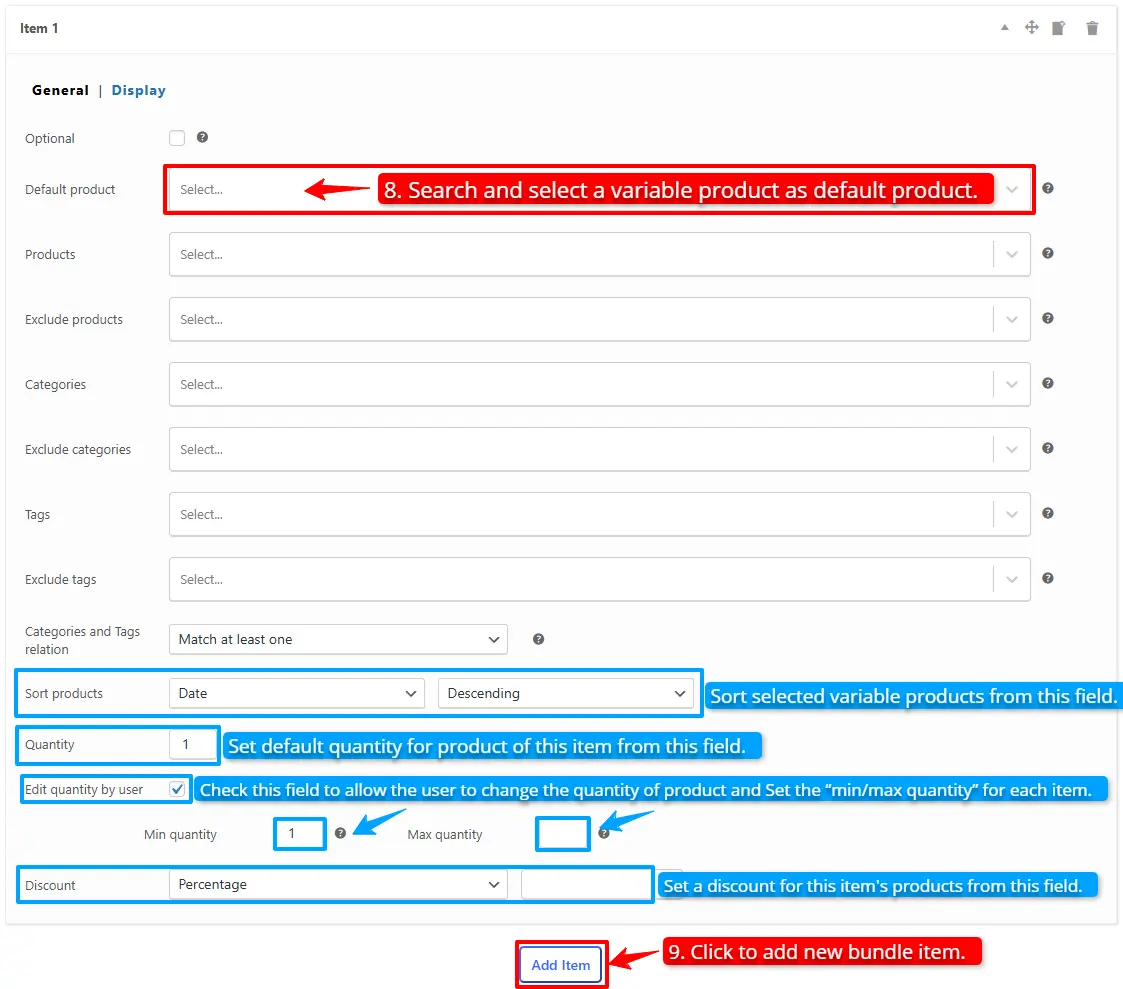
8. Now, in the “default product” field, search and select a variable product. You can also select as many variable products as you want in the products section.
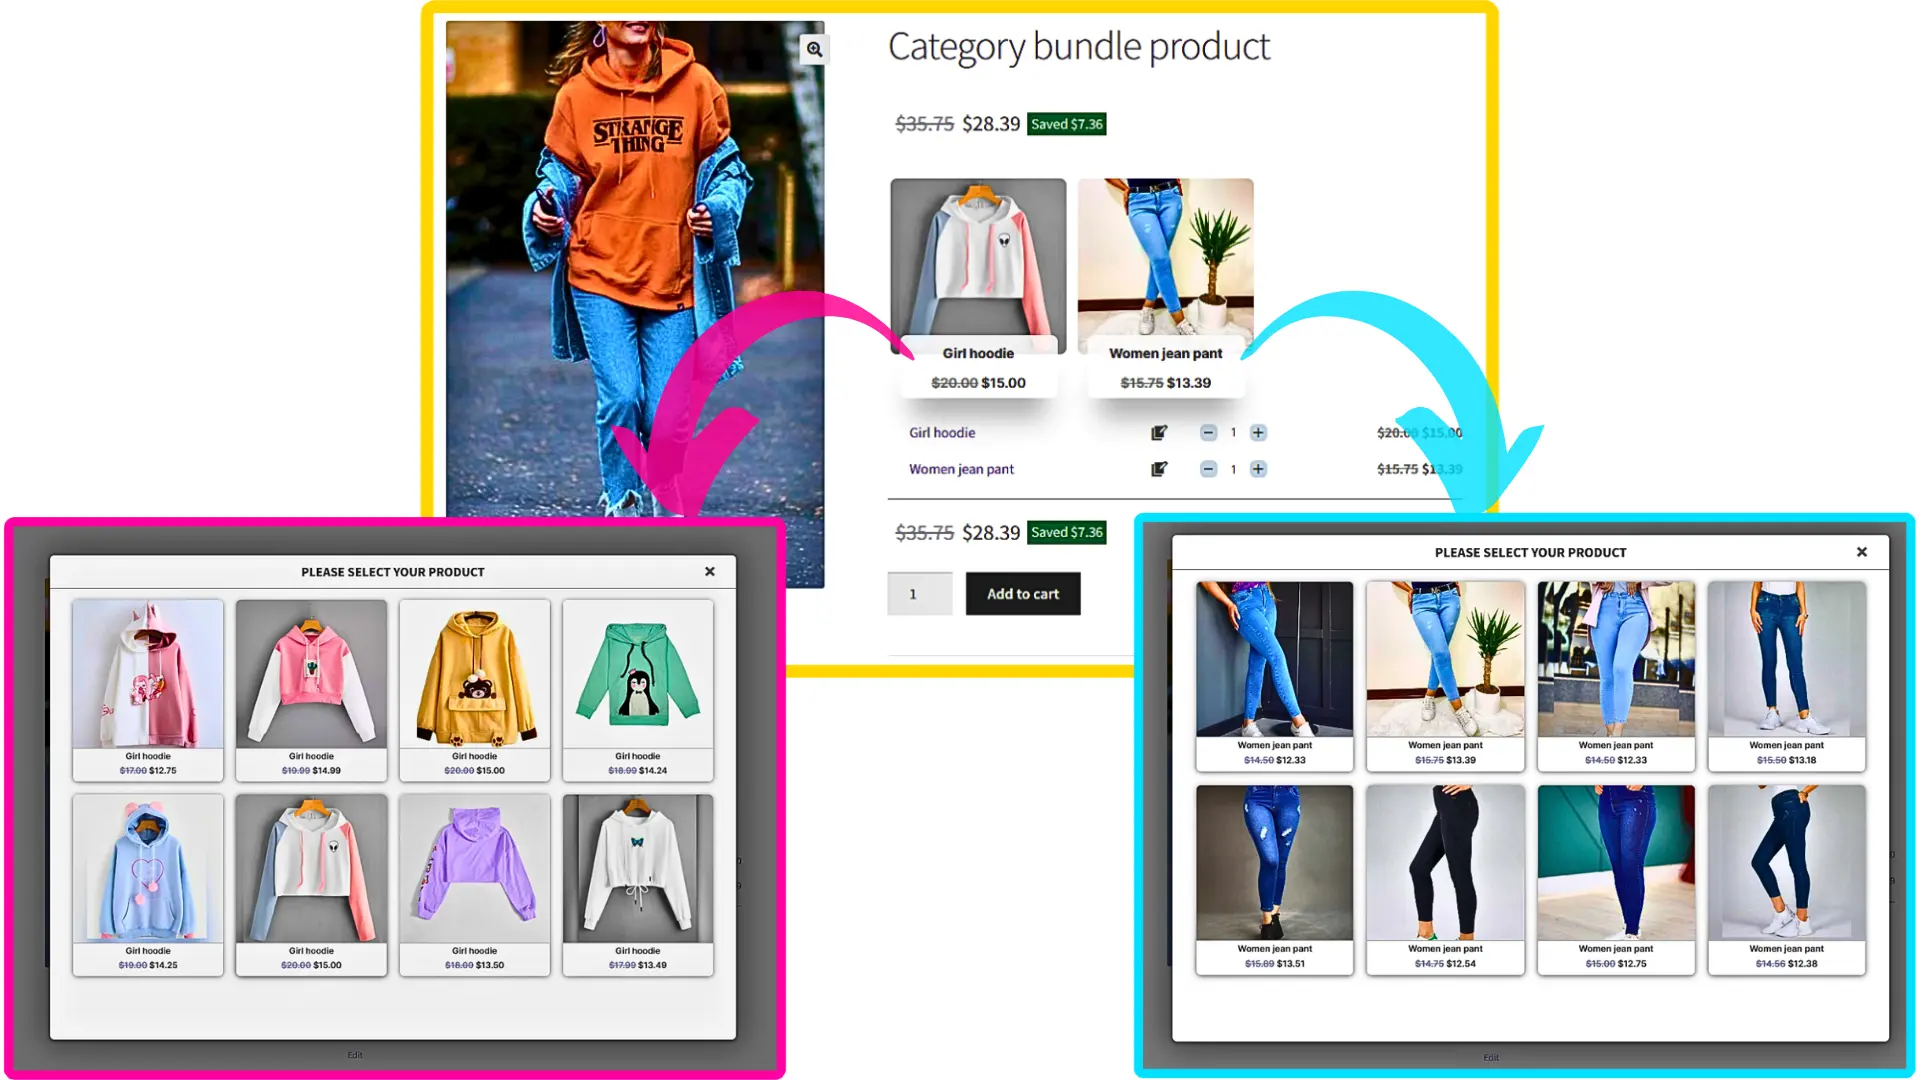
- Likewise, if you would like to include variable products from a category, you can do it with the “Categories” field of the item. therefore you can search for categories and add them.
- In addition, you can do the same for the variable product tags and include them in the “Tags” field.
Step 2: Customising WooCommerce mix-and-match product bundle
You can also configure the below settings to your mix and match Product Bundle in the item field:
- Sort products: With this field, you can sort selected variable products by “ID”, “Title”, “Menu order”,” Date”, “Price”, “popularity” and“Rating”.
- Quantity: In this field, you can set the default quantity for each product.
- Edit quantity by user: Check this field to allow the user to change the quantity of product and Set the “min/max quantity” for each item.
- Discount: In this field, you can set discounts for product bundles by percentage, price or fixed price.
Now you can navigate to the “display” tab of the item and configure the following sections:
- Overwrite bundle item title.
- Overwrite bundle item short description. (Show when the mouse hovers over it)
- Change the title of the bundle empty item.
- Change the product list product selection title.
- Change the pop-up header title.
- Set an image for the empty item.
9. Then you can click on “Add Item” to add a new item to the mix and match product bundles and configure it as in the previous steps. we create one other item and select simple products for this item.
Step 3: Configure the Plugin Settings
To configure the Plugin Settings, you can just read this section of the article for more information.
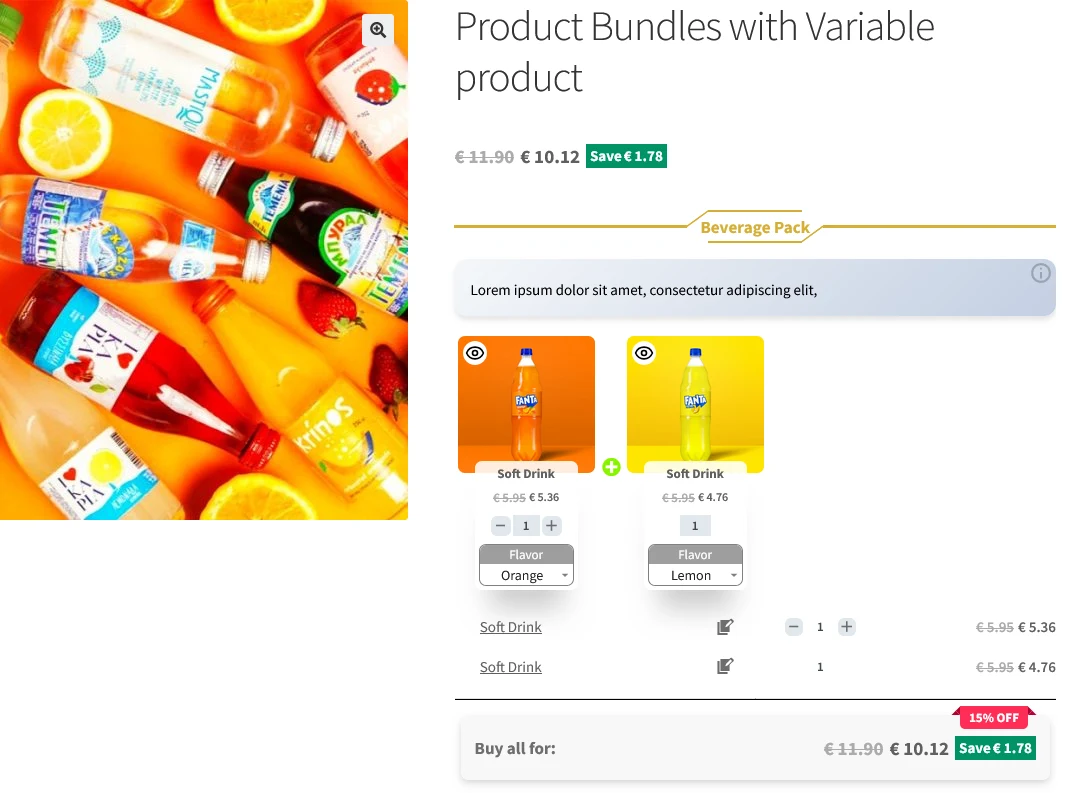
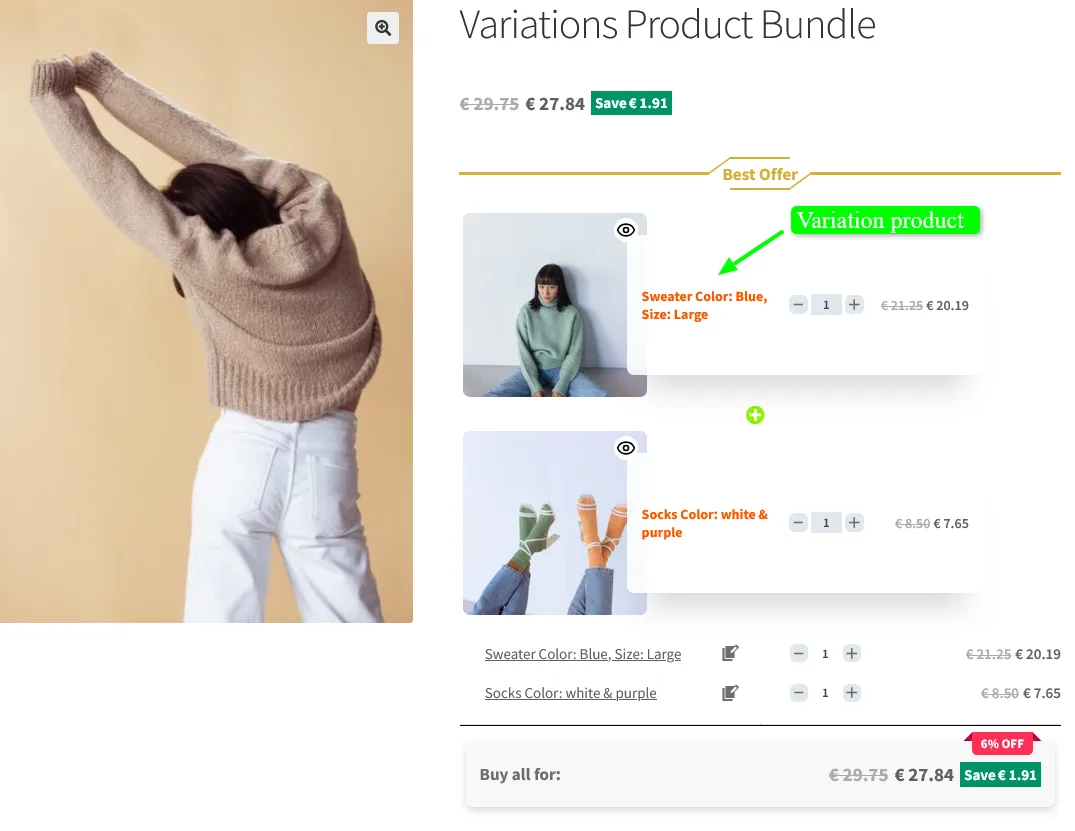
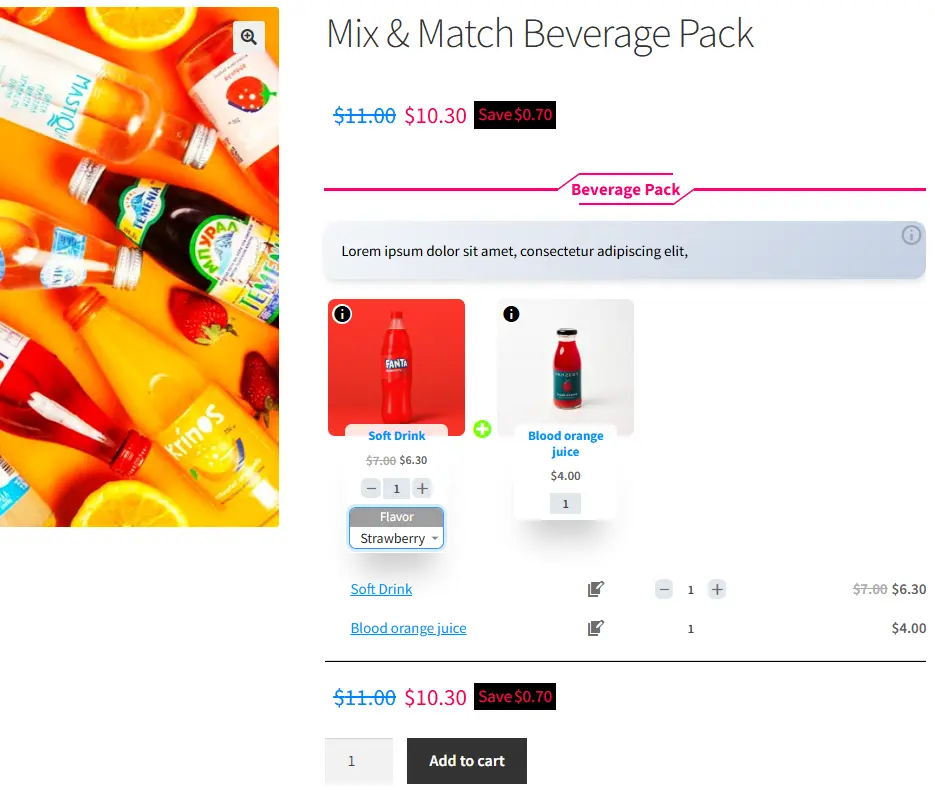
Final result of Mix and Match With Variable Products
Now open the product page on the frontend to see the mix-and-match product bundles.
Optional Items in WooCommerce Product Bundles
You can make product bundle items optional, so that the customer does not have to select a product for that bundle item.
Step 1: Create optional product bundle item
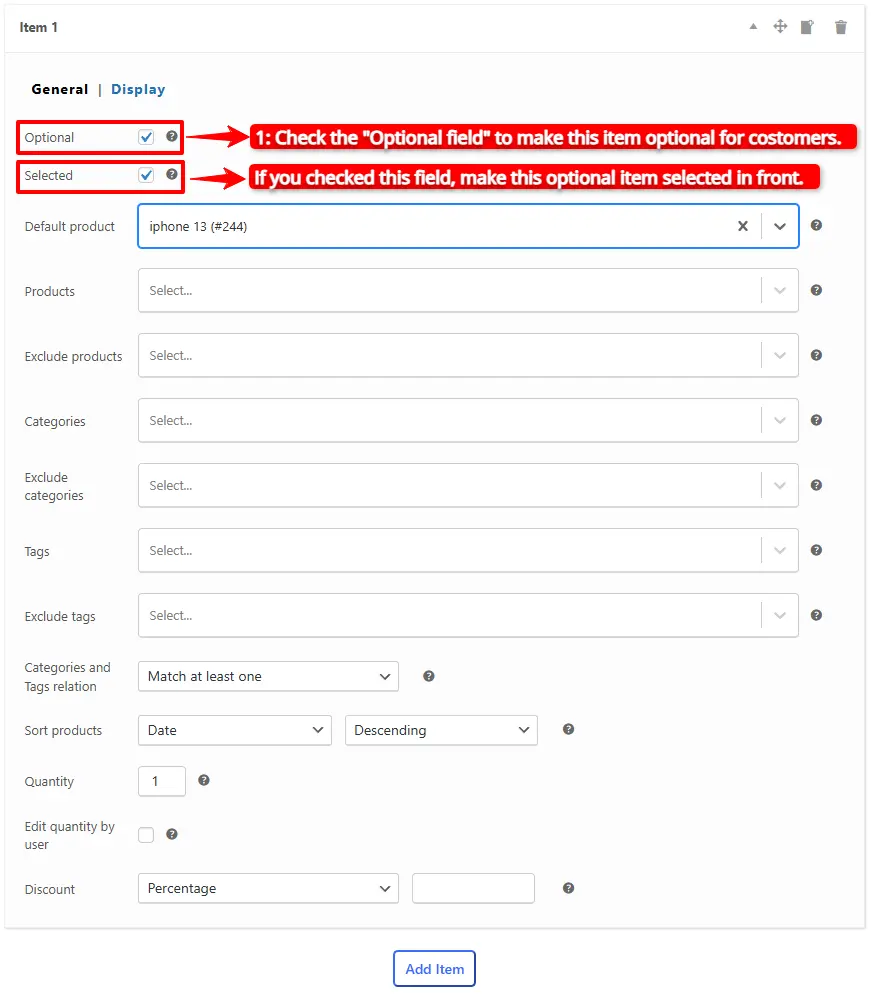
1. To make an item optional, open it and check the “Optional” field. This option is available in the pro version of the Easy Product Bundles for WooCommerce.
2. Check the “Selected” field to make this optional item selected at first time in front.
Step 2:Change the Optional item mode
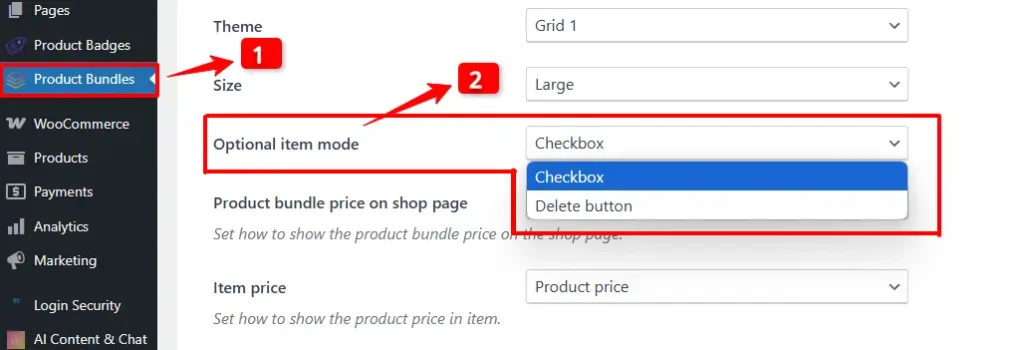
3. Go to the “product bundle” tab in the WordPress dashboard.
4. In the settings, navigate to the “Optional Item Mode” section and change the mode of the optional item to either “Checkbox” or “Delete Button”.
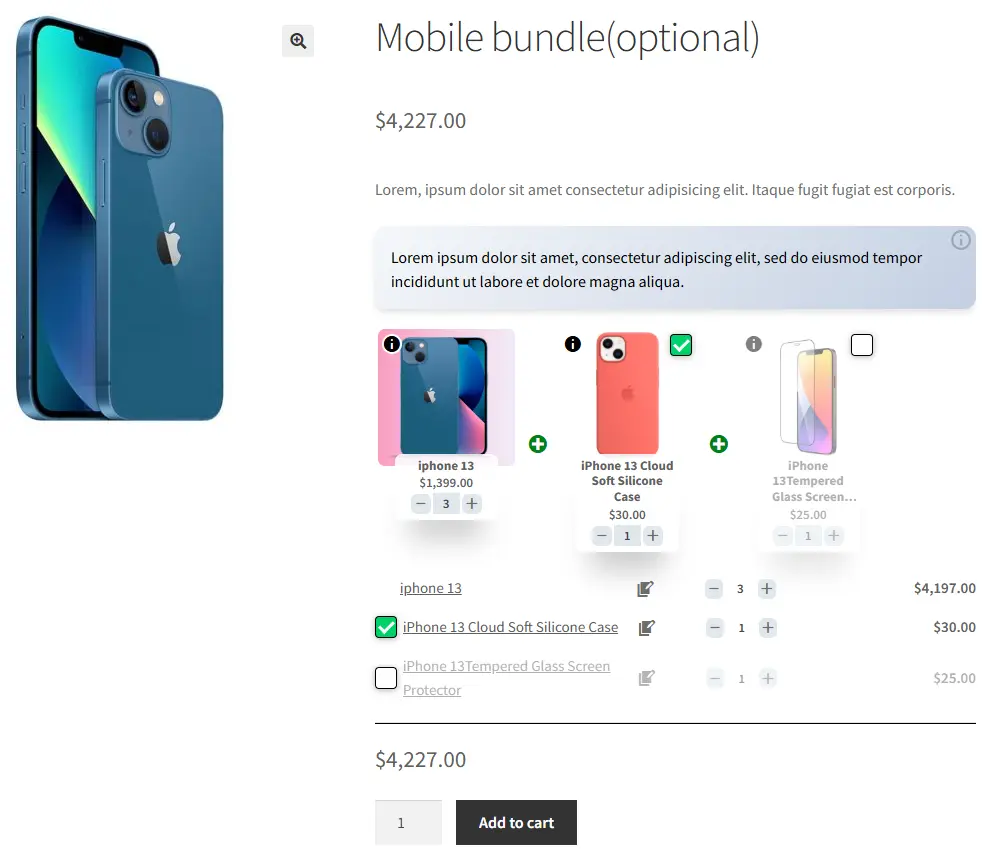
Final Result of Optional Product Bundles
After setting an item as optional, a checkbox or delete button will appear above the bundled item, allowing the customer to choose whether or not to include that product in their purchase.
Offer BOGO Deals in WooCommerce
BOGO deals are one of the best strategies to make money and build customer loyalty.
In this article, we will use the Easy Product Bundles for WooCommerce to create BOGO deals. If you would like to create advanced BOGO deals, you can check out Discount Rules and Dynamic Pricing for WooCommerce or Auto Add Products to Cart for WooCommerce plugins.
Step 1: Create a Product Bundle
1. To create a BOGO deal in WooCommerce, navigate to WooCommerce Products >> Add New to create a new product.
2. Set a name for the product bundle.
3. Click on “Add Media” and select an image for your product bundle.
4. Now navigate to the Product data panel, and select “Product bundle” as the product type.
5. After selecting “Product bundle” as the product type the “Product Bundles” tab will appear in the product data panel.
Step 2: Add bundle items
6. Navigate to the “Product Bundles” tab
7. Click the “Add Item” button to add a new bundle item to the product bundle.
8. Now, in the “Default Product” field, search for the product and select it.
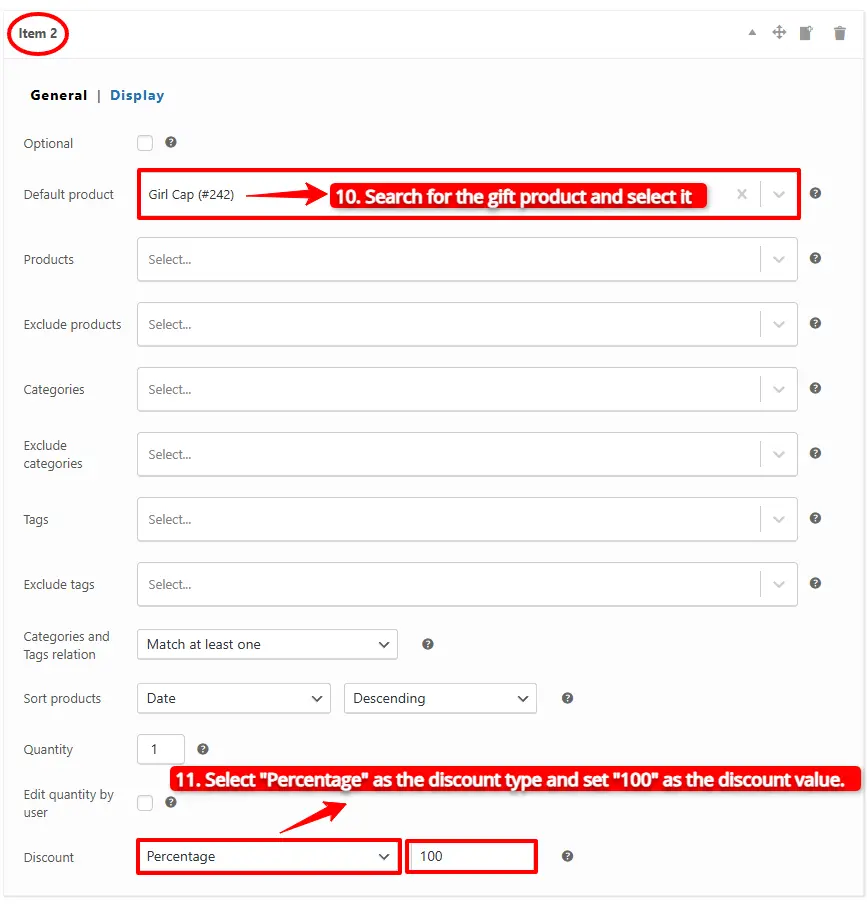
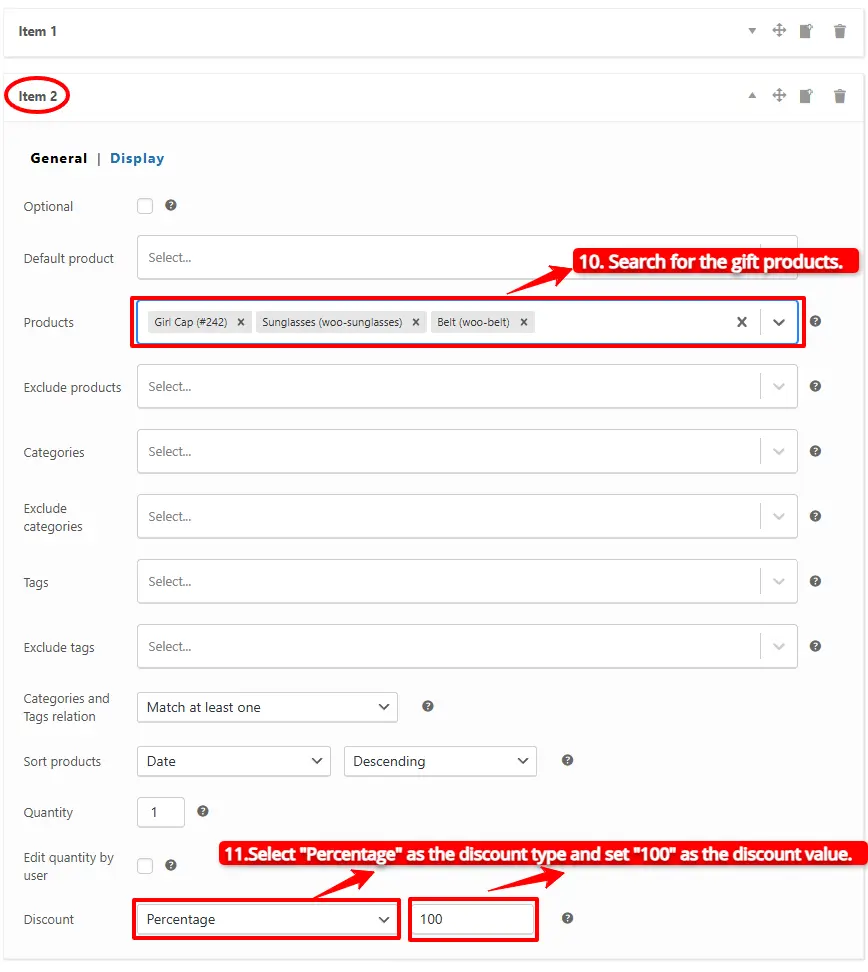
9. Click on the “Add Item” button to add a new item for the gift product.
10. In the “Default Product” field, search for the gift product and select it.
Note: The bundle item has a “Discount” field, and you can use it to apply a discount on the gift product.
11. Select “Percentage” as the discount type and set “100” as the discount value. The gift product will be free.
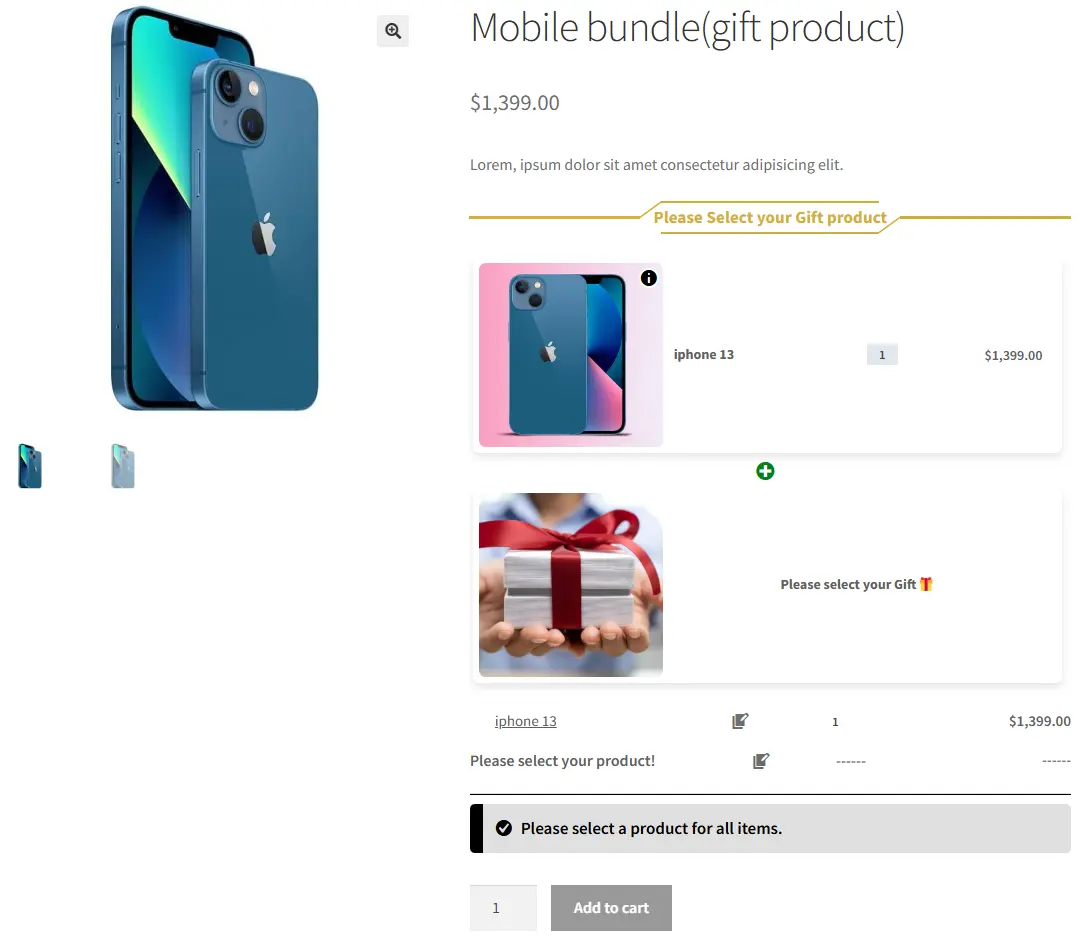
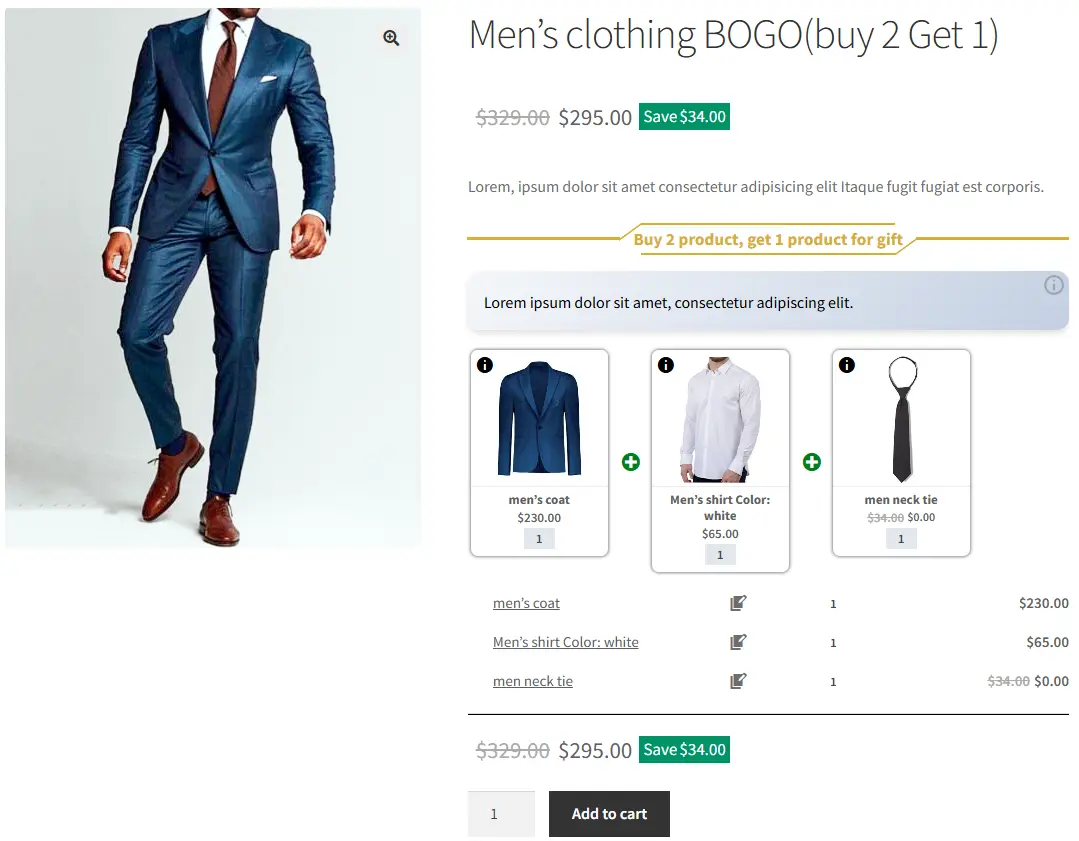
Final Result of BOGO Deals in WooCommerce
12. Publish the product, and you will see the product in the image below.
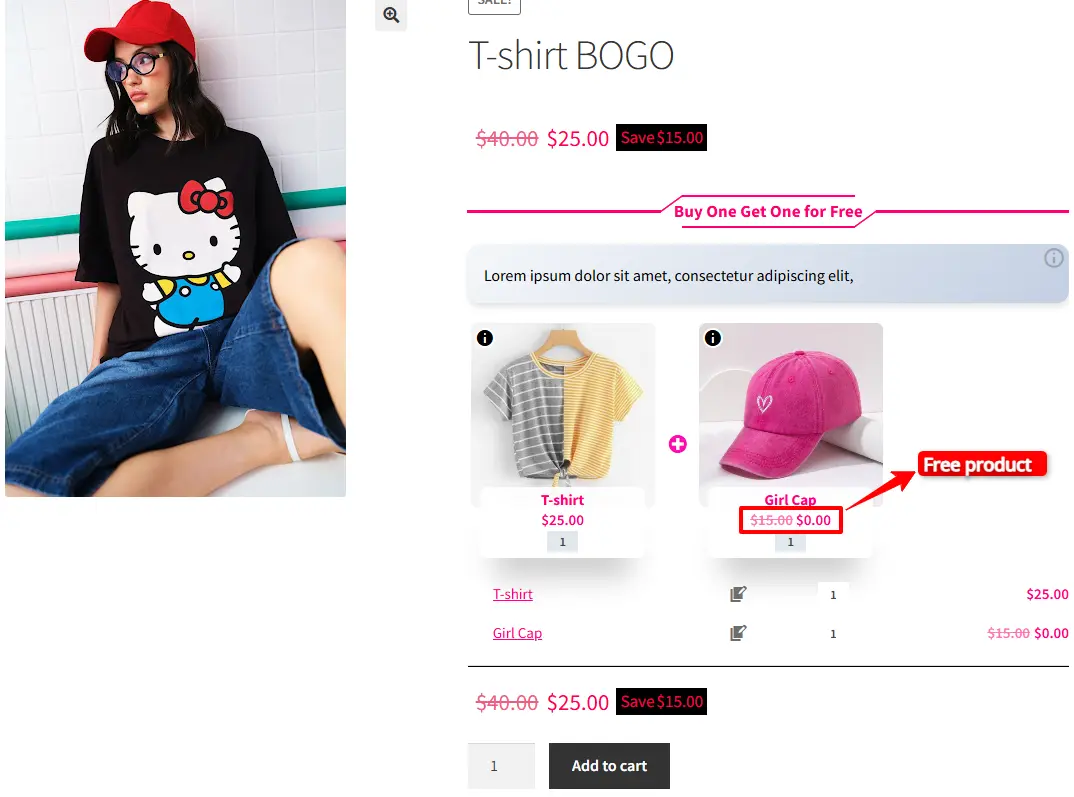
When the customer purchases it, he will only pay the t-shirt price and will get the gift product for free.
Offer Multiple Gift Products in WooCommerce
You can offer multiple gift products in WooCommerce with the Product Bundles for WooCommerce plugin.
In the BOGO deal offered in the above example, we offered one product as a gift product. So we can edit it to include multiple product items.
1. To offer multiple products as gifts, edit the “Products” field of the item and include all of the gift products there, so the customer can choose from them.
2. In the “Products” field, search for the gift products and include them as shown in the image below.
You can use one of the gift products as a default gift product or leave it empty to allow the customer to choose it.
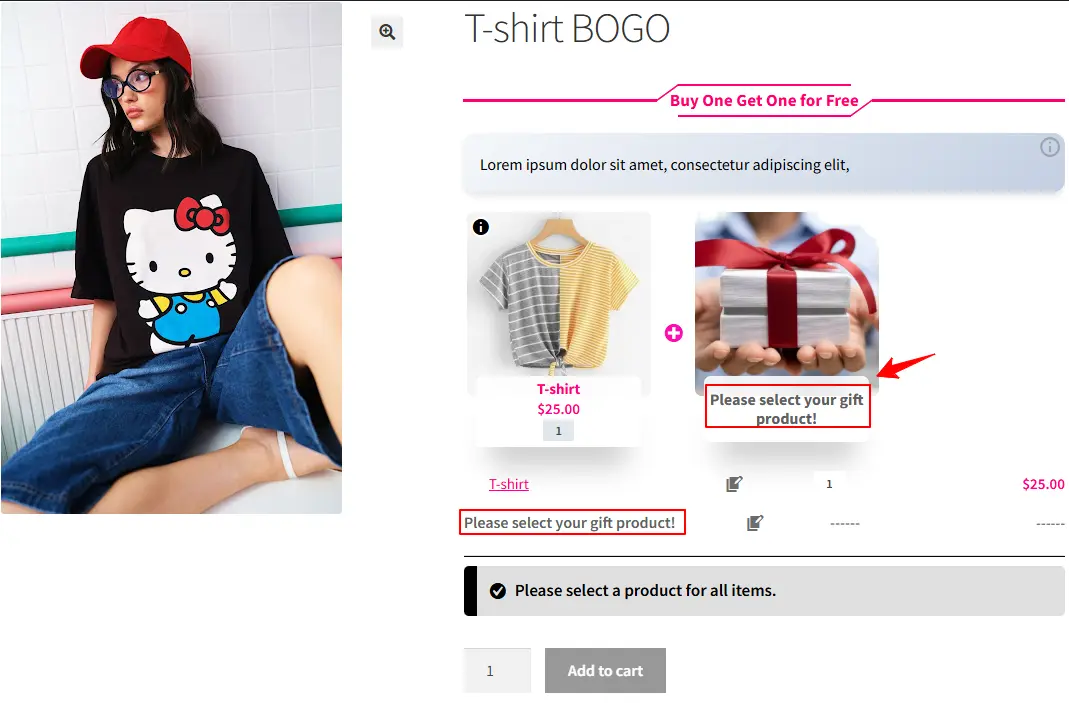
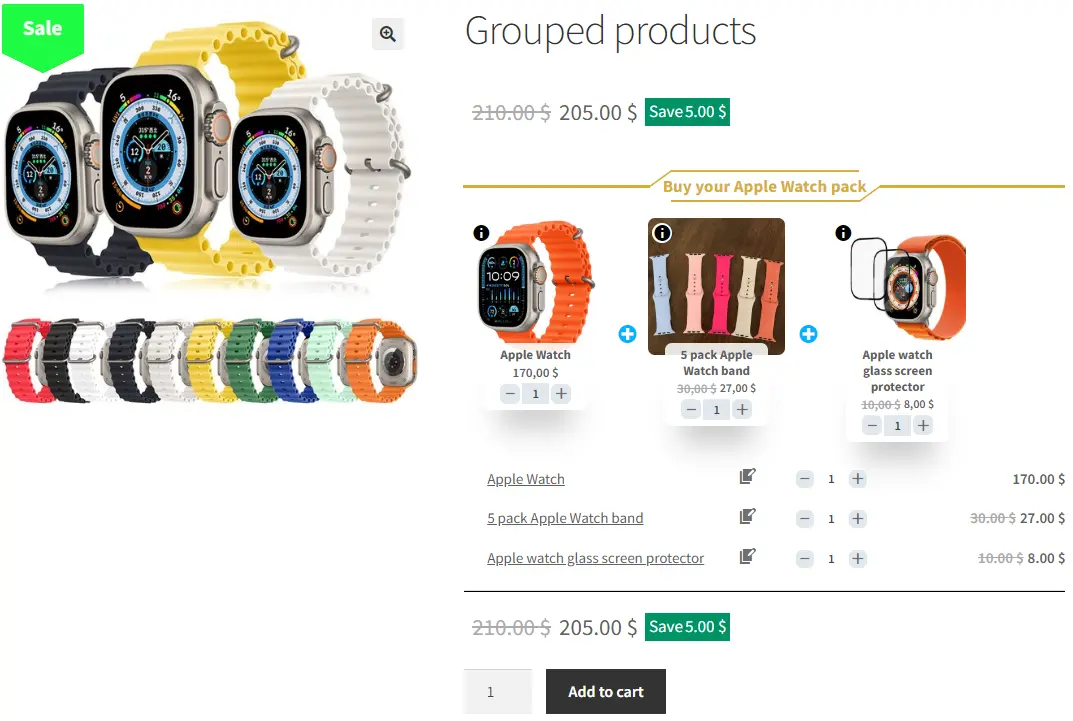
Final result of offering multiple gift products
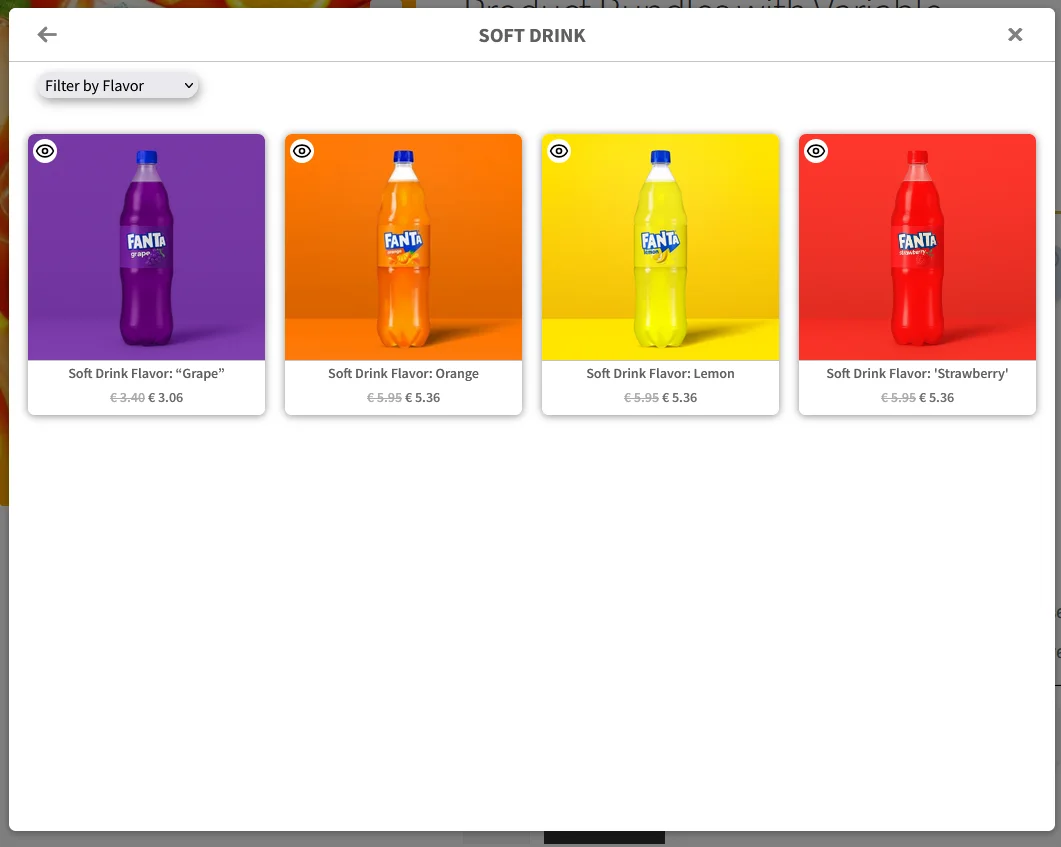
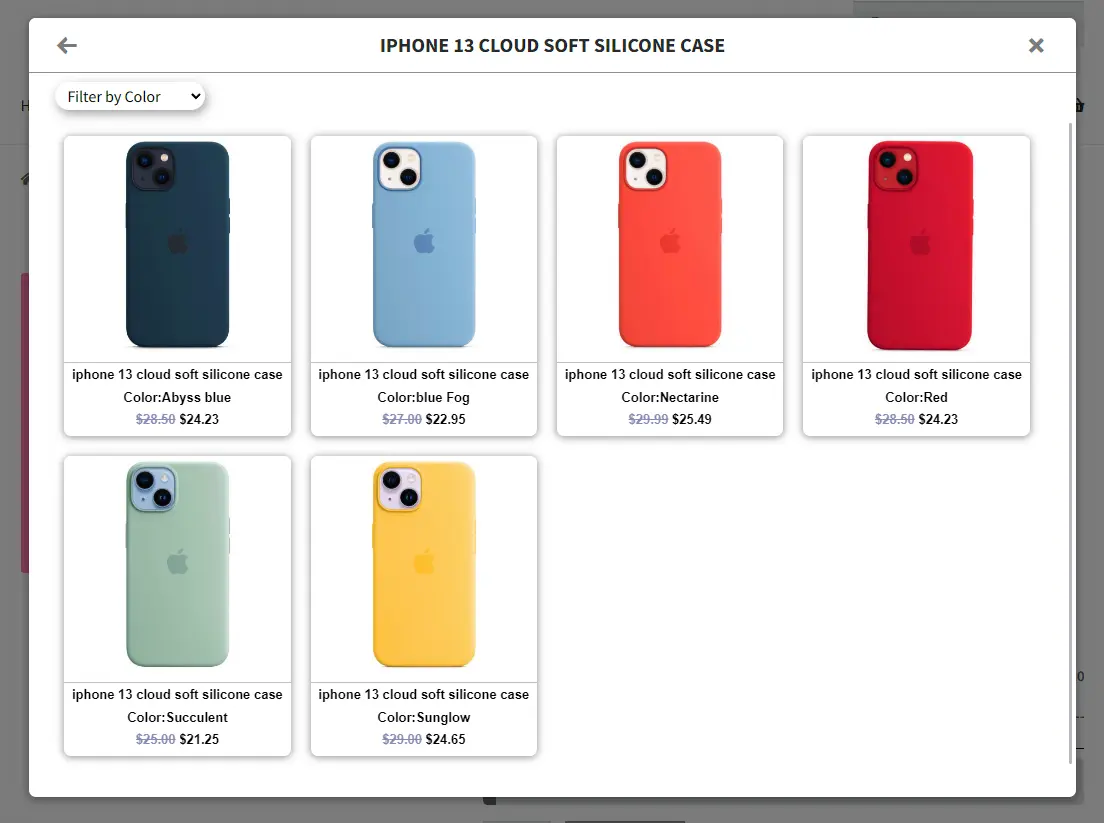
The product page will be like the image and allows the customer to choose the gift product in a popup.
Create Configurable or Personalized Products in WooCommerce
Products like food or clothes sets are examples of configurable or personalized products.
If you want to make your restaurant different from other ones, you can offer configurable foods. It allows customers to make the food as they like it.
Step 1: Create regular products
To create a configurable product, first, you should create simple or variable products that you want to include in the bundle.
Step 2: Create a Product Bundle
1. After creating regular products in WooCommerce, navigate to WooCommerce Products >> Add New to create a new product.
2. Now navigate to the Product data panel, and select “Product bundle” as the product type.
3. After selecting “Product bundle” as the product type the “Product Bundles” tab will appear in the product data panel.
Step 3: Add Items to the Bundle
4. Navigate to the “Product Bundles” tab and click on the “Add Bundle” button to add a new bundle item to the product bundle.
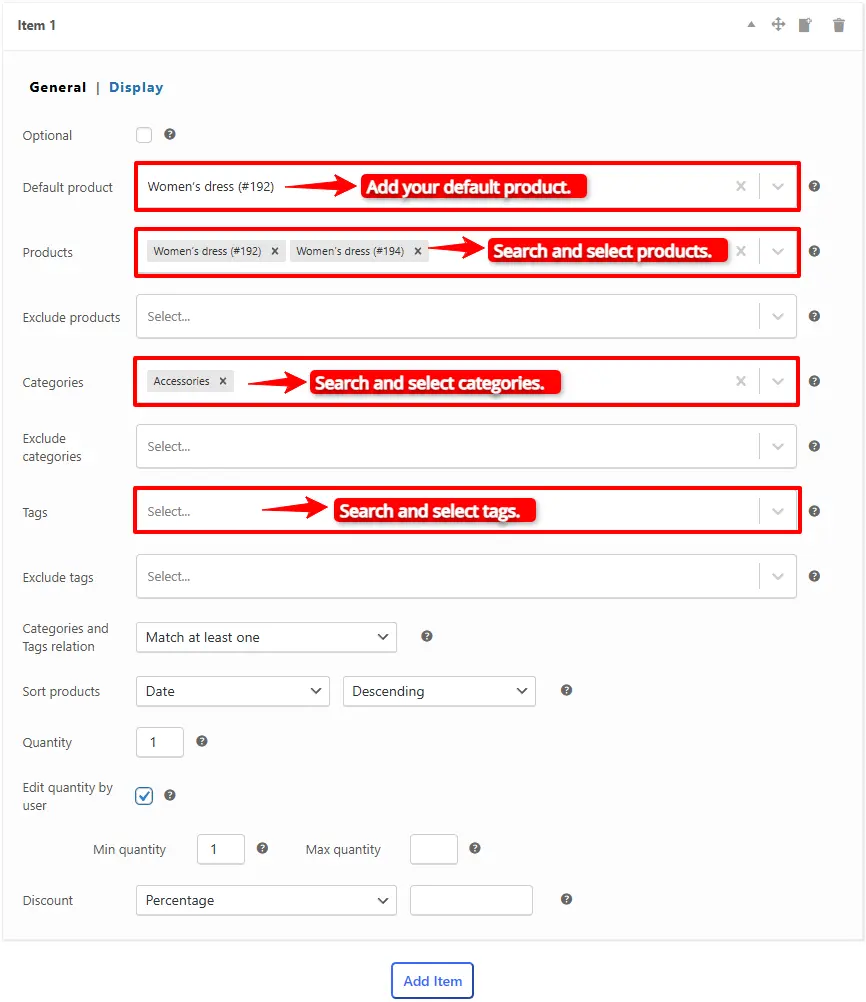
5. You can set a default product for each bundle item by selecting the default product in the “Default product” field.
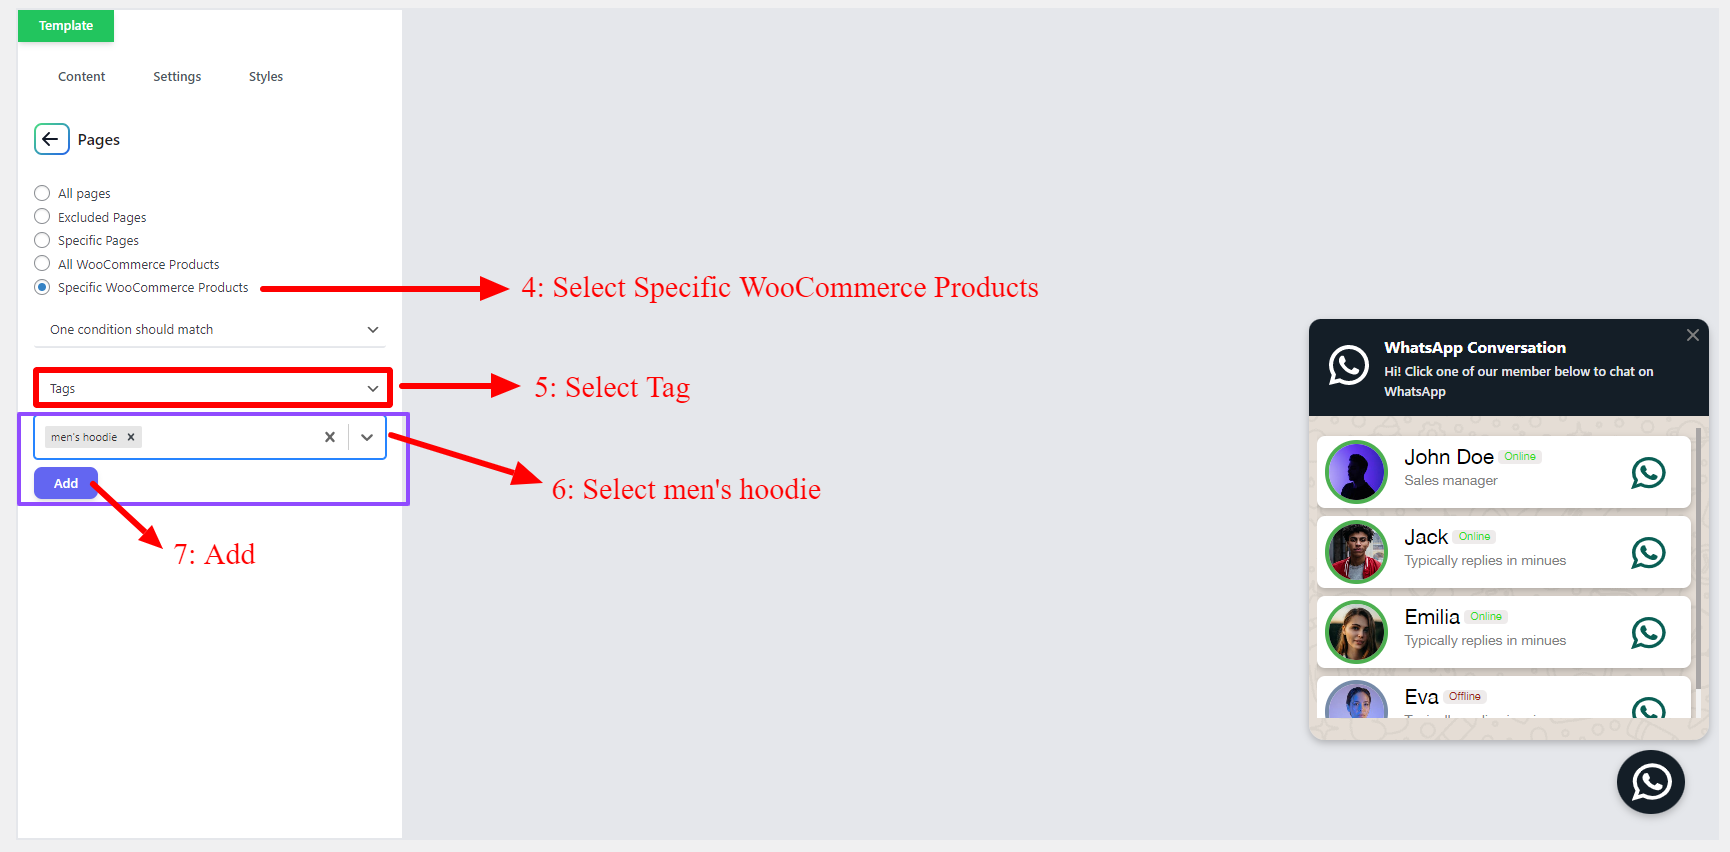
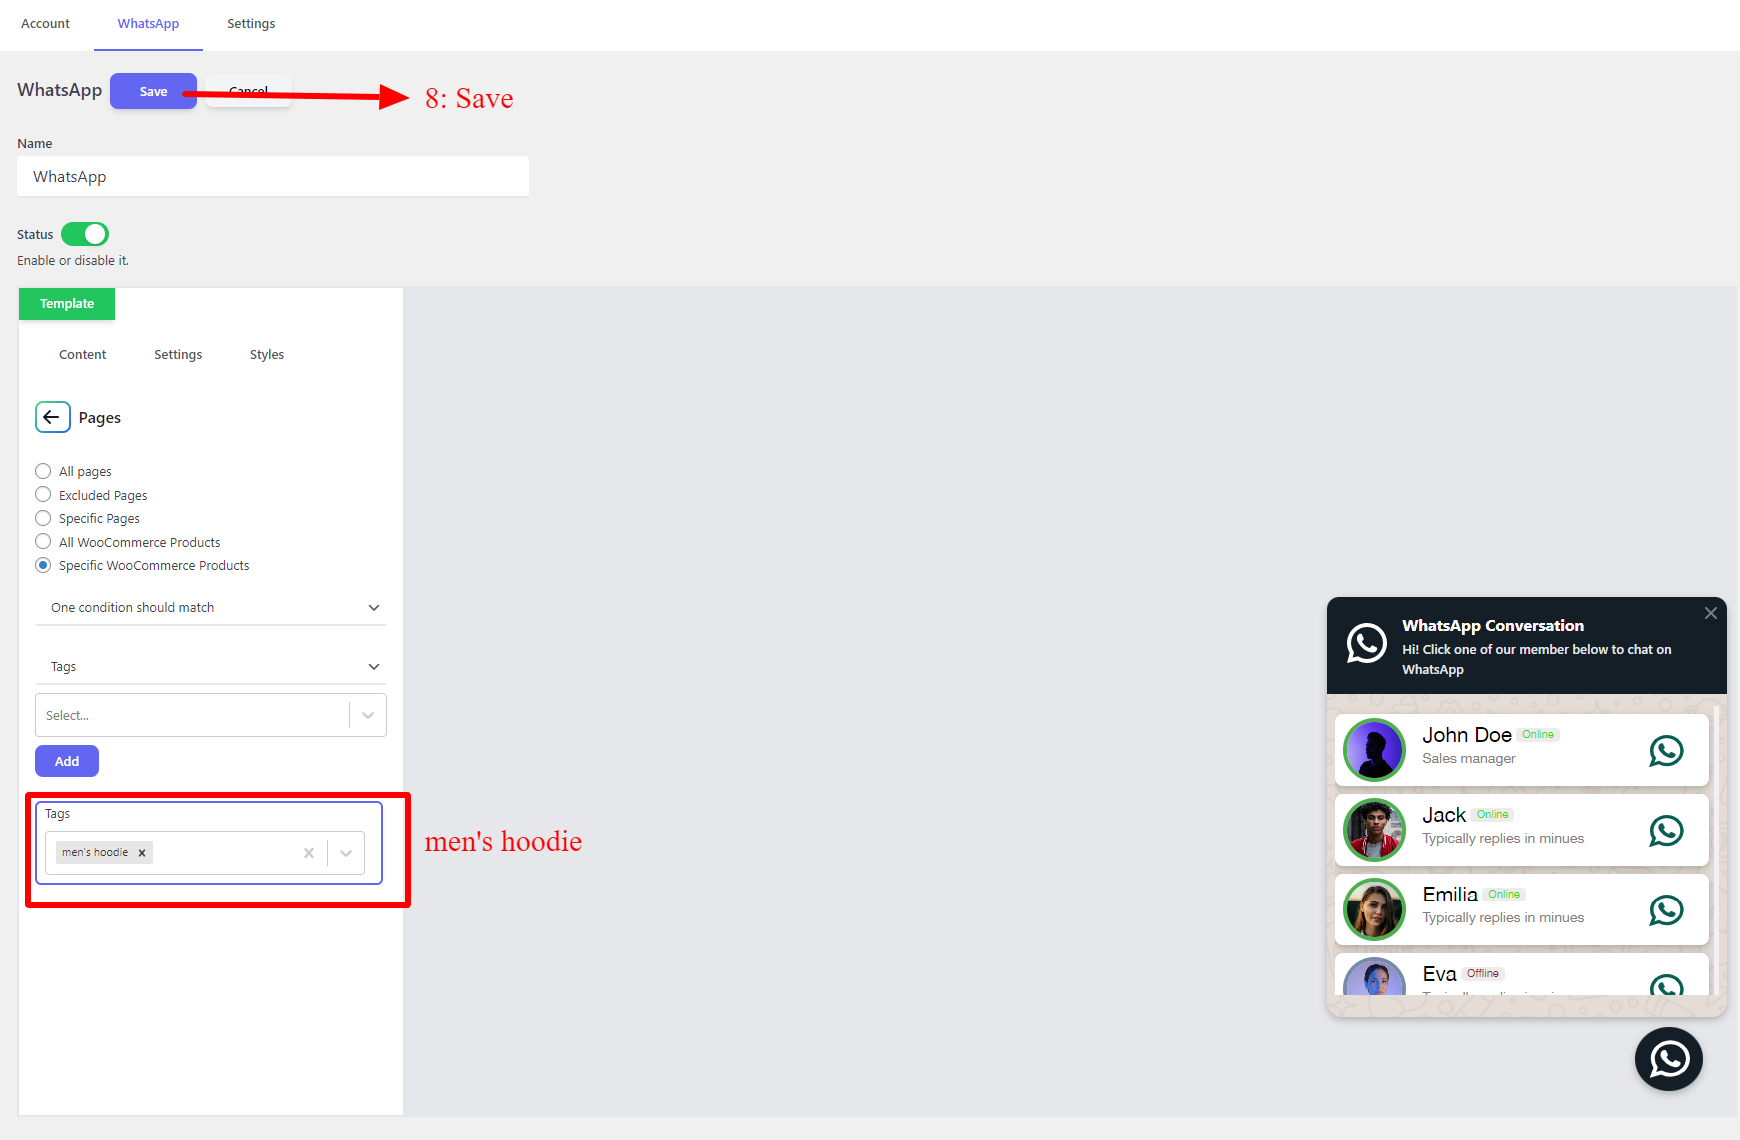
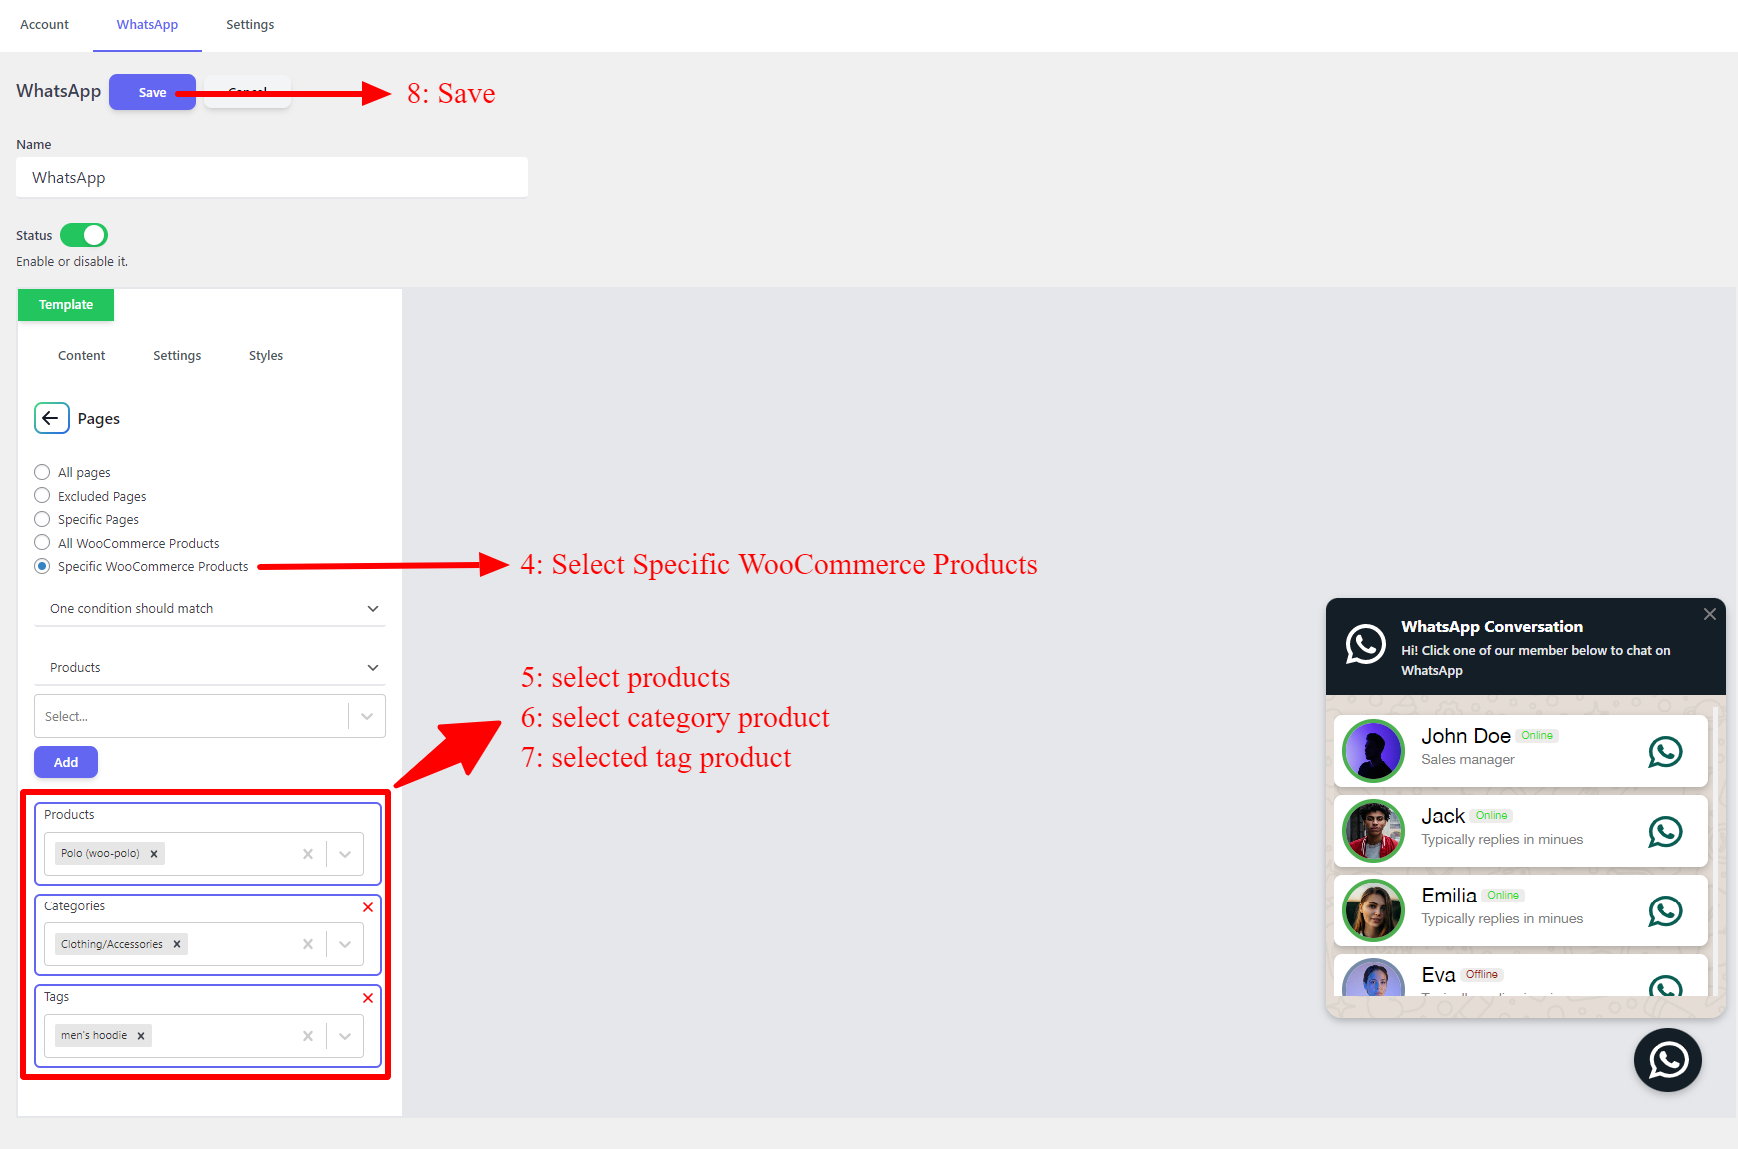
6. Now you can include other available options for that item in the “Products” field of the item. Search for the products and add them to the “Products” field.
- Or if you would like to include products from a category, you can do it with the “Categories” field of the item. You can search for categories and add them to the “Categories” field.
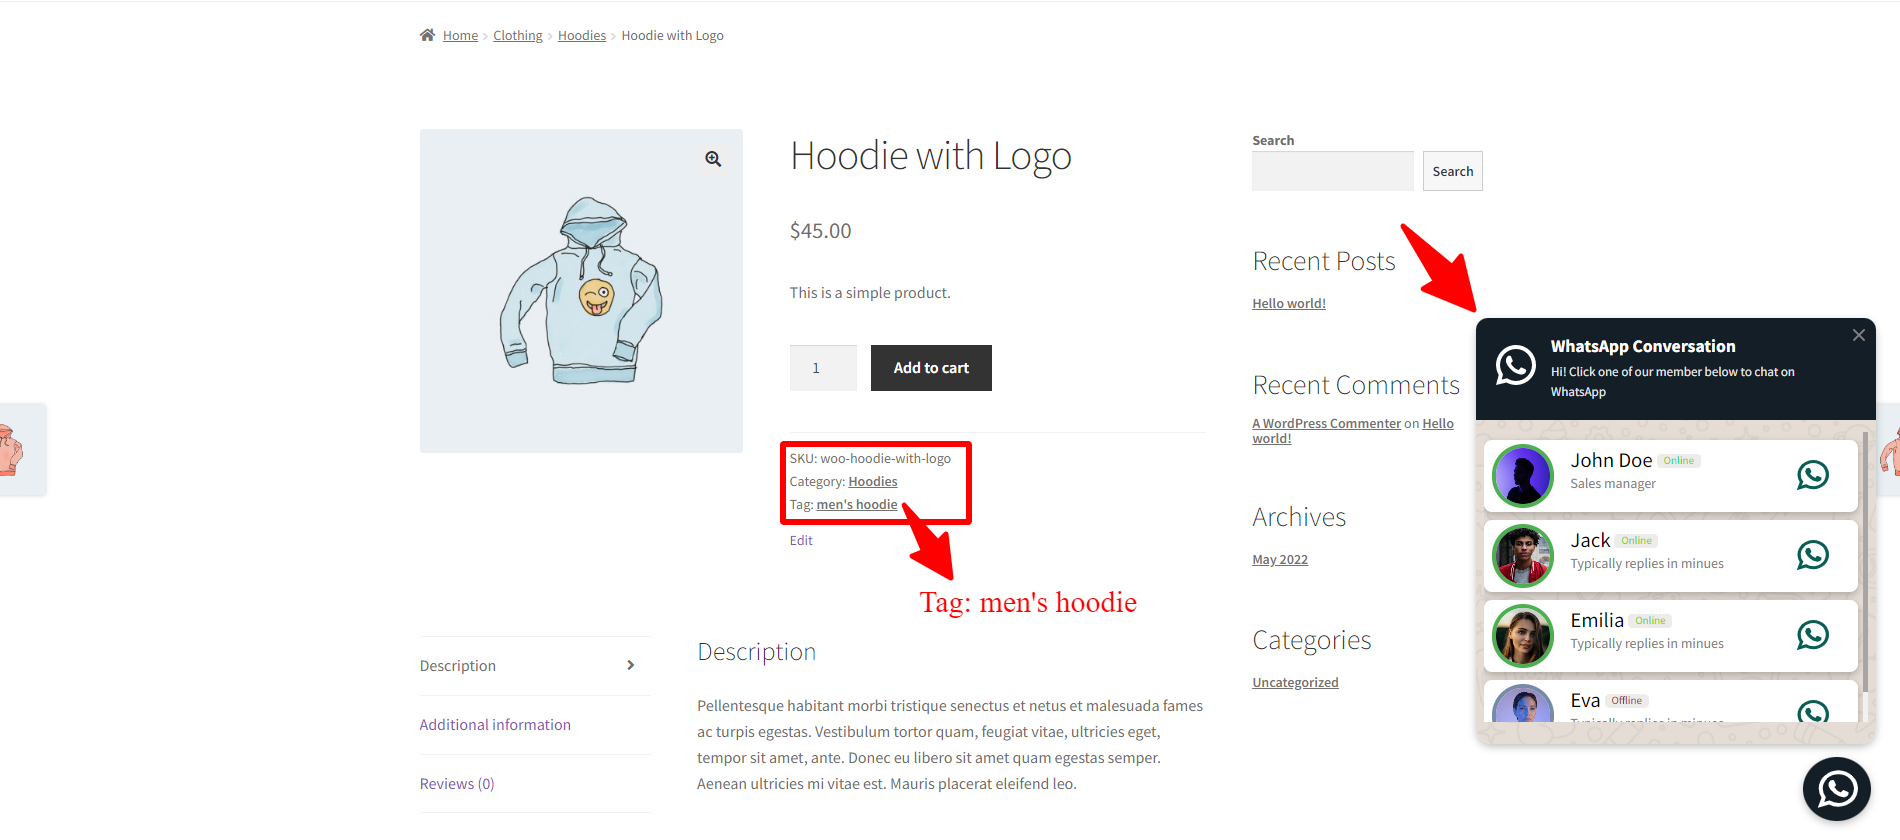
- You can do the same for the product tags and include them in the “Tags” field.
Now we have added an item to the bundle, and you can repeat the above “Add Items to the Bundle” steps to add other items to the bundle.
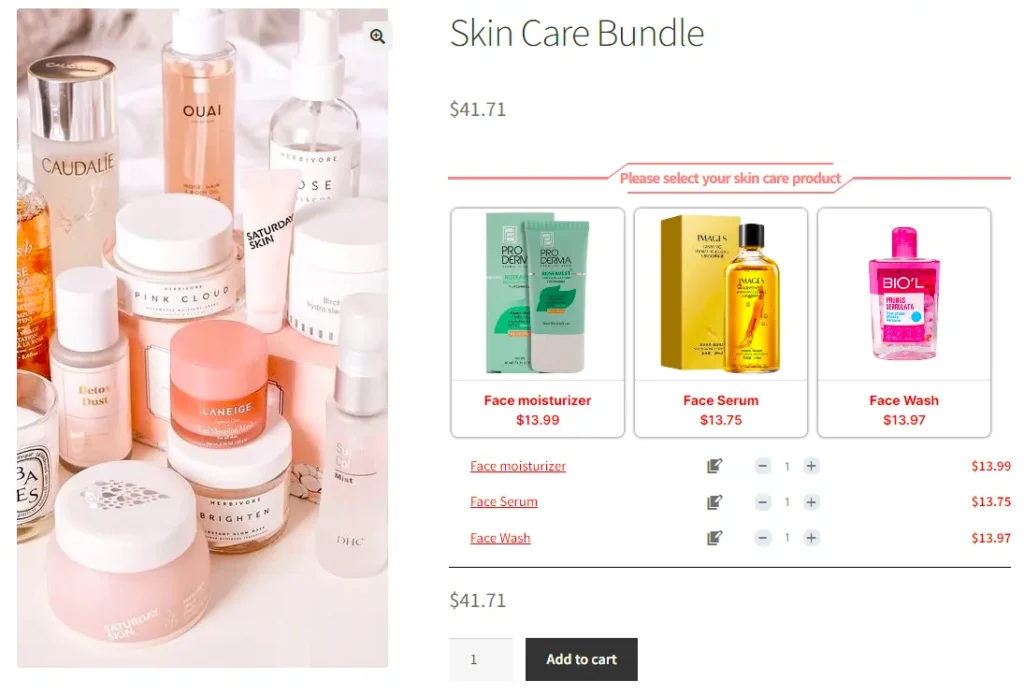
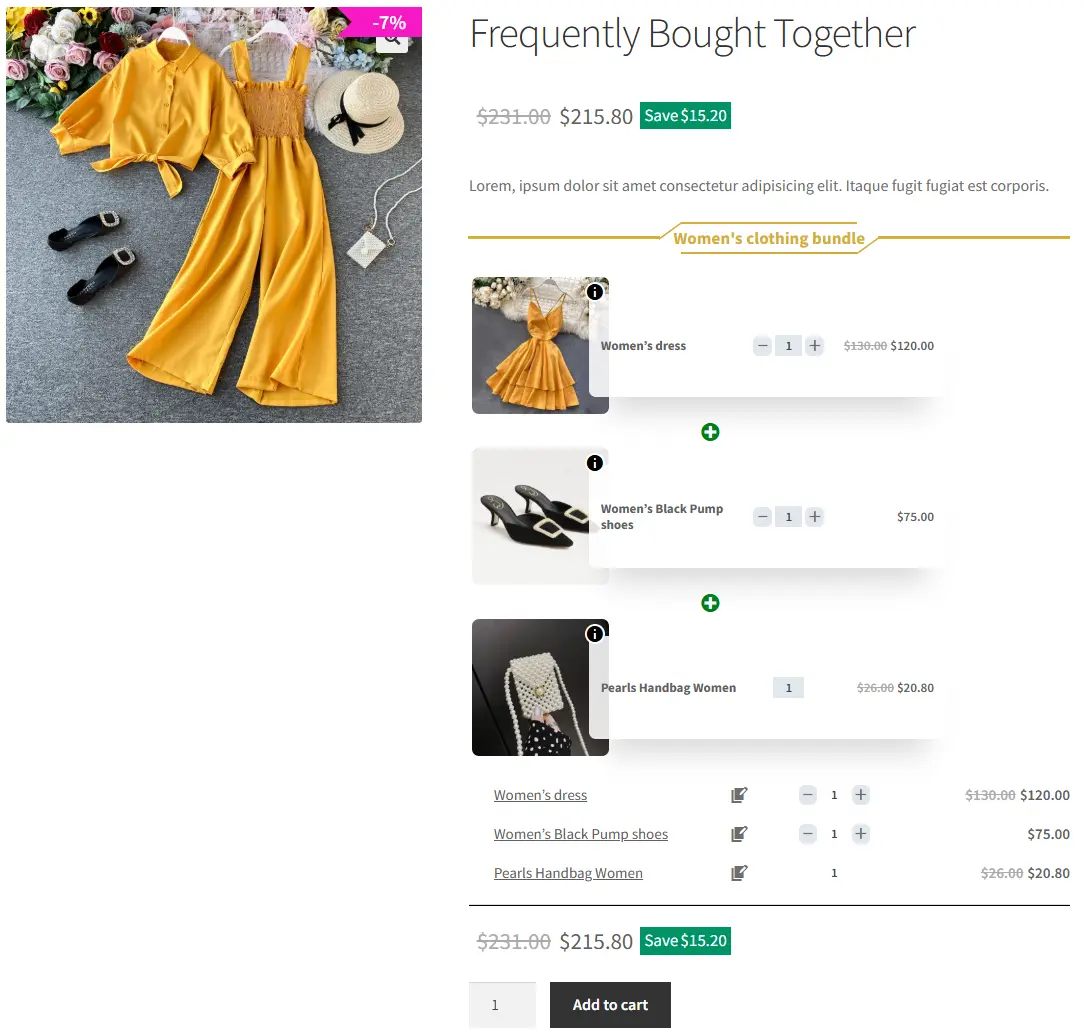
Final Result of WooCommerce Mix and Match Free Plugin
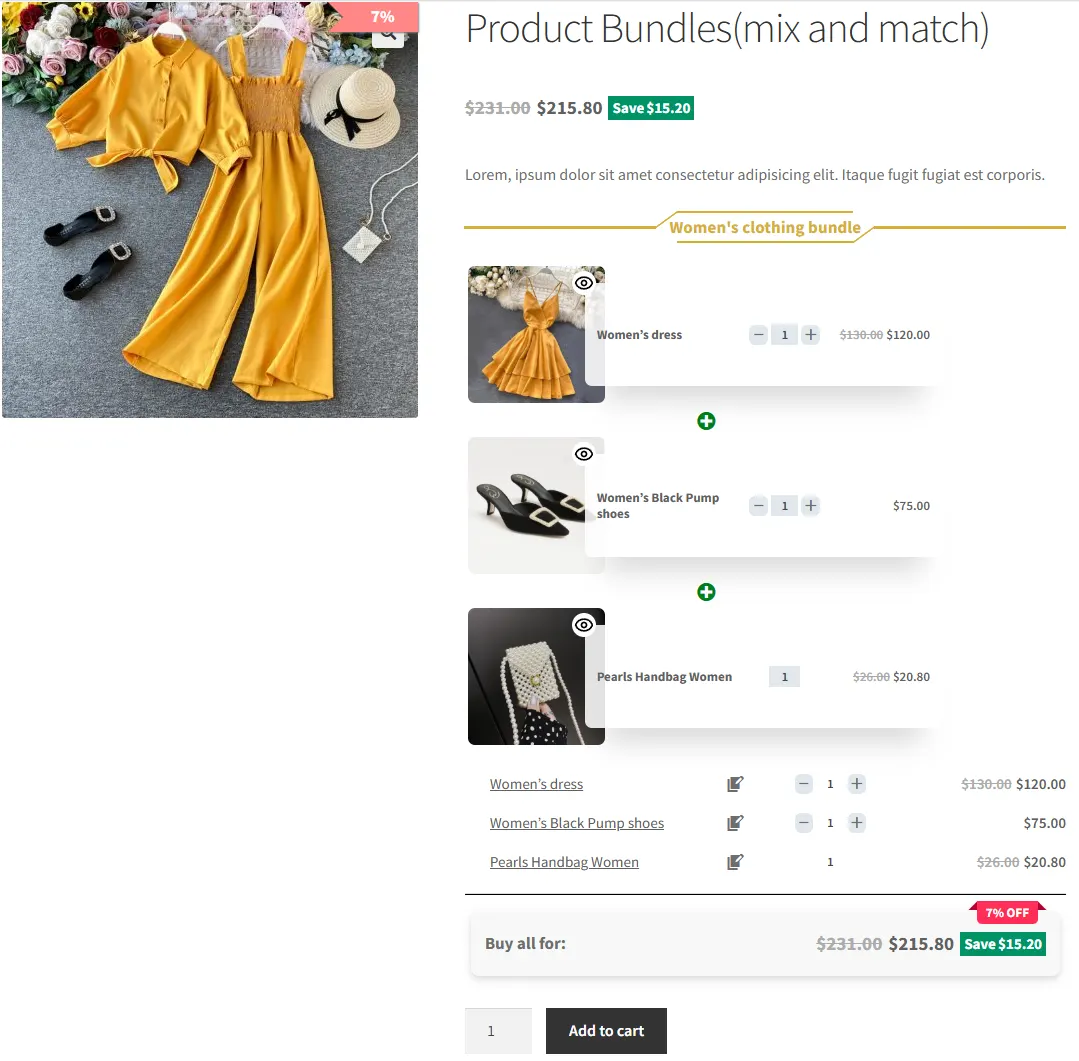
We have created a configurable Women’s clothes set that allows customers to build their own set, like the image below.
Shortcodes
The plugin has the below shortcodes and you can use them:
- [asnp_wepb_product] Use it on the product page to show the bundles.
- [asnp_wepb_product show_add_to_cart="1"] Use it on the product page to show the bundles + add to cart button.
Articles
To delve deeper into the realm of Product Bundle plugin and their applications, we invite you to explore the array of informative resources we’ve compiled in the list below. These resources promise to expand your understanding and proficiency in leveraging the potential of this plugin to the fullest:
- WooCommerce Product Bundles Free Plugin
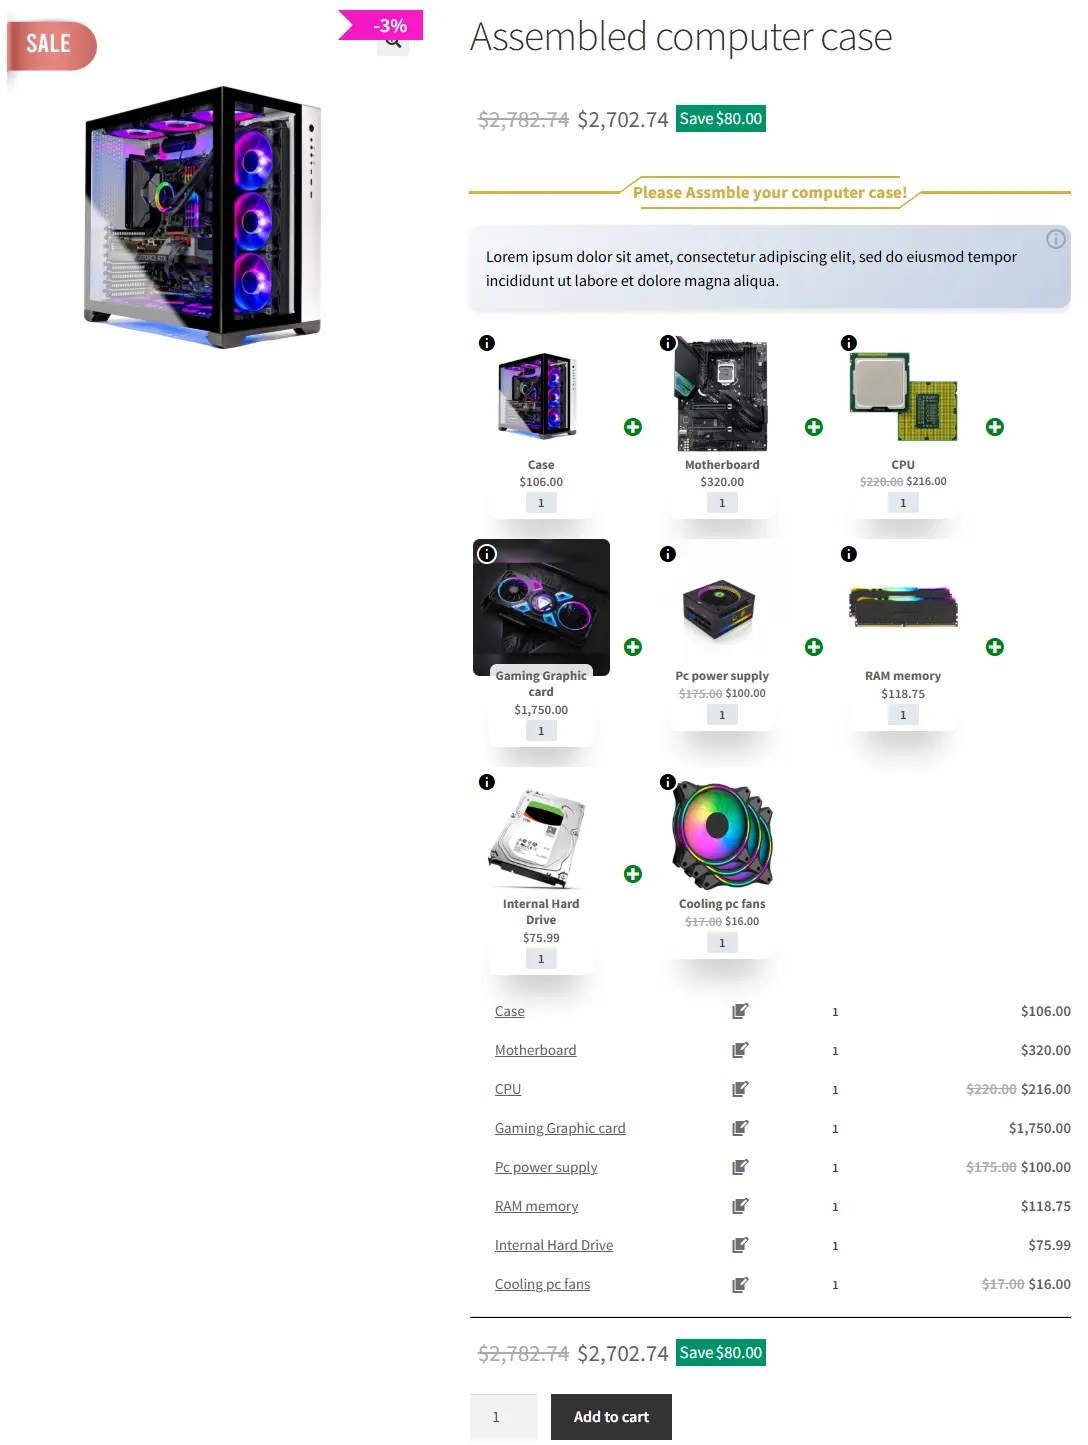
- Create Assembled Products in WooCommerce(2024)
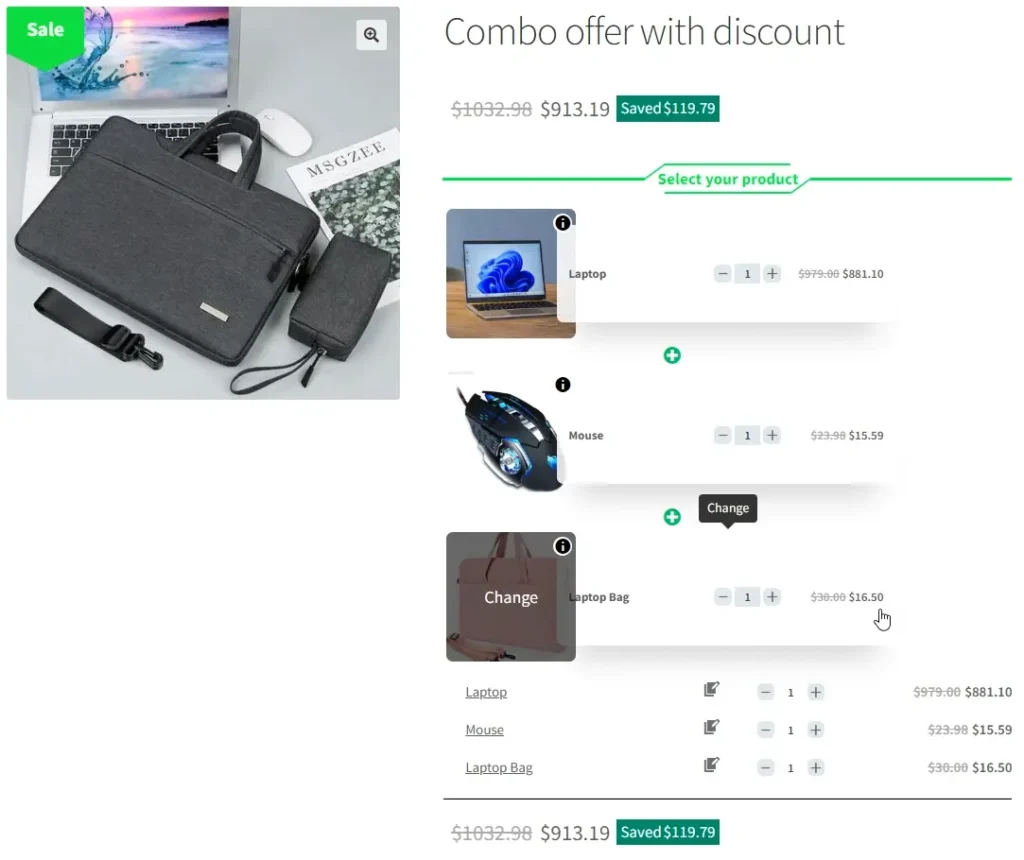
- How to Create WooCommerce Combo Offers (2024)
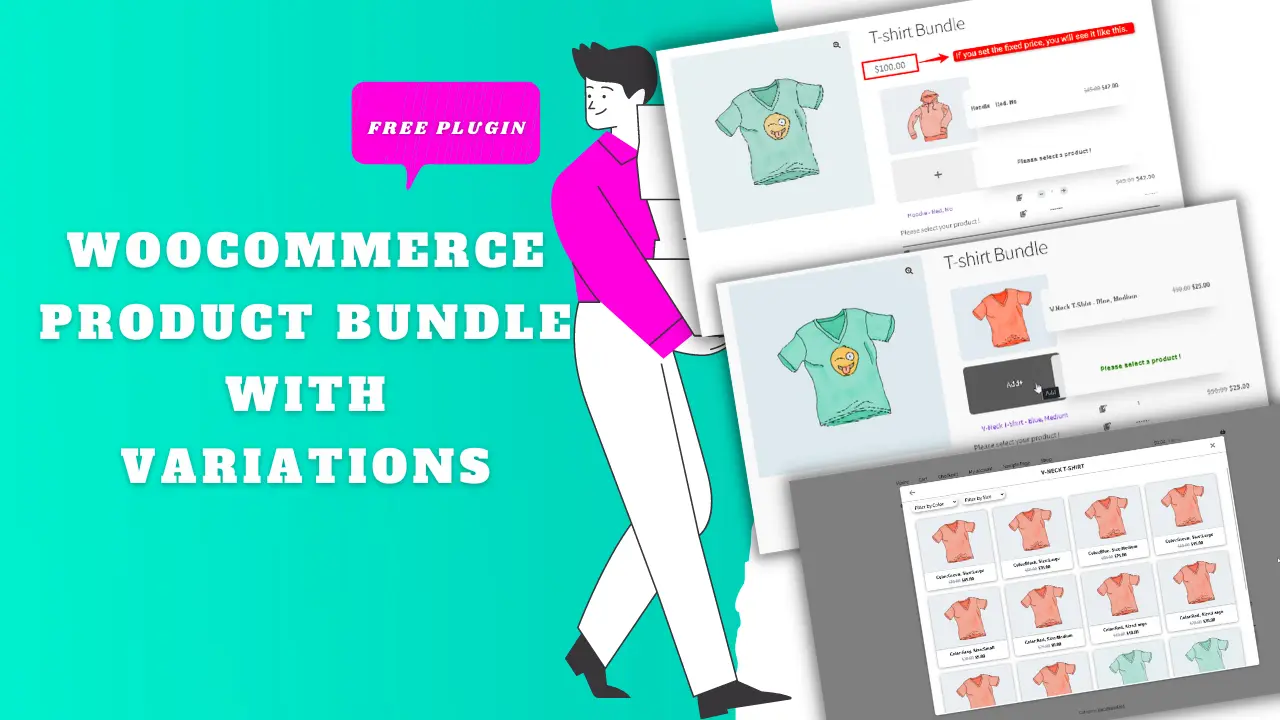
- WooCommerce Product Bundle with Variations (Free Plugin)
- Create Custom Bundles with Categories in WooCommerce Product Bundle Plugin
- How to Create WooCommerce Composite Products?
- WooCommerce Product Bundle: How to Create Dynamic and Flexible Bundles
- Gift a Product in WooCommerce with Product Bundles
- How to translate the WooCommerce product bundle
WooCommerce Mix and Match Free Plugin FAQ
A mix-and-match product allows customers to create personalized boxes. They can select products and quantities from multiple available products and mix them together to build their own one.
To create a mix and match product you can use the Easy Product Bundles for WooCommerce. The plugin allows creating simple to advanced mix and match products like bundle discounts, BOGO deals, multiple gift products, custom products, and configurable or personalized products easily.
If you want to merge products and sell them together then you can create a bundle product and sell it. You can use the Easy Product Bundles for WooCommerce plugin to create simple to advanced bundles.


