WooCommerce, with its vast array of features and plugins, has revolutionized the way online businesses operate. One of its most significant contributions is the ability to create dynamic and flexible product bundles. Gone are the days of traditional bundling methods, where customers were limited to fixed packages. With WooCommerce Product Bundle Builder plugin, businesses can now craft bundles that cater to individual preferences and offer personalized shopping experiences. In this article, we will explore the art of creating flexible bundles, the advantages they bring to businesses and customers alike, and delve into the dynamics of WooCommerce bundles.
Table of Contents
- Unleashing the Power of WooCommerce Product Bundles
- Innovative Strategies for Creating Unique Product Bundles
- Benefits of Creating Product Bundles in WooCommerce
- Taking eCommerce to the Next Level with Dynamic Bundles
- Maximizing Profitability with Dynamic and Flexible Bundles
- Breaking Free from Traditional Product Bundling Methods
- The Art of Crafting Flexible and Irresistible Bundles
- Boosting Sales and Customer Satisfaction with WooCommerce
- Creating Memorable Shopping Experiences with WooCommerce
- A Closer Look at the Dynamics of WooCommerce Bundles
- How to Create Dynamic Product Bundles in WooCommerce
- Video Tutorial
- 1. Creating Dynamic Bundles with Products
- 2. Creating WooCommerce Product Bundles with Categories
- 3. Creating WooCommerce Product Bundles with Tags
- 4. Creating Mix and Match Products in WooCommerce
- Shortcodes
- Conclusion
- FAQ
Unleashing the Power of WooCommerce Product Bundles
In the highly competitive world of eCommerce, finding new and innovative strategies to attract customers and boost sales is essential. One such strategy that has gained popularity is the use of product bundles. By combining multiple products into a single package, businesses can offer unique and enticing deals to their customers. WooCommerce, one of the leading eCommerce platforms, provides a powerful tool called Product Bundle Builder for WooCommerce that allows businesses to create dynamic and flexible bundles. In this article, we will explore the various ways businesses can leverage this tool to create memorable shopping experiences and maximize profitability.
Innovative Strategies for Creating Unique Product Bundles
When it comes to creating product bundles, businesses need to think outside the box and come up with innovative strategies to stand out from the competition. Product Bundle Builder for WooCommerce offers a range of options to help businesses create unique bundles that captivate customers. From bundling related products together to offering customizable options, businesses can experiment with different combinations to find the perfect bundle that meets the needs and desires of their target audience. By thinking creatively and exploring unconventional options, businesses can create bundles that not only boost sales but also leave a lasting impression on customers.
Benefits of Creating Product Bundles in WooCommerce
Creating product bundles in WooCommerce can offer several benefits to both customers and businesses. For customers, product bundles provide a convenient way to purchase multiple related items at once, saving time and effort. Bundles also often come at a discounted price compared to buying individual products separately, offering customers a cost-effective solution. Additionally, bundles can enhance the customer’s shopping experience by suggesting complementary items that they may not have considered otherwise. For businesses, product bundling can drive sales and increase average order value. By grouping products together, businesses can strategically promote certain items and increase their visibility. Bundles also allow businesses to clear out excess inventory or promote slow-selling items by pairing them with more popular products. Overall, creating product bundles in WooCommerce can be a win-win situation for both customers and businesses, providing convenience, savings, and opportunities for increased sales.
Taking eCommerce to the Next Level with Dynamic Bundles
Traditional product bundling methods often involve fixed bundles that offer little flexibility for customers. However, WooCommerce Product Bundles take eCommerce to the next level by allowing businesses to create dynamic bundles. With dynamic bundles, businesses can offer customers the freedom to choose from a selection of products, creating a personalized bundle that suits their specific needs. This level of customization not only enhances the shopping experience but also increases customer satisfaction and loyalty. By giving customers the power to create their own bundles, businesses can tap into the growing demand for personalized and unique shopping experiences, setting themselves apart from their competitors.
Maximizing Profitability with Dynamic and Flexible Bundles
In today’s fast-paced and ever-evolving eCommerce landscape, businesses need to adapt and find new ways to drive sales and maximize profitability. WooCommerce Product Bundles provides businesses with a powerful tool to create dynamic and flexible bundles that captivate customers and boost sales. By utilizing innovative strategies, businesses can create unique bundles that stand out from the competition and offer customers a personalized shopping experience. With the ability to create customizable bundles, businesses can tap into the growing demand for personalized products and experiences, ensuring long-term customer satisfaction and loyalty. With WooCommerce Product Bundles, the possibilities are endless, and businesses can truly unleash the power of bundling to take their eCommerce game to new heights.
Breaking Free from Traditional Product Bundling Methods
Traditional product bundling methods were often rigid and lacked the flexibility required to meet the diverse needs of customers. With WooCommerce, businesses can break free from these limitations. By offering dynamic bundles, businesses can give customers the freedom to select from a wide range of products and create their own personalized bundles. This flexibility allows customers to choose products that align with their tastes, which in turn increases customer satisfaction and encourages repeat purchases.
The Art of Crafting Flexible and Irresistible Bundles
Crafting flexible and irresistible bundles is an art that businesses can master with WooCommerce. Instead of offering pre-determined packages, businesses can use WooCommerce to create bundles that cater to different price points and customer preferences. For example, a clothing store can offer a bundle where customers can select any three items from a range of tops, bottoms, and accessories. This not only encourages customers to explore more products but also increases the chances of upselling and cross-selling.
Boosting Sales and Customer Satisfaction with WooCommerce
WooCommerce product bundles provide a win-win situation for both businesses and customers. By offering flexible bundles, businesses can boost their sales and revenue. Customers are more likely to make a purchase when they have the freedom to customize their bundles, leading to higher conversion rates. Additionally, the ability to create customized bundles allows businesses to tap into niche markets and cater to specific customer segments. This personalized approach enhances customer satisfaction, leading to increased customer loyalty and positive word-of-mouth.
Creating Memorable Shopping Experiences with WooCommerce
Creating memorable shopping experiences with product bundles is a powerful strategy that can enhance customer satisfaction and loyalty. By combining complementary products or services into a cohesive bundle, retailers can offer customers a convenient and value-packed shopping experience. These bundles can cater to specific customer needs or preferences, helping them save time and effort in selecting individual items. Moreover, product bundles can also introduce customers to new products or encourage them to try different variations, expanding their product knowledge and increasing their engagement with the brand. Overall, by providing unique and tailored shopping experiences through product bundles, retailers can leave a lasting impression on customers, fostering long-term relationships and driving repeat business.
A Closer Look at the Dynamics of WooCommerce Bundles
WooCommerce Bundles provide a versatile solution for businesses looking to sell products with added value or convenience. Taking a closer look at the dynamics of WooCommerce Bundles reveals how this feature enhances the customer experience and boosts sales. By allowing customers to purchase multiple related products as a bundle, businesses can offer discounts, create curated packages, and encourage upselling. This not only increases the average order value but also improves customer satisfaction by simplifying the purchasing process. Additionally, WooCommerce Bundles provide businesses with the flexibility to customize bundle configurations, pricing, and promotions, catering to the diverse needs and preferences of their target audience. Overall, the dynamics of WooCommerce Bundles contribute to a seamless and engaging shopping experience, resulting in higher conversions and customer loyalty.
How to Create Dynamic Product Bundles in WooCommerce
To create a dynamic product bundle in WooCommerce, we will use the Product Bundle Builder for WooCommerce plugin.
With the Product Bundle Builder for WooCommerce, you can create bundles with products, categories, and tags. Also, you can apply a discount or pricing on each item.
Video Tutorial
1. Creating Dynamic Bundles with Products
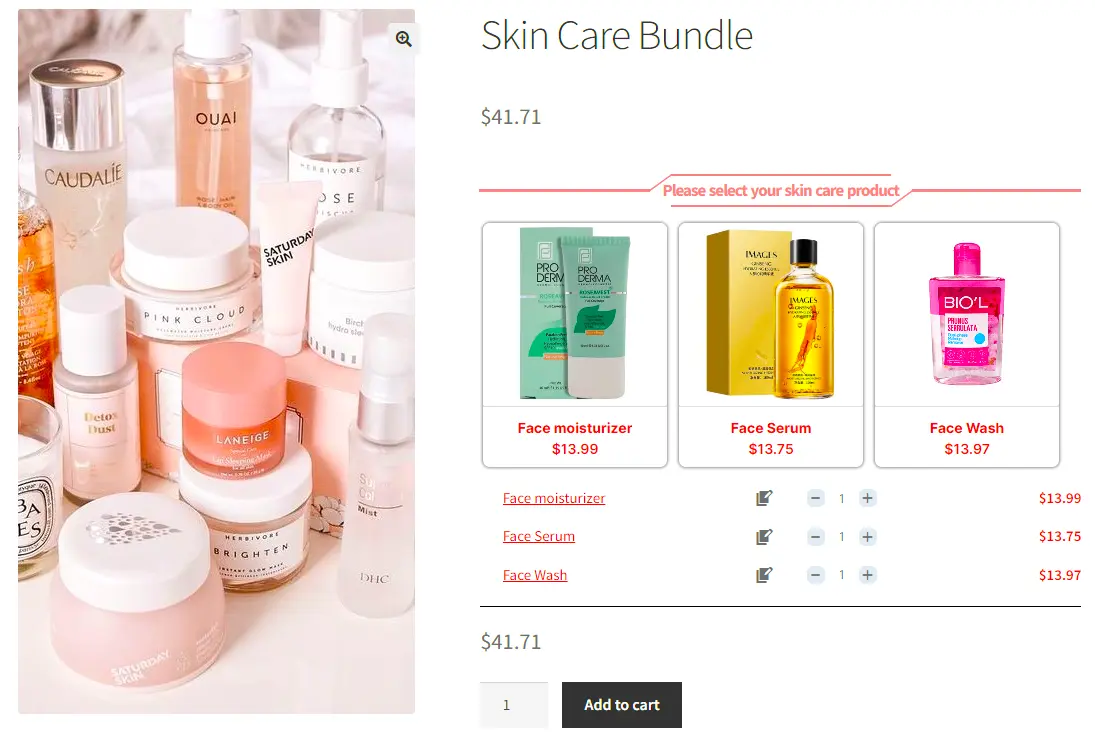
The first way of offering dynamic product bundles in WooCommerce is to use products for each bundle item. The user can select a product from multiple available products for each bundle item.
Step 1: Creating a Product in WooCommerce
Follow the below steps to add a new product bundle in WooCommerce.
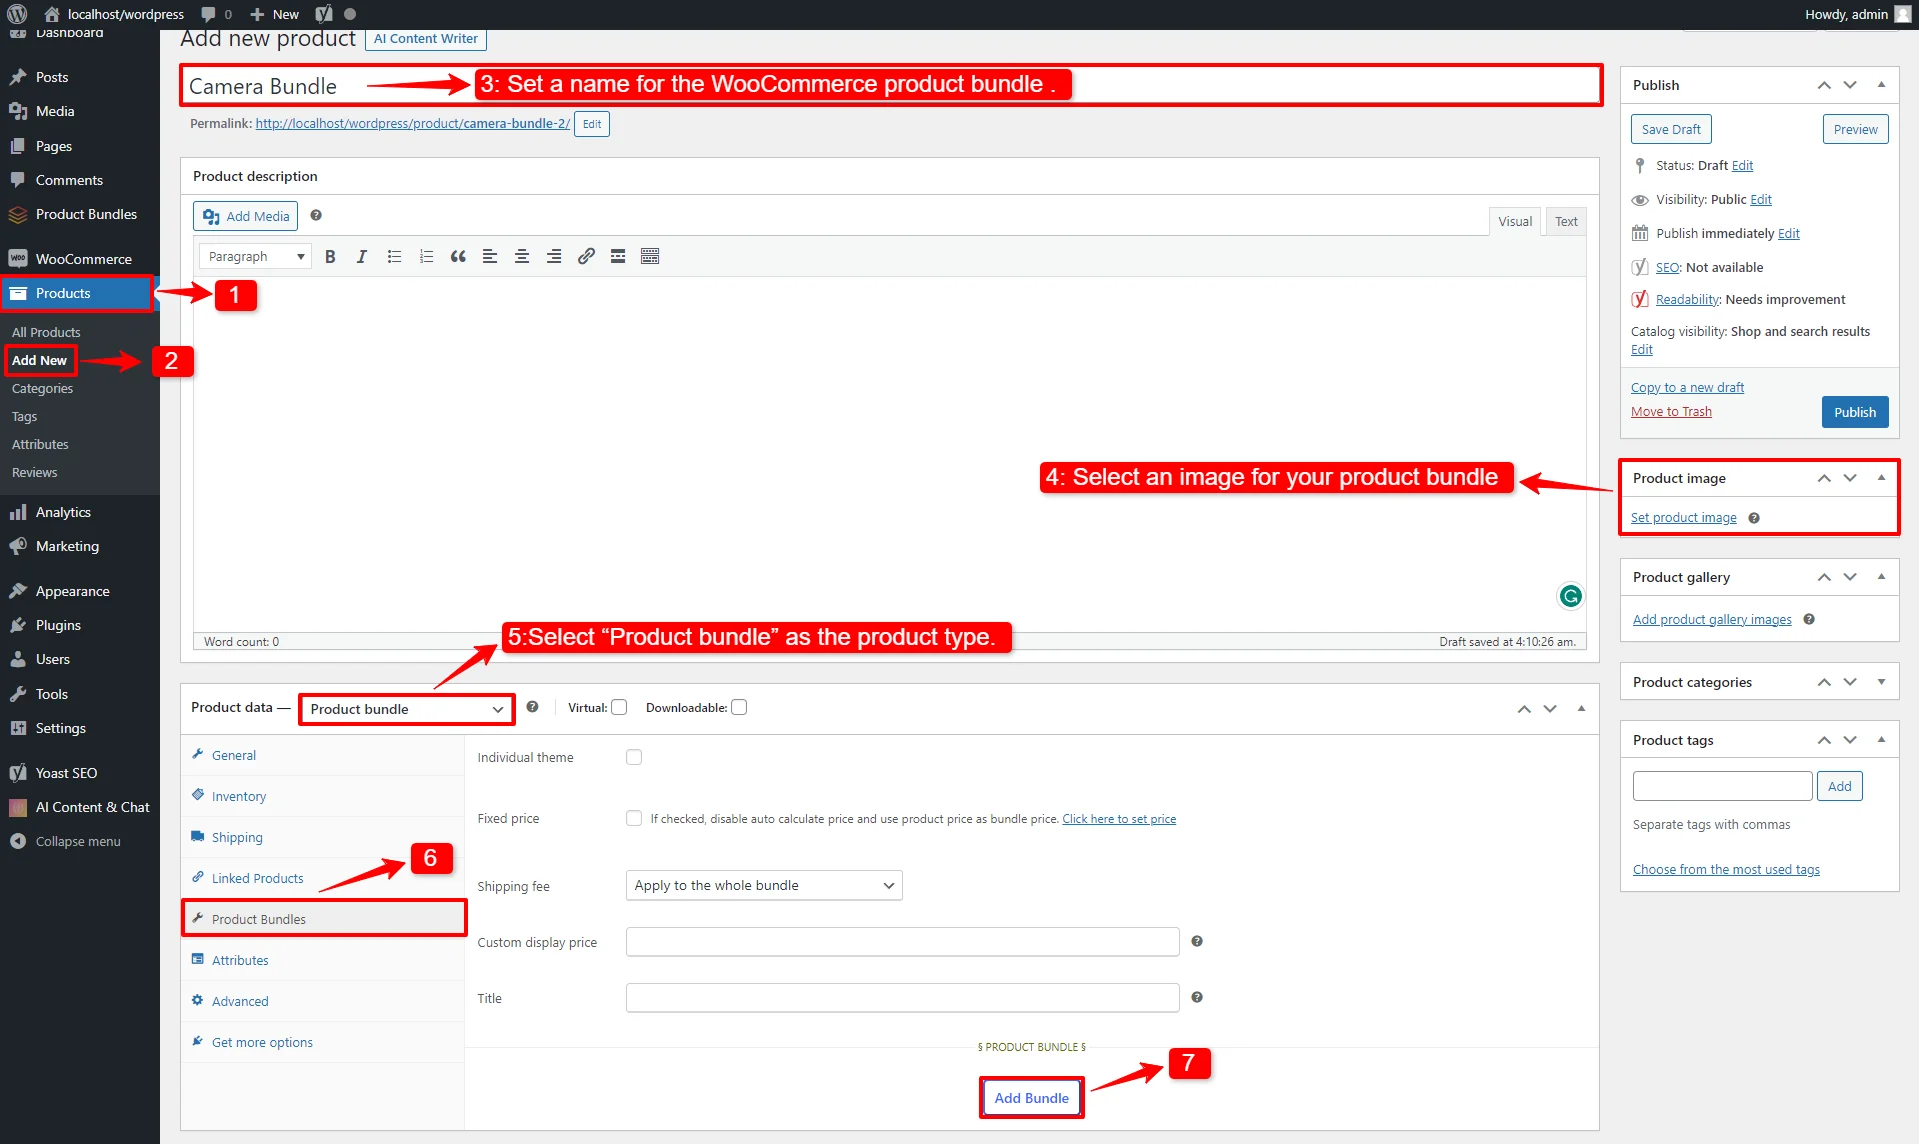
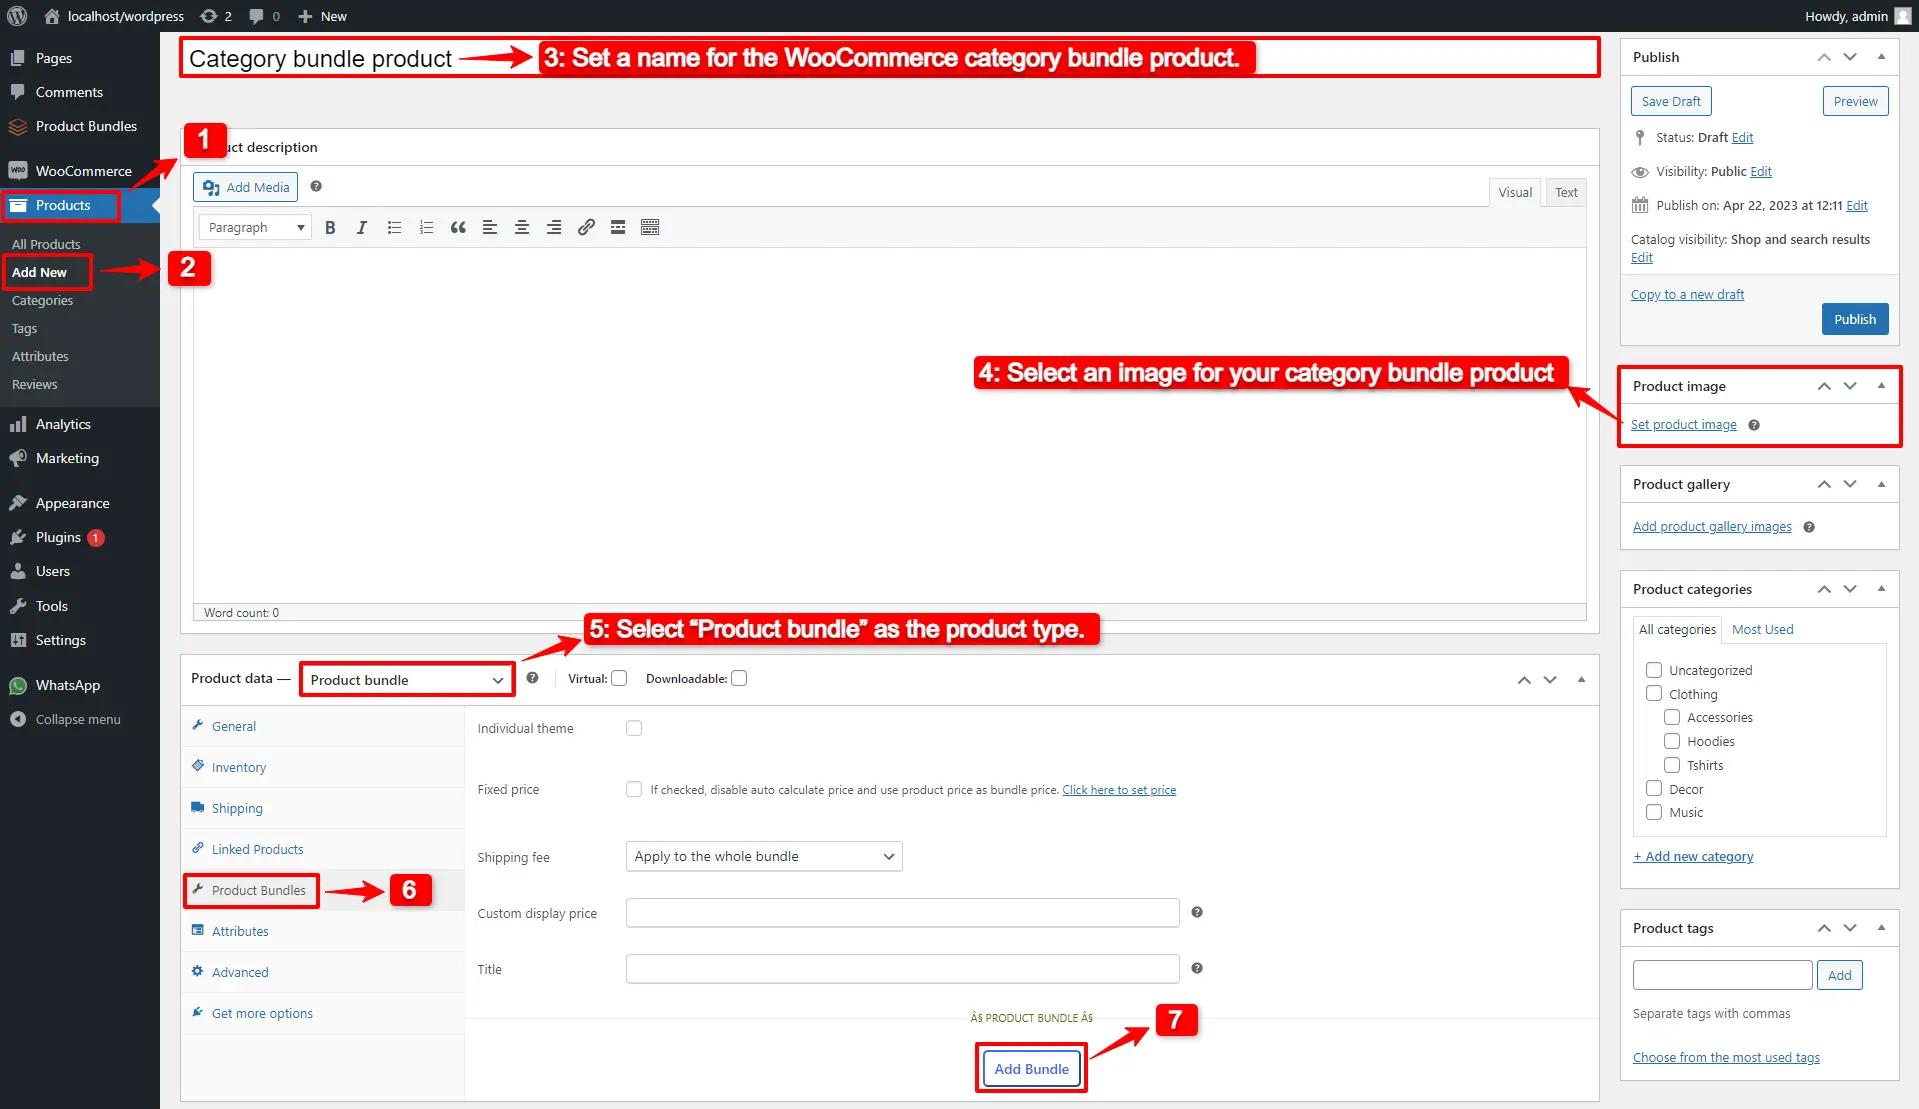
- Navigate to WooCommerce “Products”.
- Click on “Add New” to create a new product.
- Set a name for the WooCommerce product bundle .
- Click on “Set product image” from the right sidebar and select an image for your product bundle.
- Now navigate to the Product data panel, and select “Product bundle” as the product type.
- After selecting “Product bundle” as the product type the “Product Bundles” tab will appear in the product data panel.
- Navigate to the “Product Bundles” tab and click on the “Add Bundle” button to add a new bundle item.
Step 2: Adding Bundle Items
Now you should add as many bundle items that you want to the product bundle, and then configure them by following the below steps.
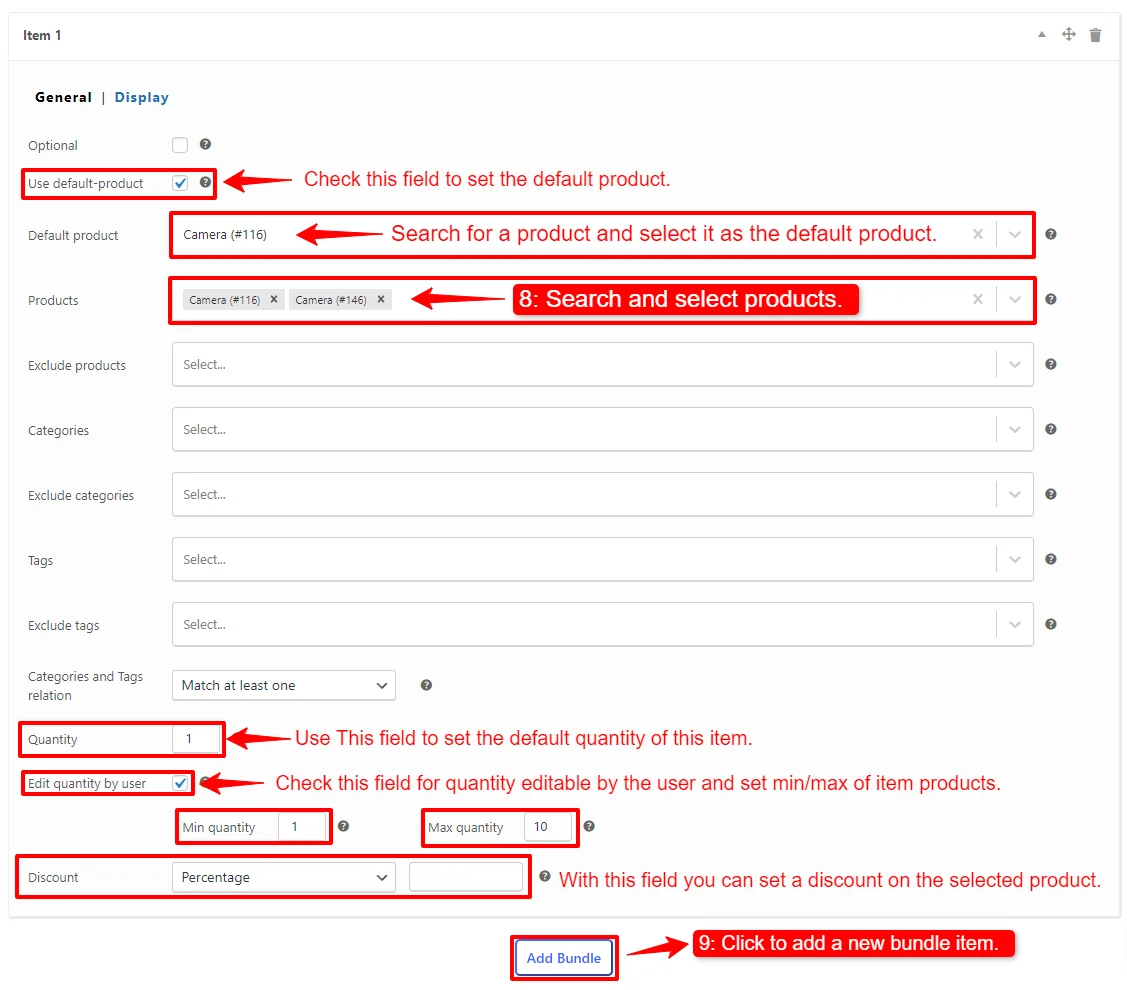
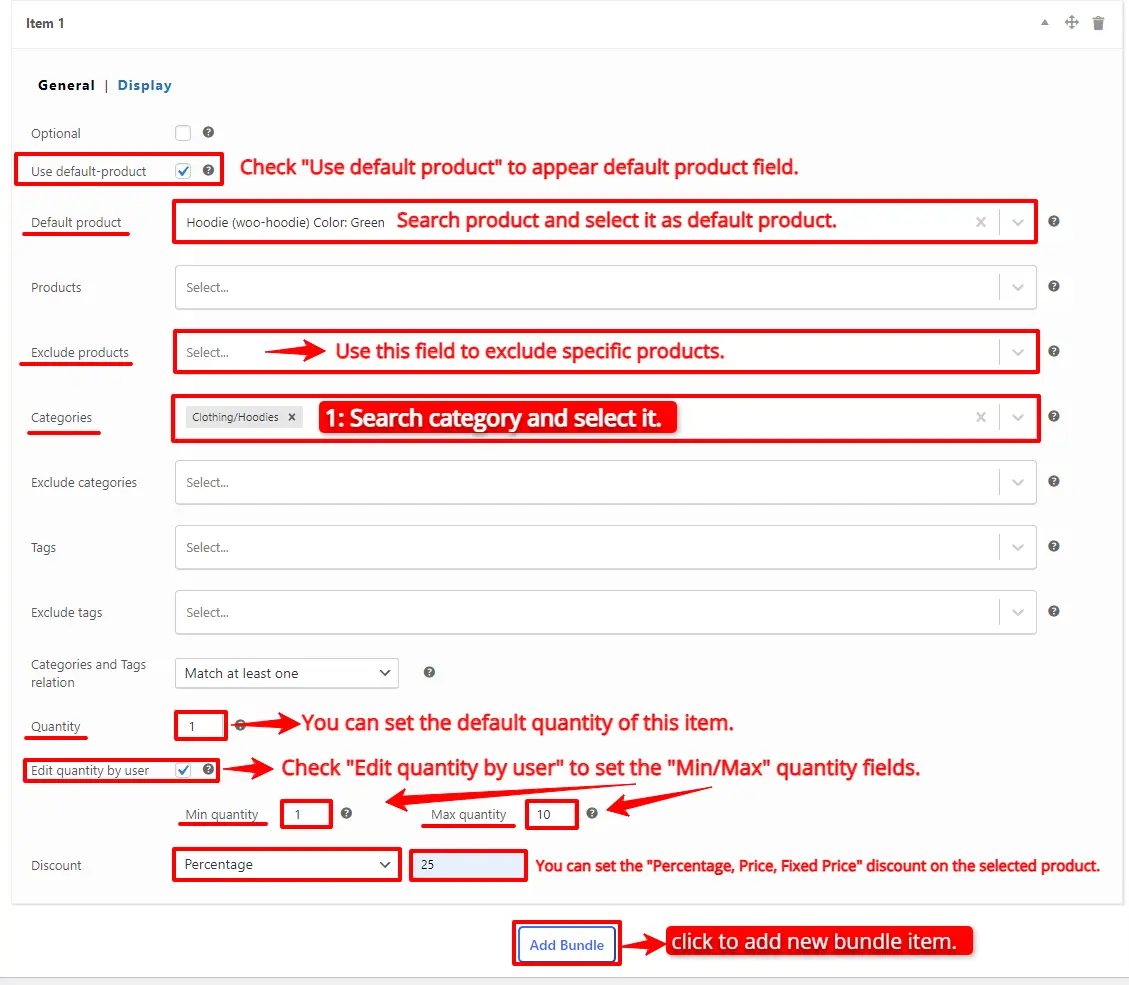
- You can set a “Default Product” for the bundle item by selecting “Use default product” and setting a product to the “Default product” field.
- In the “Products” field, you can include as many products as you want. Including more products gives more flexibility and user can choose a desired product from the available ones.
- Use the “Quantity” field to set the default quantity of this item.
- If the quantity is editable by the user then select “Edit quantity by user” and set the “Min/Max” quantity fields.
- With the “Discount” field you can set a “Percentage, Price, Fixed Price” discount on the selected product.
Repeat Step 2, to add as many items as you want to the bundle and configure them.
Step 3: Price of Product Bundle
The WooComerce Product Bundle plugin offers two pricing strategies.
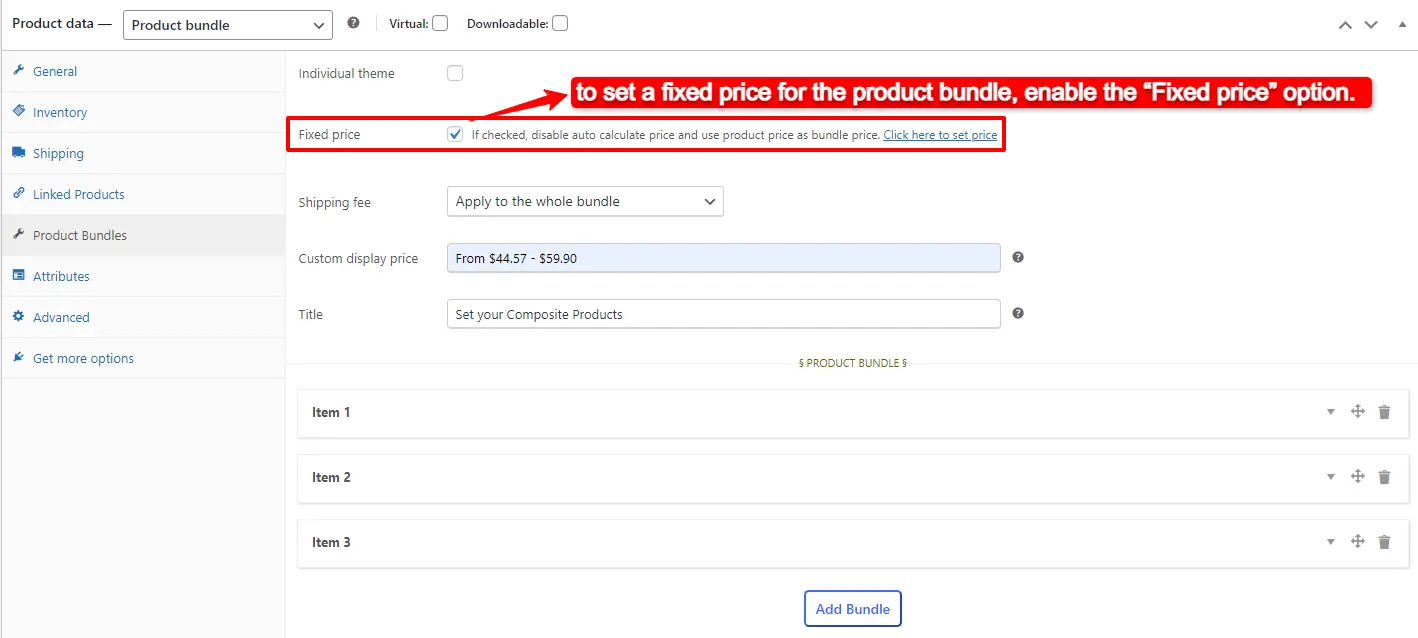
- A fixed price for the whole bundle product
- Auto calculate the price based on selected products
Fixed Price
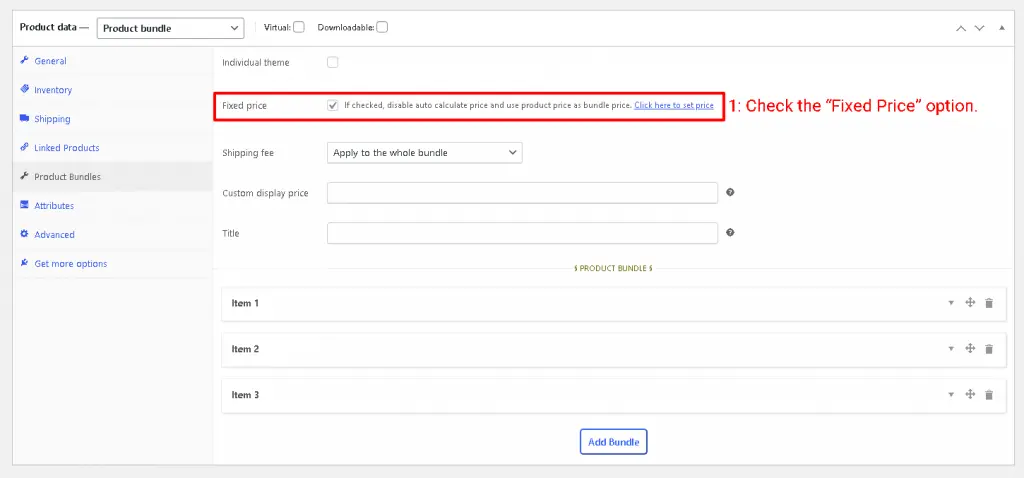
If you would like to set a fixed price for the whole bundle product, then check the “Fixed Price” option.
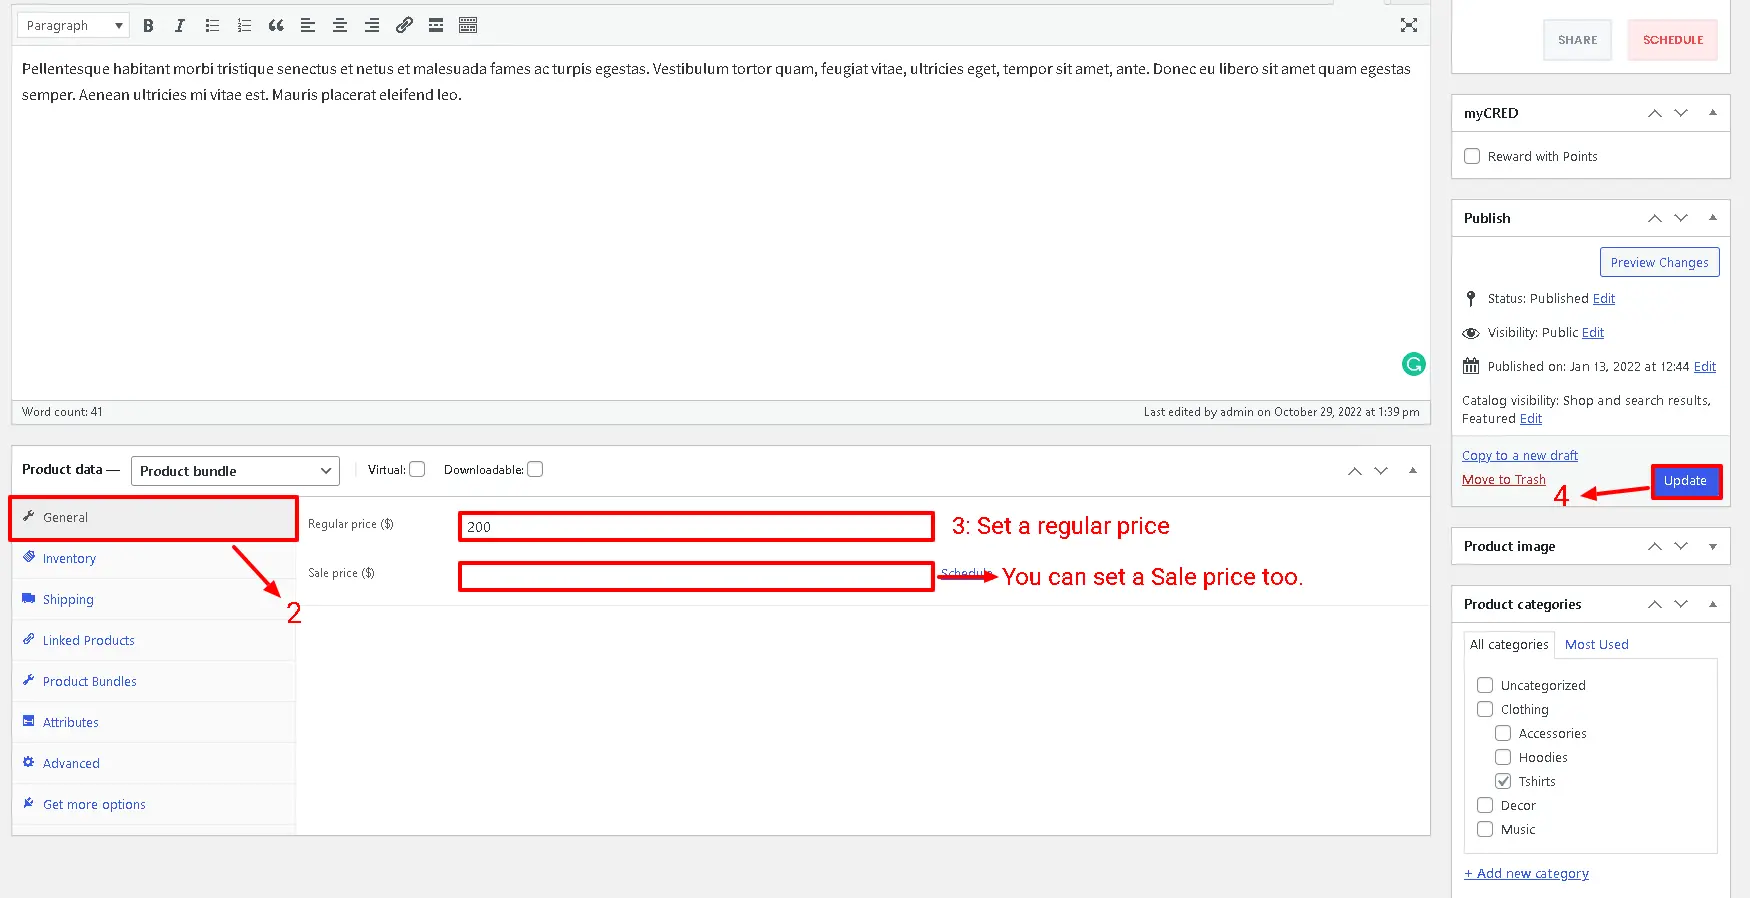
Navigate to the “General” tab and set a regular price for the Product. You can set a Sale price too.
After setting a price, update the product.
Auto Calculate Price
Auto calculates price helps to set a dynamic price for the product bundle based on selected items for the bundle.
To use the auto-calculate price feature, uncheck the “Fixed Price” option and update the product.
Step 4: Position of Product Bundle
You can set a position for the product bundle on the product page by following the below steps.
- Navigate to the “Product Bundles” menu page in WordPress admin.
- In the settings tab, there is a “Bundle position” option to change the bundle position on the product page.
- You can select the appropriate position from the available options like “before add to cart button”, “after add to cart button”, etc.
- Also, there are options to show the product bundle before or after a CSS selector.
- After selecting “before” or “after” CSS selector, find a CSS selector on the product page and put it in the “CSS Selector” field.
- Save the settings, after selecting a position for the bundle.
In the case, none of the listed positions helps, you can use the below shortcodes of the plugin.
- Use it on the product page to show the bundles.
- Use it on the product page to show the bundles + add to cart button.
Step 5: Product Bundle Page
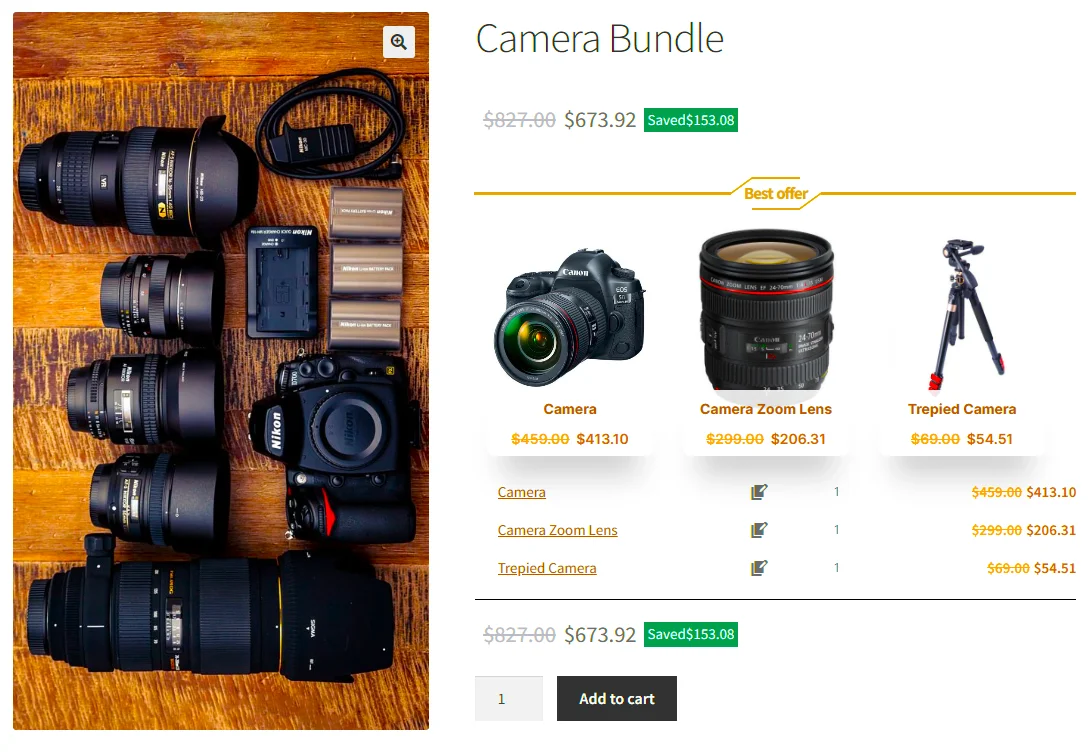
After creating and publishing the product bundle, open the product page on the front end.
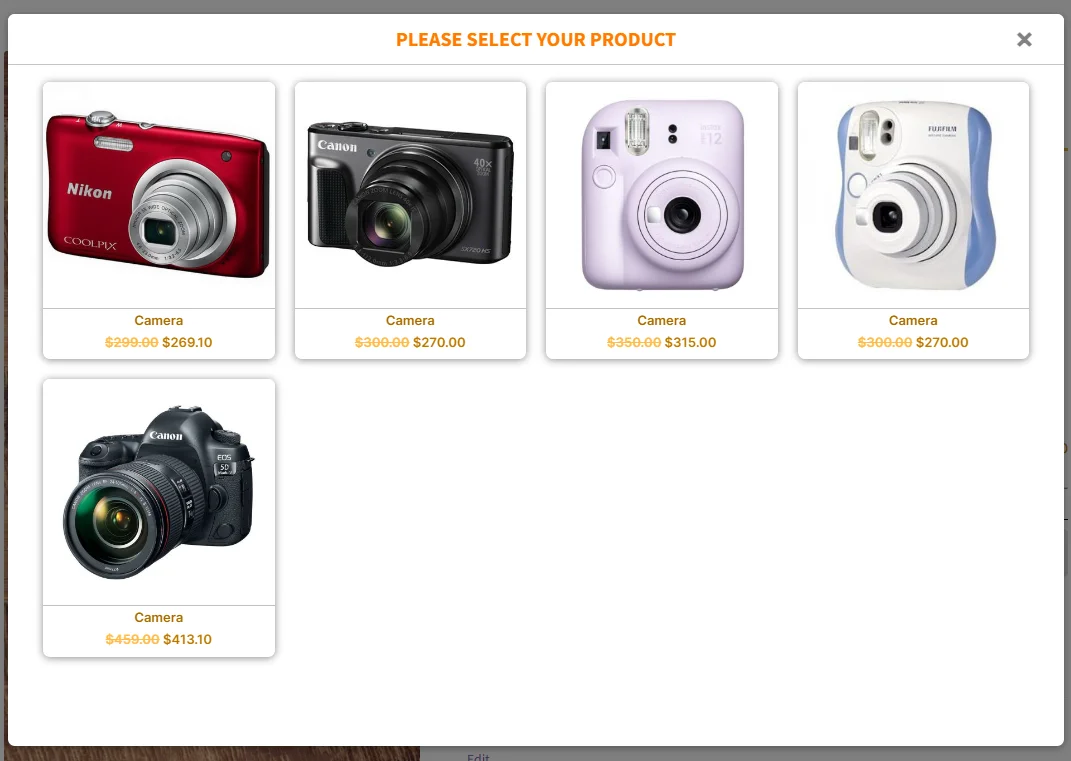
When the user clicks on each bundle item, he can select the desired product from multiple available products like in the below image.
Step 6: Add to Cart
After selecting a product, for all of the bundle items you can add it to the cart to see the result.
2. Creating WooCommerce Product Bundles with Categories
Creating dynamic product bundles with categories is a strategic approach to enhance customer experience and increase sales. By categorizing products into specific groups, businesses can create attractive bundles that offer customers a variety of options while maximizing profitability. This method allows for flexibility in creating personalized packages that cater to different customer preferences and needs. By offering bundled products from different categories, businesses can entice customers to explore new products and potentially increase their overall spending. Additionally, dynamic product bundles with categories can help businesses streamline their inventory management and pricing strategies, ensuring that each bundle remains profitable and cost-effective. Overall, this approach provides a win-win situation for both businesses and customers, as it enhances the shopping experience and drives sales.
Step 1: Add a Product
To create a dynamic product bundle in WooCommerce with categories, first, you should add a product and then select the “product bundle” as the type of product. Read this section of the article for more information.
Step 2: Add Categories as Bundle Items
Now you should add as many bundle items that you want to the product bundle, and then configure them by following the below steps.
- You can set a “Default Product” for the bundle item by selecting “Use default product” and setting a product to the “Default product” field.
- In the “Categories” field, you can include as many categories as you want.
- Use the “Quantity” field to set the default quantity of this item.
- If the quantity is editable by the user then select “Edit quantity by user” and set the “Min/Max” quantity fields.
- With the “Discount” field you can set a “Percentage, Price, Fixed Price” discount on the selected product.
Repeat Step 2, to add as many items as you want to the bundle and configure them.
Step 3: Pricing Product Bundle
Now you should decide about the pricing of the product bundle. You can use a fixed price for the whole bundle or use auto calculate price, to calculate the bundle price based on selected items.
Read this section of the article for more information.
Step 4: Position of Product Bundle
You can set the product bundle position on the product page with the “Bundle Position” option in the plugin settings.
Read this section of the article for more information.
Step 5: Add to Cart
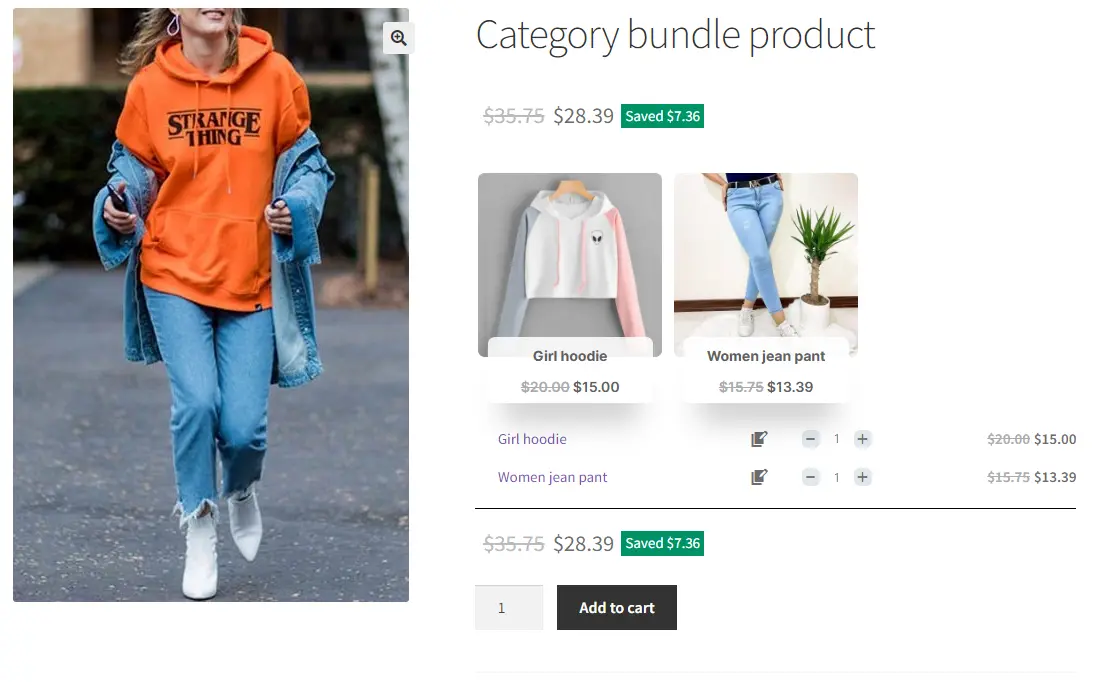
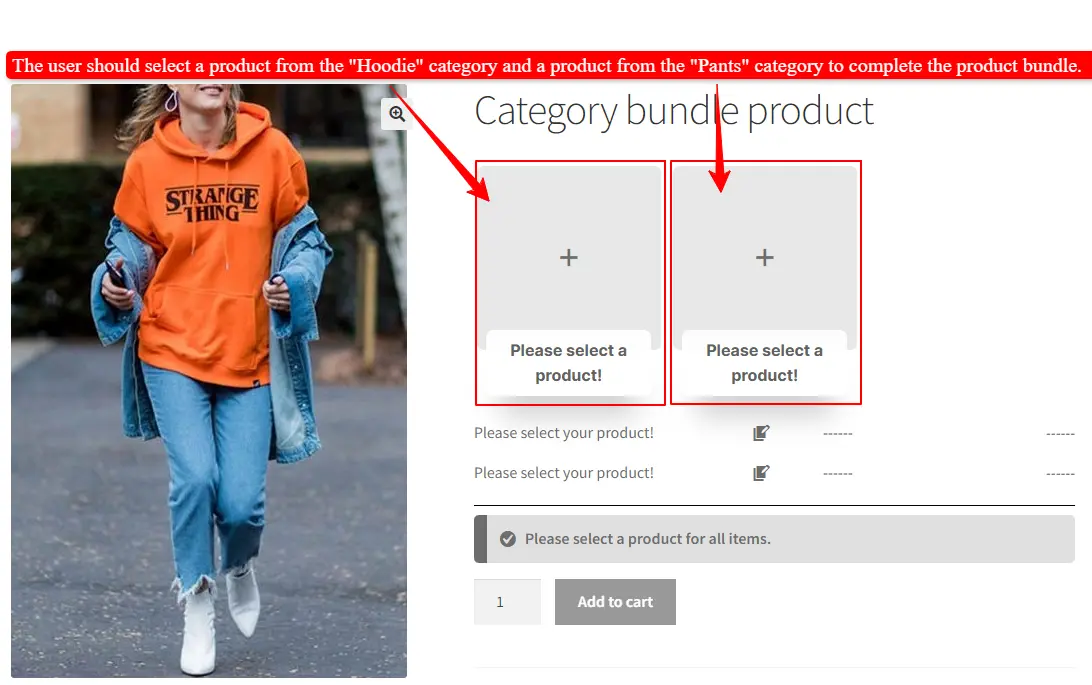
After publishing the product bundle. Open the product page and select a product for each bundle item then add it to the cart.
3. Creating WooCommerce Product Bundles with Tags
WooCommerce Product Tags are a powerful tool that allows online store owners to categorize and organize their products effectively. These tags act as keywords or labels that describe the product’s characteristics, making it easier for customers to find what they are looking for. By assigning relevant tags to products, store owners can improve the search experience for customers and increase the chances of sales conversions. Additionally, WooCommerce Product Tags also enable store owners to create product collections or group similar products together, making it easier for customers to explore related items. Overall, WooCommerce Product Tags provide a practical and efficient way to manage and enhance the shopping experience on an online store platform.
To create a product bundle with tags follow the below steps.
Step 1: Add a Product
First, you should add a product in WooCommerce, and use “Product Bundle” as its type. Read this section for more information.
Step 2: Adding Bundle Items
Now you should add as many bundle items that you want to the product bundle, and then configure them by following the below steps.
- You can set a “Default Product” for the bundle item by selecting “Use default product” and setting a product to the “Default product” field.
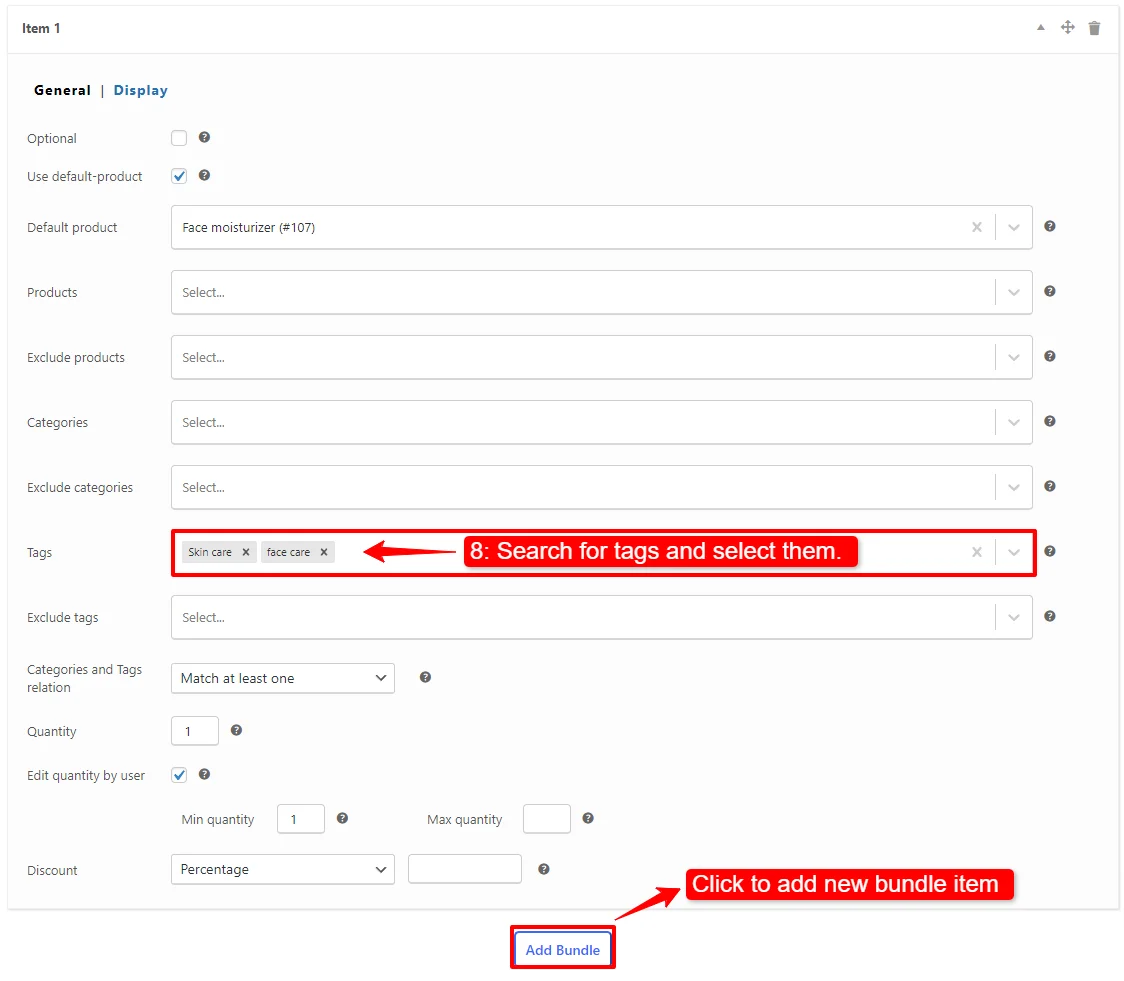
- In the “Tags” field, you can include as many tags as you want. Including more tags, gives more flexibility.
- Use the “Quantity” field to set the default quantity of this item.
- If the quantity is editable by the user then select “Edit quantity by user” and set the “Min/Max” quantity fields.
- With the “Discount” field you can set a “Percentage, Price, Fixed Price” discount on the selected product.
Repeat Step 2, to add as many items as you want to the bundle and configure them.
Step 3: Pricing Product Bundle
Now you should decide about the pricing of the product bundle. You can use a fixed price for the whole bundle or use auto calculate price, to calculate the bundle price based on selected items.
Read this section of the article for more information.
Step 4: Position of Product Bundle
Set a position for the product bundle on the product page, by reading this section.
Step 5: Add to Cart
After publishing the product bundle. Open the product page and select a product for each bundle item then add it to the cart.
4. Creating Mix and Match Products in WooCommerce
Creating mix-and-match products in WooCommerce opens up a world of possibilities for businesses. With this feature, businesses can offer their customers the flexibility to customize and personalize their purchases. Whether it’s creating a custom gift box, designing a personalized bundle, or allowing customers to choose their preferred combination of products, the mix and match feature empowers businesses to cater to individual preferences. This not only enhances the shopping experience but also enables businesses to increase sales by offering unique and tailored options. By incorporating mix-and-match products in WooCommerce, businesses can stay ahead of the competition, meet customer expectations, and ultimately drive growth and customer loyalty.
To create a mix and match product in WooCommerce, we can include products, categories and tags in the bundle items.
This feature allows customers to create their own product box from a long list of available products.
Step 1: Add a Product
First, you should add a product in WooCommerce, and use “Product Bundle” as its type. Read this section for more information.
Step 2: Adding Bundle Items
- You can set a “Default Product” for the bundle item by selecting “Use default product” and setting a product to the “Default product” field.
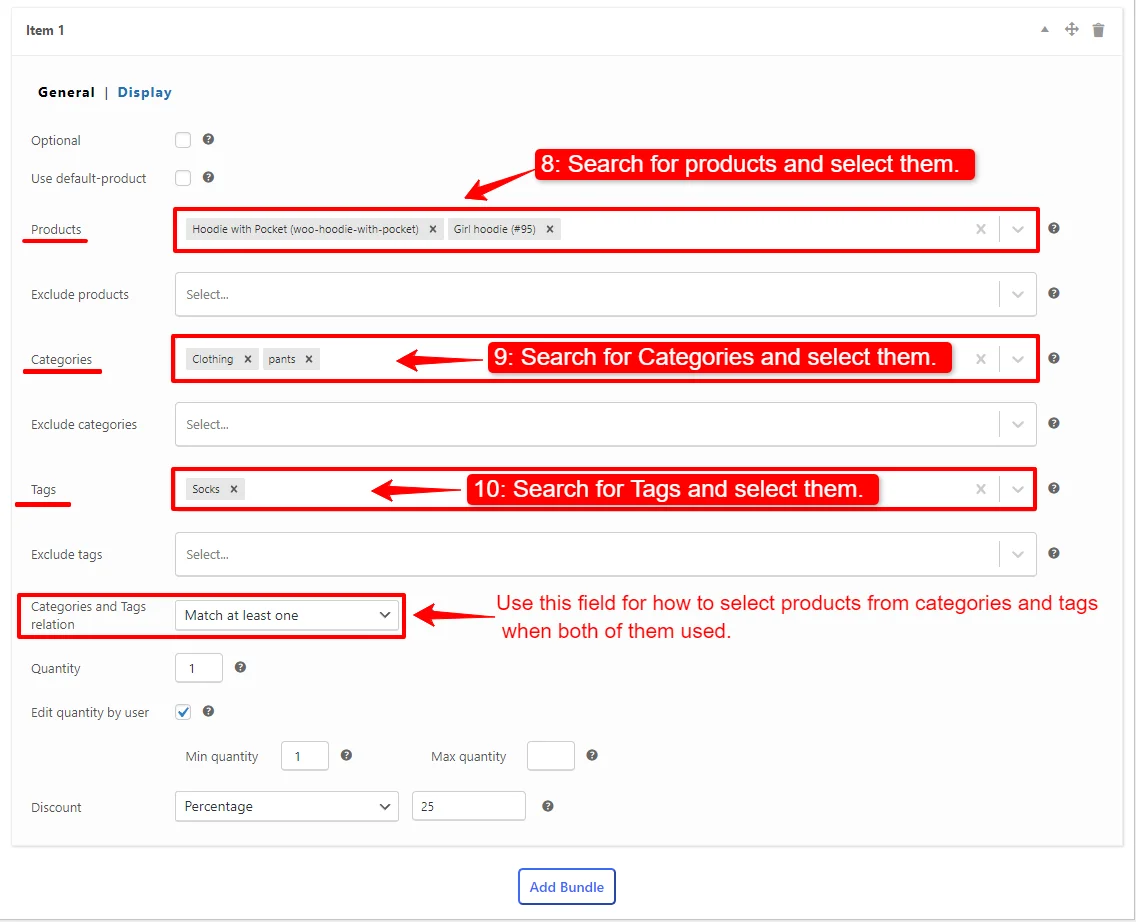
- Use “Products, Categories, Tags” fields to offer multiple products for the item.
- Use “Exclude products, Exclude categories, Exclude tags” to exclude products from the item.
- In the “Tags” field, you can include as many tags as you want. Including more tags, gives more flexibility.
- Use “Categories and Tags relation” for how to select products from categories and tags when both of them used.
- Use the “Quantity” field to set the default quantity of this item.
- If the quantity is editable by the user then select “Edit quantity by user” and set the “Min/Max” quantity fields.
- With the “Discount” field you can set a “Percentage, Price, Fixed Price” discount on the selected product.
Repeat Step 2, to add as many items as you want to the bundle and configure them.
Step 3: Add Optional Items (Optional)
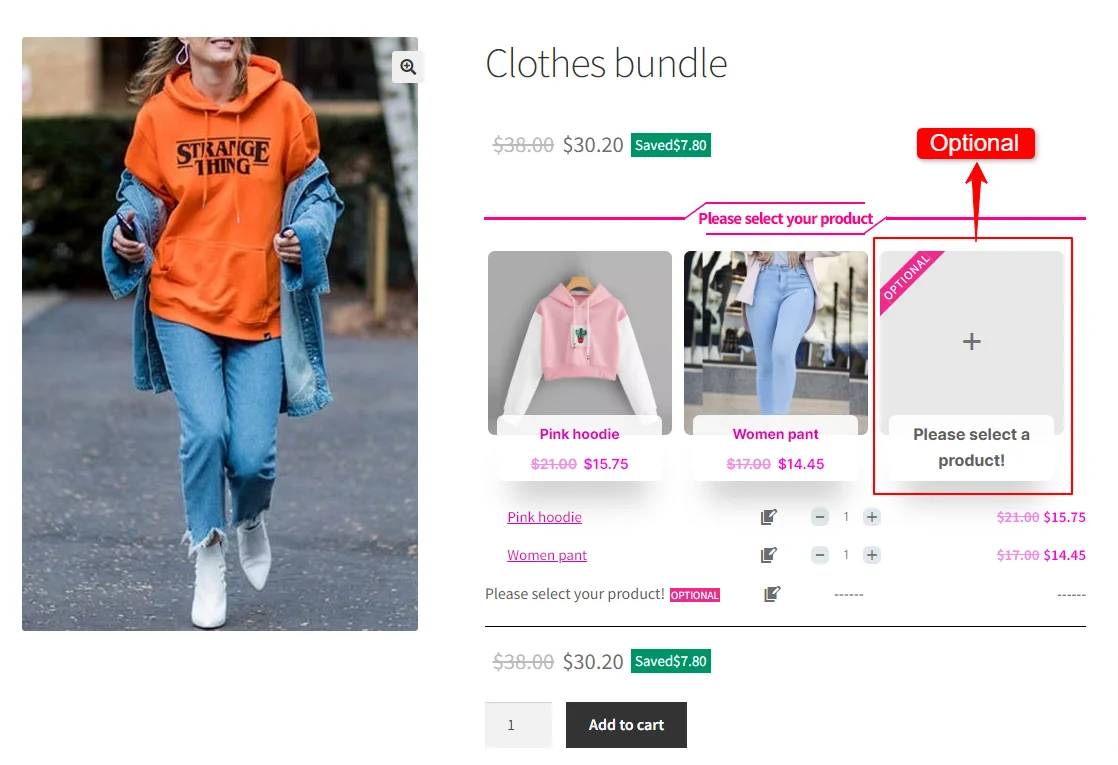
You can add some optional items to the bundle. Users don’t have to pick a product for optional items.
- Add an item to the bundle.
- Select the “Optional” field of the item.
- You can set a “Default product” for the item. Users can remove the optional item’s product in the front end.
- Add “Products, Categories or Tags” to configure the item.
Step 4: Pricing Product Bundle
Now you should decide about the pricing of the product bundle. You can use a fixed price for the whole bundle or use auto calculate price, to calculate the bundle price based on selected items.
Read this section of the article for more information.
Step 5: Position of Product Bundle
Set a position for the product bundle on the product page, by reading this section.
Step 6: Product page
Open the product page to check how you configured the mix and match product bundle in WooCommerce.
As you can see in the below image, we added an optional item to the bundle, and the user can pick a product for it or leave it empty.
After selecting a product for each bundle item, add it to the cart to see the result.
Shortcodes
The plugin has the below shortcodes and you can use them:
- [asnp_wepb_product] Use it on the product page to show the bundles.
- [asnp_wepb_product show_add_to_cart="1"] Use it on the product page to show the bundles + add to cart button.
Conclusion
In conclusion, WooCommerce product bundles have revolutionized the way businesses operate online. By breaking free from traditional bundling methods and offering dynamic bundles, businesses can provide personalized shopping experiences that meet the diverse needs of customers. The flexibility and customization options that WooCommerce offers not only boost sales and revenue but also enhance customer satisfaction and loyalty. In the ever-evolving world of e-commerce, mastering the art of creating flexible and engaging product bundles is essential for businesses to stay ahead of the competition and create memorable shopping experiences for their customers.
Hence, my aspiration is that this article has empowered you to arrive at an optimal decision for your store site. To delve deeper into the realm of Product Bundle plugins and their applications, I invite you to explore the array of informative resources I’ve compiled in the list below. These resources promise to expand your understanding and proficiency in leveraging the potential of these plugins to the fullest:
- Create Assembled Products in WooCommerce
- How to Create WooCommerce Combo Offers
- Boost Your E-commerce Sales with WooCommerce Product Bundle
- How to Create WooCommerce Composite Products? (free in 2023)
- WooCommerce Product Bundle: How to Create Dynamic and Flexible Bundles
- Create Custom Bundles with Categories in WooCommerce Product Bundle Plugin
- Provide Free Gift Products in WooCommerce Complete Guide
- WooCommerce Mix and Match Free Plugin
- WooCommerce Product Bundle with Variations (Free Plugin)
FAQ
A WooCommerce product bundle is a collection of multiple products that are sold together as one package. It allows online store owners to create appealing bundles for customers to buy multiple related products at once. The bundle can include products from different categories or variations. By offering bundled products at a discounted price, merchants can simplify the purchasing process, encourage higher sales, and improve customer satisfaction.
You can use Product Bundle Builder for WooCommerce to create simple to advanced product bundles in WooCommerce.
Yes, you can set “price, percentage, and fixed price” discount on each bundle item. Or you can set a sale price for the whole product bundle in WooCommerce.
Yes, you can choose a theme and size for product bundles in WooCommerce. There are gird and list themes available with “small, medium and large” sizes. Also, you can change colors of the product bundle.
To manage inventory for product bundles in WooCommerce, open the product in admin and navigate to the inventory tab. Then enable the Stock management and set the Quantity. Also, the product bundle builder plugin automatically manages the bundle items stock availablability.
Yes, you can offer dynamic and flexible product bundles in WooCommerce using the Product Bundle Builder for WooCommerce.
You can manage shipping fee in product bundles based on “bundle items” or “whole bundle”. Navigate to the “Product Bundle” tab on product edit page the choose “bundle items” or “whole bundle” for the shipping fee field.
No, there is not any limit to the number of products that you can include in a bundle.
