
Translating the WooCommerce product bundle plugin into your local language can significantly increase your online store’s revenue. When customers can browse and shop in their native language, they are more likely to trust your store and complete a purchase. Offering localized content allows you to reach new markets, expand your customer base, and improve the overall shopping experience. It also enhances customer satisfaction and can improve your store’s visibility in search engines by targeting keywords in different languages. Altogether, these benefits create a strong competitive advantage and help boost sales and long-term growth. In this article, we will show you how to translate the WooCommerce Product Bundle plugin into your own language.
Video Tutorial
To translate WooCommerce Product Bundles in your local language, follow the steps below:
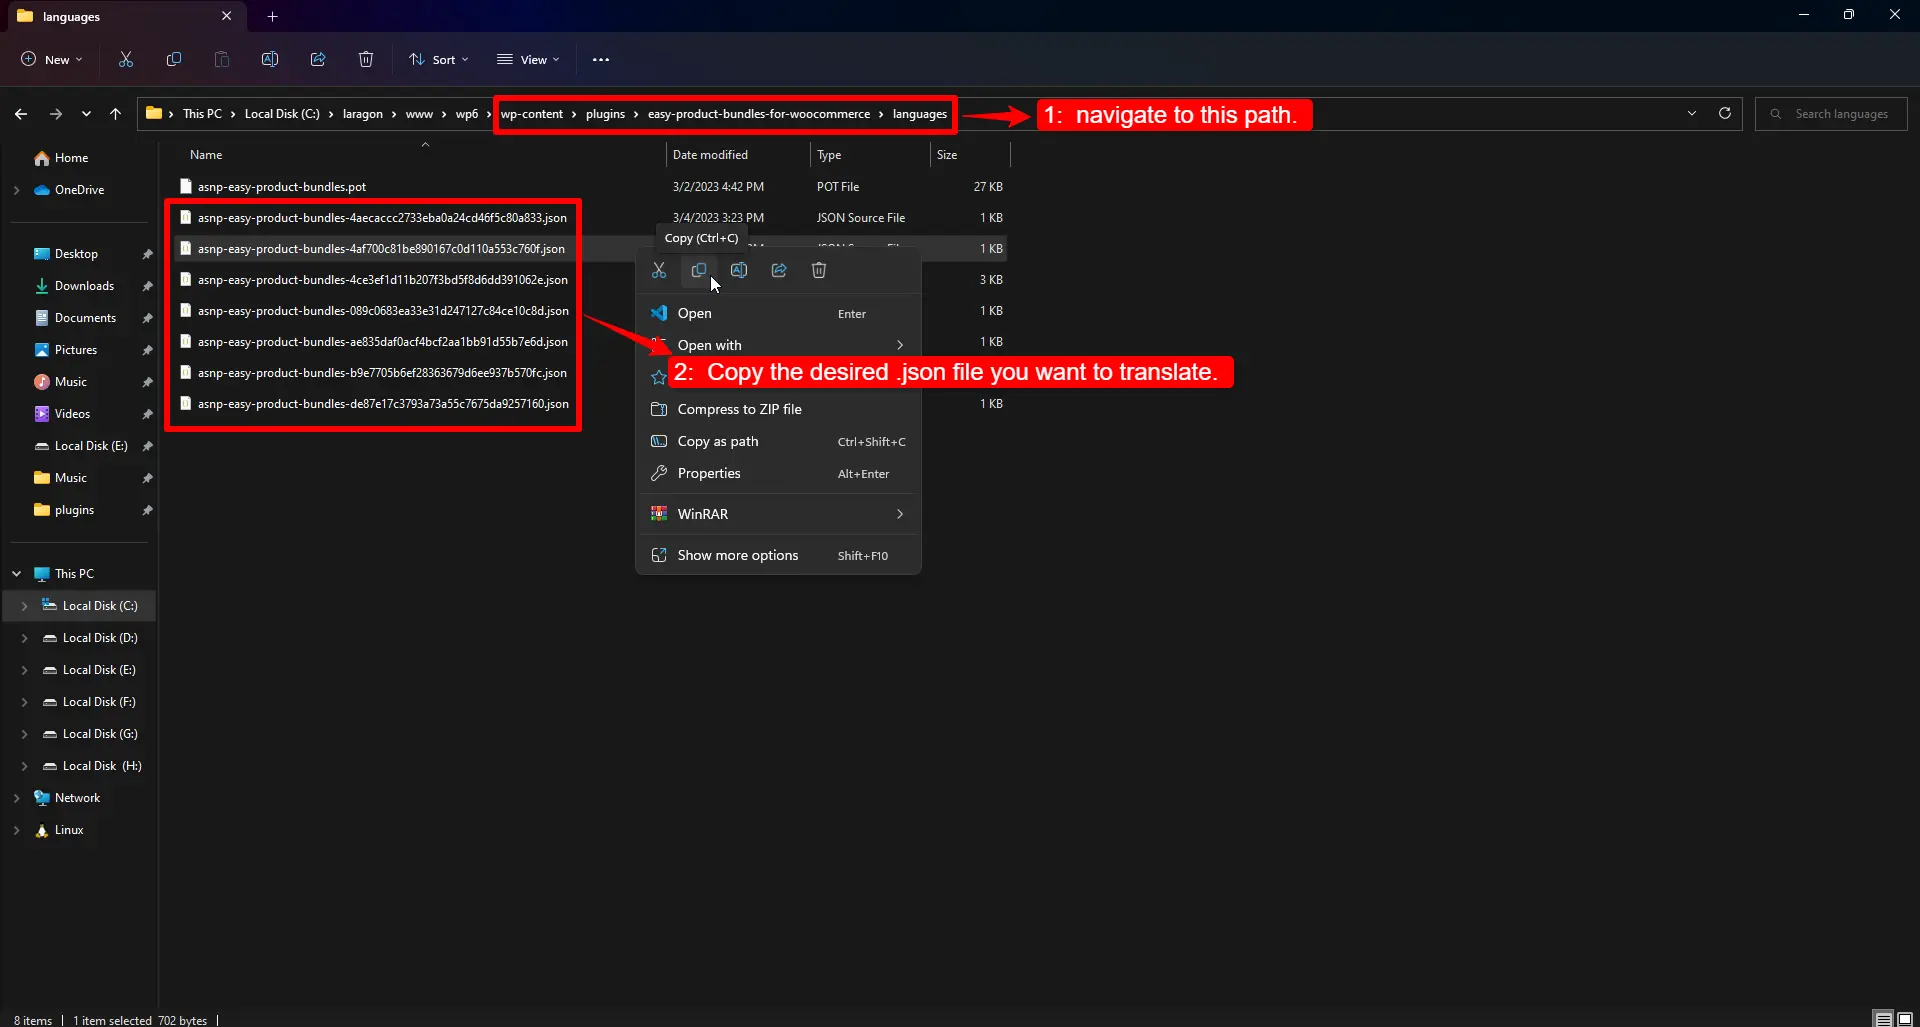
1: Locate the Plugin’s Language Files
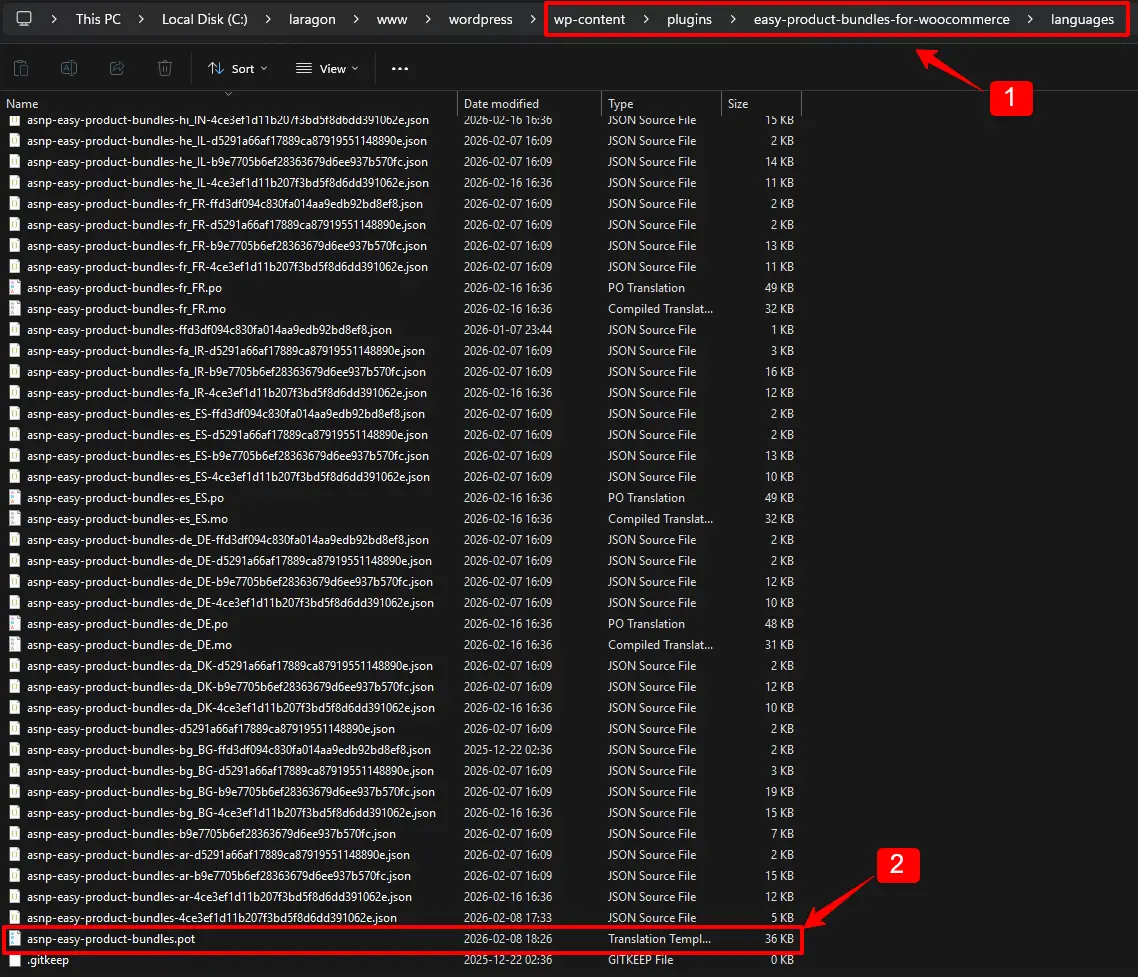
Navigate to the plugin’s language folder:
wp-content/plugins/easy-product-bundles-for-woocommerce/languages/
Inside this folder, you will find multiple .json files, each containing translations for different parts of the plugin. These files represent separate sections or features of the plugin. You can select a specific file to translate or copy all of them if you plan to translate the entire plugin.
2. Copy the JSON Files to a Safe Location
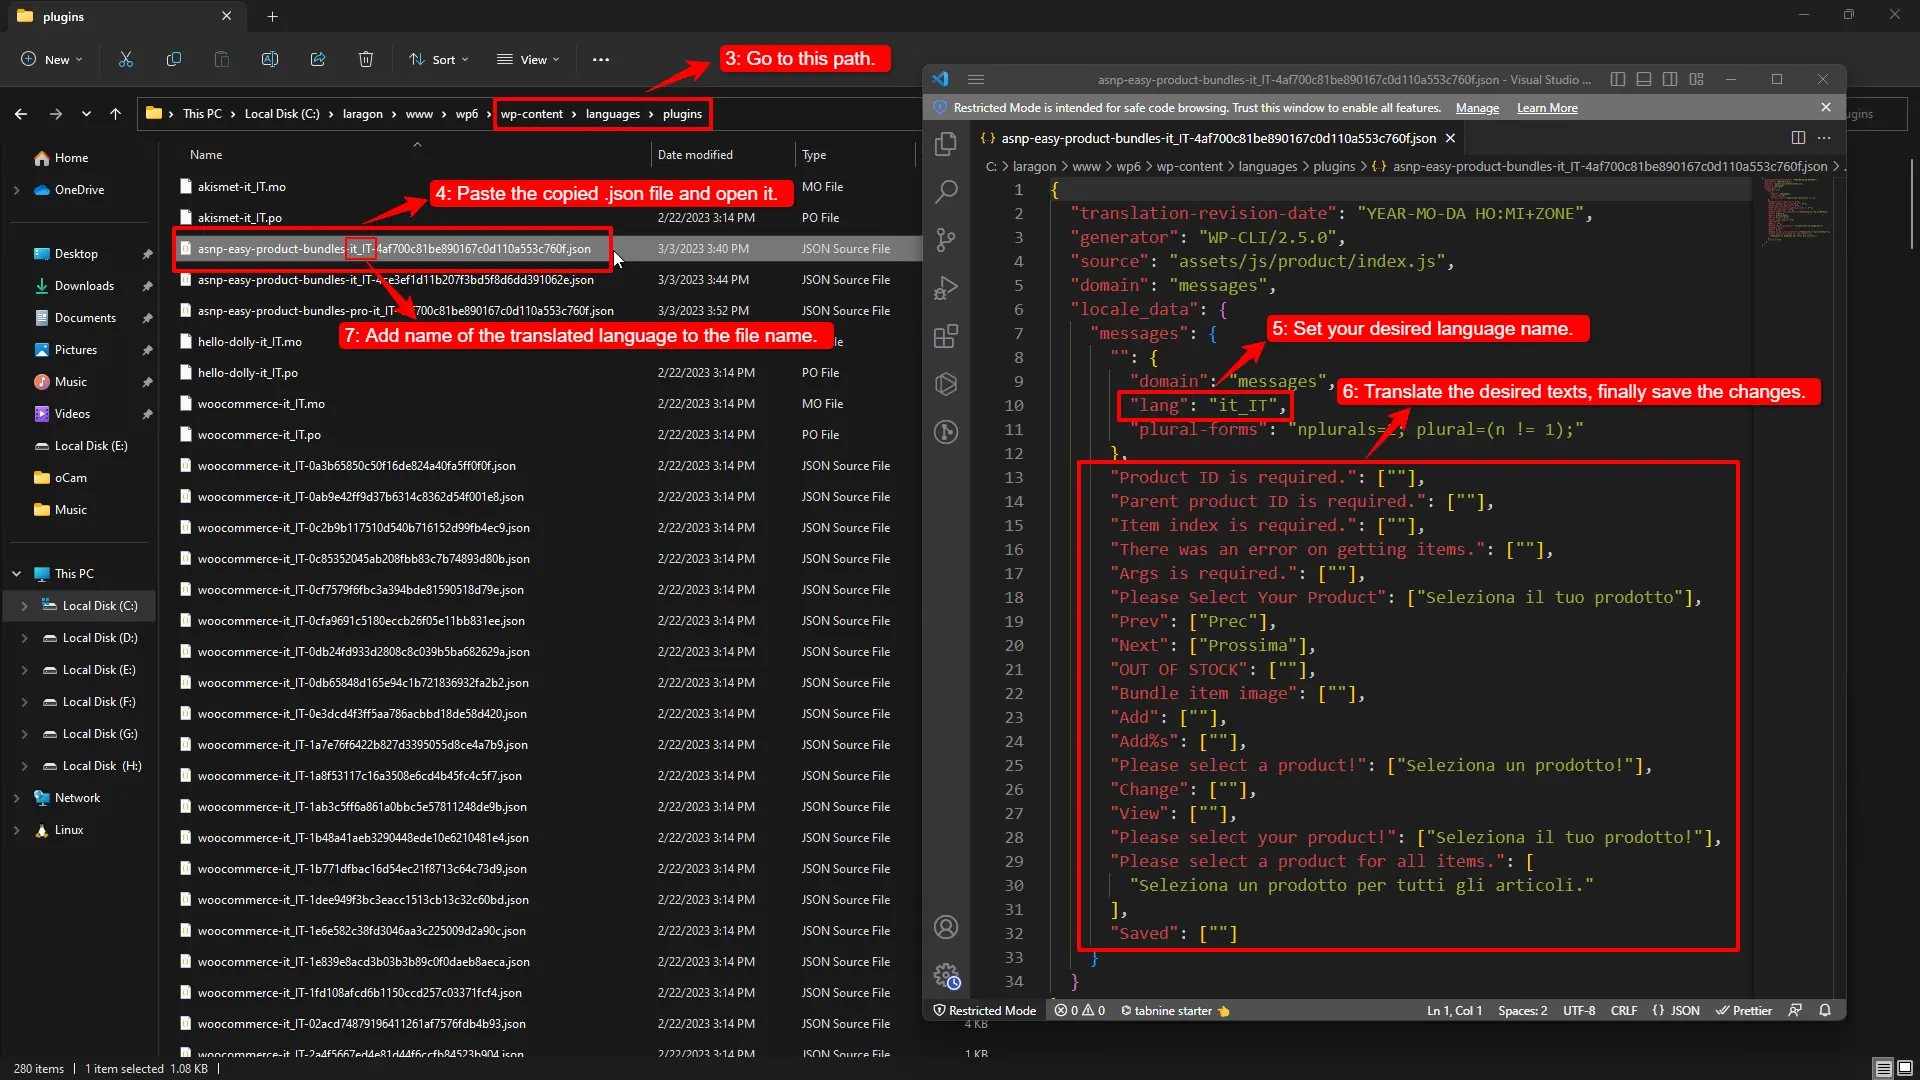
Copy and paste the selected .json file(s) into the WordPress plugin language directory:
wp-content/languages/plugins/
Using this location ensures that your translations will not be overwritten when the plugin is updated.
3. Open the JSON Files in a Code Editor
Open the copied .json file(s) using a text or code editor such as VS Code, Sublime Text, or Notepad++. Using a proper editor prevents formatting errors that could break the translation.
4. Set Your Local Language
Inside each JSON file, find the line specifying the language:
"lang": "en"Replace "en" with your target WordPress locale. For example, for Italian:
"lang": "it_IT"Valid locale examples include: fr_FR (French), de_DE (German), es_ES (Spanish), etc.
5. Translate the Text Strings
Translate each string inside the JSON array while keeping the JSON structure intact. For example:
"Please select a product!": ["Seleziona un prodotto!"]- The key (before the colon) must remain unchanged.
- Only translate the value inside the array.
- Preserve quotes, brackets, and punctuation to avoid JSON errors.
6. Update the File Name
To ensure WordPress recognizes your translation, add your locale code to the copied JSON file’s name. For example:
asnp-easy-product-bundles-it_IT-4af700c81be890167c0d110a553c760f.json- Keep the original hash (
-4af700c81be890167c0d110a553c760f) if present. - Insert your locale code before the hash (e.g.,
it_ITfor Italian).
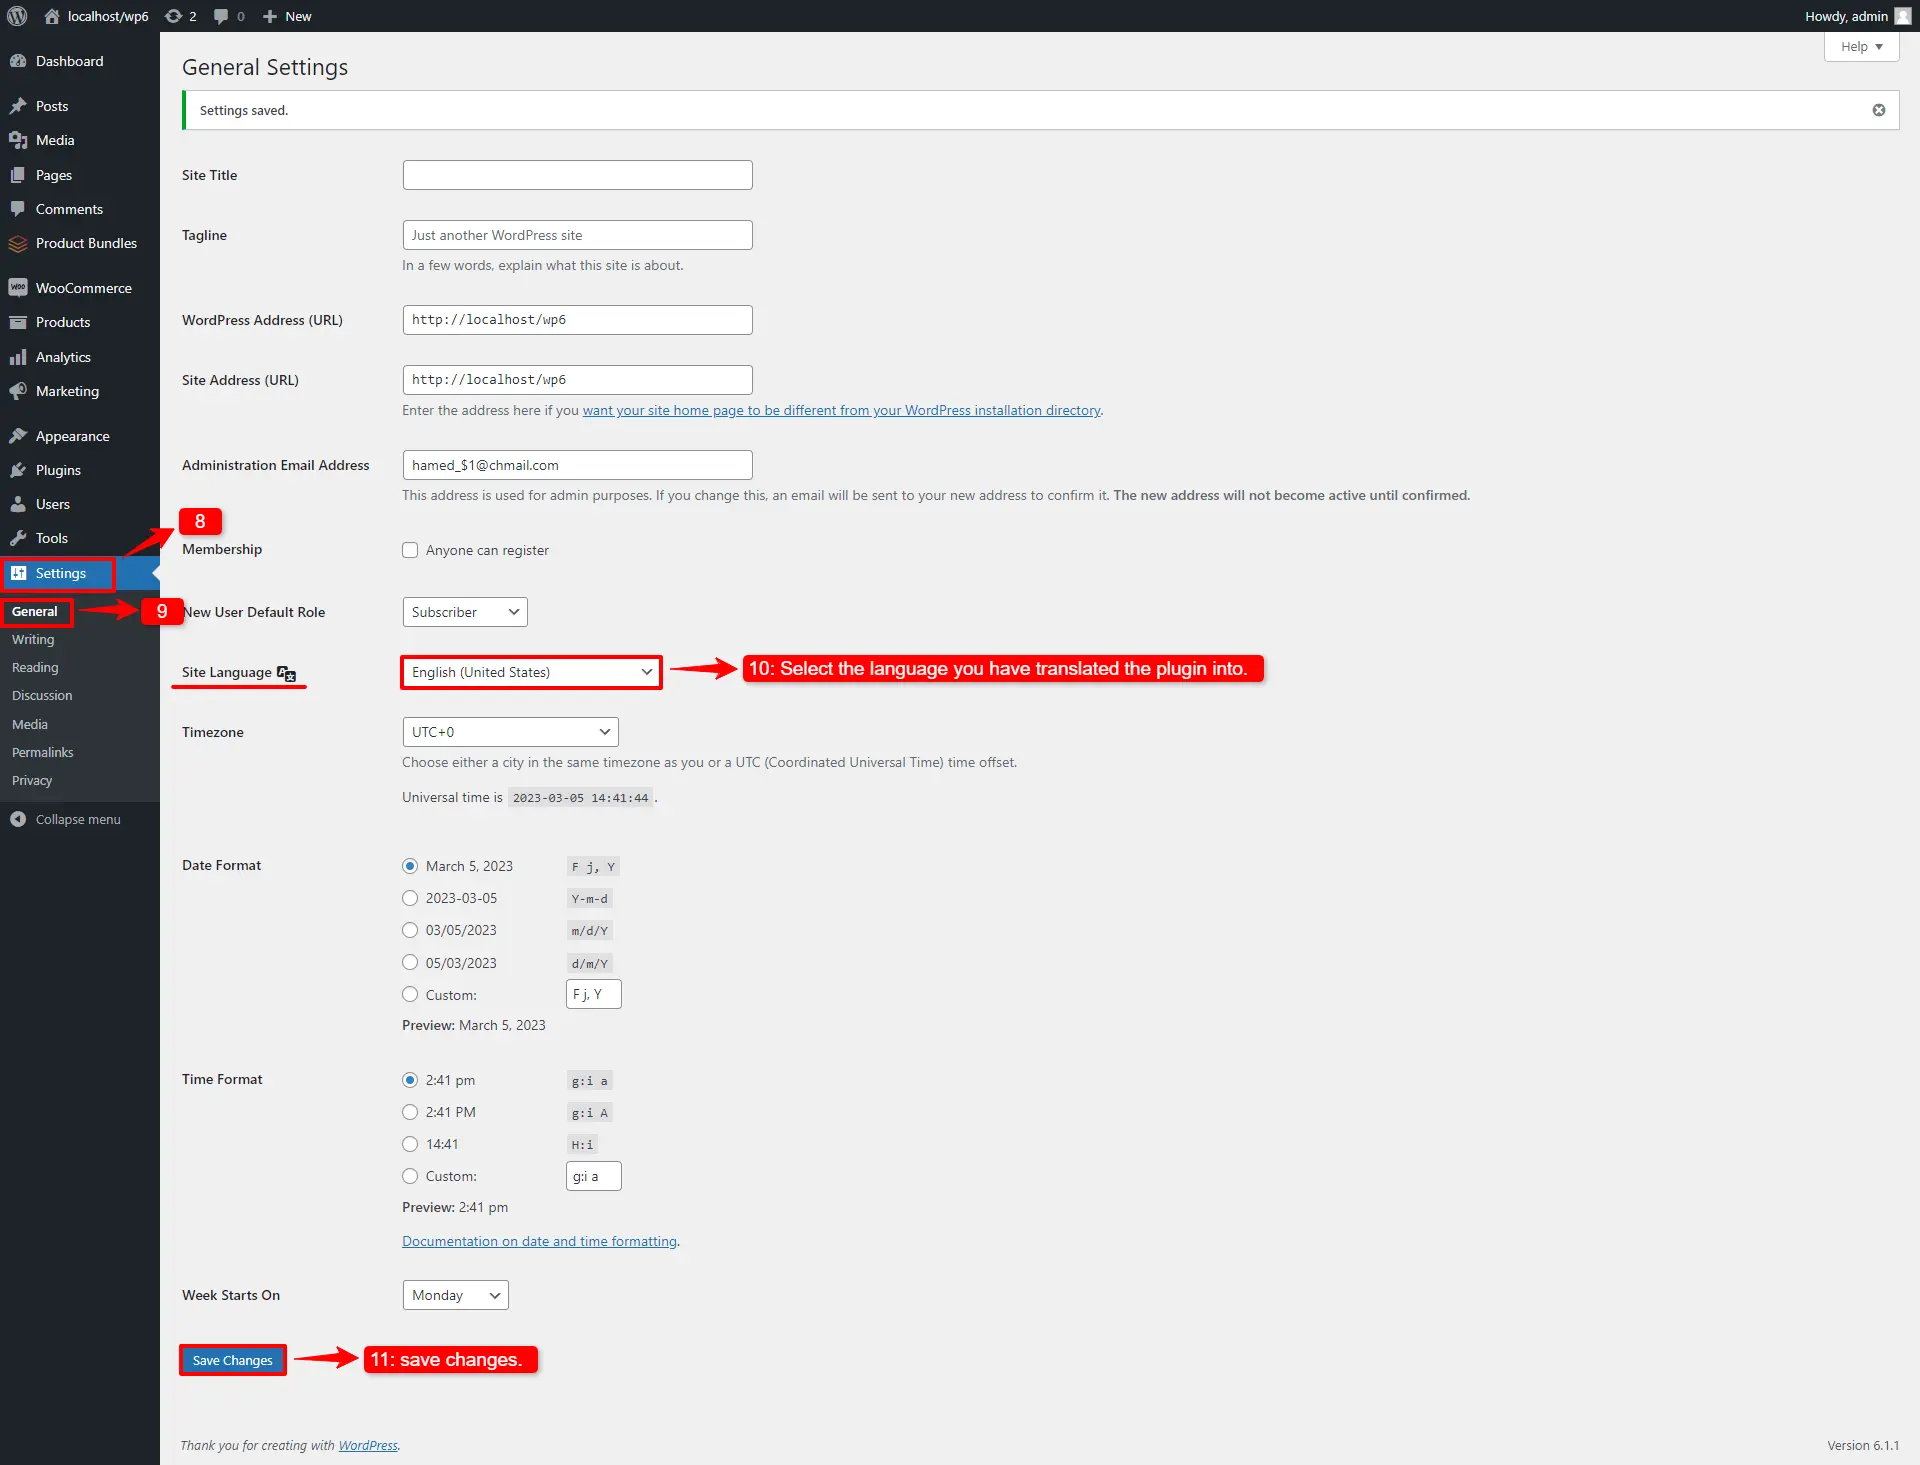
7. Set Your Site Language
- Log in to your WordPress admin panel.
- Go to Settings → General.
- In the Site Language field, select the local language that matches your translation.
8. Save Changes
Click Save Changes at the bottom of the page. This activates your translated language across your site, including the WooCommerce Product Bundles plugin.
9. Verify the Translation
- Visit your store frontend and check product bundle pages.
- Confirm that all translated strings appear correctly.
- If any text is missing, double-check the JSON formatting, locale code, and file placement.
- Clear any caching plugins or server cache if necessary.
Additional Tips and Best Practices
- Do not edit the original plugin files; always work on the copy in
wp-content/languages/plugins/. - Use valid WordPress locale codes.
- Double-check JSON formatting to prevent errors.
- Backup your translation files before updating the plugin.
- Remember: JSON translations are for JavaScript strings. PHP strings might still require PO/MO files or a translation plugin such as Loco Translate.
How to translate the .pot file of the WooCommerce product bundle plugin
This guide walks you through the translation process from start to finish using the WooCommerce product bundle plugin’s POT file.
Step 1: Install Poedit
Poedit is one of the most widely used editors for translating WordPress plugins. You can download and install it on Windows, macOS, or Linux from the official website.
Step 2: Find the Plugin’s POT File
Most WordPress plugins that are translation-ready include a POT (Portable Object Template) file. This file contains all strings marked for translation.
For Easy Product Bundles for WooCommerce, the POT file is usually located in:
/wp-content/plugins/easy-product-bundles-for-woocommerce/languages/
Step 3: Create a New Translation in Poedit
- Open Poedit.
- Choose “Create New Translation.”
- Navigate to the plugin’s POT file and open it.
- Select your target language (for example,
de_DEfor Germany). - Translate each string one by one.
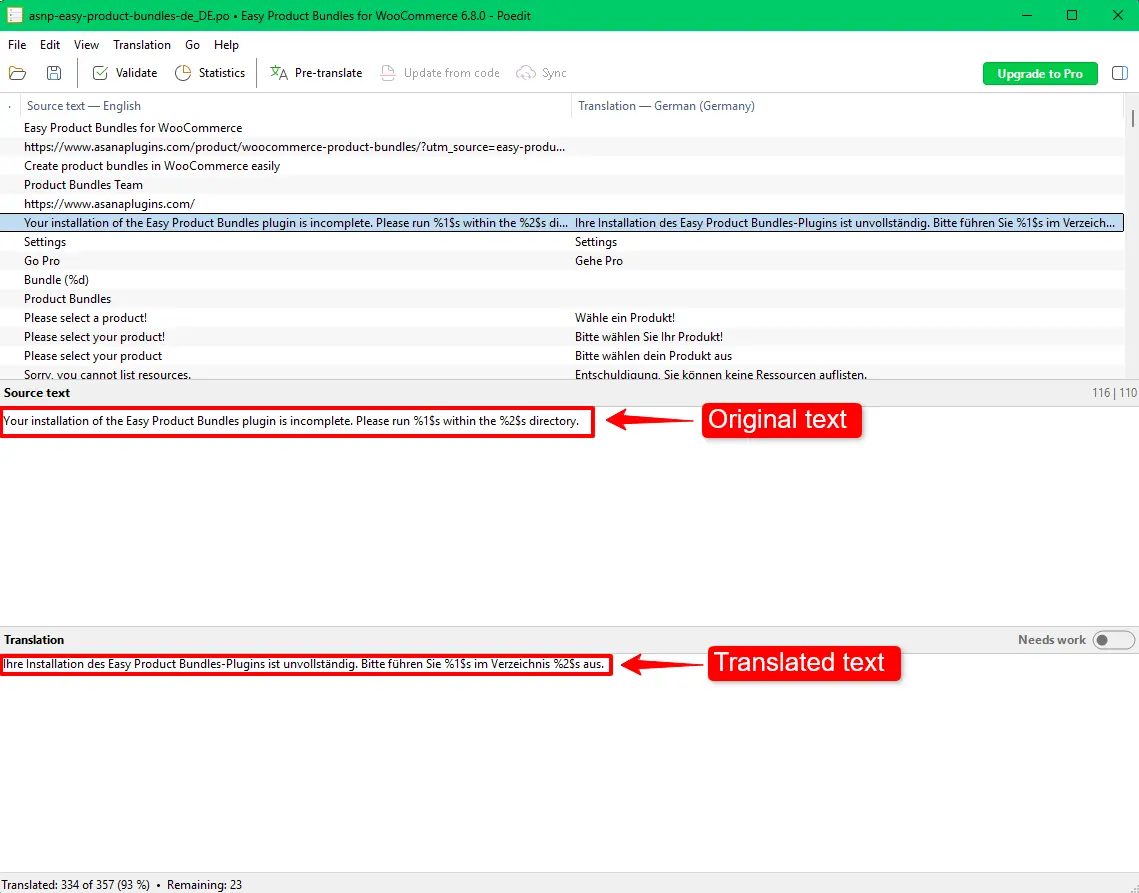
- At the end of translating the desired texts, save changes.
Poedit automatically saves your translations in two files:
asnp-easy-product-bundles-LOCALE.po– editable translation fileasnp-easy-product-bundles-LOCALE.mo– compiled file WordPress uses at runtime
Step 4: Place Your Translation Files
After saving, upload your .po and .mo files to one of these locations:
Preferred (safe from plugin updates):
wp-content/languages/plugins/
Alternative:
wp-content/plugins/easy-product-bundles-for-woocommerce/languages/
Using the first location helps ensure that translations are not overwritten when the plugin updates.
Step 5: Verify Text Domain and Locale
Make sure the file names match the WordPress locale format. For example:
asnp-easy-product-bundles-de_DE.po
asnp-easy-product-bundles-de_DE.mo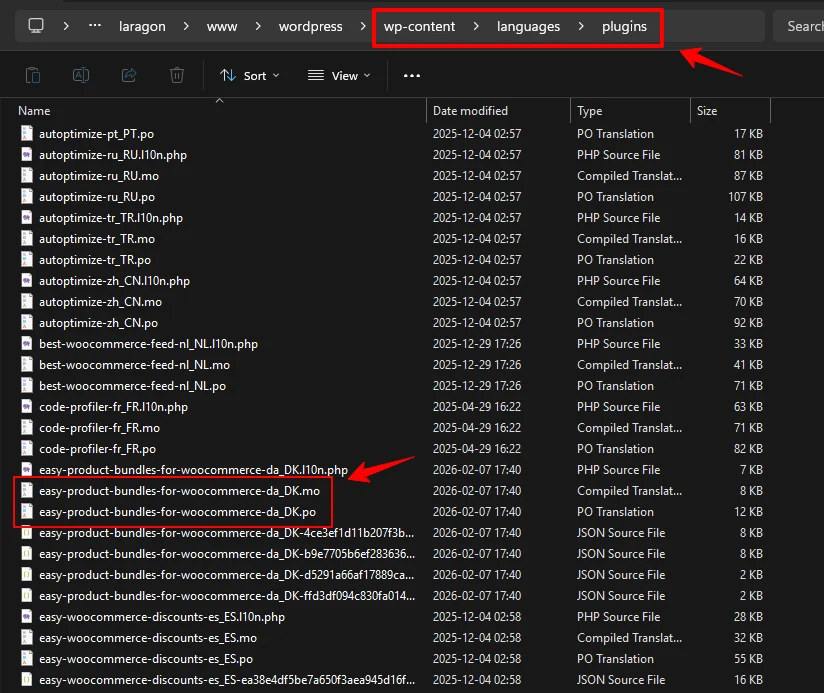
Also, confirm that your WordPress site language matches the locale under:
Settings → General → Site Language
Step 6: Clear Cache and Test
If you use a caching plugin or server cache, clear it. Then visit pages where the plugin strings appear. Your translations should now be visible in the site frontend and admin interface.
Best Practices
- Avoid editing plugin core files directly.
- Always store translation files in the
wp-content/languages/plugins/directory when possible. - Double-check locale codes (
en_US,es_ES,fr_FR, etc.). - Keep backups of your translation files.
Alternative: Translate in WordPress Dashboard
If you prefer not to use Poedit, you can use plugins like Loco Translate directly inside WordPress:
- Install and activate the translation plugin.
- Navigate to Loco Translate → Plugins → Easy Product Bundles for WooCommerce.
- Create or edit translation files from the admin UI.
This method can be easier for many users, but it requires careful file placement to avoid overwriting during updates.
Conclusion
Translating Easy Product Bundles for WooCommerce using its POT file ensures a professional, update-safe multilingual experience for your WooCommerce store. With Poedit and correct file placement, you can localize every user-facing label and message in the plugin.