Updated on — Leave a comment

How to Create WooCommerce Composite Products? (free Plugin)

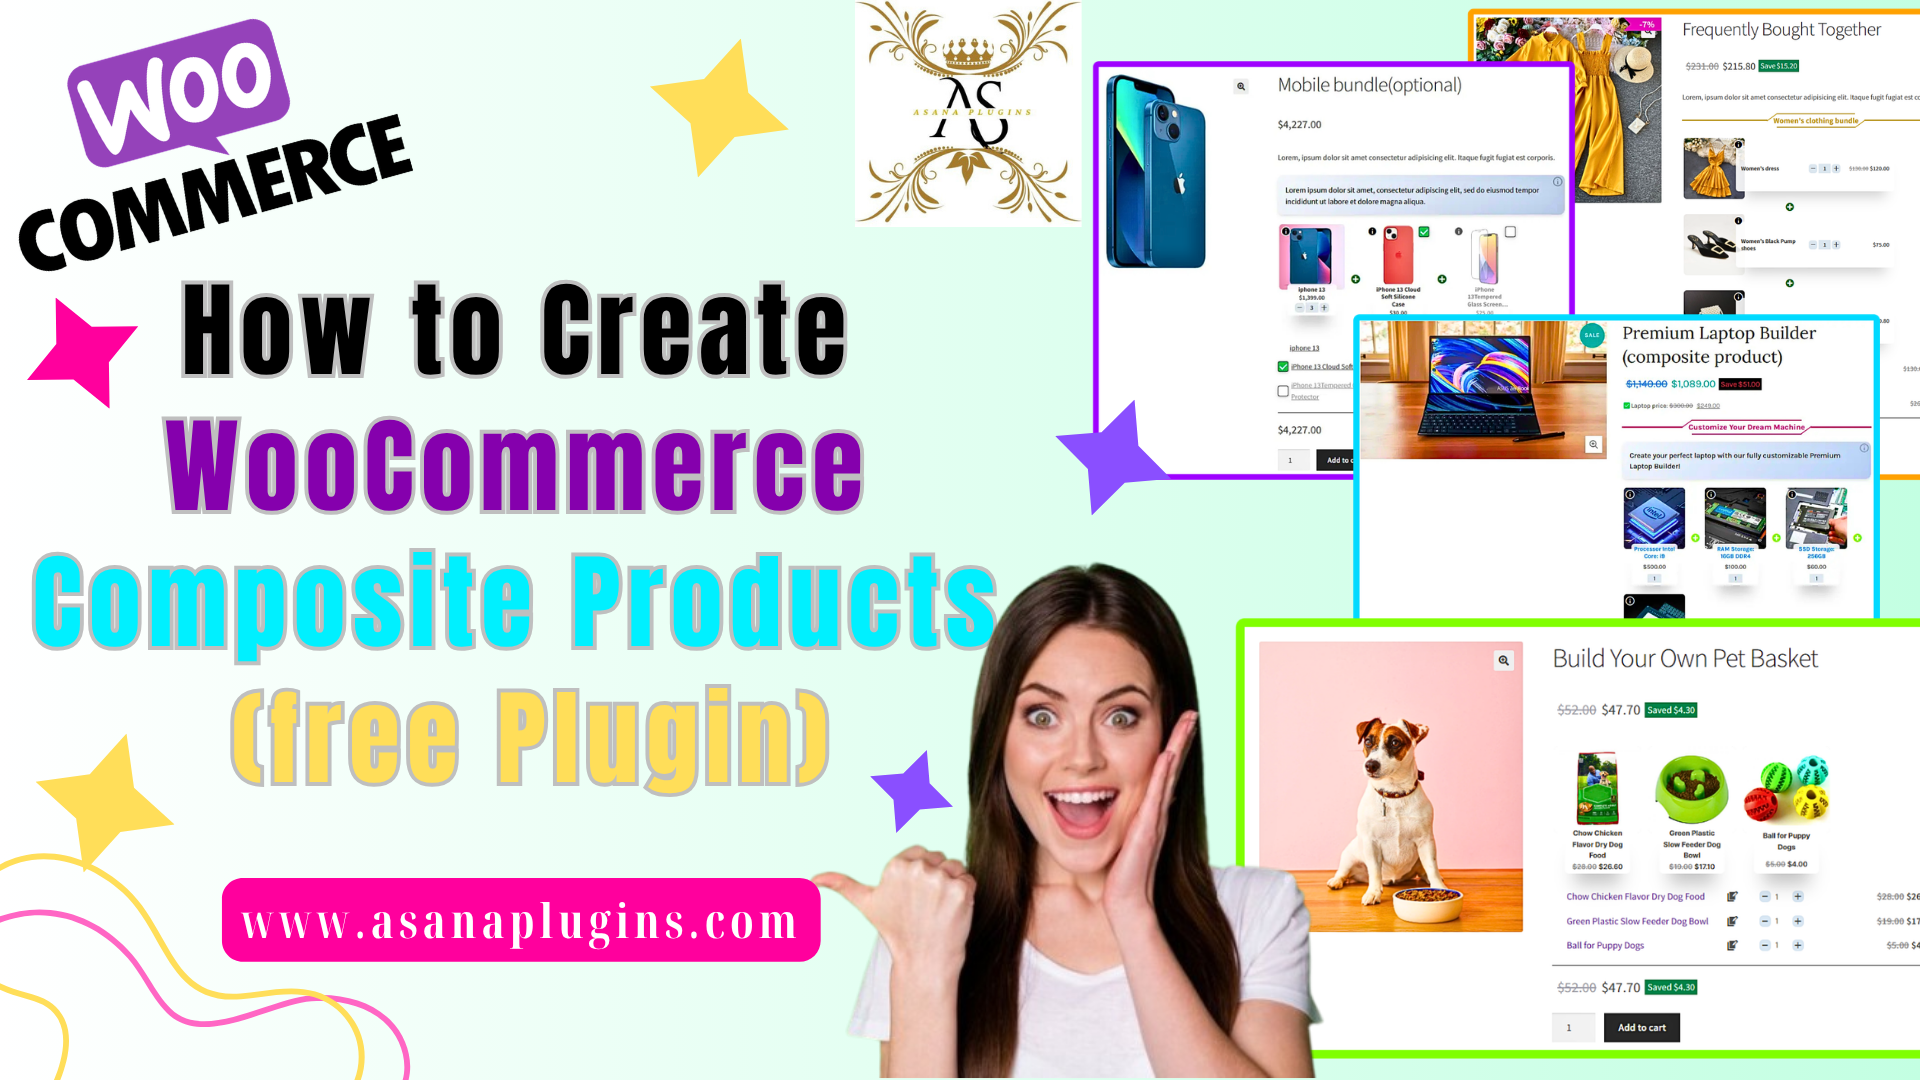
WooCommerce Composite Products

This article provides a clear and practical guide on How to Create WooCommerce Composite Products in 2026 using the free and powerful Easy WooCommerce Product Bundles plugin. You’ll learn how to build flexible, customizable composite products in WooCommerce that allow customers to mix and match components based on their preferences. The guide walks you through configuring product components, setting dynamic or fixed pricing, managing stock for individual items, and optimizing the overall shopping experience. Whether you’re selling build-your-own kits, customizable bundles, or personalized product packages, this step-by-step guide will help you create high-converting composite product offers in WooCommerce.

What are WooCommerce Composite Products?

WooCommerce composite products allow customers to build and purchase fully customizable products by selecting from predefined components or options. Instead of buying a fixed item, shoppers can assemble a product that fits their exact needs.
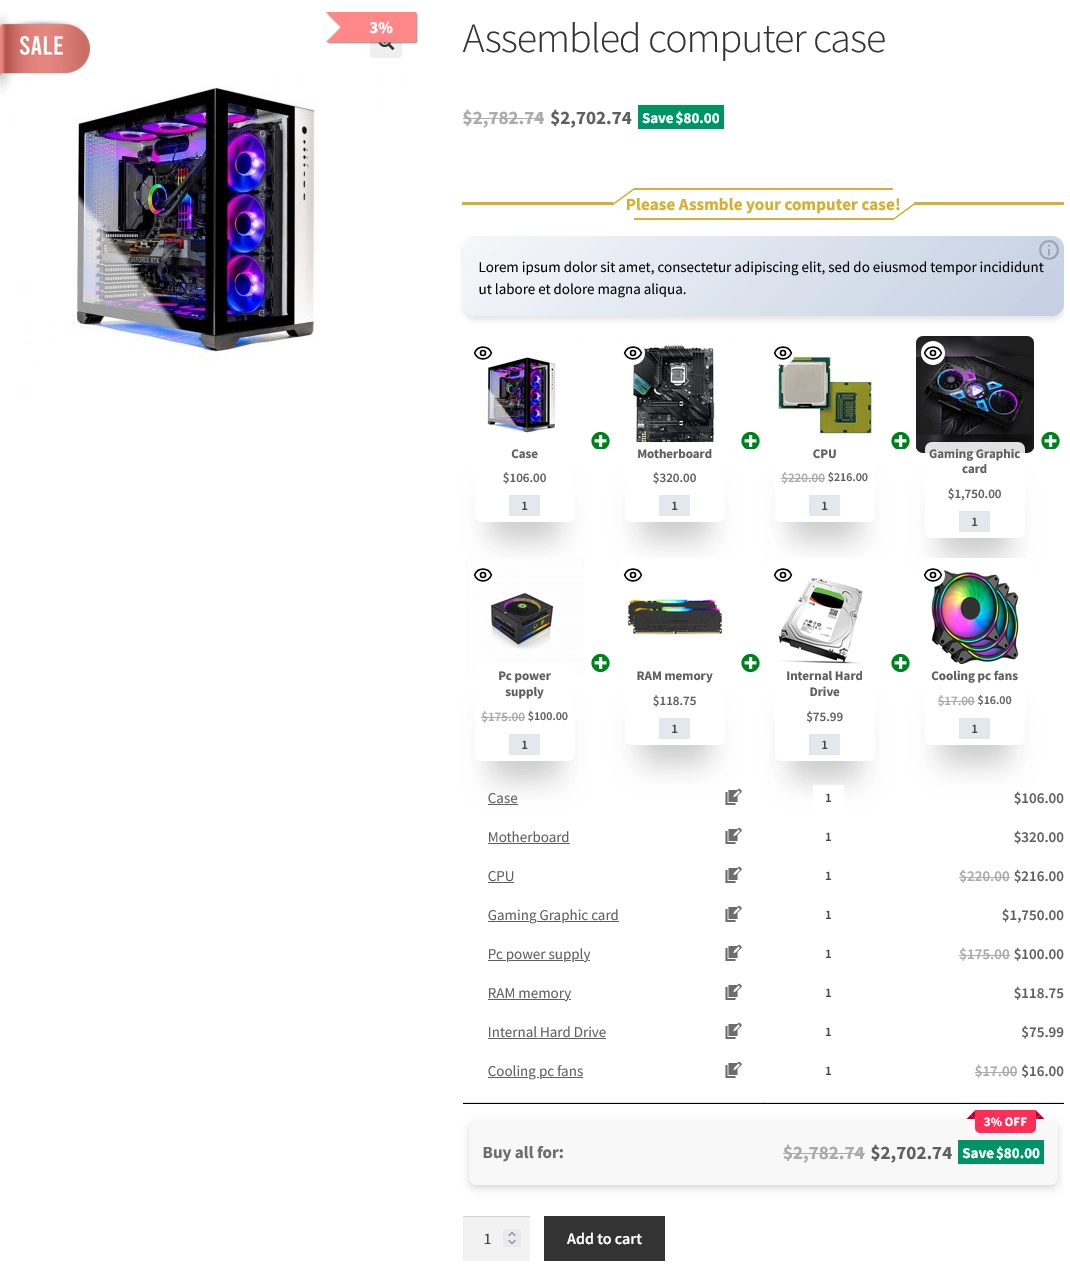
For example, with a “Build Your Own PC” composite product, customers can choose the case, motherboard, graphics card, and other components to create a personalized computer. Another popular example is a “Build Your Pet Basket,” where customers select toys, treats, grooming products, and more to create a custom gift basket. As different options are selected, the total price updates dynamically based on the chosen items.

Composite products give customers flexibility while keeping the buying process structured and easy. By offering tailored product combinations, you can improve the shopping experience and increase conversions in your WooCommerce store. This means more visitors complete their purchases instead of leaving the site, helping you generate higher sales from the same amount of traffic.

Benefits of WooCommerce Composite Products

WooCommerce composite products offer powerful advantages for online stores that want to sell smarter, not just more.

  • Customization: Customers can build products that match their exact needs. This creates a more personal shopping experience and increases satisfaction.
  • Flexibility: Composite products work for many business models—such as build-your-own kits, product bundles, subscription boxes, or configurable packages.
  • Higher Sales Potential: When customers select components themselves, they often add more items than they originally planned. This naturally increases average order value (AOV).
  • Built-in Upselling and Cross-Selling: During the configuration process, you can suggest related items or premium upgrades, encouraging customers to enhance their purchase.
  • Stronger Competitive Position: Offering customizable products helps your store stand out. Unique product experiences are harder for competitors to copy.
  • Better Customer Engagement: Interactive product building keeps customers involved longer, which builds trust and increases the likelihood of completing the purchase.
  • Smarter Marketing Opportunities: You can promote personalized bundles, seasonal kits, or targeted offers based on customer preferences.
  • Valuable Data Insights: By analyzing which components customers choose most often, you gain insights into buying behavior. This helps you optimize inventory, pricing, and future product strategies.

In short, composite products don’t just improve the shopping experience—they turn your WooCommerce store into a more strategic and data-driven business.

Example of composite products

Here are some examples of composite products that are created using the Easy WooCommerce Product Bundles plugin:

  • Gift Baskets: Snacks, Beverages, Gourmet Items, Personalized Messages, Gift Wrapping.
  • Custom Computers: CPUs, Motherboards, RAM, Storage, Graphics Cards, Power Supplies, Cases
  • Furniture Sets: Sofa, Chairs, Coffee Tables, Lamps, Rugs, Cushions
  • Home Theater Systems: TVs, Soundbars, Speakers, Blu-ray Players, Streaming Devices
  • Custom Jewelry: Chains, Pendants, Charms, Stones, Engravings
  • Meal Kits: Main Ingredients, Side Dishes, Sauces, Spices, Cooking Instructions
  • Custom Apparel: T-Shirts, Hoodies, Pants, Hats, Custom Prints
  • Beauty and Skincare Sets: Cleansers, Toners, Moisturizers, Serums, Masks

How to Create WooCommerce Composite Products

🎥Video Tutorial

Step1: Installing the Product Bundle Builder for WooCommerce

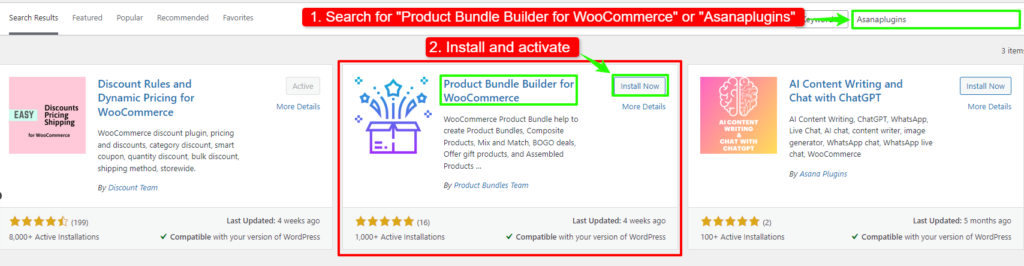
The Easy WooCommerce Product Bundles free plugin is one of the best WooCommerce plugins for creating composite products in your online store, so Follow the steps below to install this plugin :

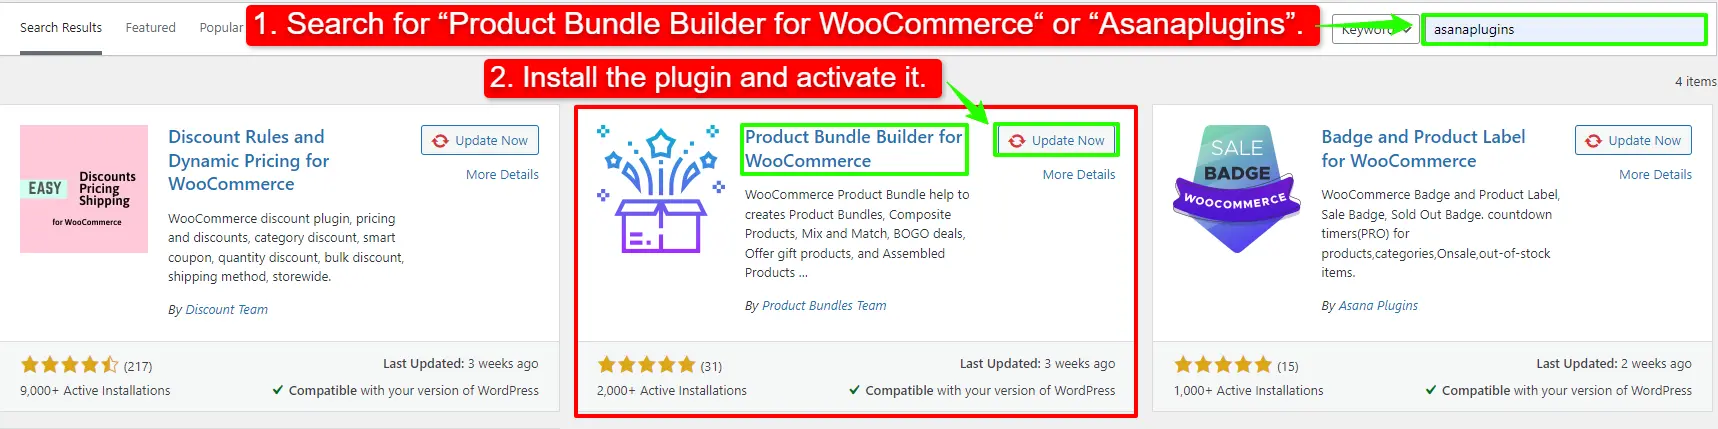
1. Navigate to the Plugins >> Add New menu on your WordPress website

2. Then search for “Easy Product Bundles for WooCommerce“

3. Find the “Bundles – WooCommerce Product Bundles” by “Asana Plugins“

4. Install the plugin and activate it.
install product bundle
Some examples that you can create with the Easy WooCommerce Product Bundles plugin:
  • Simple or Pure product bundles
  • Advanced and Dynamic product bundles
  • Assembled products bundle
  • Mix-and-Match products bundle
  • Frequently bought together products bundle
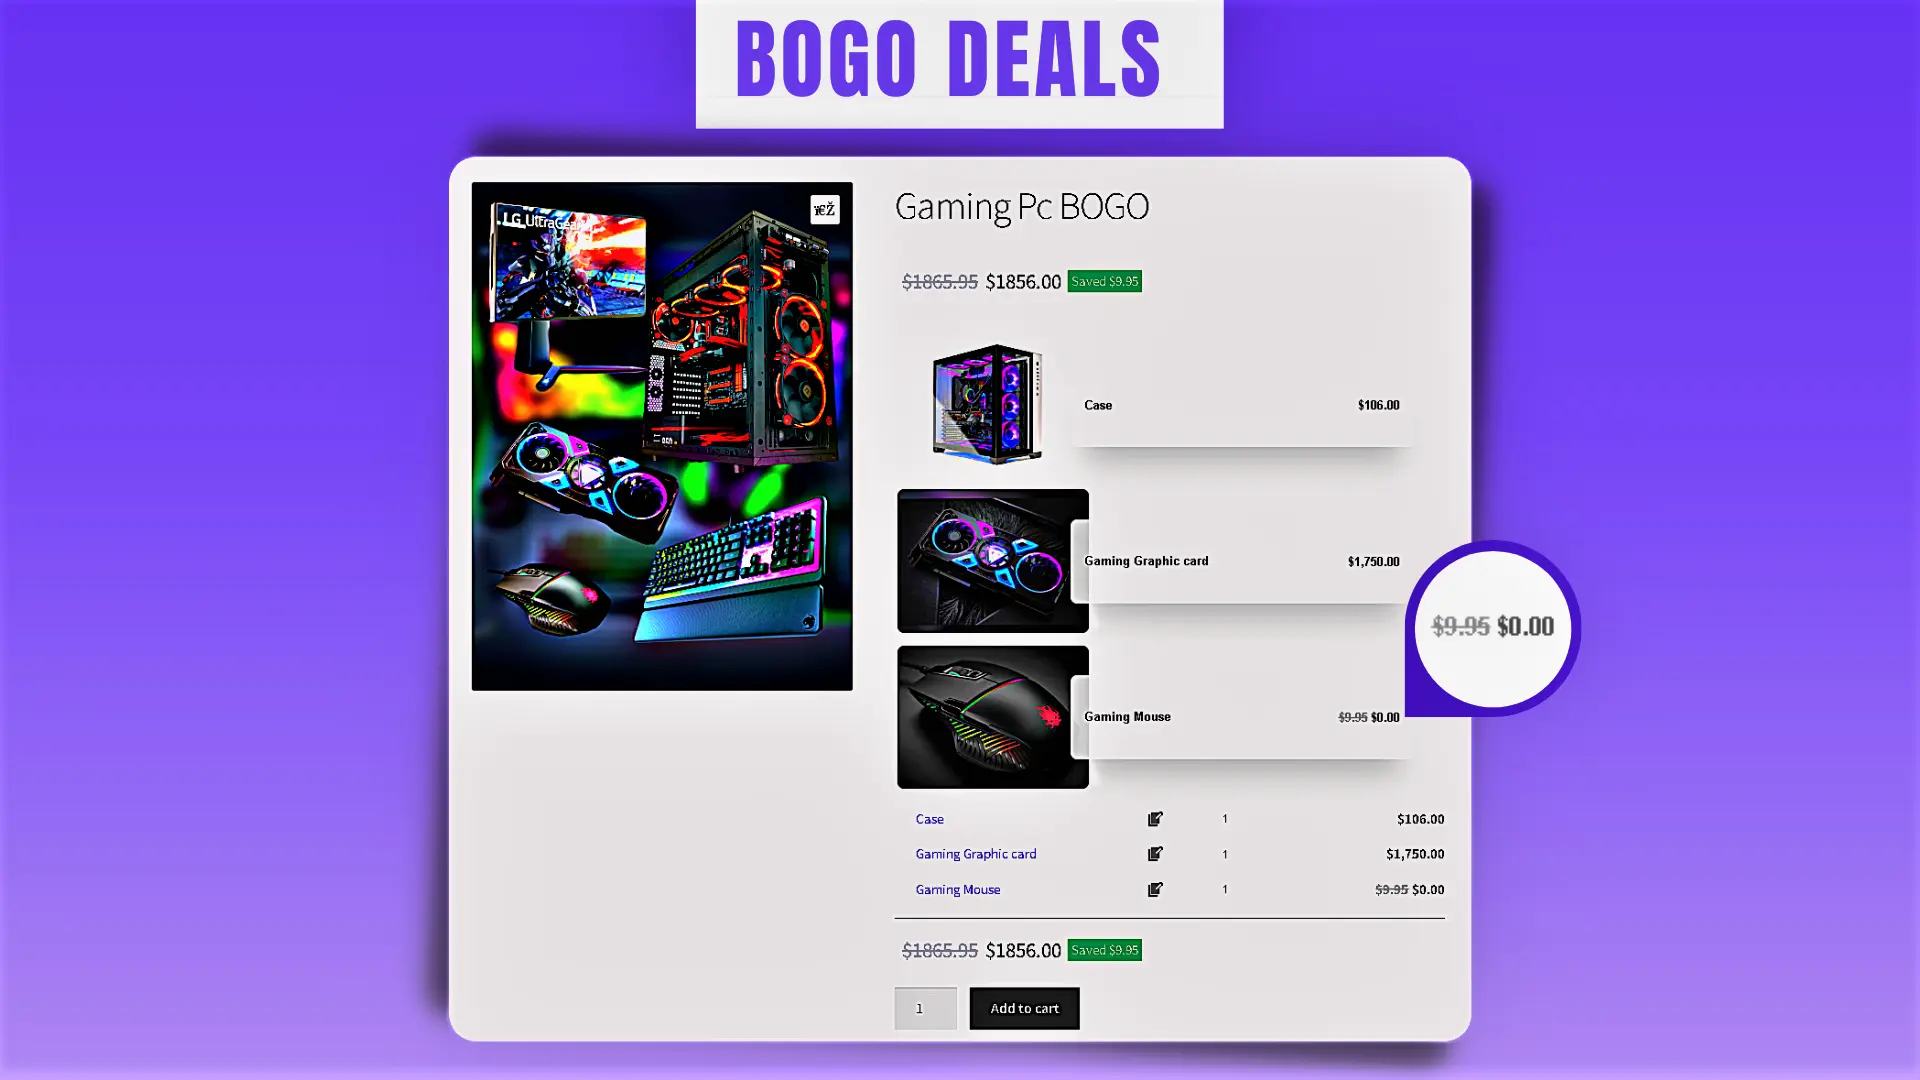
  • Create BOGO deals
  • Give gift products
  • Create Personalized Boxes
  • Recommend addons and essentials
  • Optional products in WooCommerce Product Bundles

Step2: Creating WooCommerce Composite Products

Therefore after installing the Easy WooCommerce Product Bundles free plugin, you can create composite products in WooCommerce.
Here we will create composite products from Pet Supplies:

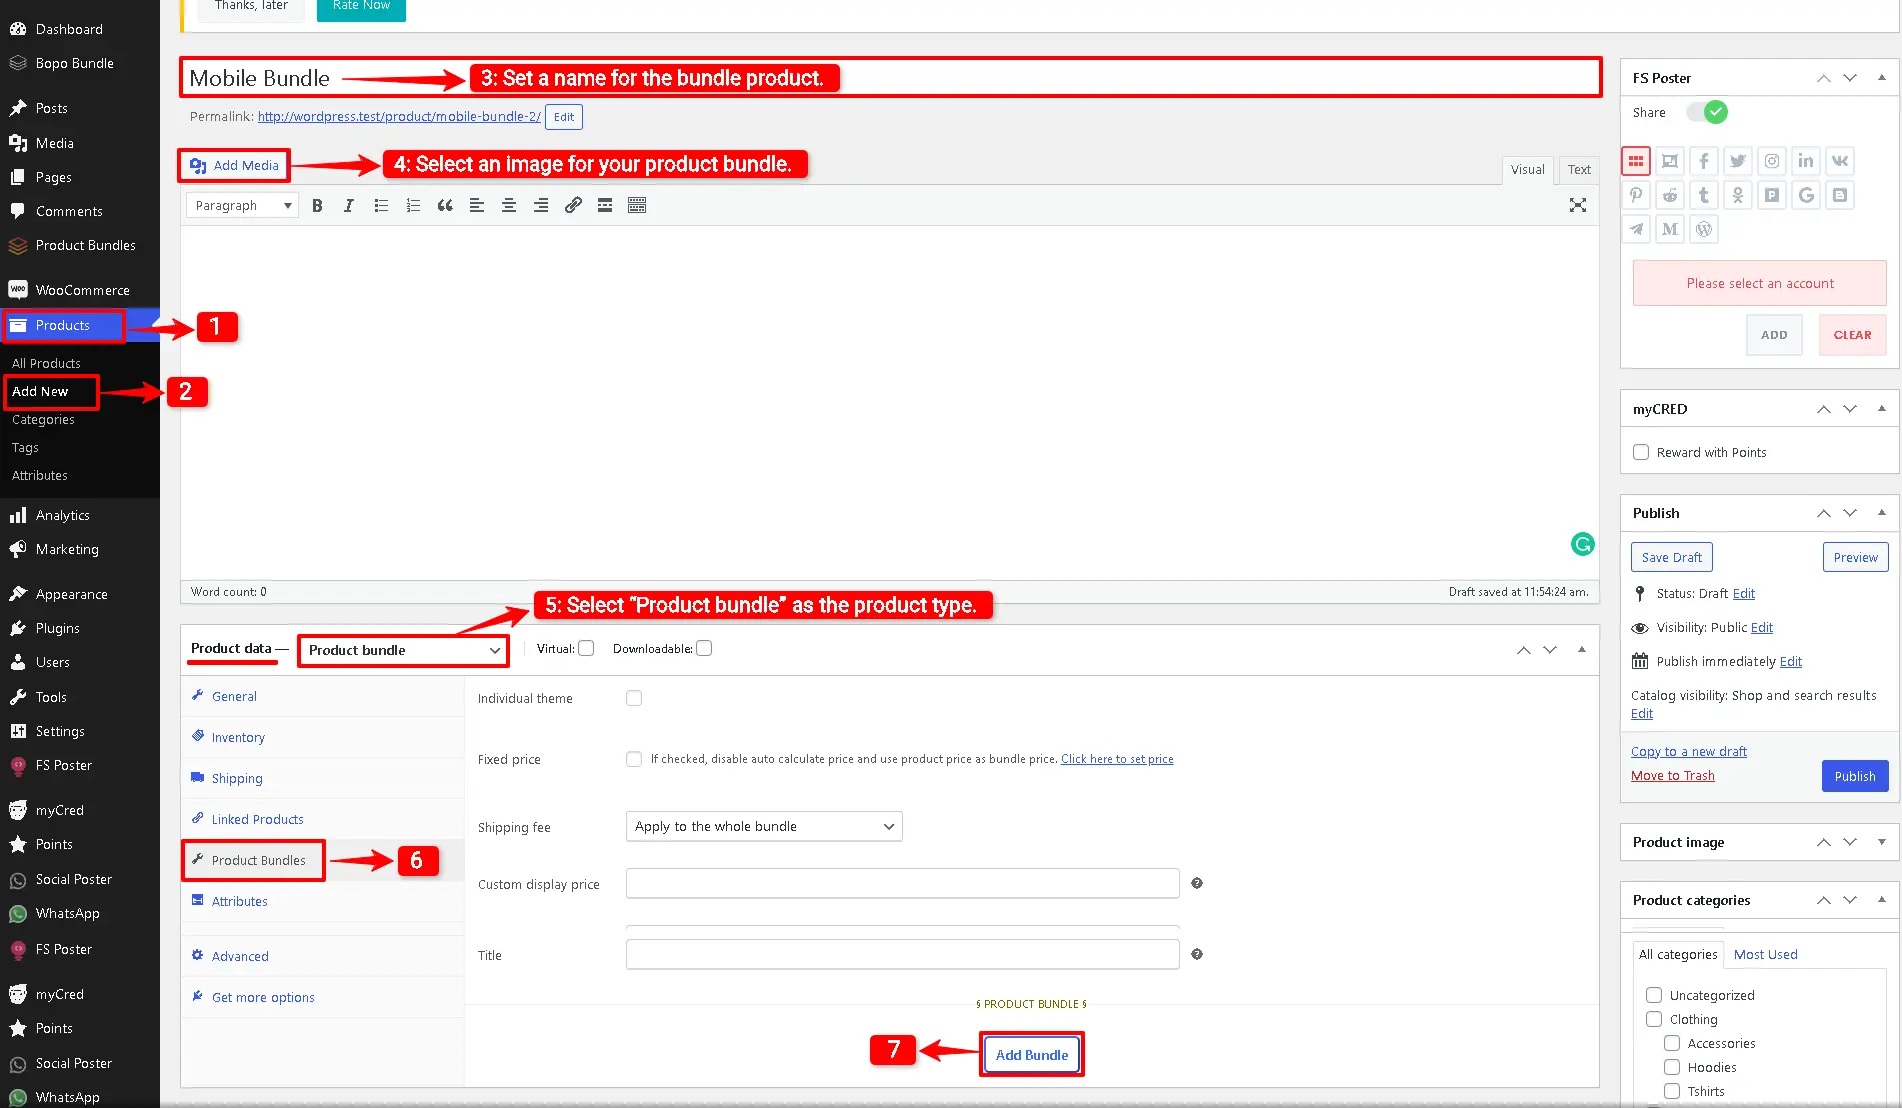
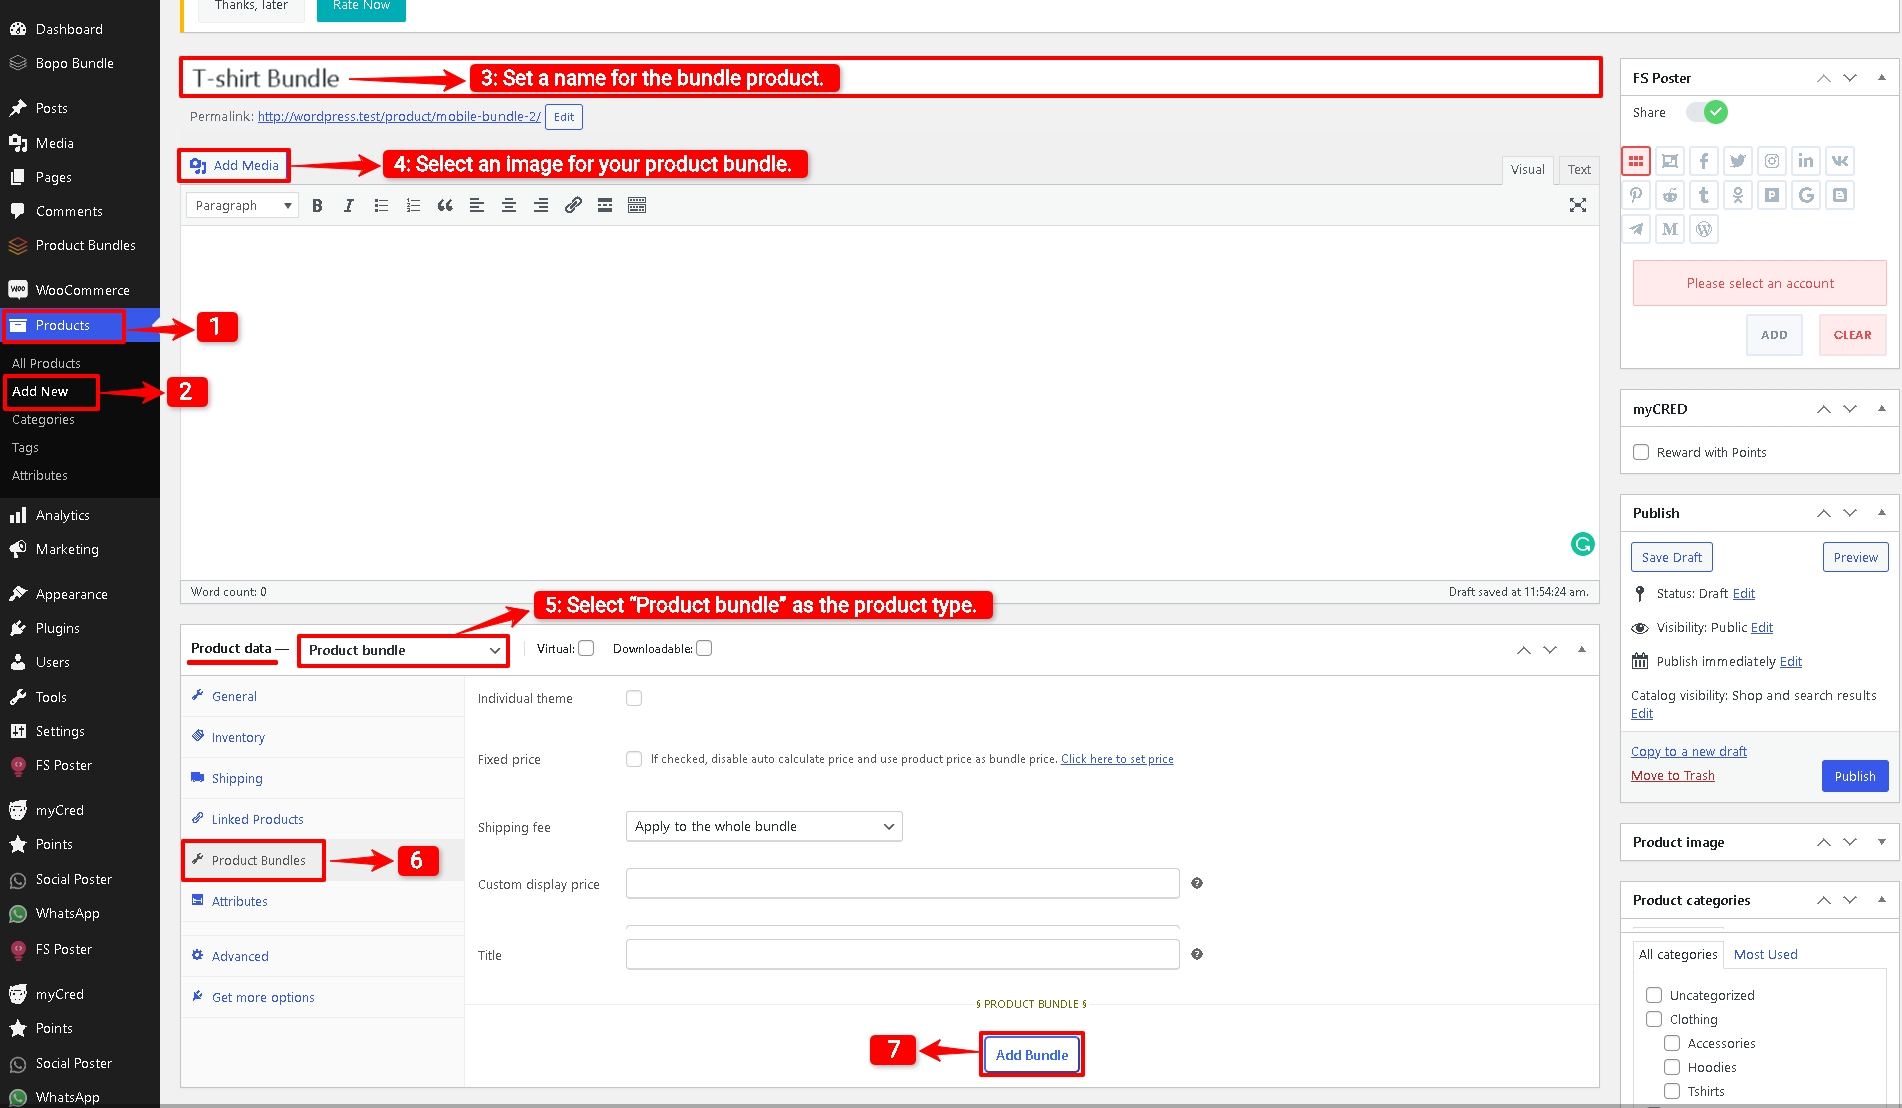
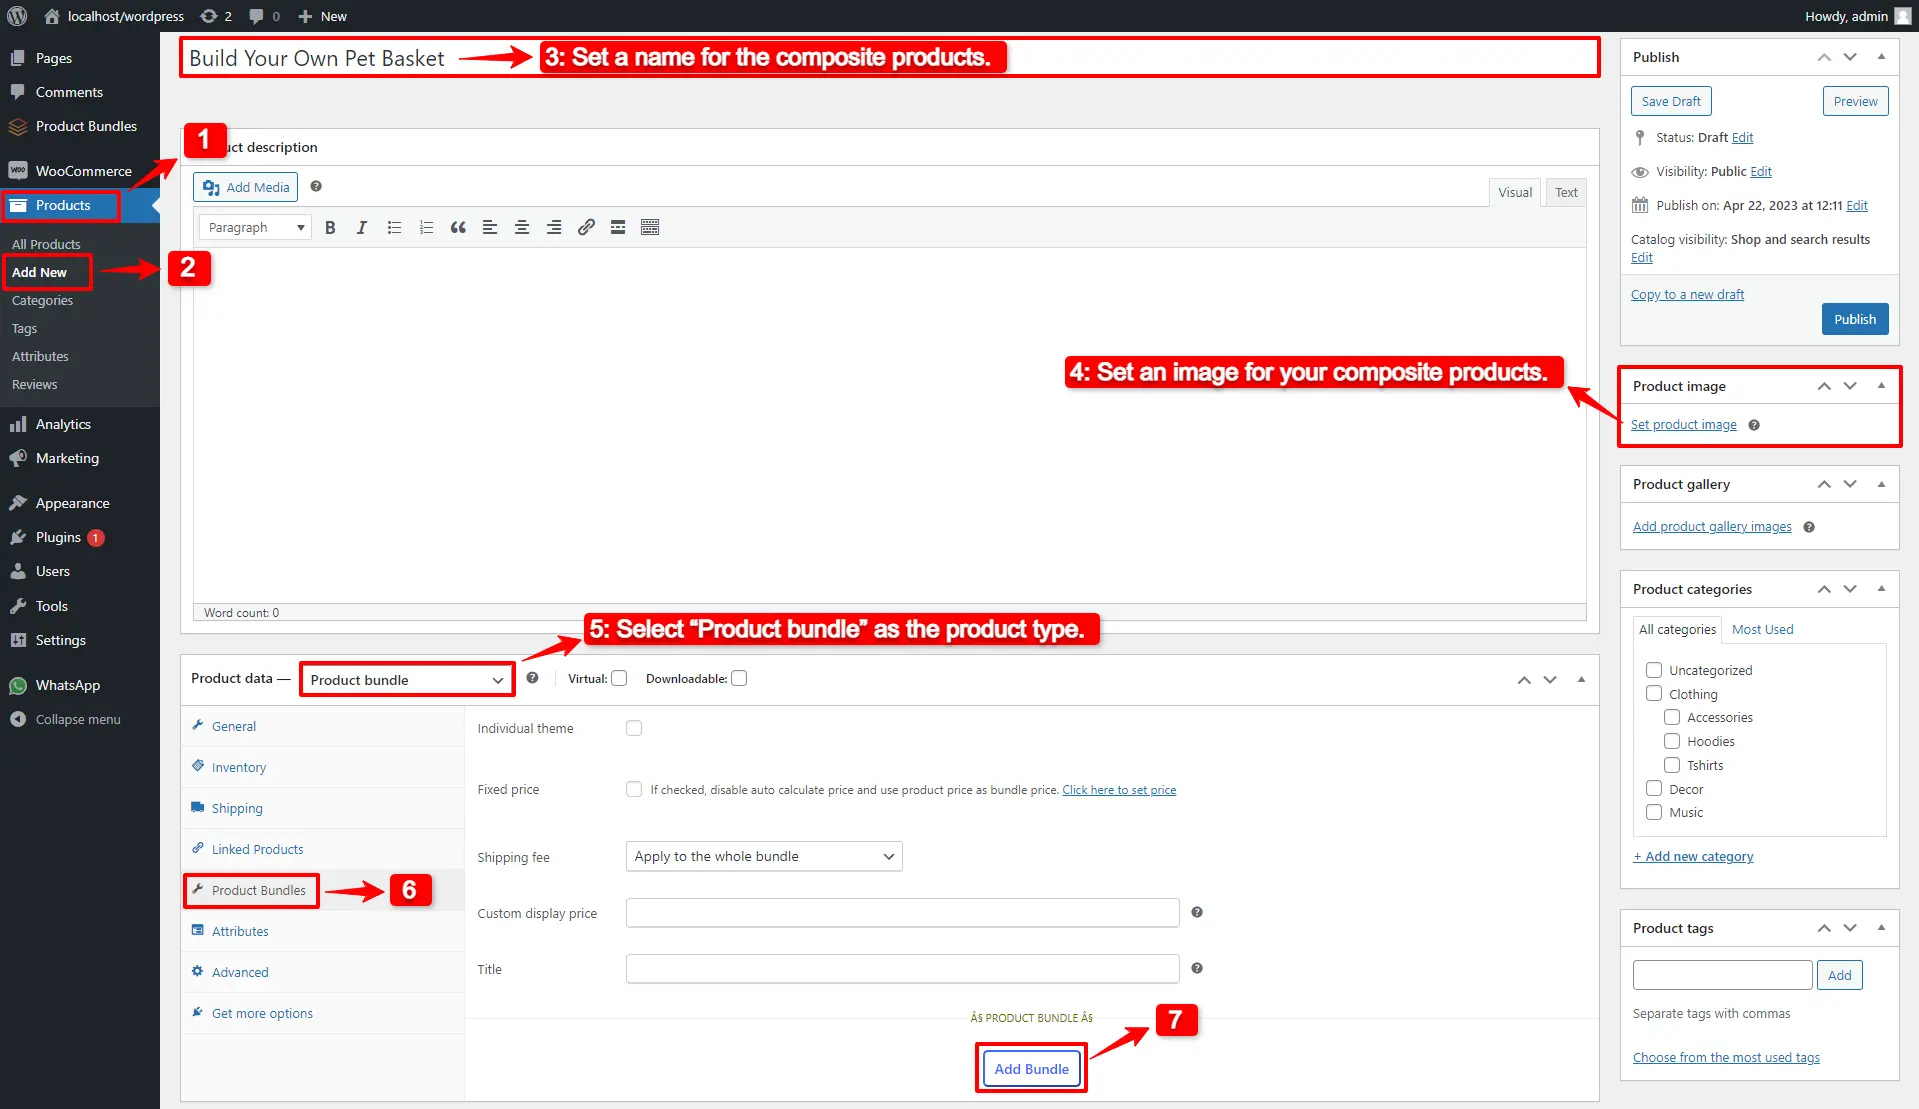
1. Navigate to WooCommerce “Products”.

2. Click on “Add New” to create a new product.

3. Set a name for the composite products, for instance, “Build Your Own Pet Basket”.

4. Click on “Set product image” from the right sidebar and select an image for your composite products.

5. Now navigate to the Product data panel, and select “Product bundle” as the product type.

6. After selecting “Product bundle” as the product type the “Product Bundles” tab will appear in the product data panel.

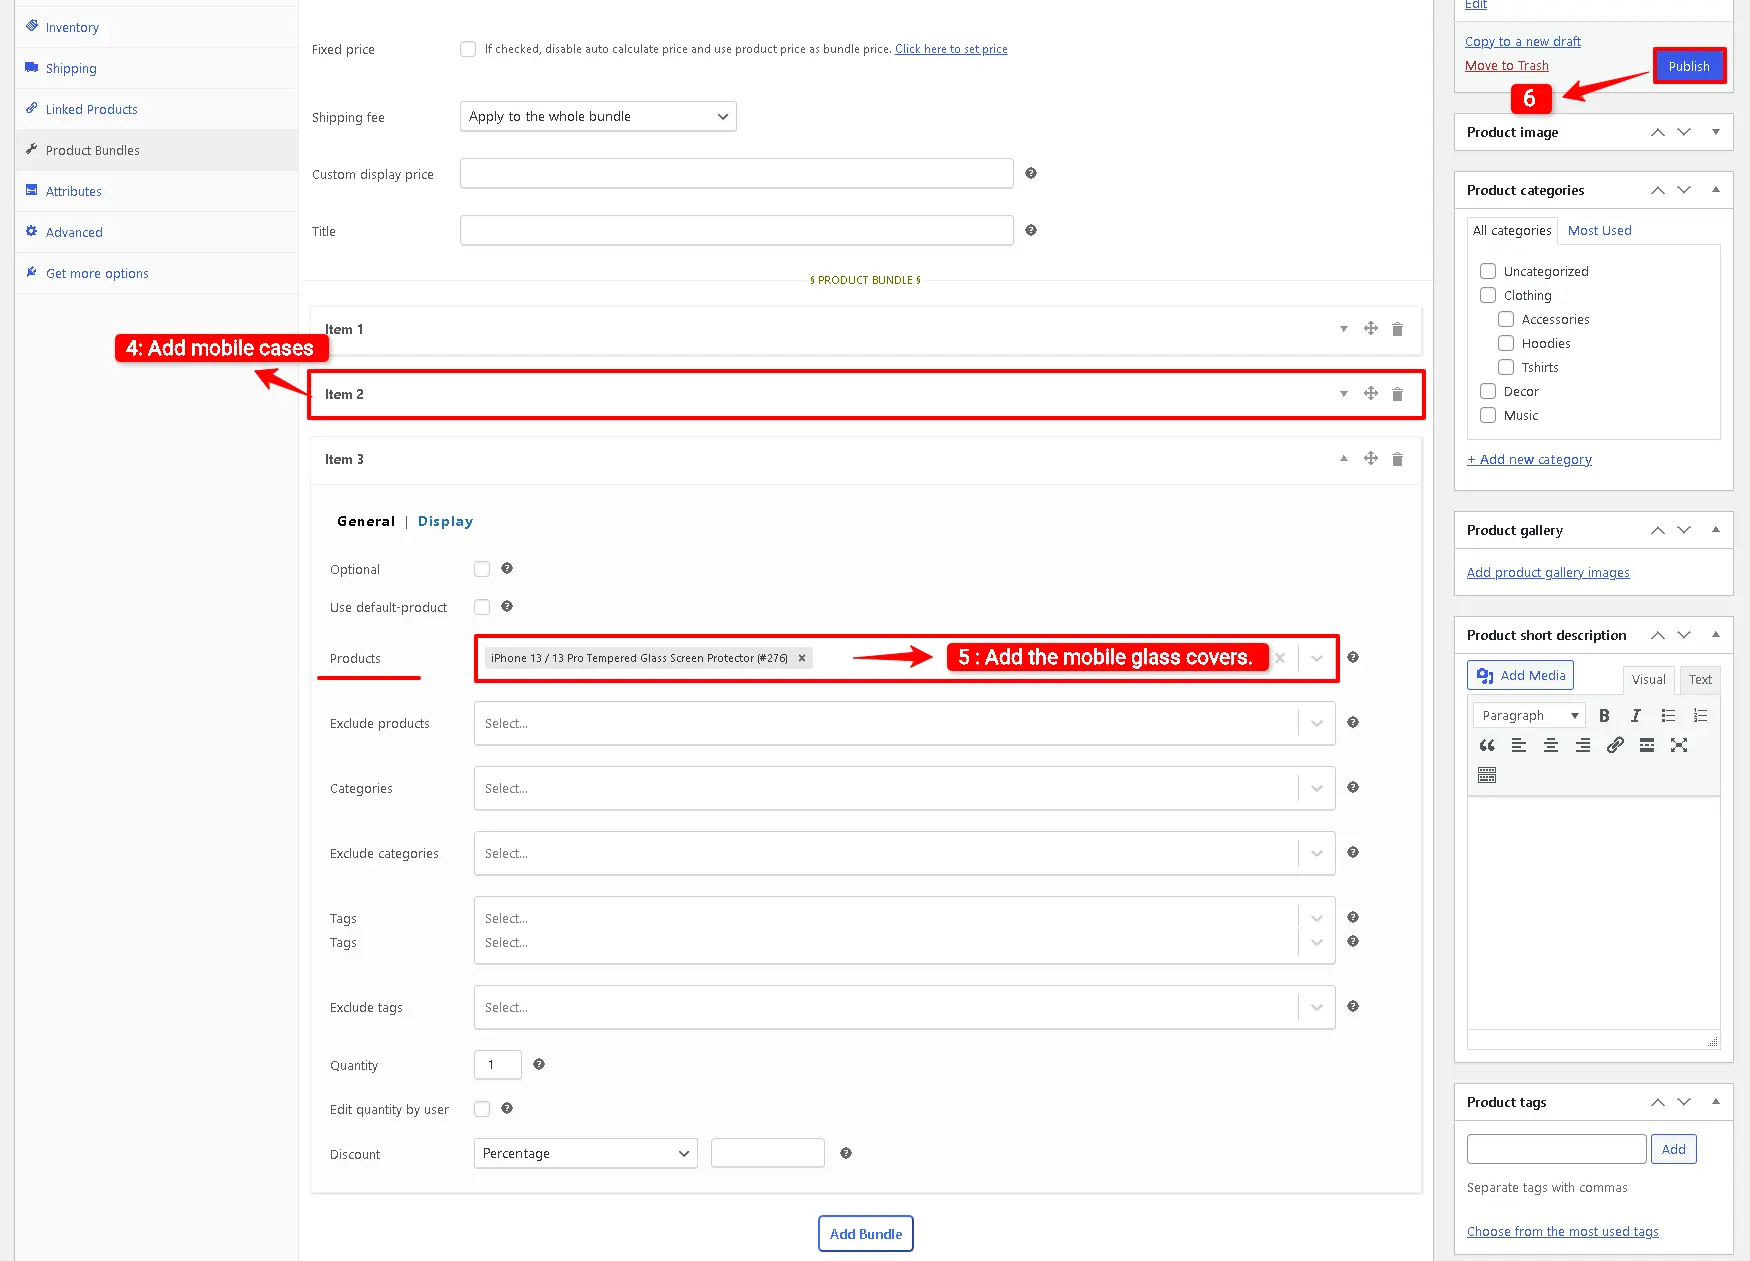
7. Navigate to the “Product Bundles” tab and click on the “Add Item” button to add a new bundle item to the composite products.
How to Create WooCommerce Composite Products

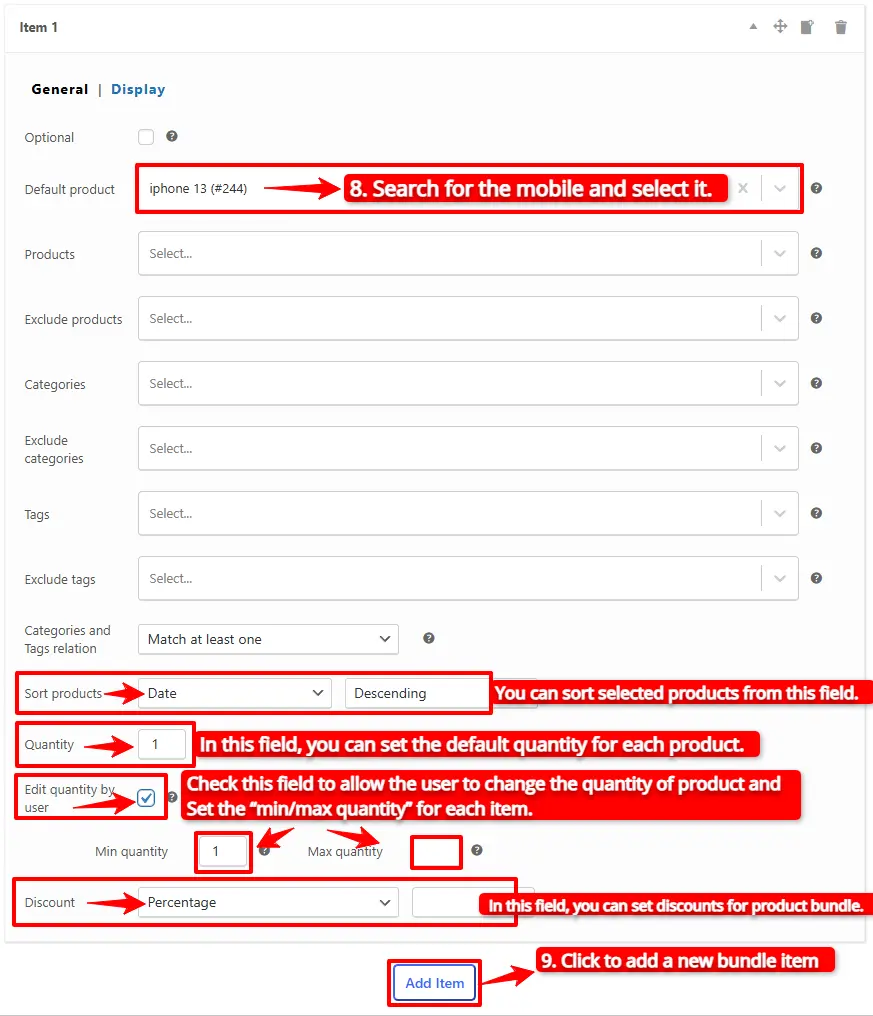
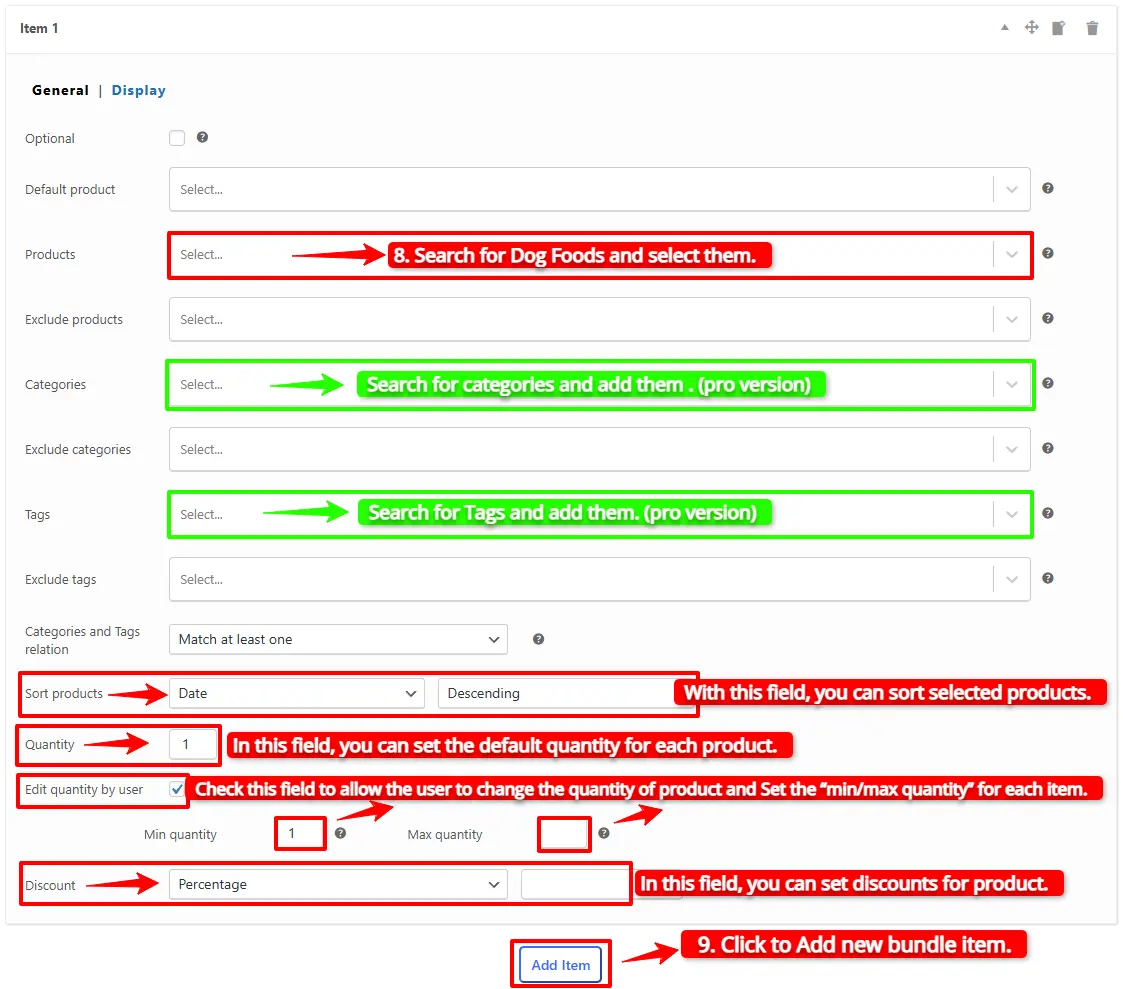
8. Now, in the “Products” field, search for Dog Foods and select them.

  • Or Likewise, if you would like to include products from a category, you can do it with the “Categories” field of the item. therefore you can search for categories and add them to the “Categories” field. (pro version)
  • in addition, you can do the same for the product tags and include them in the “Tags” field. (pro version)

Step 3: Customising WooCommerce composite product Bundle

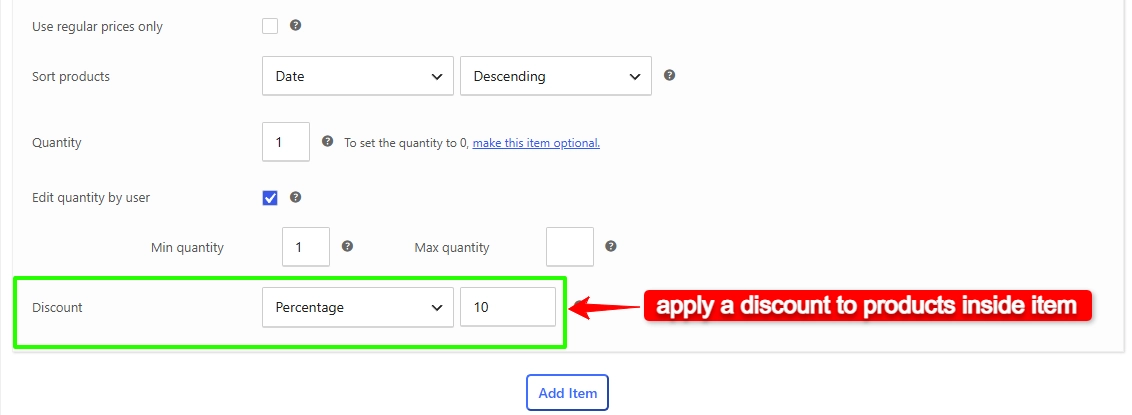
You can also configure the below settings to your WooCommerce Product Bundle in the item field:

  • Sort products: With this field, you can sort selected products by “ID”, “Title”, “Menu order”,” Date”, “Price”, “popularity” and“Rating”.
  • Quantity: In this field, you can set the default quantity for each product.
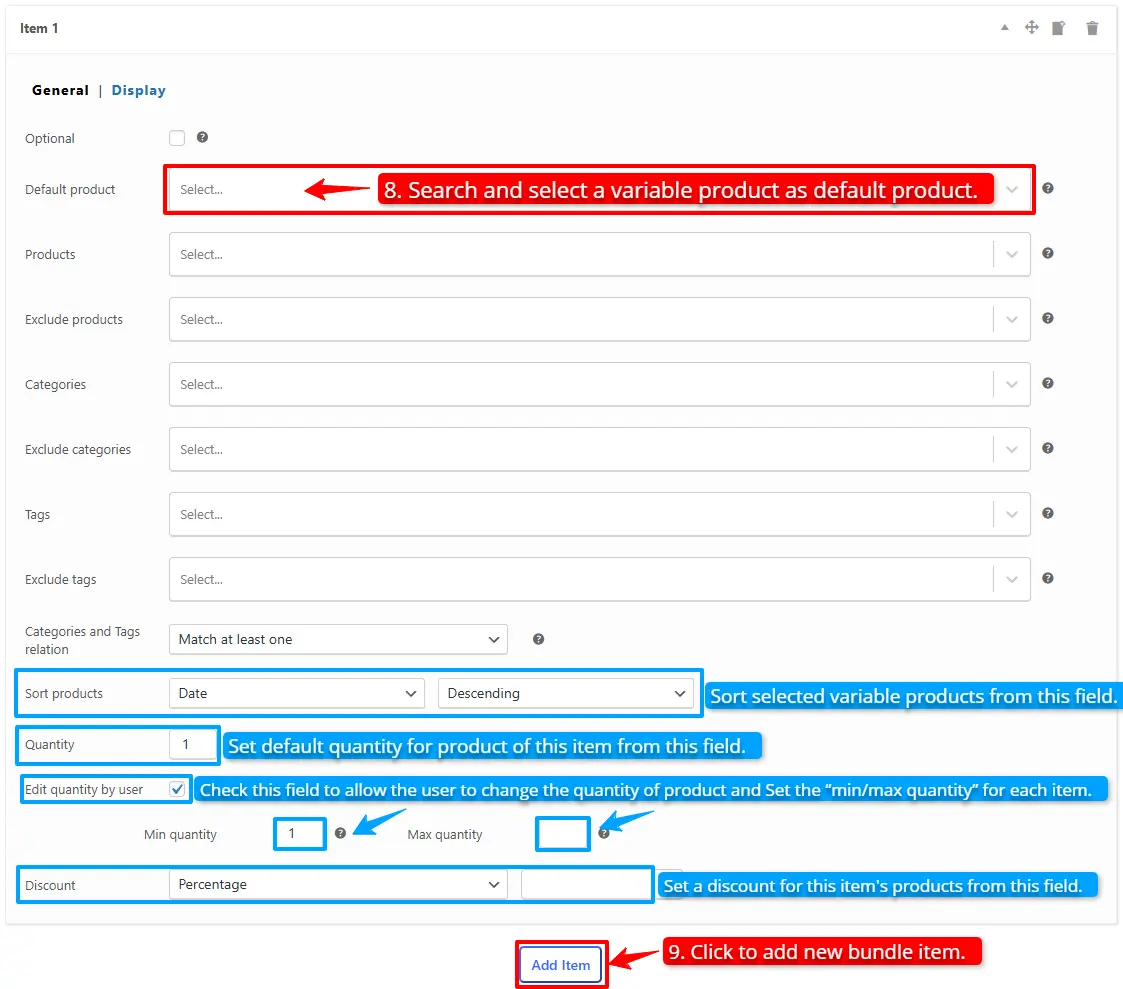
  • Edit quantity by user: Check this field to allow the user to change the quantity of product and Set the “min/max quantity” for each item.
  • Discount: In this field, you can set discounts for product bundles by percentage, price or fixed price.
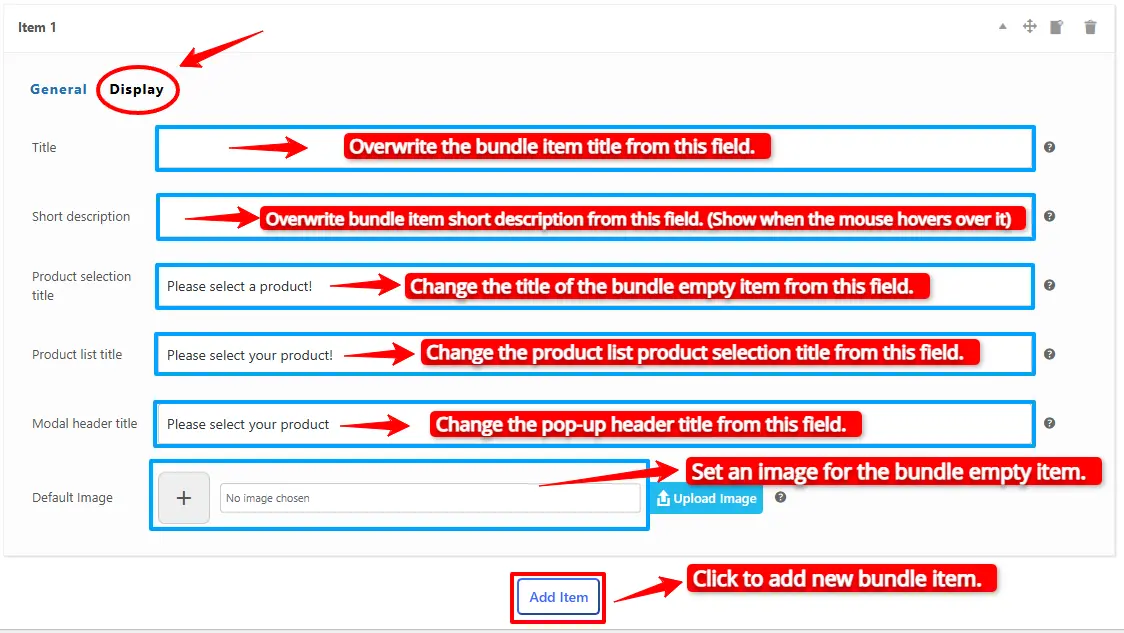
Now you can go to the “display” tab of the item and configure the following sections:

  • Overwrite bundle item title.
  • Overwrite bundle item short description. (Show when the mouse hovers over it)
  • Change the title of the bundle empty item.
  • Change the product list product selection title.
  • Change the pop-up header title.
  • Set an image for the empty item.
Display tab of product bundle item

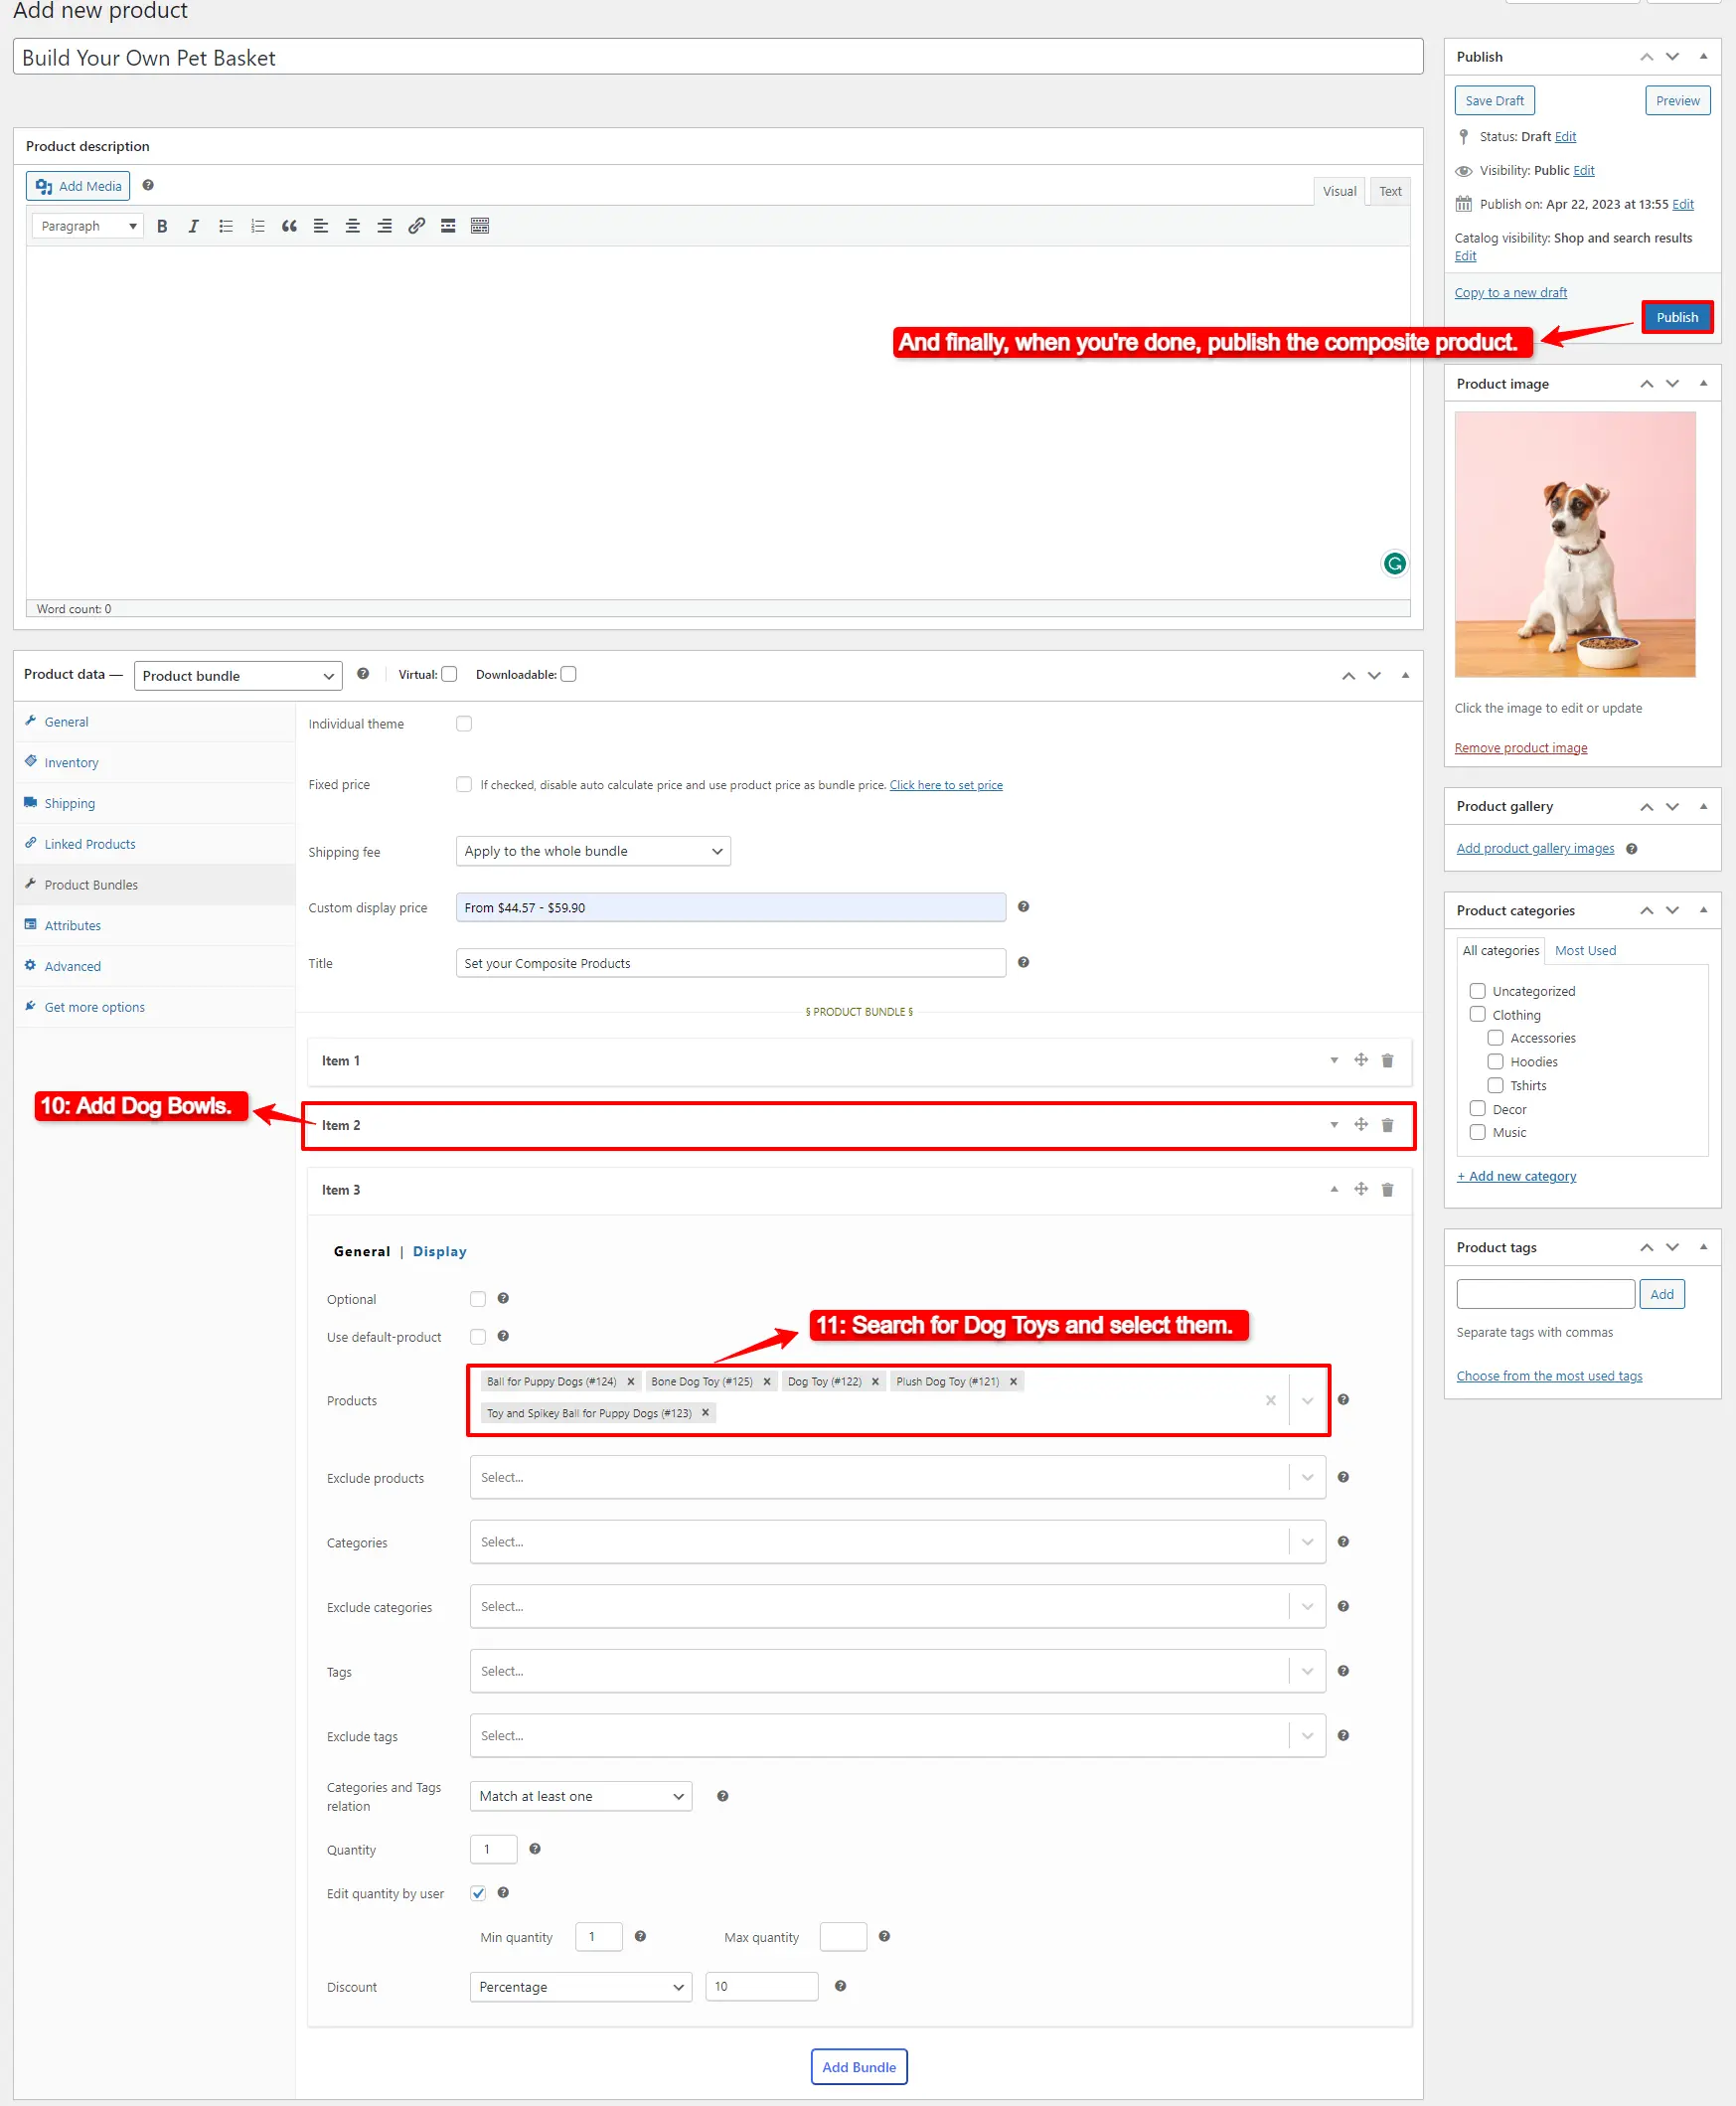
9. Then click on the “Add Item” button to add a new bundle item for the Dog Bowls.

10. Now in Item 2 in the “Products” field, search for Dog Bowls and select them.

11. Click on the “Add Bundle” button to add a new bundle item for the Dog Toys. Then in the “Products” field search for Dog Toys and select them.
publish composite products

Step4: Pricing for WooCommerce Composite Products

After adding products you can choose how want to price your composite product.

The Easy WooCommerce Product Bundles free plugin offers two pricing strategies:

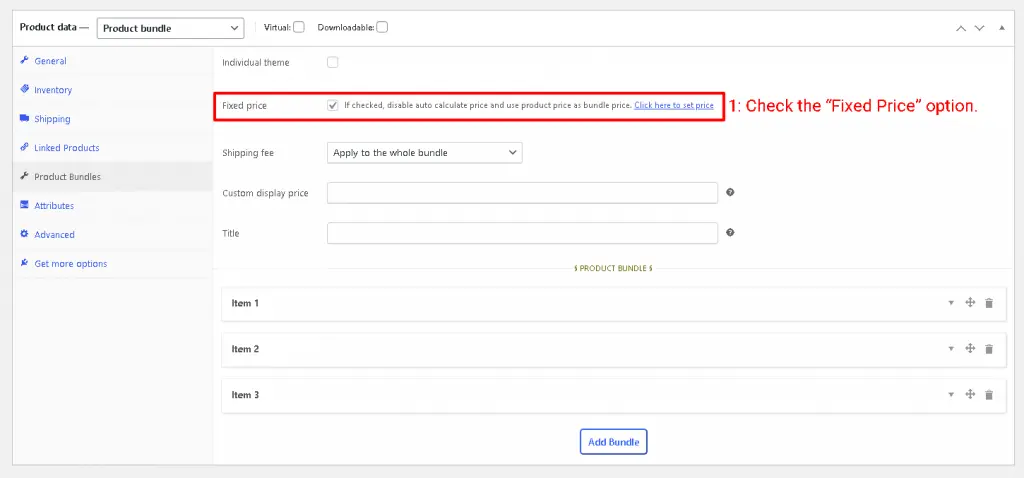
  1. Fixed Price: Sets a fixed price for the whole composite products
  2. Auto Calculate Bundle Price: Allow the plugin to calculate the composite product price using the selected products for the bundle items.

If you want to set a fixed price for the composite product, enable the “Fixed price” option then navigate to the “General tab”, and set a price for the “Regular price” field. You can set a “Sale price” too.
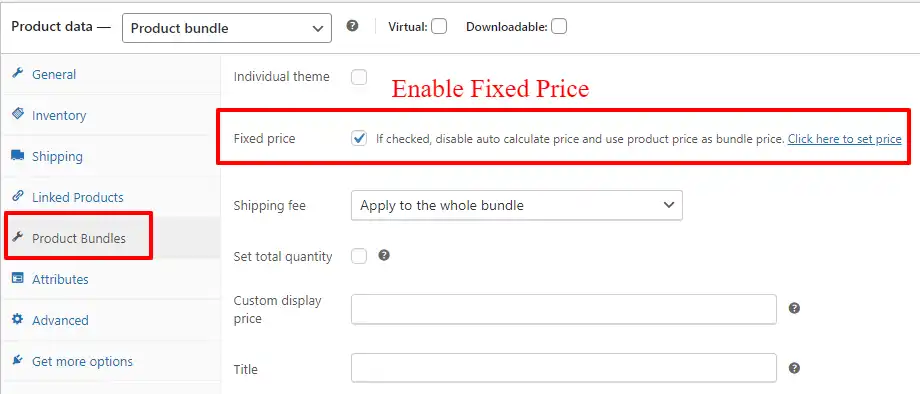
Fixed Price for WooCommerce Composite product


To use the “Auto Calculate Bundle Price” disable the “Fixed price” option.

12. Now you can publish the composite products on your website.

Step 5: Configure the Plugin Settings

All the plugin settings you need can be found on the “Product Bundles” tab in the WordPress dashboard.
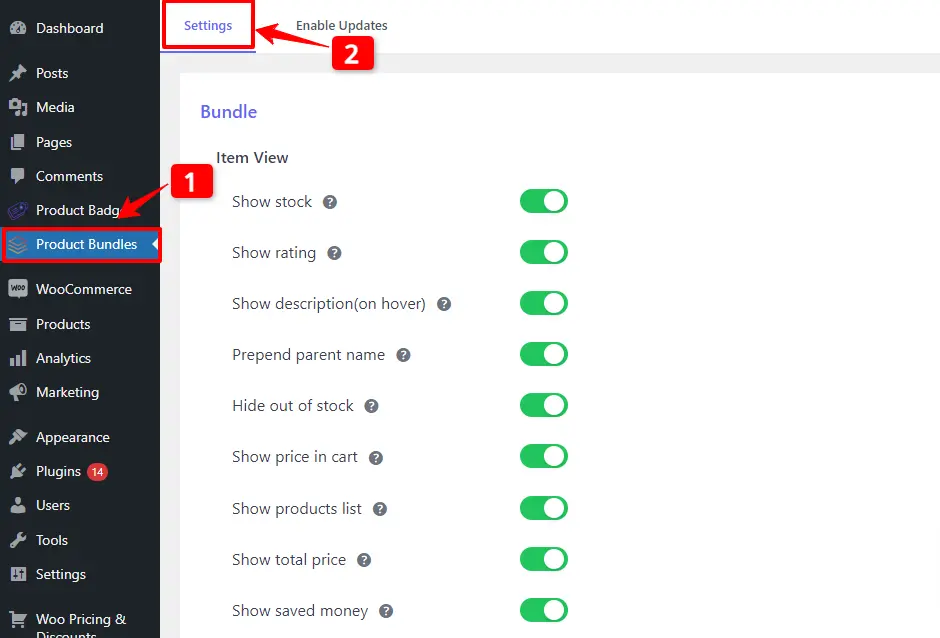
Configure the Product Bundles plugin Settings

Settings and customization are available on this page:

Item View: In this section, you can configure various settings, such as displaying stock availability, showing product ratings and descriptions, adding a quantity field on item pages, displaying a plus icon for items, setting the theme and size options, positioning product bundles on the product page, defining custom CSS selectors, specifying the product price selector, and many other customizable options.

Change product popup: In this section, you can configure popup settings.

Styles: In this section, you can customize the colours of different parts of your bundle and set the product image object-fit CSS.

Final Result of WooCommerce Composite Products

As a result, the WooCommerce composite products are like the image below.
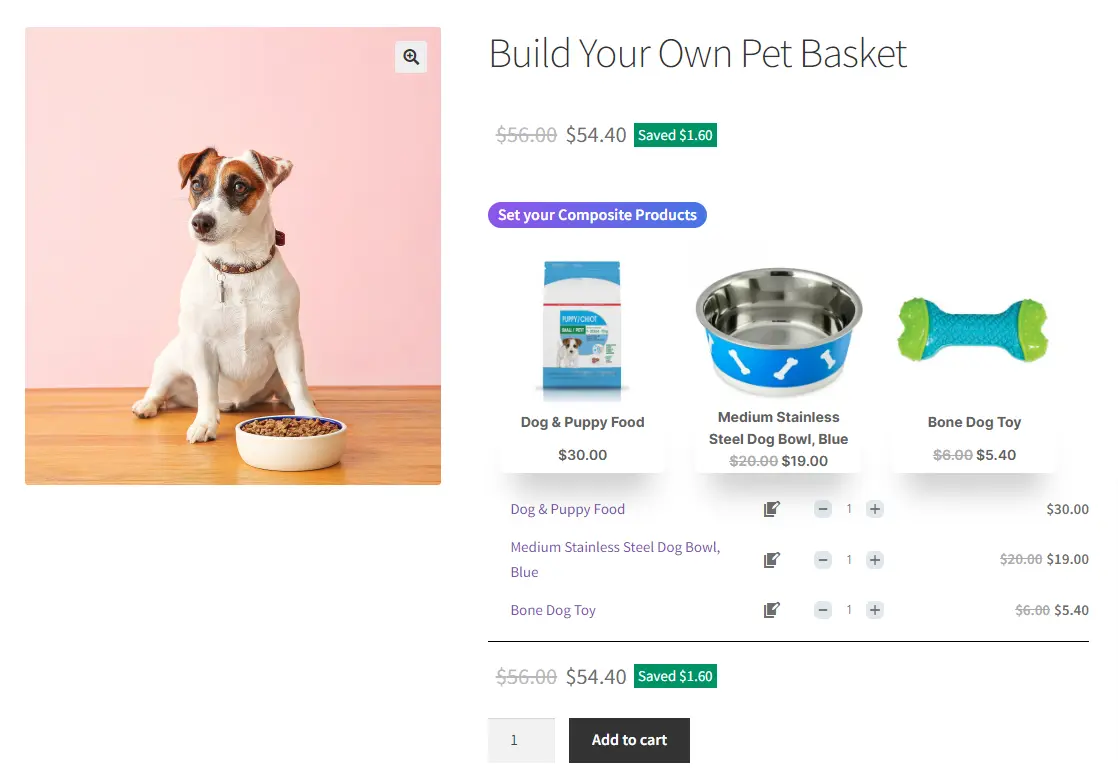
How to Create WooCommerce Composite Products

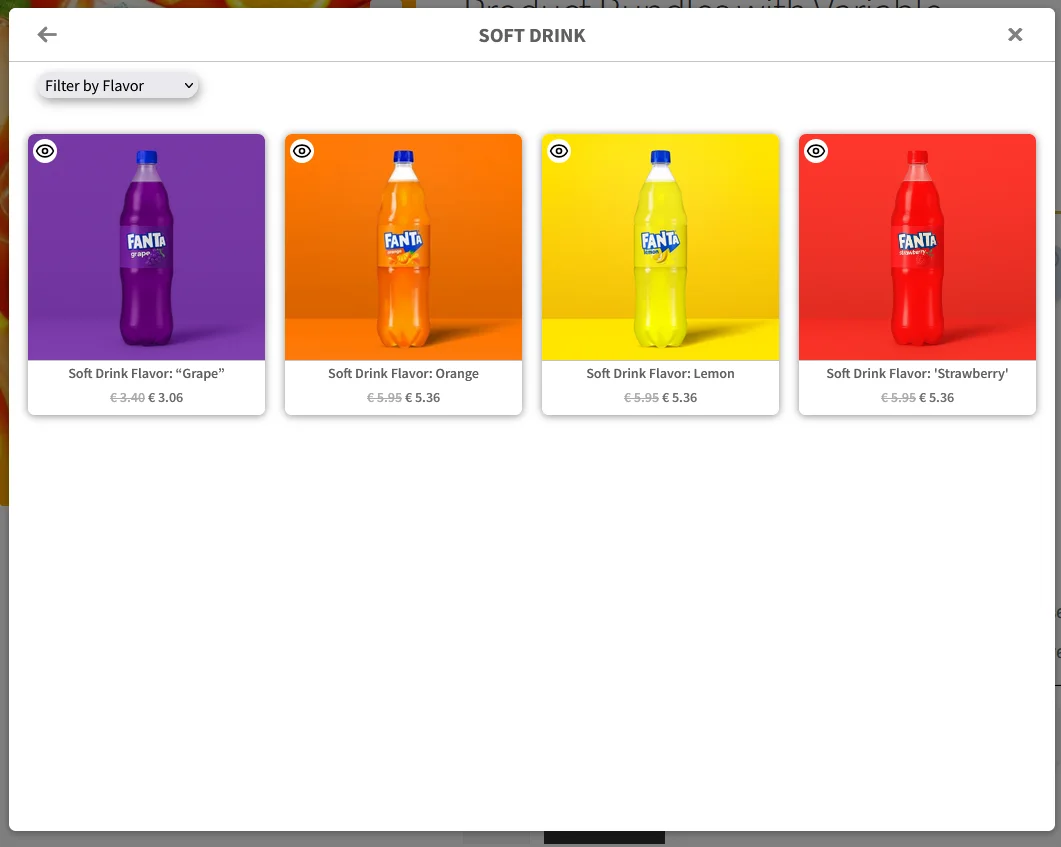
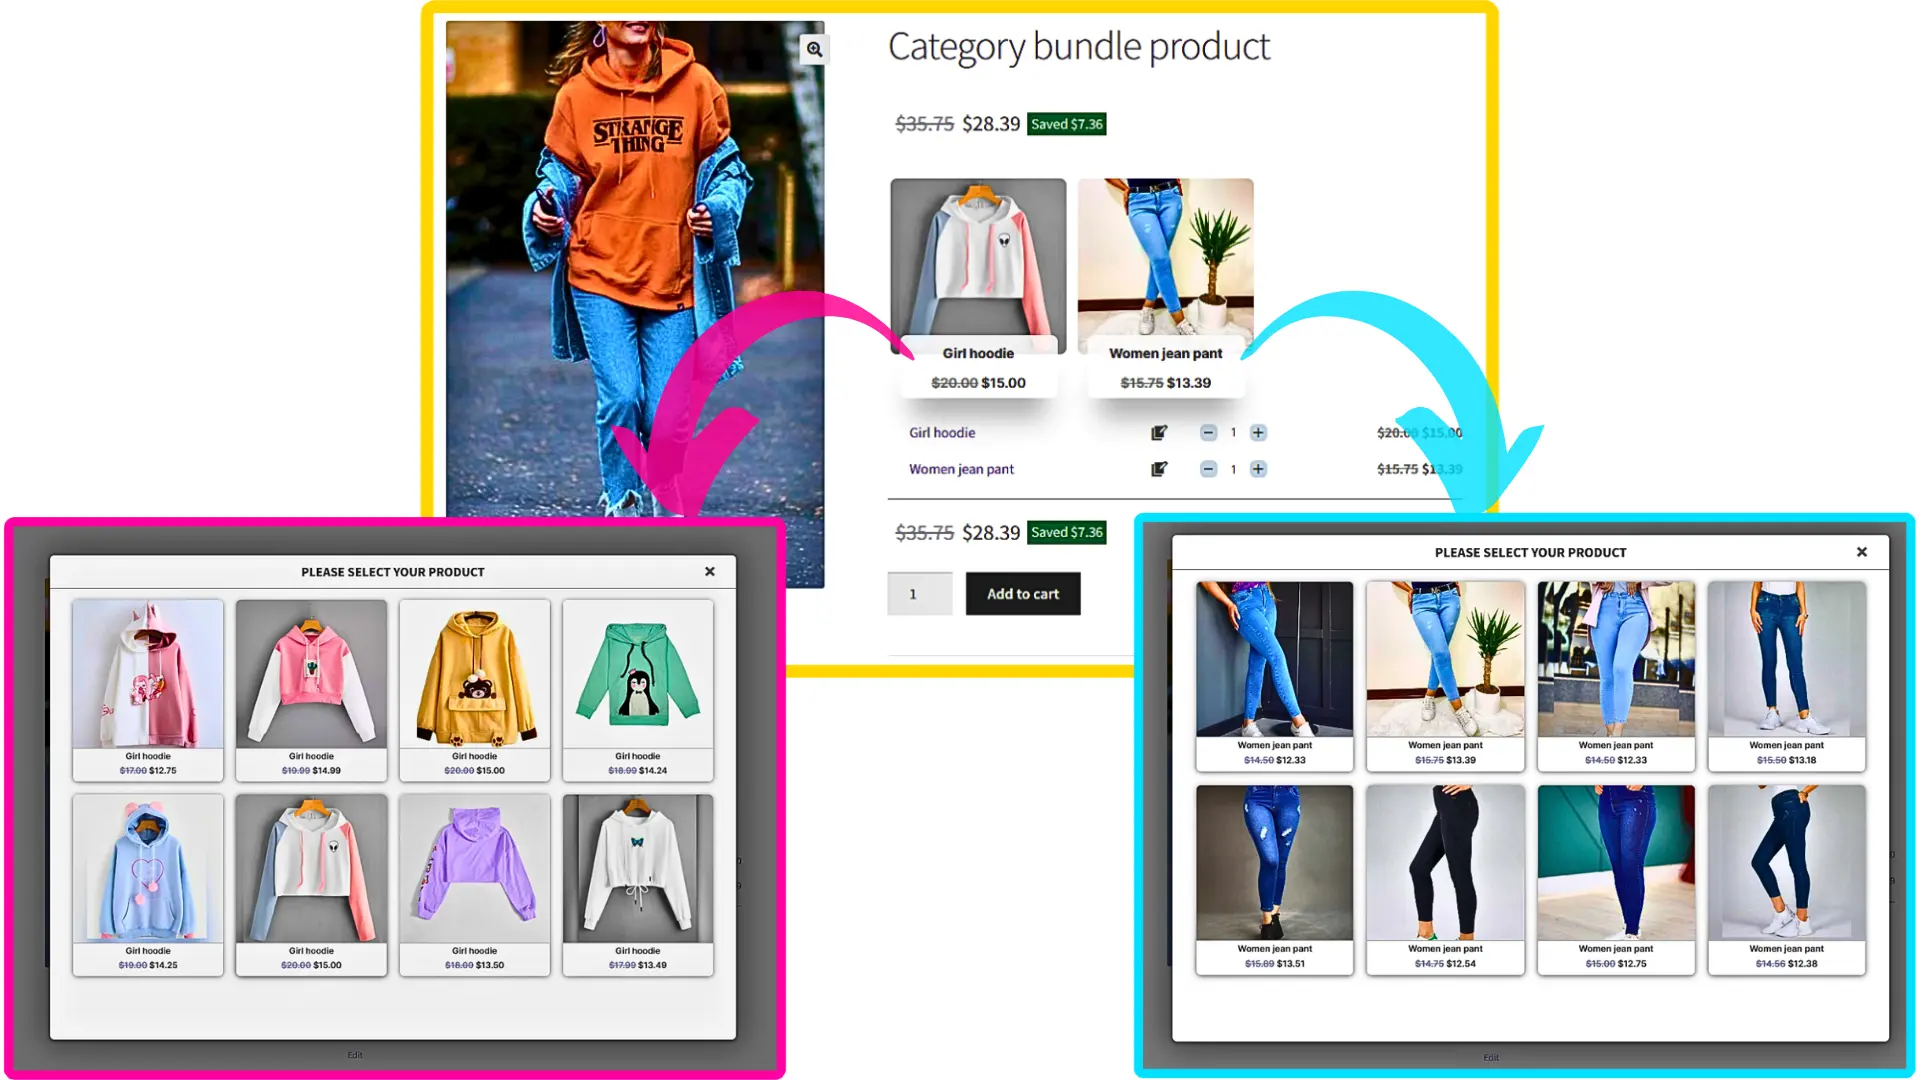
And the customer can choose other available products from the popup.

How to Create a WooCommerce Composite Product with Variable Products

Creating WooCommerce composite products with flexible variable options allows you to deliver a more interactive and personalized shopping experience in 2026. Customers can easily build product bundles that match their exact needs—whether that means choosing size, color, model, or technical specifications—all from a single product page.

For example, you can create a custom laptop builder where users select their processor, RAM, storage, graphics card, and accessories step by step. The price updates dynamically as options change, giving customers full transparency before checkout.

This structured customization improves confidence, reduces cart abandonment, and increases average order value. At the same time, you maintain better inventory control by managing each component individually. The result is a smoother buying journey for customers and a more scalable, professional system for your WooCommerce store.

🎥Tutorial

Step 1: Create Variable Products in WooCommerce

First, you should create Variable products in WooCommerce.

To create variable product in WooCommerce read this article create variable products to create a variable product.

Step 2: Creating WooCommerce Composite Products

1. Navigate to WooCommerce “Products”.

2. Click on “Add new product” to create a new product.

3. Set a name for the composite products.

4. Click on “Set product image” from the right sidebar and select an image for your composite products.

5. Now navigate to the “Product data” panel, and select “Product bundle” as the product type.

6. After selecting “Product bundle” as the product type the “Product Bundles” tab will appear in the product data panel.

7. Navigate to the “Product Bundles” tab and click on the “Add Item” button to add a new bundle item to the composite products.

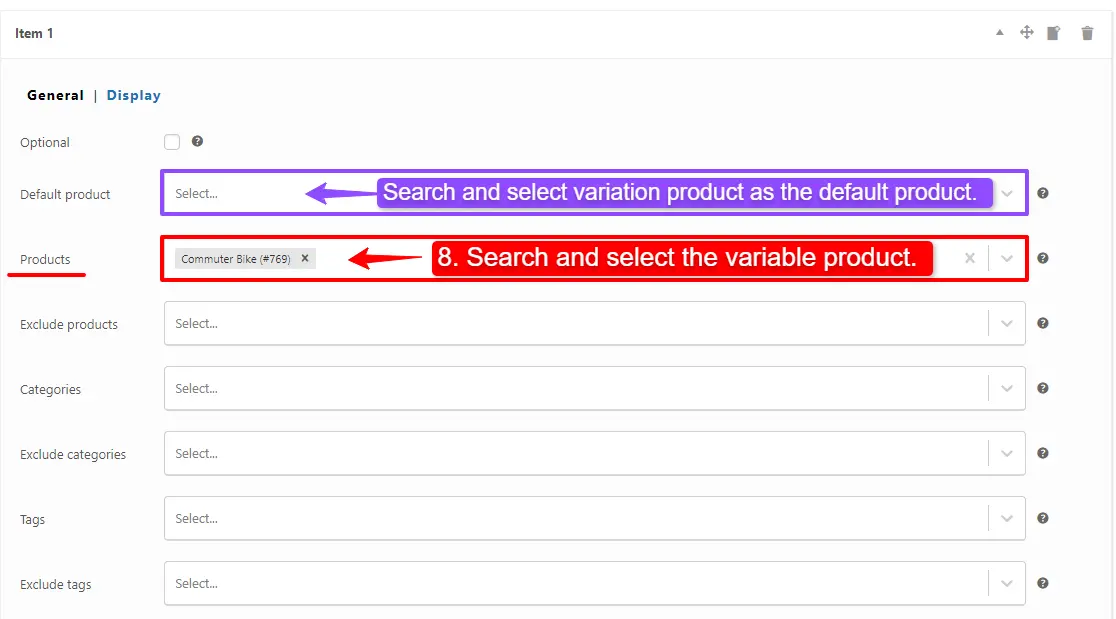
8. Now scroll down to the item field, and in the “Products” field of the item Search and select the Variable products you want.

you can also set the default variation product for this item in the default product field. (PRO VERSION)
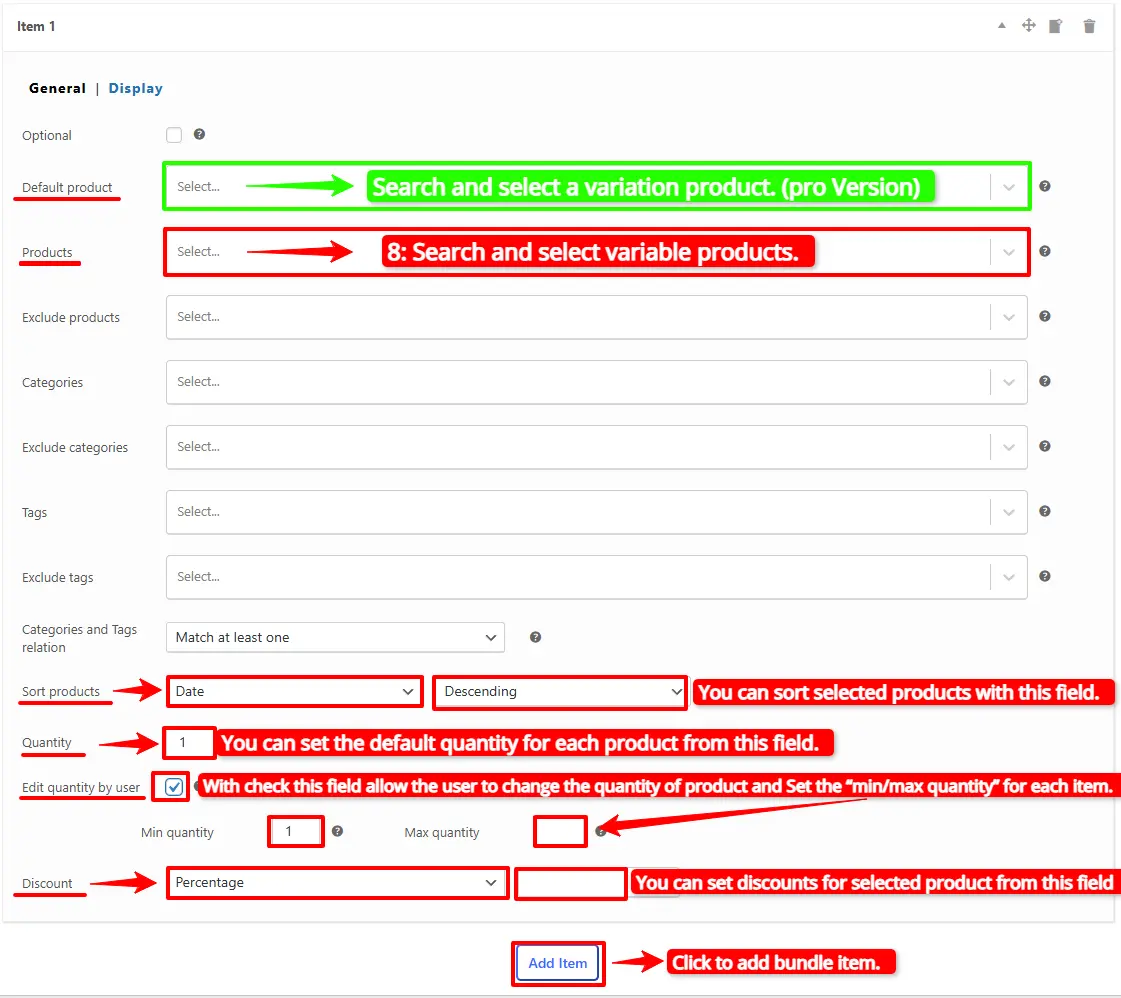
Add variable product to WooCommerce Composite Product

Step 3: Customising WooCommerce composite products

For customising the composite product, please read this section of the article for more information.

9. Then click on “Add Item” to add a new item to the composite products with Variable product and configure it as in the previous steps. We have created 2 other bundle items.

Step 4: Pricing for composite Products with Variable Products

For customising the composite product, please read this section of the article for more information.

10. Now you can publish the composite products with variables on your website.

Step 5: Configure the Plugin Settings

To configure the Plugin Settings, you can just read this section of the article for more information.

Final Result

Now open the product page on the front end.
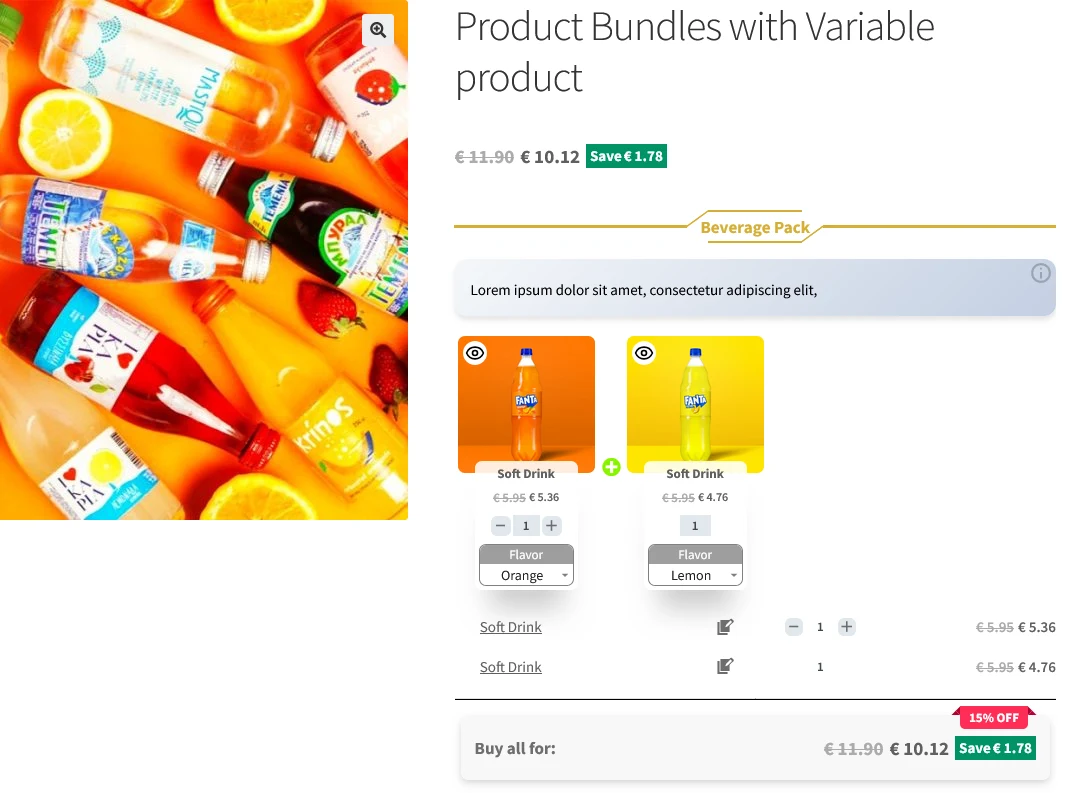
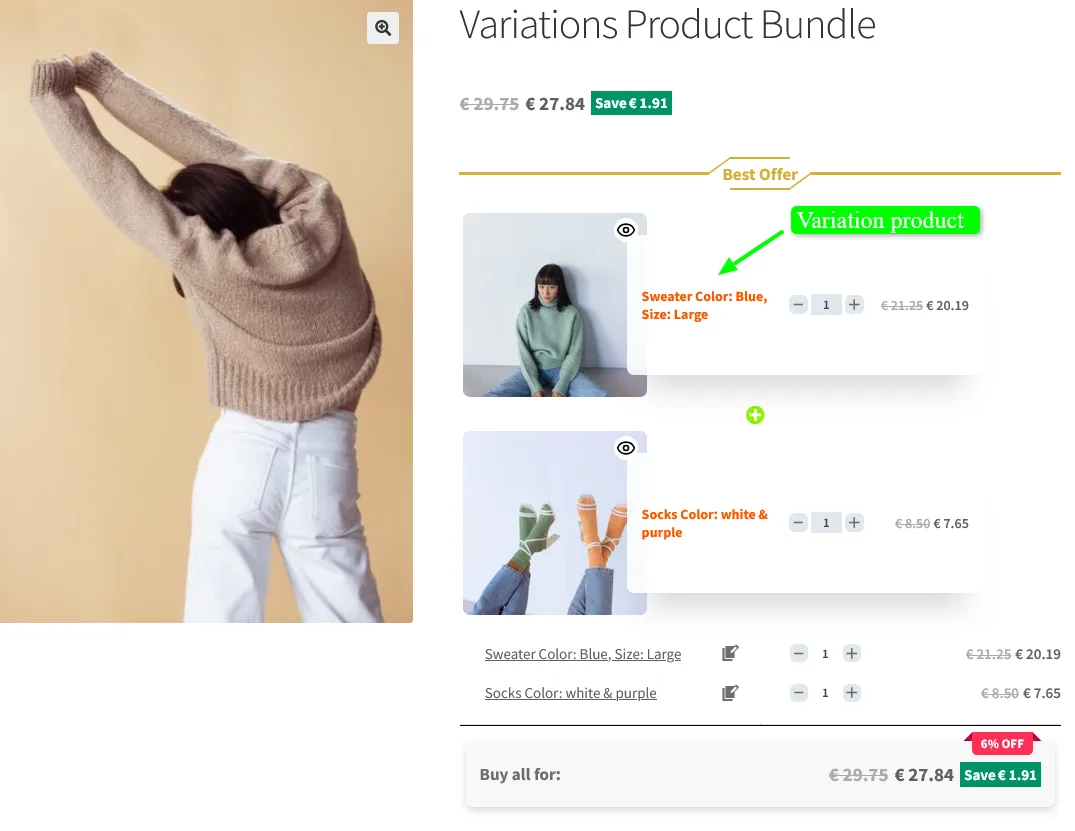
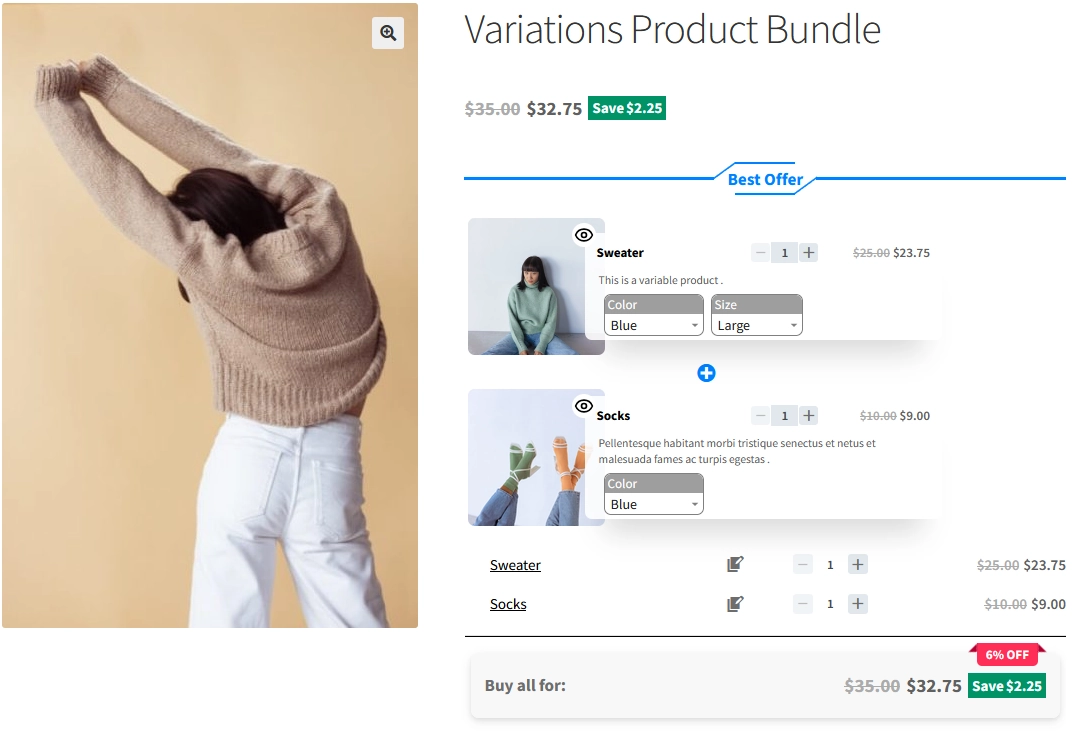
As a result, after selecting a variation product, for all of the bundle items, the WooCommerce composite products with variable will be shown in the image below.
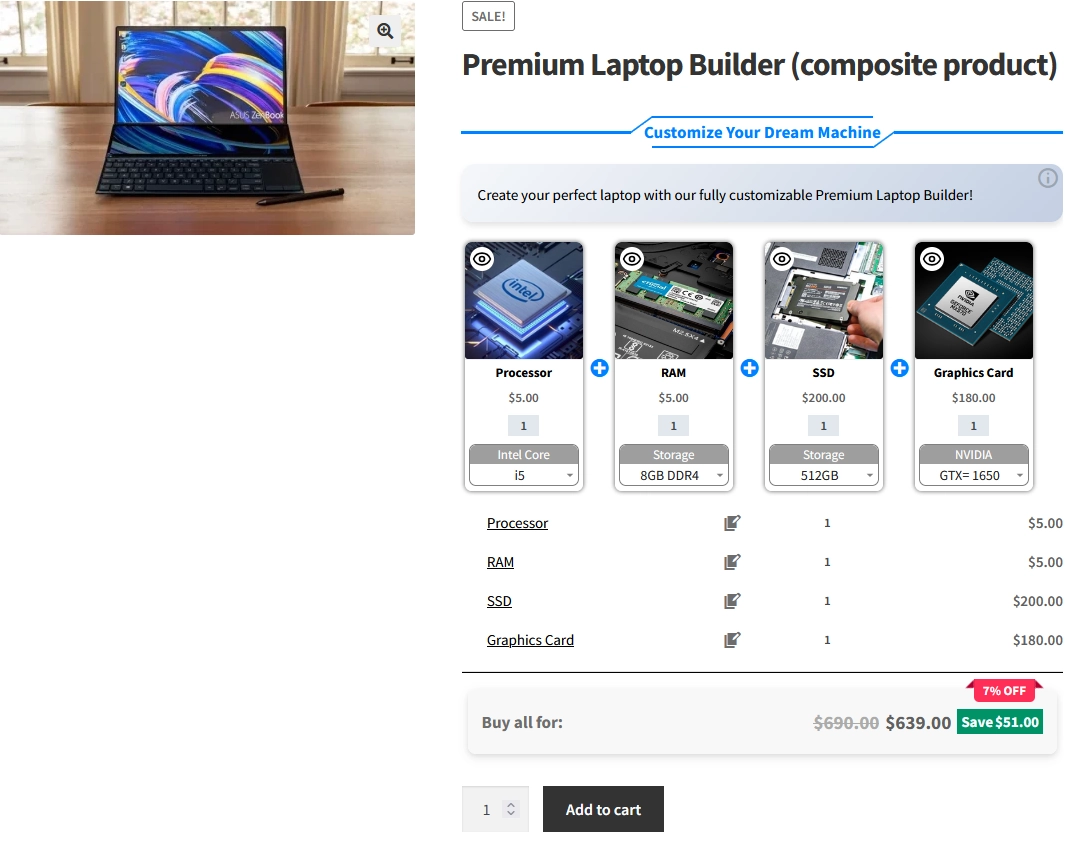
WooCommerce composite products

Shortcodes

  • [asnp_wepb_product] Use it on the product page to show the bundles.

  • [asnp_wepb_product show_add_to_cart="1"] Use it on the product page to show the bundles + add to cart button.

Related Resources

Want to learn more about WooCommerce product bundles and related strategies? Explore these helpful guides:

🌐SOCIAL MEDIA LINKS

Updated on — Leave a comment

4 Best WooCommerce free plugins to boost sales and revenue

In this article, we want to introduce 4 Best WooCommerce free plugins to boost sales and revenue for online stores that use WooCommerce, which is a popular e-commerce platform for WordPress websites. These plugins offer various features and tools to help store owners promote their products and incentivize customers to make more purchases and make it easy for website visitors to contact the website owner or customer support team. Overall, WooCommerce Boost Sales plugins aim to help store owners increase sales and revenue by making it easier and more appealing for customers to make additional purchases.

The desired plugins are as follows:

  1. Discount Rules and Dynamic Pricing for WooCommerce
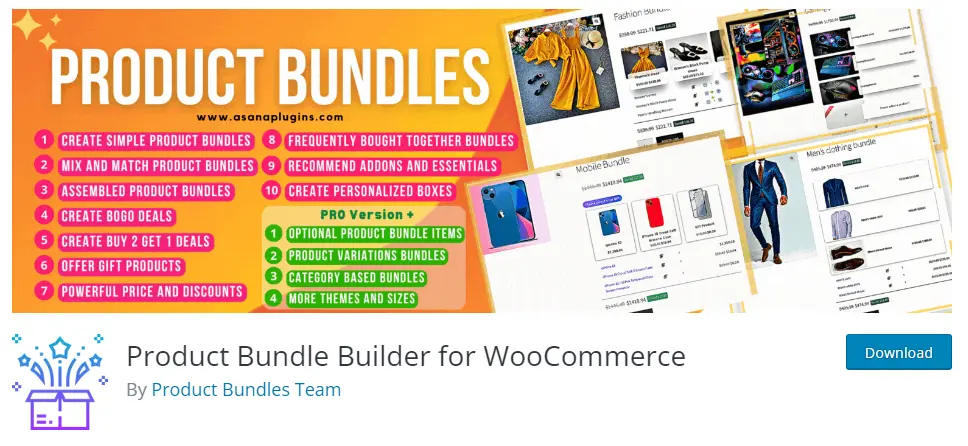
  2. Product Bundle Builder for WooCommerce
  3. Badge and Product Label for WooCommerce
  4. AI Content Writing and Chat with ChatGPT

1) Discount Rules and Dynamic Pricing for WooCommerce

Best WooCommerce free plugins to boost sales-Discount Rules and Dynamic Pricing for WooCommerce

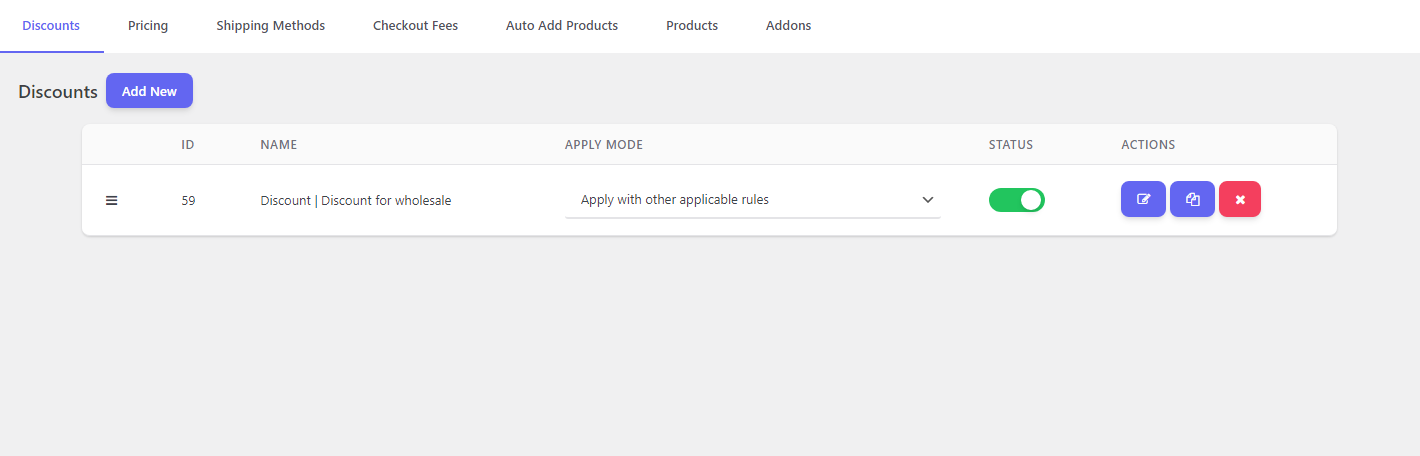
The WooCommerce Dynamic Pricing & Discounts plugin is a comprehensive tool that provides practical solutions for setting up discount offers on your WooCommerce store. As one of the best WooCommerce free plugins to boost sales, it offers a perfect combination of ease of use and powerful features. Whether you’re a beginner or an experienced user, this plugin is easy to use and comes with advanced features to cater to your needs. It enables you to create and customize your discount rules with ease, ensuring that your customers get the best deals on your products. With its intuitive interface and out-of-the-box functionality, this plugin is an ideal solution for anyone looking to boost sales and improve customer engagement on their WooCommerce store.

Video tutorial

🚀FEATURES

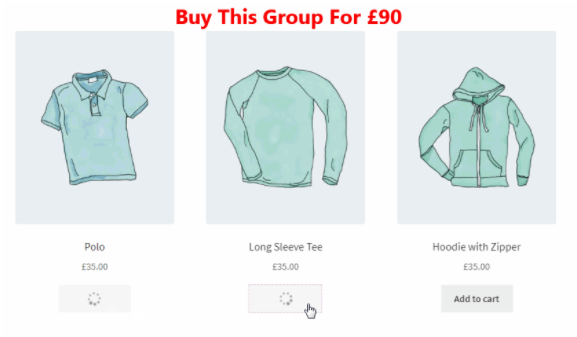
  • Create a bundle discount in WooCommerce
  • WooCommerce dynamic pricing and discounts free plugin
  • WooCommerce Discount Rules | Video Tutorial
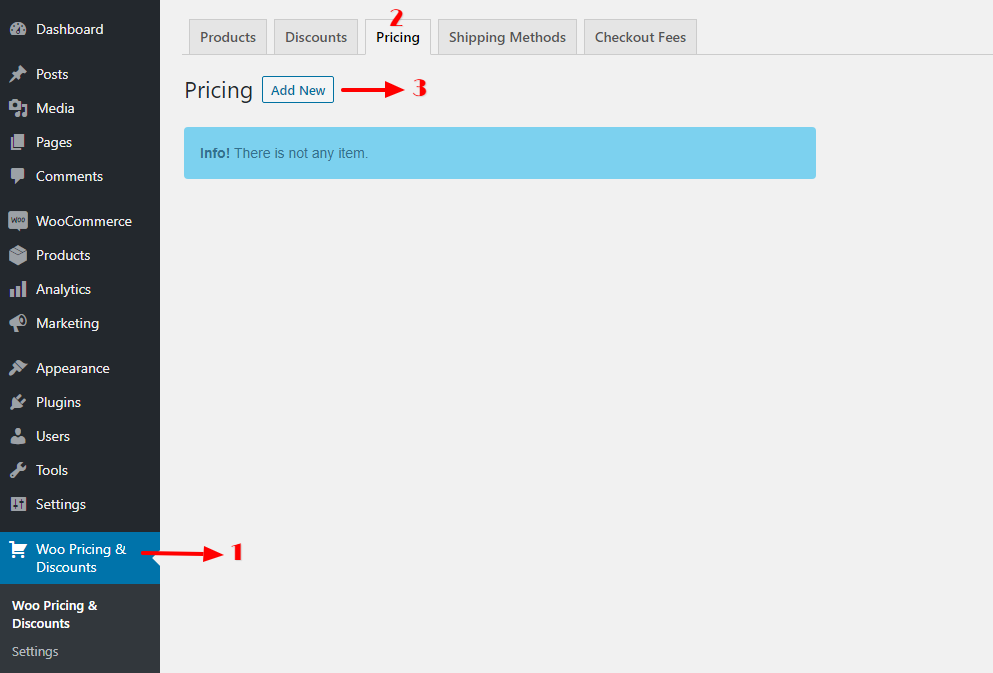
  • Create Category Discount
  • Percentage OFFs
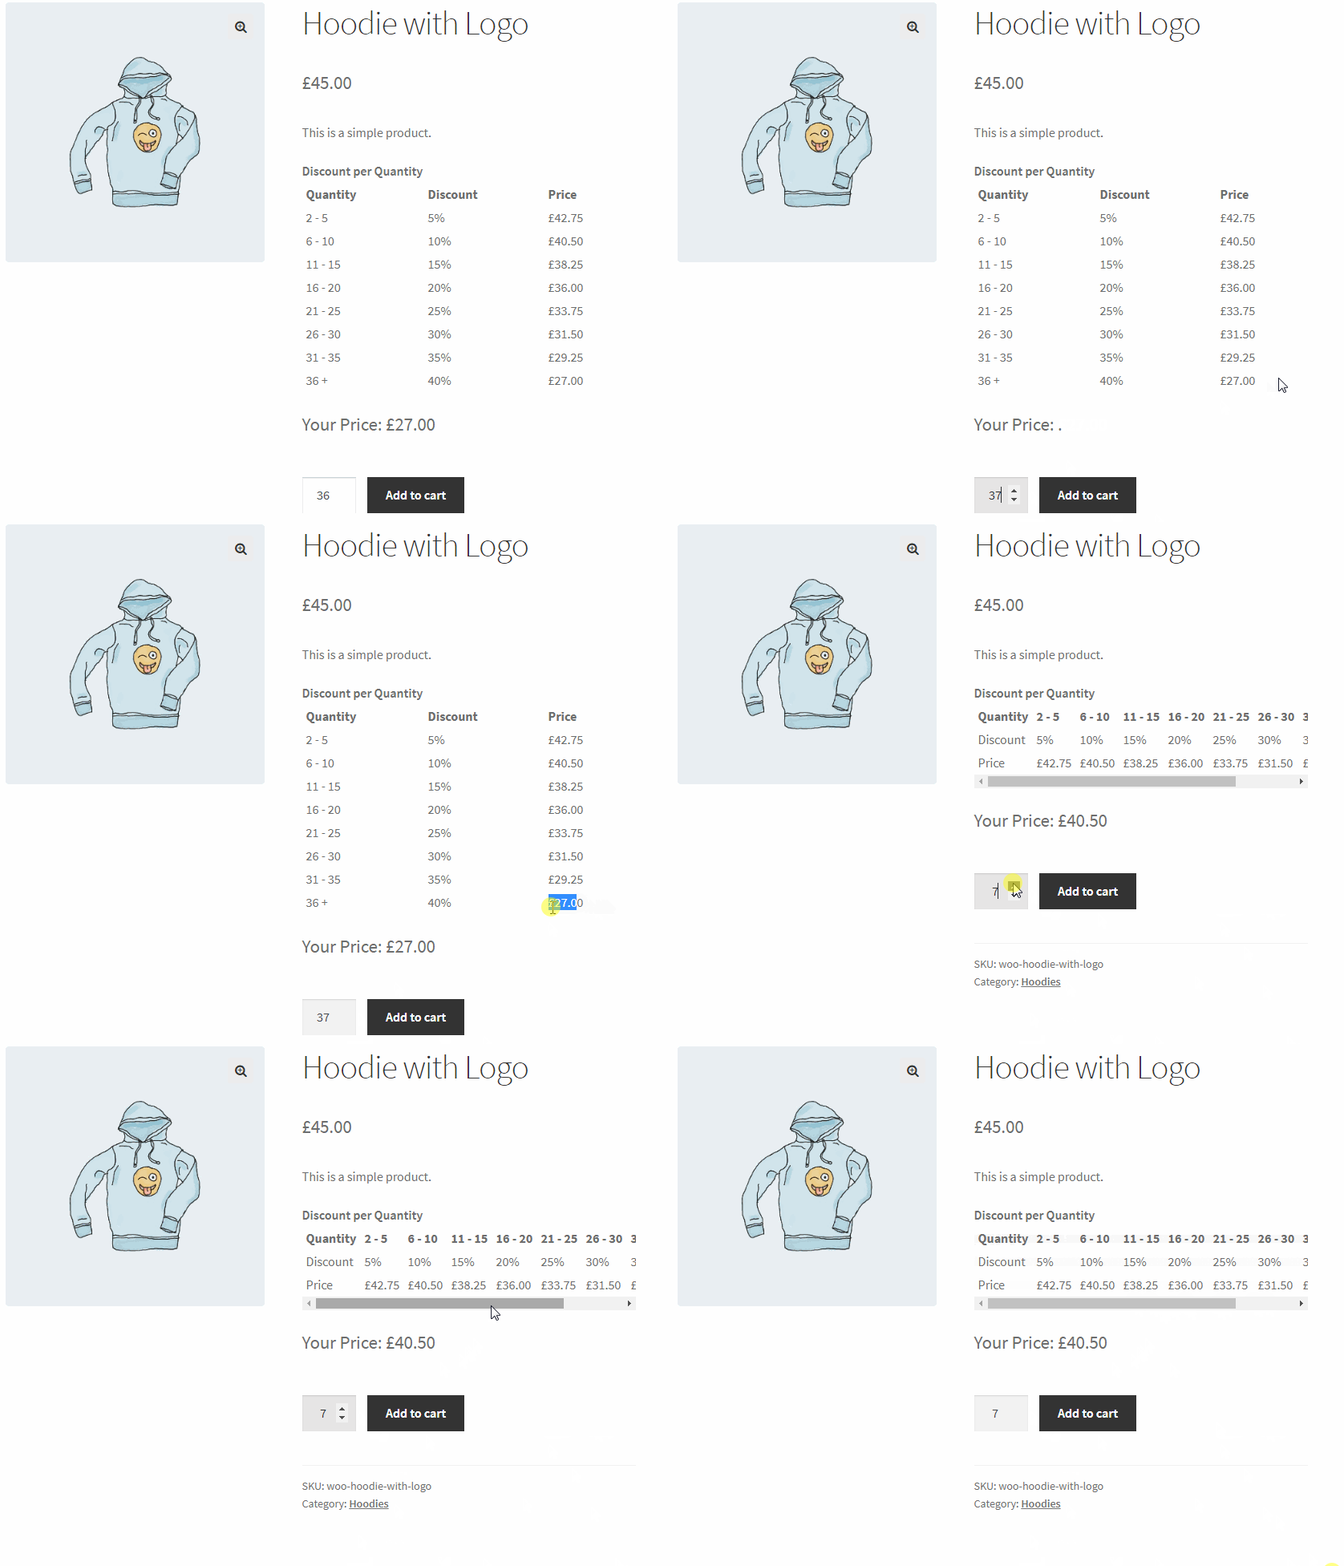
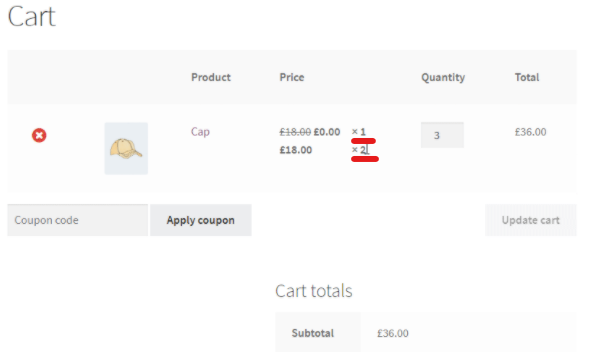
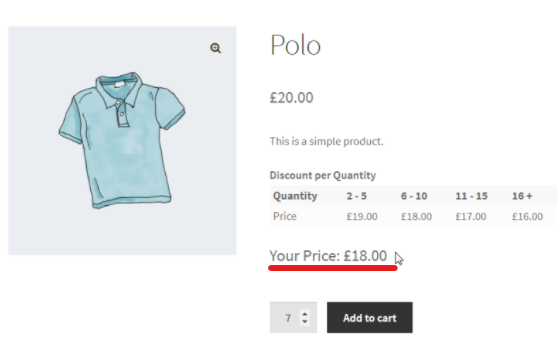
  • Bulk pricing (Example: Buy 2 to 5 with 5%, 6 to 10 with 10%, 11 to 15 with 20%, 16 and greater with 25%)
  • Display quantity table on product page
  • Product based OFFs
  • Scheduled product OFFs
  • Cart offers (Example: Get 20% OFF on Black Friday or get 15% OFF on specific date)
  • cart total based offers(Example: Spend more than $500, get 20% OFF)
  • Order total based offers
  • Exclude selected products from rules (product price based rules)
  • Date based rules(validity)
  • Show bulk table or quantity table on the product pages
  • A shortcode for quantity based table or bulk pricing table
  • Option to set rules expiry date (From Date , To Date)
  • Weight based shipping
  • Free shipping based on cart total amount condition
  • Shipping method based on cart total amount, number of cart items, date or date period, cart weight, cart total amount
  • Scheduled shipping methods

📽️Demo

Visit this plugin Live Demo here to see how it works.

💵Pricing

  • SINGLE SITE 👉 €60.00  €39.00
  • SINGLE SITE + ADDONS 👉 €180.00 €68.00
  • 5 SITES 👉 €200.00 €89.00
  • 5 SITES + ADDONS 👉 €360.00 €120.00
  • 25 SITES 👉 €400.00 €99.00
  • 25 SITES + ADDONS 👉 €760.00 €180.00

🖼️Screenshots

2) Product Bundle Builder for WooCommerce
Product Bundle Builder for WooCommerce-Best WooCommerce free plugins to boost sales

WooCommerce Product Bundle Builder is a top-notch WooCommerce free plugin designed to help online store owners create irresistible deals that package multiple products for sale together. This powerful tool provides an excellent way to boost sales of various product types while also offering customers attractive benefits. With Woo Product Bundle Builder, you can enhance cross-selling strategies on your WooCommerce shop, which is a smart way to increase revenue. Moreover, this plugin is search engine optimized, which helps improve your site’s ranking and ensure a higher conversion rate. Whether you’re a small business owner or a large enterprise, WooCommerce Product Bundle Builder is a smart tool to help you create compelling deals and increase sales on your WooCommerce store.

Video tutorial

🚀FEATURES

Let’s take a brief look at some of the cool features of this plugin:

  • Create Simple to Advanced Product Bundles
  • Create Woocommerce Composite Products
  • Create Dynamic Product Bundles Allow your customers to create dynamic and advanced bundles at the same time.
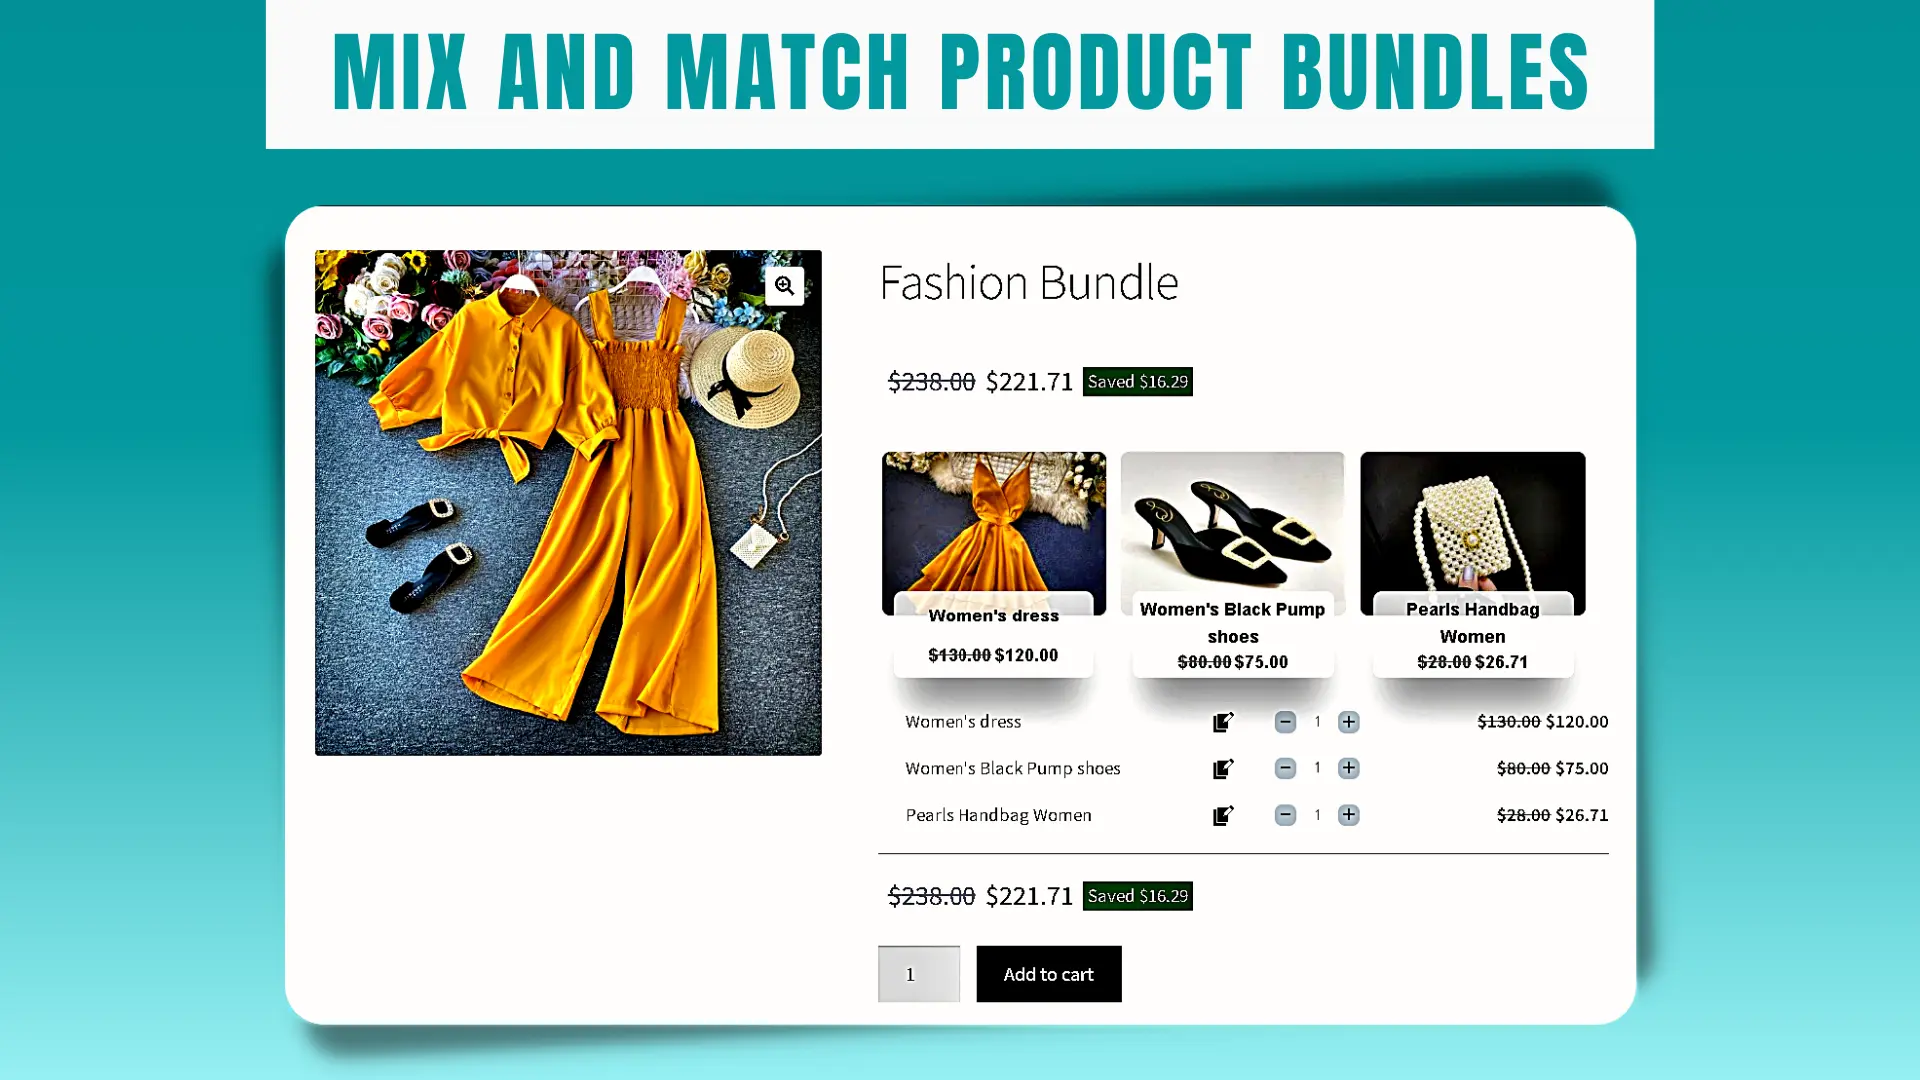
  • Create Mix and Match Products
  • Create BOGO deals Offer Buy One Get One deal.
  • Create Assembled Products
  • Gift Products Allow your customers to choose gift products from multiple available gift products.
  • Bundle Discount Set discount for product bundles by percentage or price.
  • Dynamic Price Calculates dynamic price for product bundles based on chosen items in the bundle.
  • Min/Max Quantity Set the min/max quantity for each item in the bundle.
  • Fixed Price Set a fixed price for each bundle item.
  • Item Gallery View the product gallery in a popup.
  •  Customize the title for empty items.
  • Hide out of stock products option to the plugin settings.
  • include parent price Added an option to include parent price in the bundle total price or no.
  • Product Sorting now you can sort products by ID, Title, Menu order, Date, Price, Popularity, and Rating.

🚀 PRO VERSION FEATURES

  • Variation Products Allow selecting variation products for the bundle items. (Premium Version)
  • Categories Selecting products of certain categories to appear on the bundle item list. (Premium Version)
  • Tags Selecting products of certain tags to appear on the bundle item list. (Premium Version)
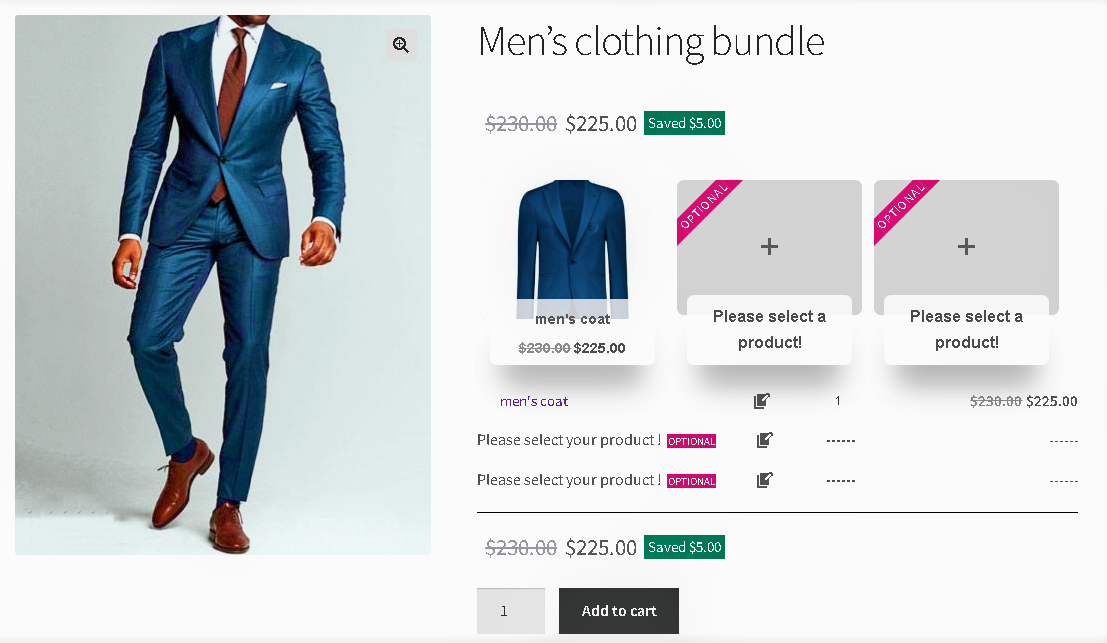
  • Optional Items Make an item of the product bundle optional so the customer does not have to choose a product for that item. (Premium Version)
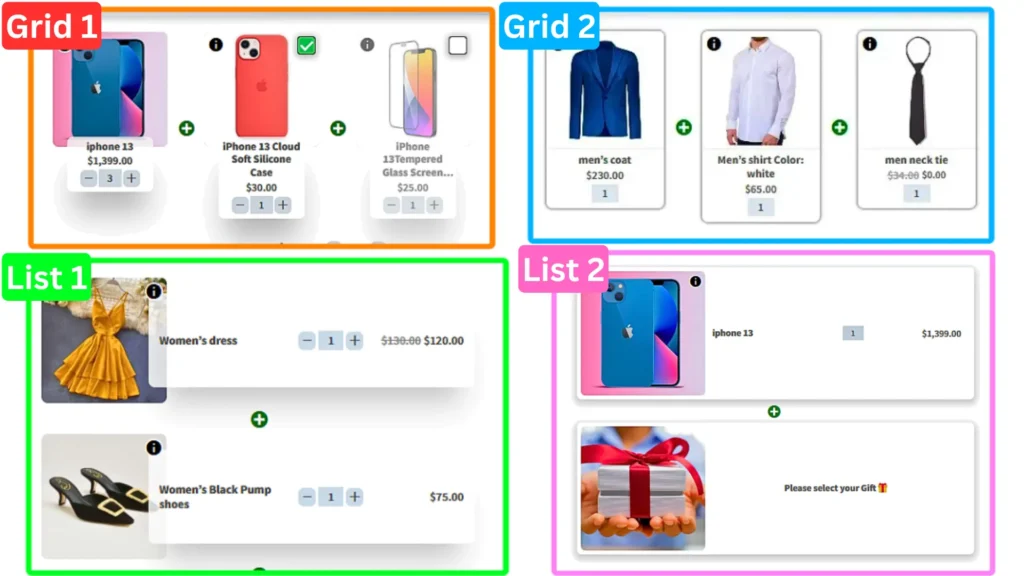
  • Themes Multiple and beautiful grids and list items theme. (Premium Version)
  • Size Small/Medium/Large size for bundle items. (Premium Version)
  • Product Quick View View the product quick view in a popup. (Premium Version)
  • Total quantity Set min or max total quantity of bundled items. (Premium Version)
  • Duplicate the item in the backend. (Premium Version) (new)
  • Empty item image assign a photo to the empty item. (Premium Version) (new)

📚SUPPORTED LANGUAGES

  • English
  • Français (French)
  • Deutsch (German)
  • Dutch (Nederlands)
  • Dansk (Danish)
  • Italiano (Italian)
  • Português (Portuguese)
  • Polski (Polish)
  • Русский (Russian)
  • Español (Spanish)
  • Türkçe (Turkish)
  • עִבְרִית (Hebrew)
  • العربية (Arabic)
  • فارسی (Persian)
  • Български (Bulgarian)
  • 简体中文 (Chinese)
  • 日本語 (Japanese)
  • हिन्दी (Indian)

📽️Demo

Visit the below links to see how it works:

💵Pricing

  • SINGLE SITE 👉 €60.00 €39.00
  • 5 SITES 👉 €200.00 €89.00
  • 25 SITES 👉 €400.00 €99.00

🖼️Screenshots

3) Product Badge, Label, Countdown Timer for WooCommerce – Sale Booster

Best WooCommerce free plugins to boost sales

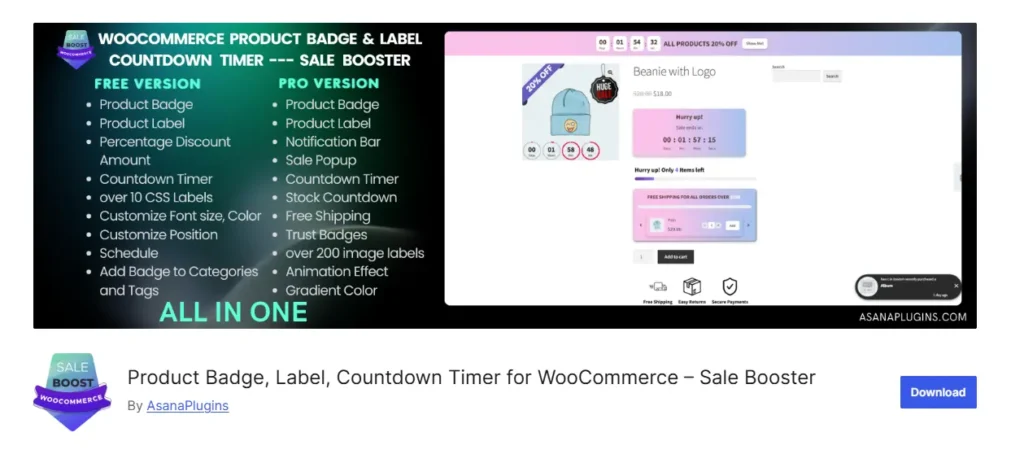
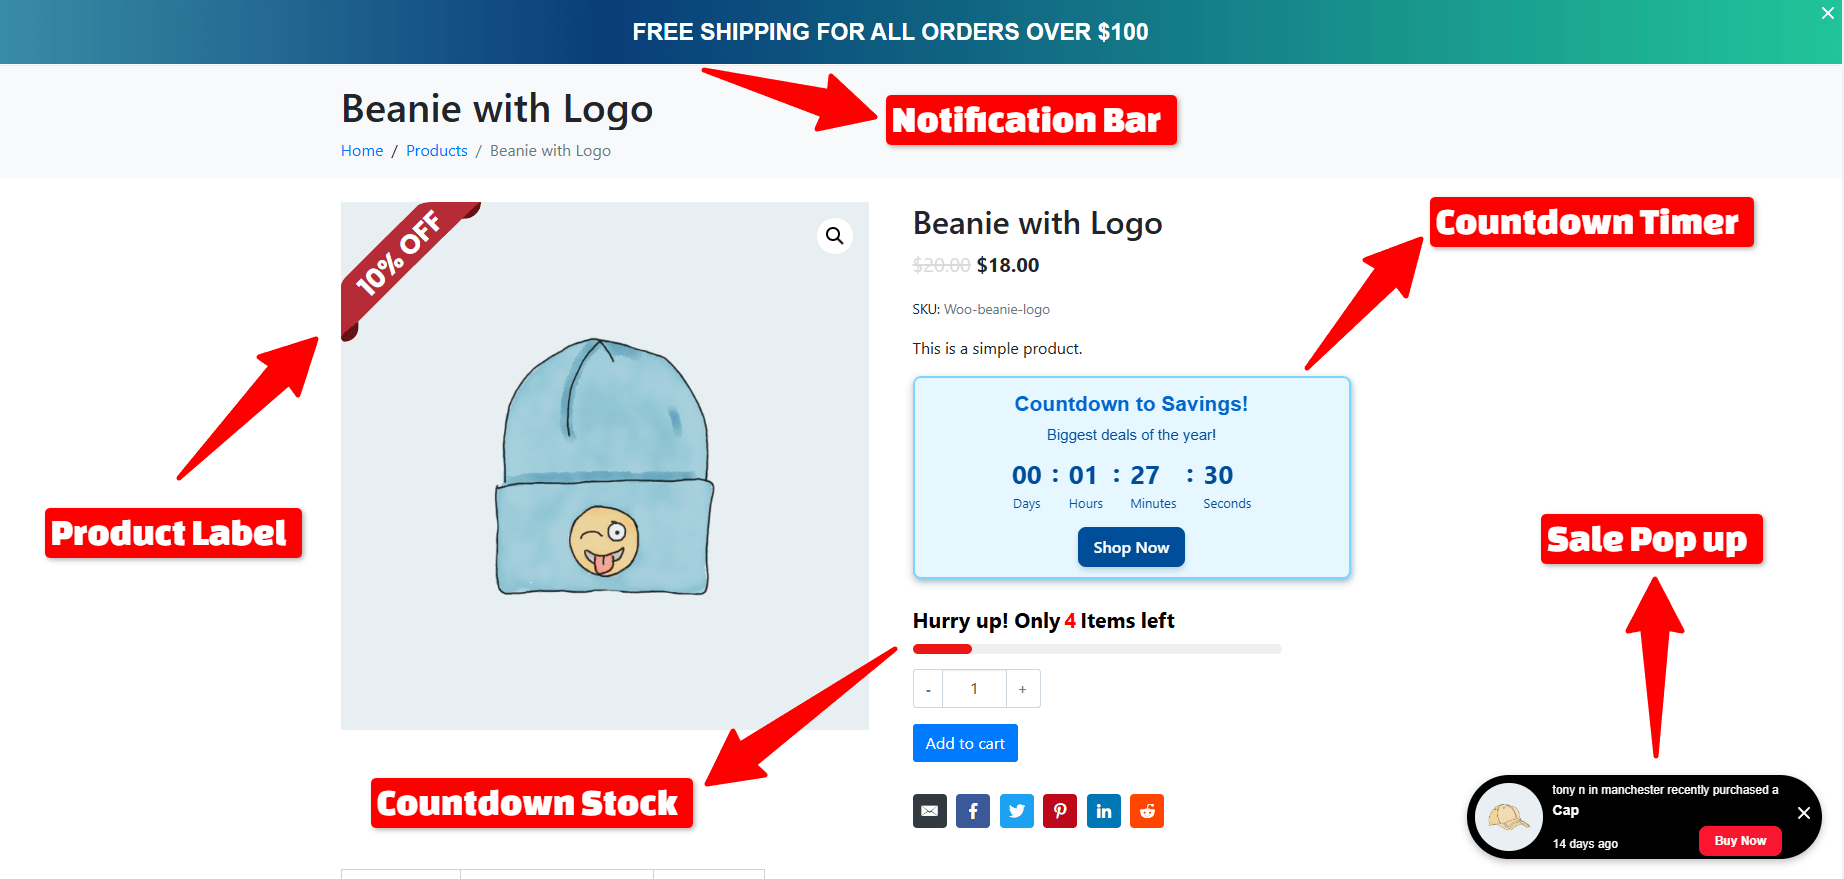
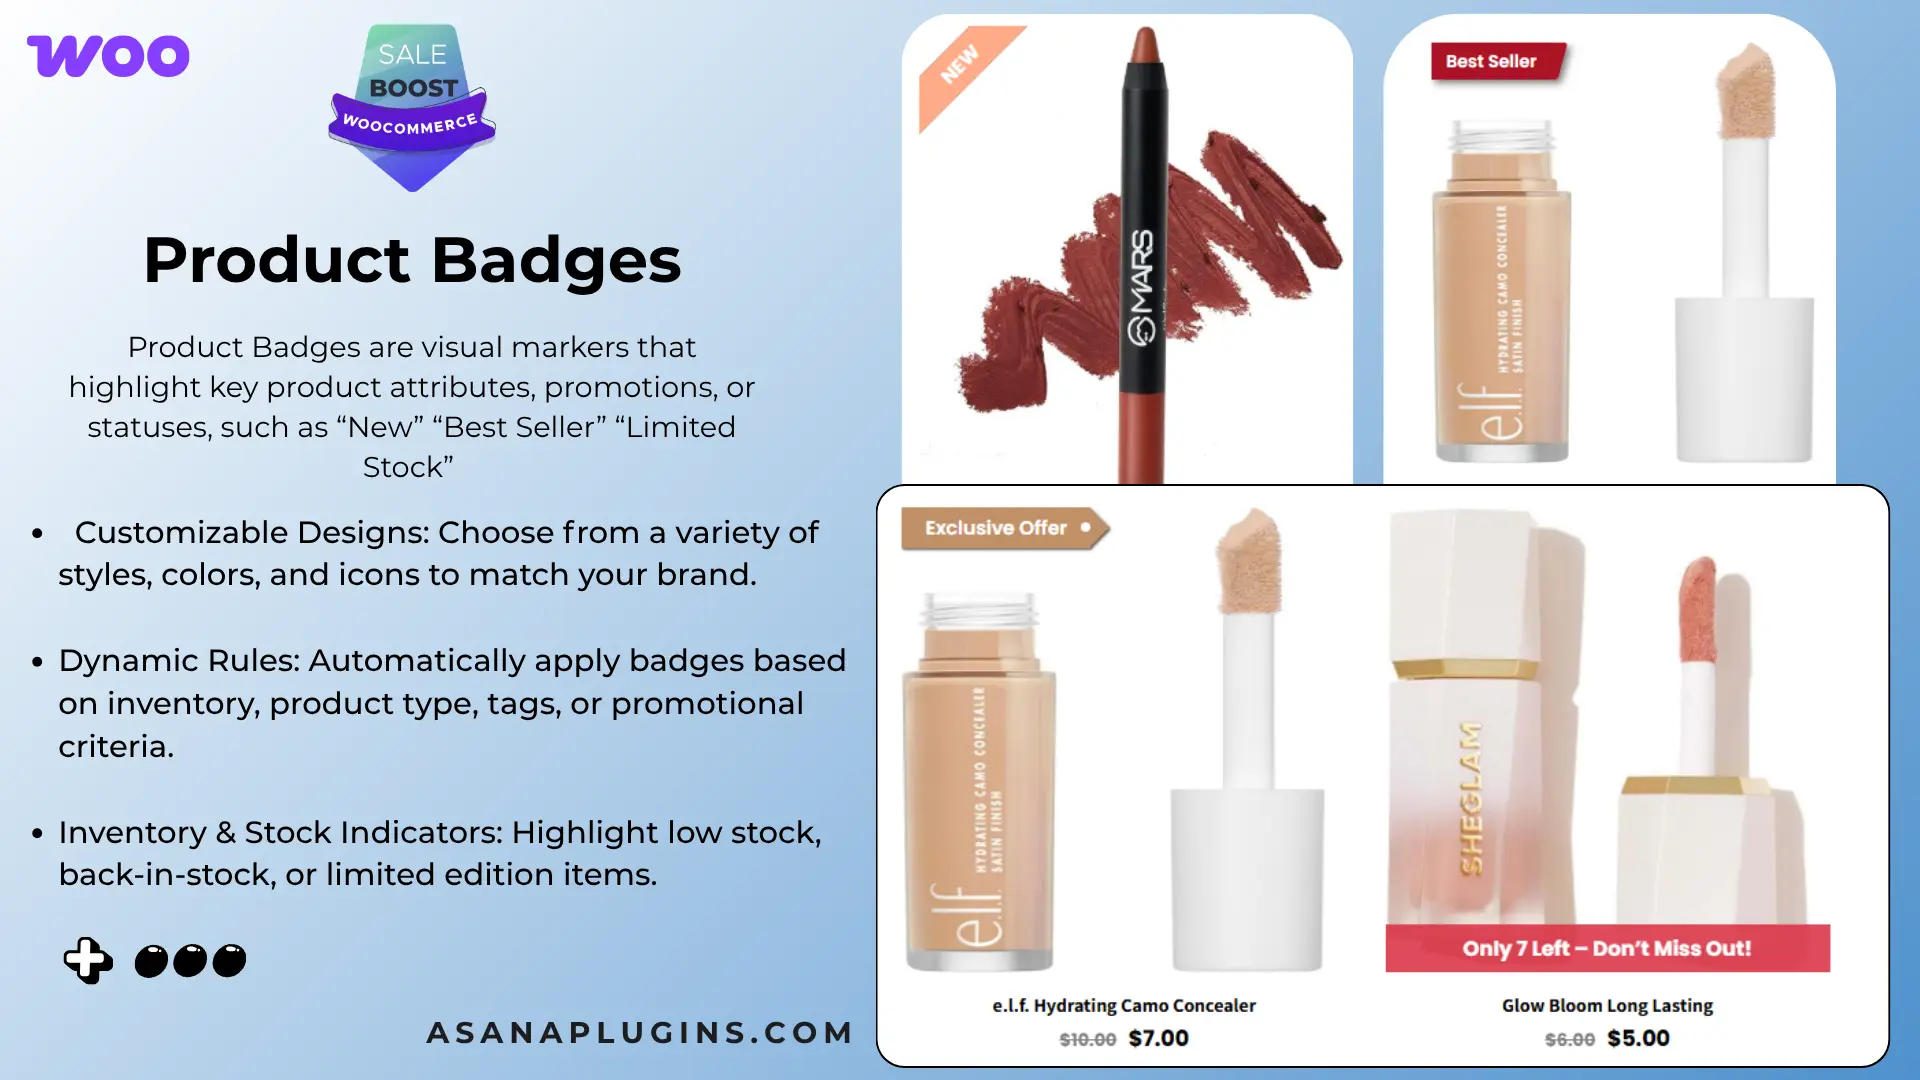
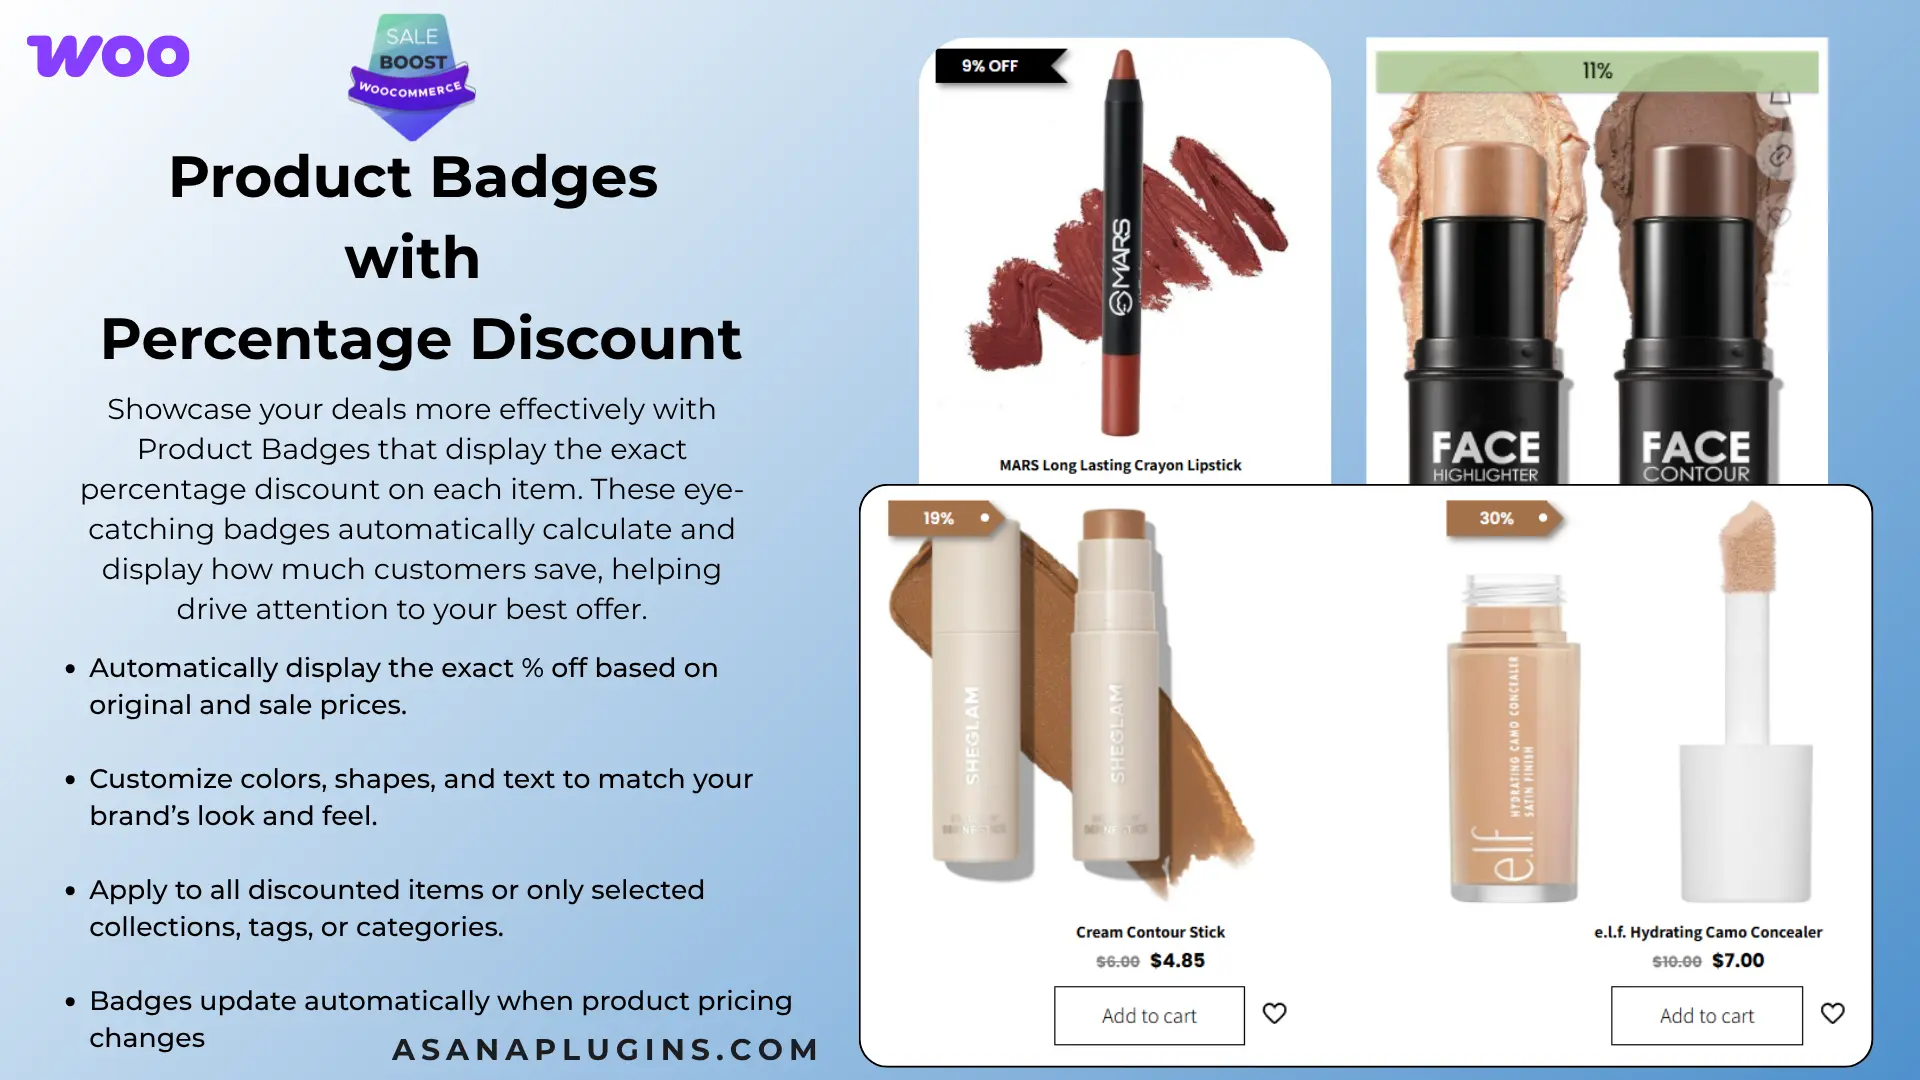
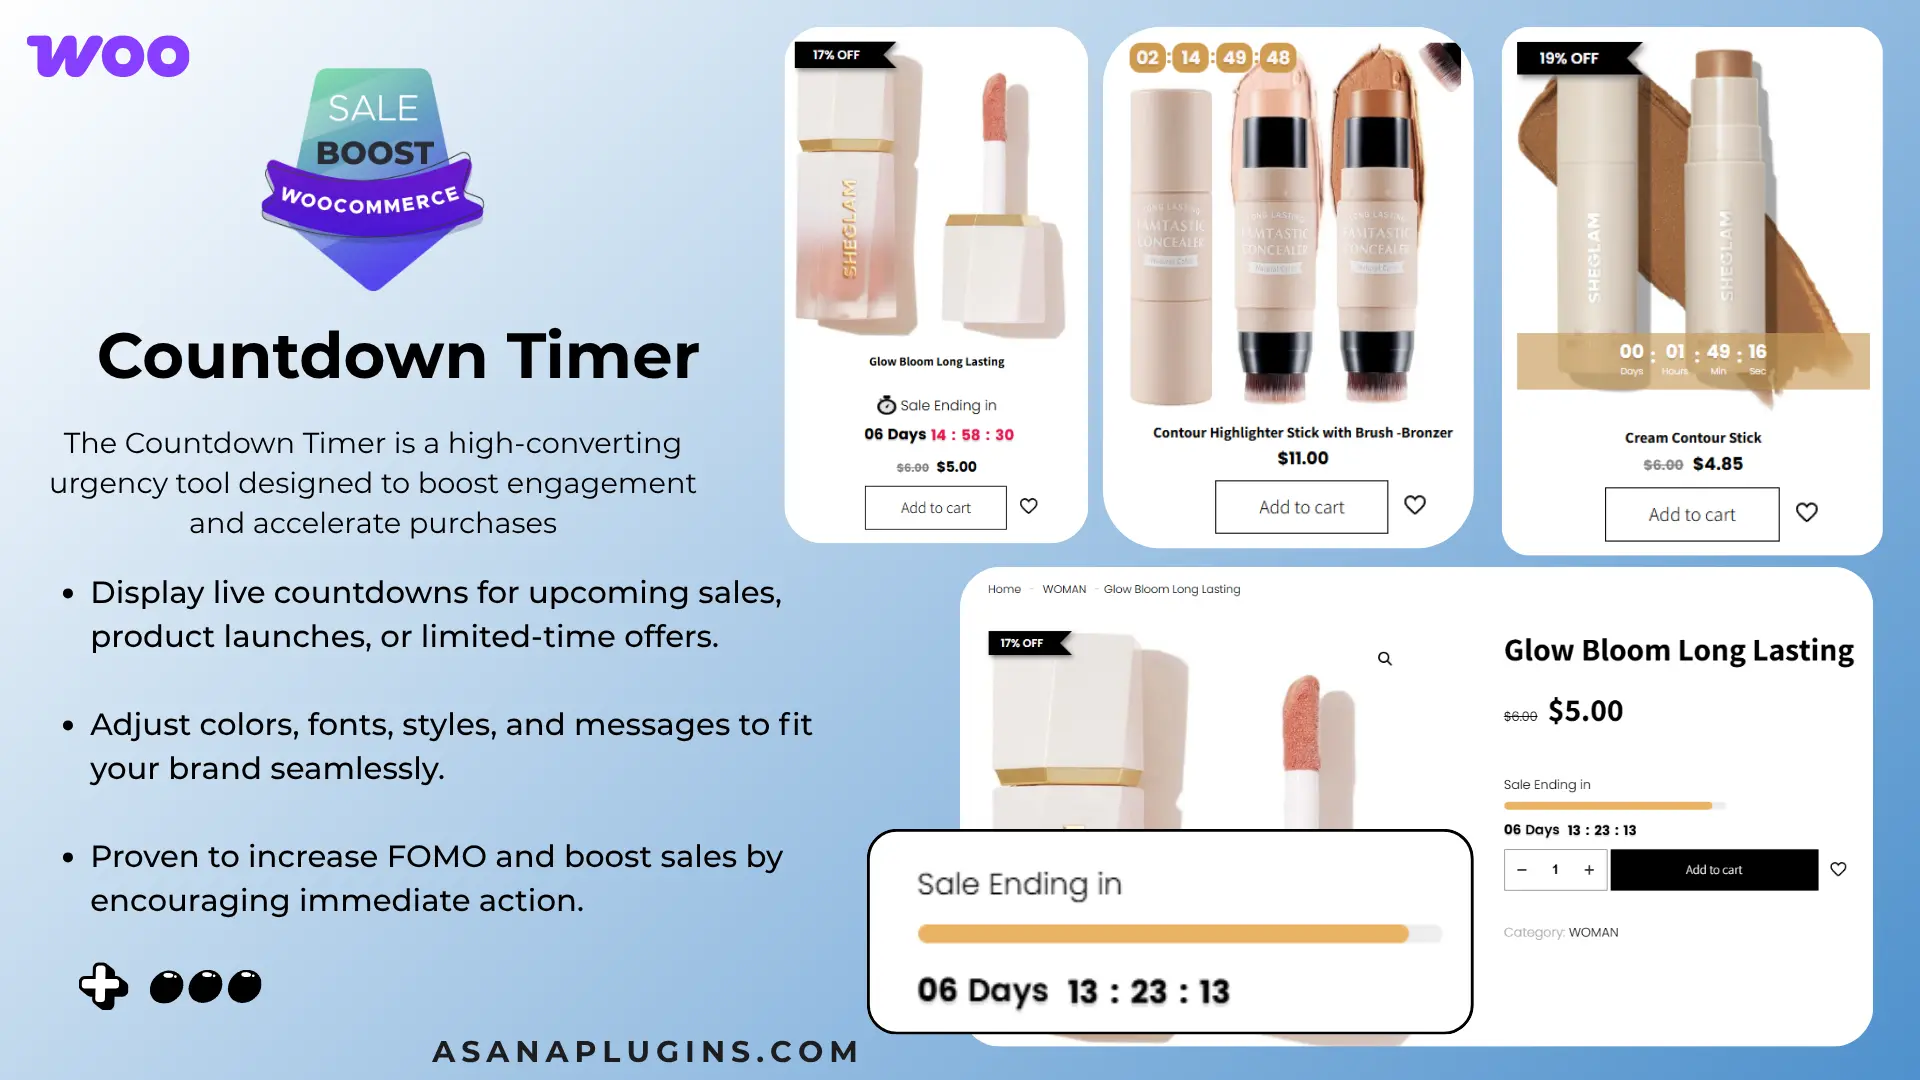
WooCommerce Badge and Product Label elevate your store’s appeal with customized badges and countdown timers (PRO Version). As one of the best WooCommerce free plugins to boost sales, it enhances your store with sale badges, product labels, and countdown timers designed to drive conversions. This all-in-one plugin empowers you to create eye-catching labels and scheduled badges for products, categories, and tags. Highlighting discount values, product quantities, ratings, shipping classes, stock status, and sale status, these labels provide valuable information to your customers. Plus, leverage the power of countdown timers to create urgency and boost sales. With an intuitive interface, you can easily customize labels and replace default on-sale badges. Take your WooCommerce store to new heights with visually appealing badges, labels, and countdown timers tailored to your unique offerings.

Video tutorial

Examples

🚀FEATURES

Let’s take a brief look at some of the cool features of this plugin:

  • Over 15 Product Badges
  • Over 10 Modern Badges
  • Free Shipping With Upsell
  • Free Shipping Bar
  • Order Notifications
  • Over 200 Image Labels
  • Trust Badges
  • Payment icons
  • Social Media Icons
  • Countdown Timer
  • Countdown Stock
  • Sales Pop-up
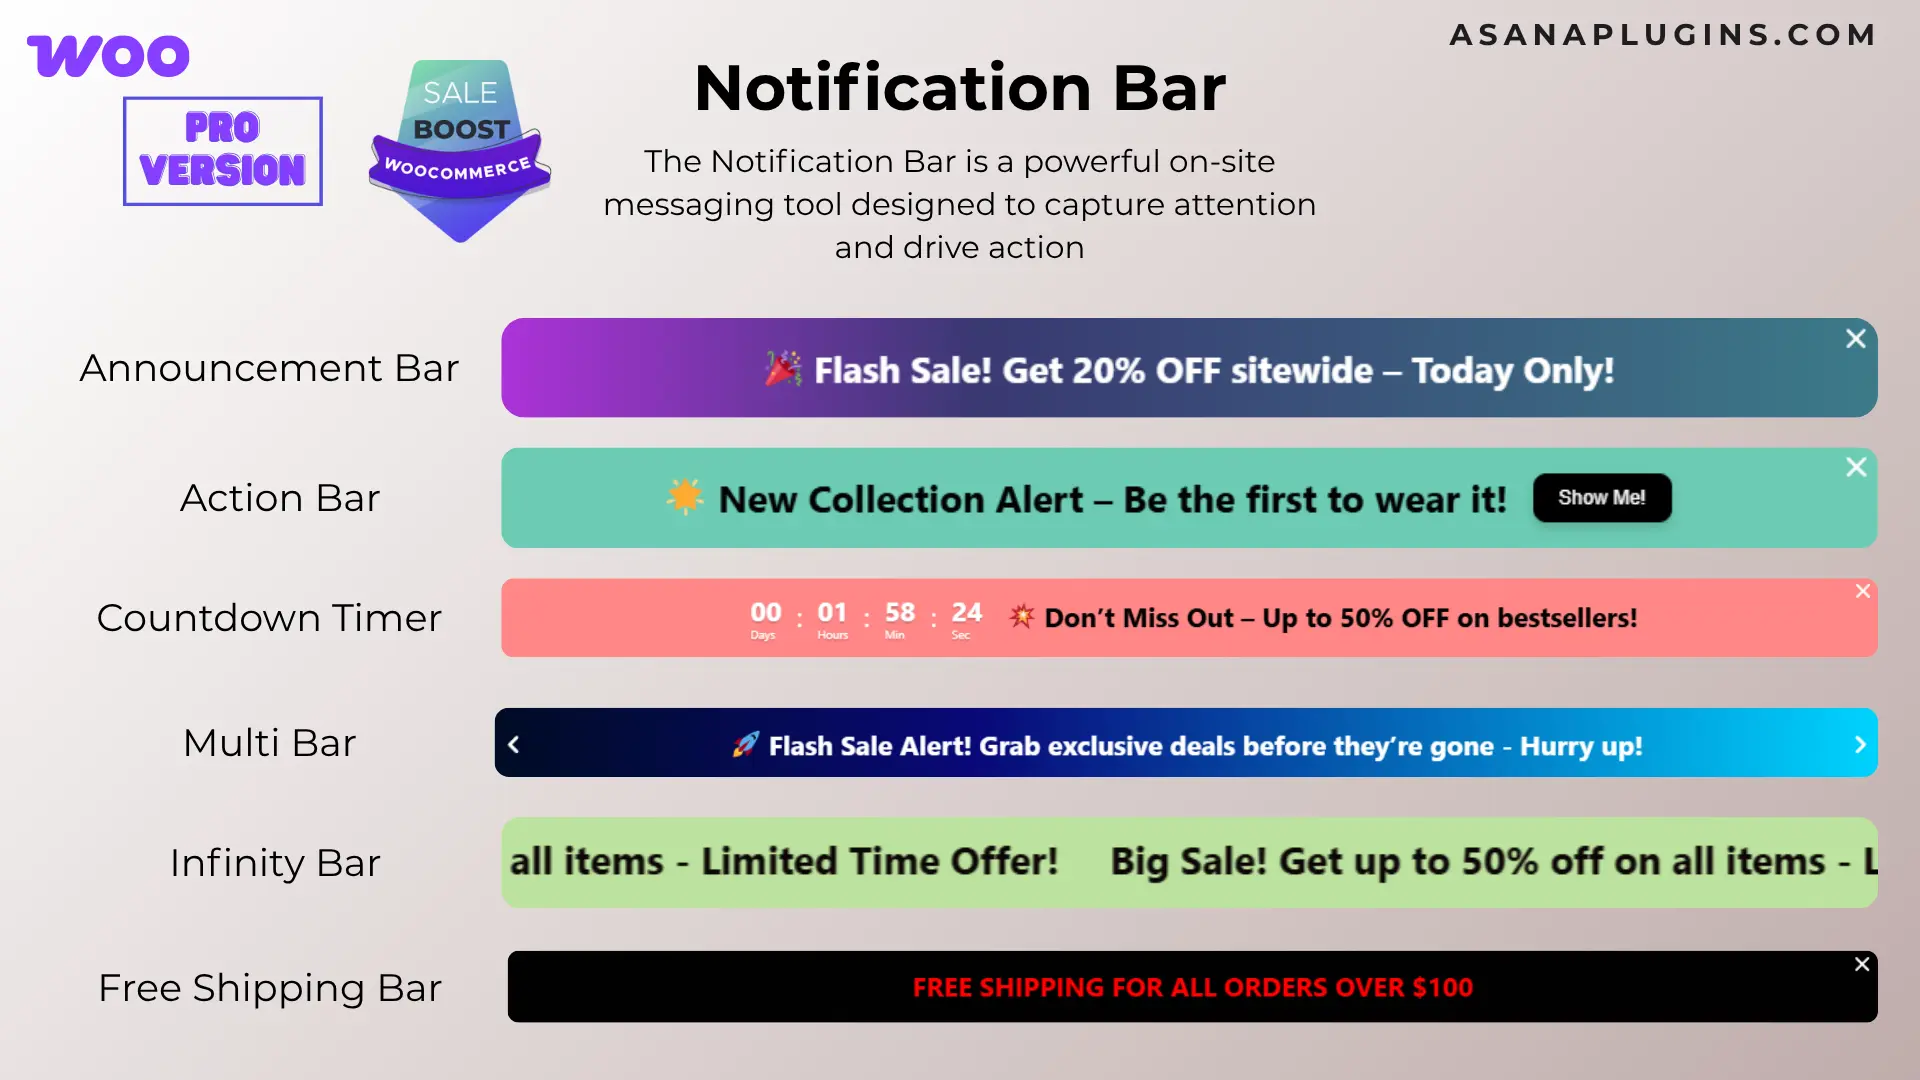
  • Notification Bar
  • Over 10 CSS Labels
  • Over 10 Countdown Timers
  • 10 Animation Effects
  • Add Badge to Out Of Image Position
  • Incorporate Gradient Colors
  • Implement Discount Rules
  • Add a Percentage Discount amount
  • Rotate CSS Labels, Image Labels, and Advanced Labels
  • Add Easy Custom labels on products
  • Access CSS label templates
  • Preview is available live for easy placement and customization
  • Add Badges to specific WooCommerce products, categories, or tags
  • Add Badges to “Is On Sale”
  • Add Badges to “In Stock” and “Out Of Stock”
  • Customize label attributes, including color, font size, line height, width, opacity, position, and much more
  • Transform And Rotate Css Labels
  • Set Toggle To the visibility of badges
  • Include an option to set an expiration Date and Time for badges
  • A unique feature for adjusting hooks that control the presentation of product labels, beneficial if your theme encounters issues displaying them or if you wish to reposition the labels
  • Adjust the Position of CSS Labels, Image Labels, and Advanced Labels
  • Include both Vertical and Horizontal Timers
  • Personalize Sale Timers with Styling Options
  • Sale Image Labels
  • Percentage Off Image Labels
  • Coming Soon Image Labels
  • Pre-Order Image Labels
  • Free Image Labels
  • Black Friday Image Labels
  • Valentine’s Day Image Labels
  • Xmas Image Labels

Tested with more than 40+ Themes

  • Flatsome
  • WoodMart 
  • Avada 
  • The7
  • Divi
  • Betheme
  • Uncode 
  • Enfold 
  • Bridge 
  • Salient
  • JupiterX 
  • XStore 
  • Porto 
  • StoreFront
  • Astra
  • OceanWP
  •  and much more

📽️Demo

Visit this plugin Live Demo here to see how it works.

💵Pricing

  • SINGLE SITE 👉 €60.00 €39.00
  • 5 SITES 👉 €200.00 €89.00
  • 25 SITES 👉 €400.00 €99.00

🖼️Screenshots

4) AI Content Writing and Chat with ChatGPT

Best WooCommerce free plugins to boost sales

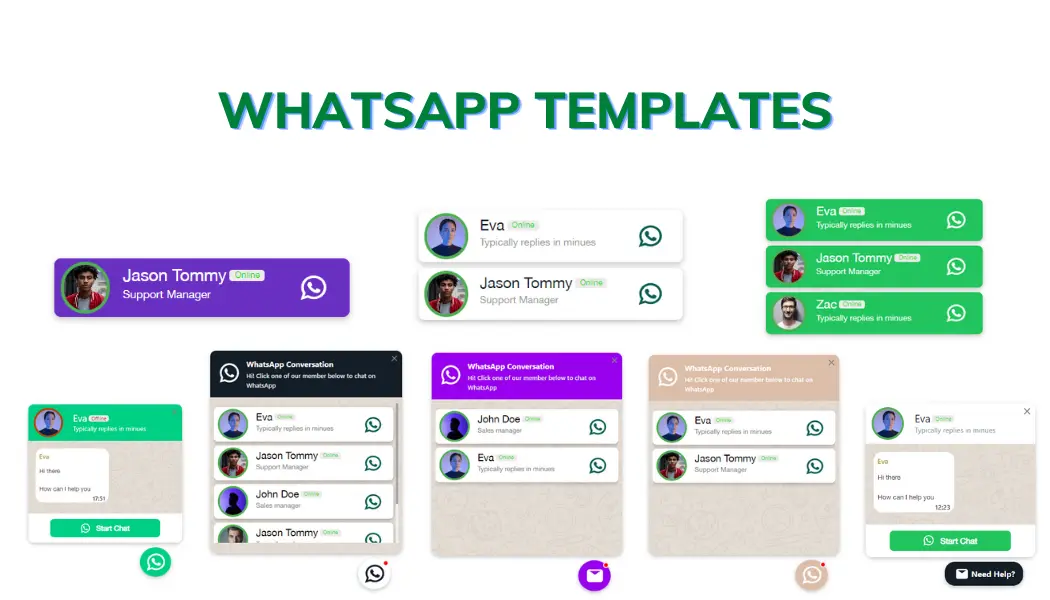
AI Content Writing and Chat with ChatGPT is one of the best WooCommerce free plugins to boost sales, combining the power of AI and real-time messaging to elevate your customer support and lead generation efforts. With WhatsApp being the most popular messaging app globally—used by over 2 billion people—adding a chat support feature to your website is essential for engaging with your customers where they already are. This plugin allows you to seamlessly integrate a WhatsApp chat button into your site, giving visitors a quick and direct way to reach your support team. At the same time, it helps capture valuable leads and drive more conversions, ultimately increasing your store’s revenue.

Video tutorial

🚀FEATURES

  • Add ChatGpt AI BOT
  • Add single-agent WhatsApp chat support
  • Add multi-agent WhatsApp chat support
  • Add a floating chat button to your website
  • Add a floating chat button to specific pages
  • Display chat support for “All Visitors”, “New Visitors”, “Returning Visitors”, “Logged in users (PRO)”, “Guest Users (PRO)”
  • Add a chat button to specific WooCommerce products, categories (PRO) or tags (PRO)
  • Add chat support to specific pages by URL.
  • Exclude chat support from specific pages by URL.
  • Display single account or multi account chat window in the floating chat button
  • Create multiple accounts with specific avatars or predefined avatars
  • Predefined templates to create chat easily and in a minute
  • Different styles and positions for Mobile and Desktop
  • Preview the live chat button in the admin when designing it
  • Custom colors, greetings, icons and avatars
  • Define custom availability and working hours for each account (PRO)
  • Define custom availability timezone for each account (PRO)
  • Keep communicating directly from your WhatsApp account
  • 4 types of chat “Floating Bubble”, “Embed Bubble”, “Embed Chat Window”, “Button”
  • WPML Ready
  • Google Analytics (PRO)
  • Facebook Pixel Analytics (PRO)

📽️Demo

Visit this plugin Live Demo here to see how it works.

💵Pricing

  • SINGLE SITE 👉 €60.00 €20.00
  • 5 SITES 👉 €200.00 €59.00
  • 25 SITES 👉 €400.00 €89.00

🖼️Screenshots

Related Resources

Want to learn more about WooCommerce product bundles and related strategies? Explore these helpful guides:

🌐SOCIAL MEDIA LINKS

Updated on — Leave a comment

How to translate WooCommerce product bundle

How to translate WooCommerce product bundle

Translating the WooCommerce product bundle plugin into your local language can significantly increase your online store’s revenue. When customers can browse and shop in their native language, they are more likely to trust your store and complete a purchase. Offering localized content allows you to reach new markets, expand your customer base, and improve the overall shopping experience. It also enhances customer satisfaction and can improve your store’s visibility in search engines by targeting keywords in different languages. Altogether, these benefits create a strong competitive advantage and help boost sales and long-term growth. In this article, we will show you how to translate the WooCommerce Product Bundle plugin into your own language.

Video Tutorial

To translate WooCommerce Product Bundles in your local language, follow the steps below:

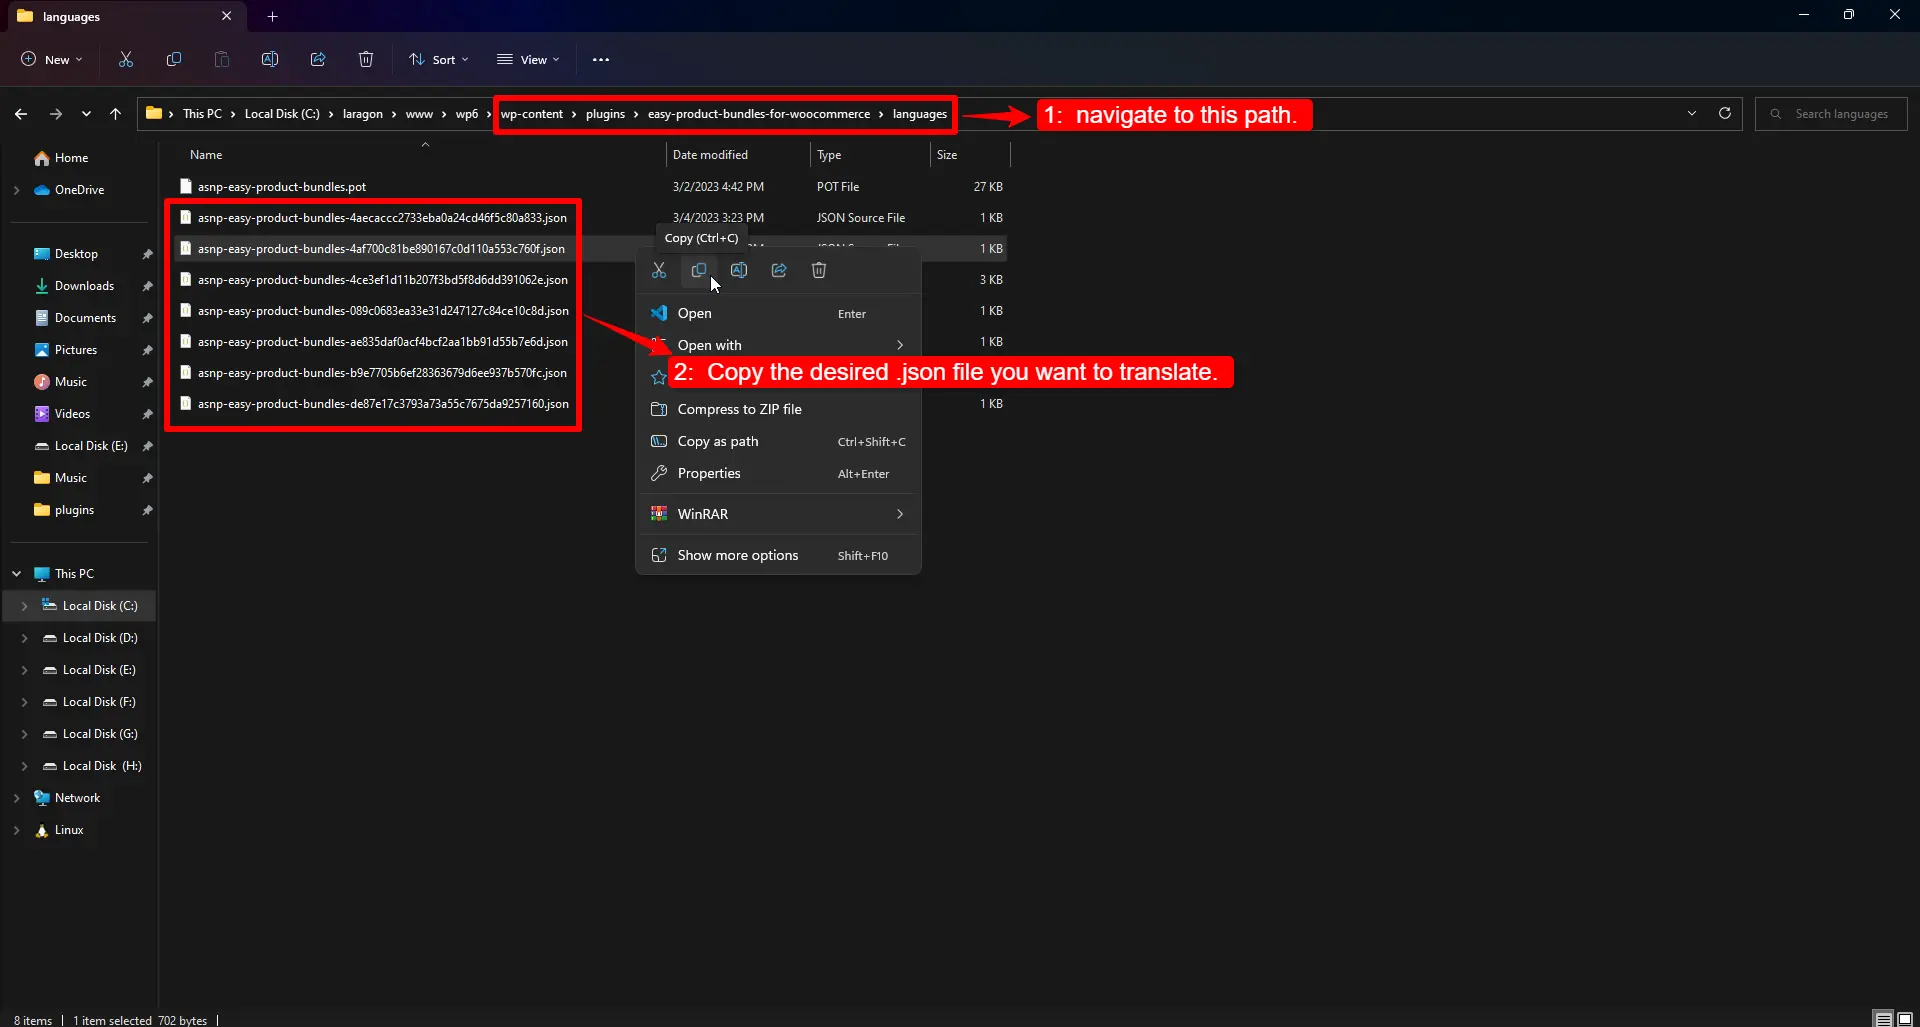
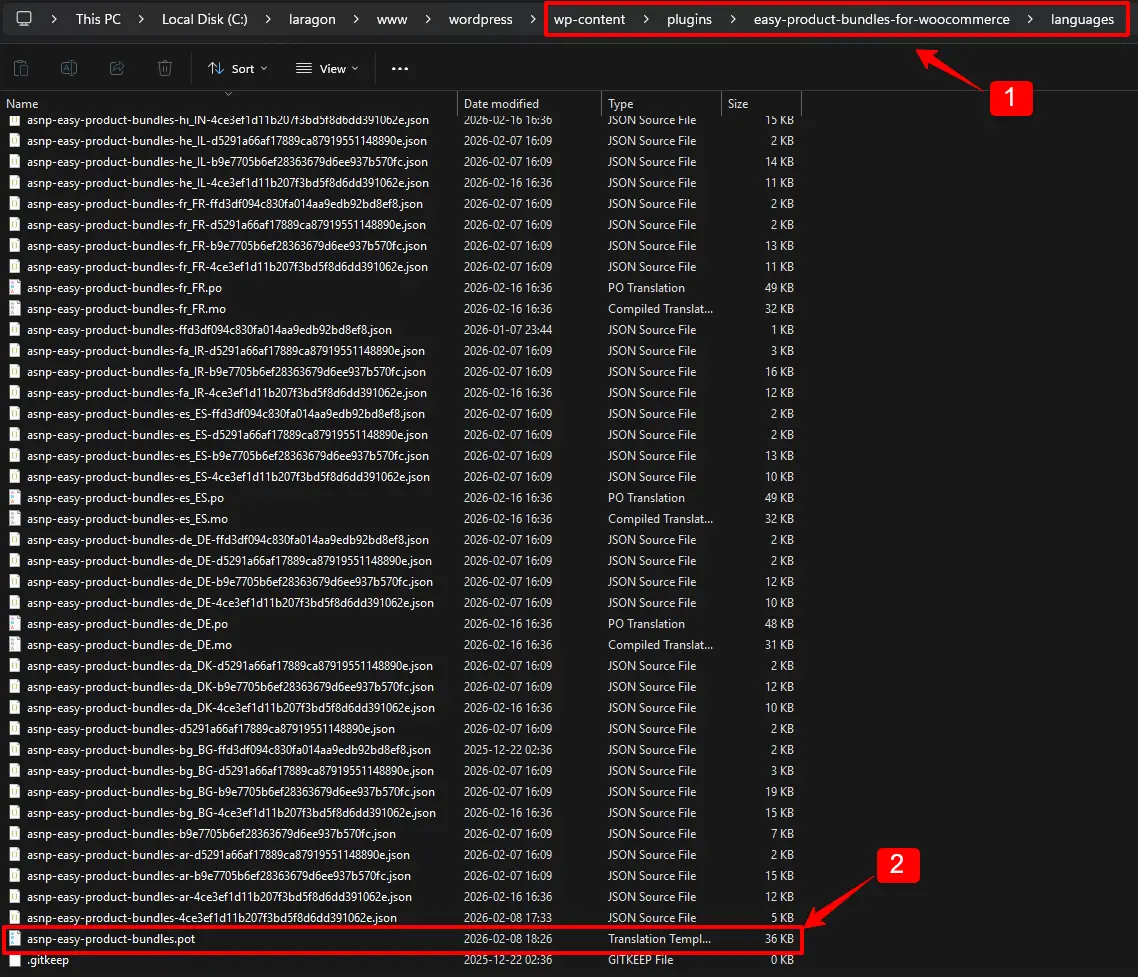
1: Locate the Plugin’s Language Files

Navigate to the plugin’s language folder:

Inside this folder, you will find multiple .json files, each containing translations for different parts of the plugin. These files represent separate sections or features of the plugin. You can select a specific file to translate or copy all of them if you plan to translate the entire plugin.

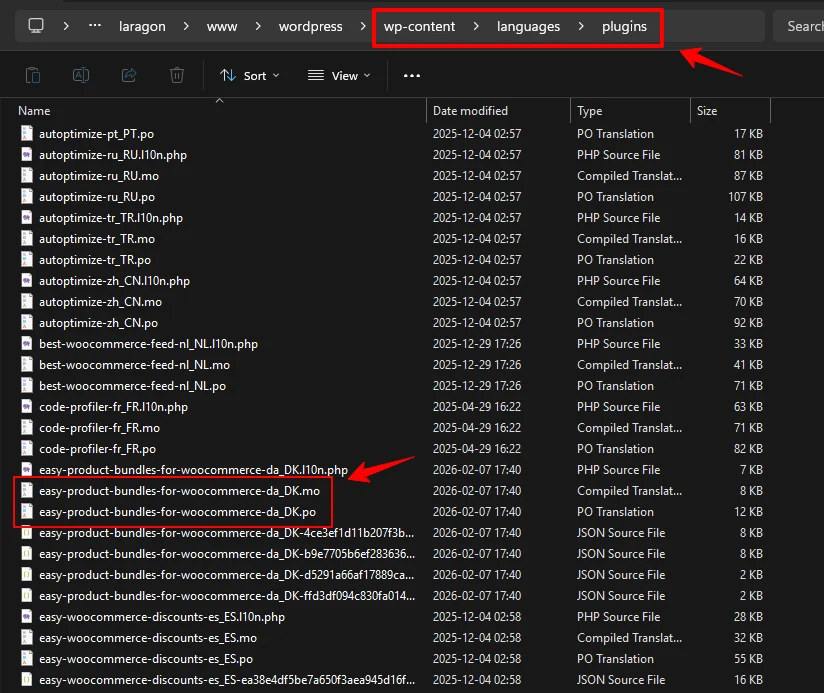
2. Copy the JSON Files to a Safe Location

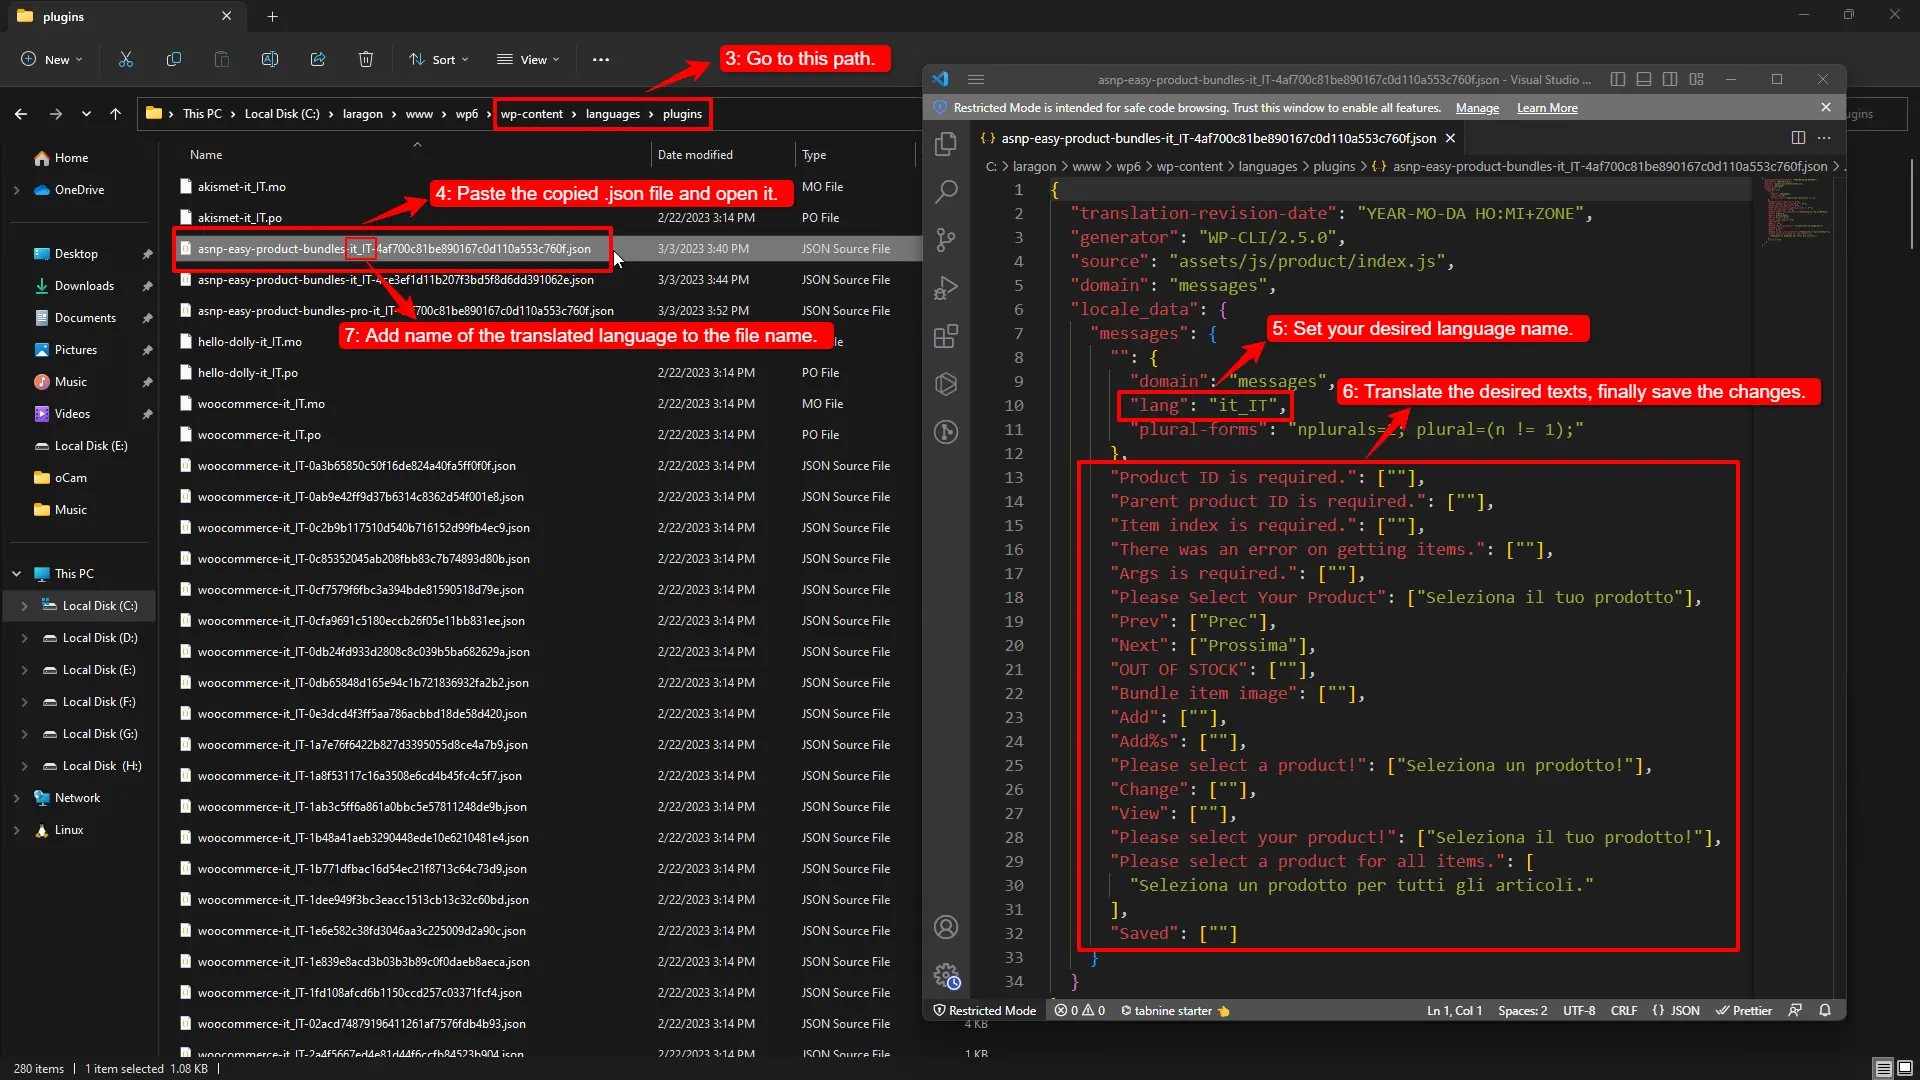
Copy and paste the selected .json file(s) into the WordPress plugin language directory:

Using this location ensures that your translations will not be overwritten when the plugin is updated.

translate WooCommerce plugin

3. Open the JSON Files in a Code Editor

Open the copied .json file(s) using a text or code editor such as VS Code, Sublime Text, or Notepad++. Using a proper editor prevents formatting errors that could break the translation.

4. Set Your Local Language

Inside each JSON file, find the line specifying the language:

Replace "en" with your target WordPress locale. For example, for Italian:

Valid locale examples include: fr_FR (French), de_DE (German), es_ES (Spanish), etc.

5. Translate the Text Strings

Translate each string inside the JSON array while keeping the JSON structure intact. For example:

  • The key (before the colon) must remain unchanged.
  • Only translate the value inside the array.
  • Preserve quotes, brackets, and punctuation to avoid JSON errors.

6. Update the File Name

To ensure WordPress recognizes your translation, add your locale code to the copied JSON file’s name. For example:

  • Keep the original hash (-4af700c81be890167c0d110a553c760f) if present.
  • Insert your locale code before the hash (e.g., it_IT for Italian).
how to translate product bundles

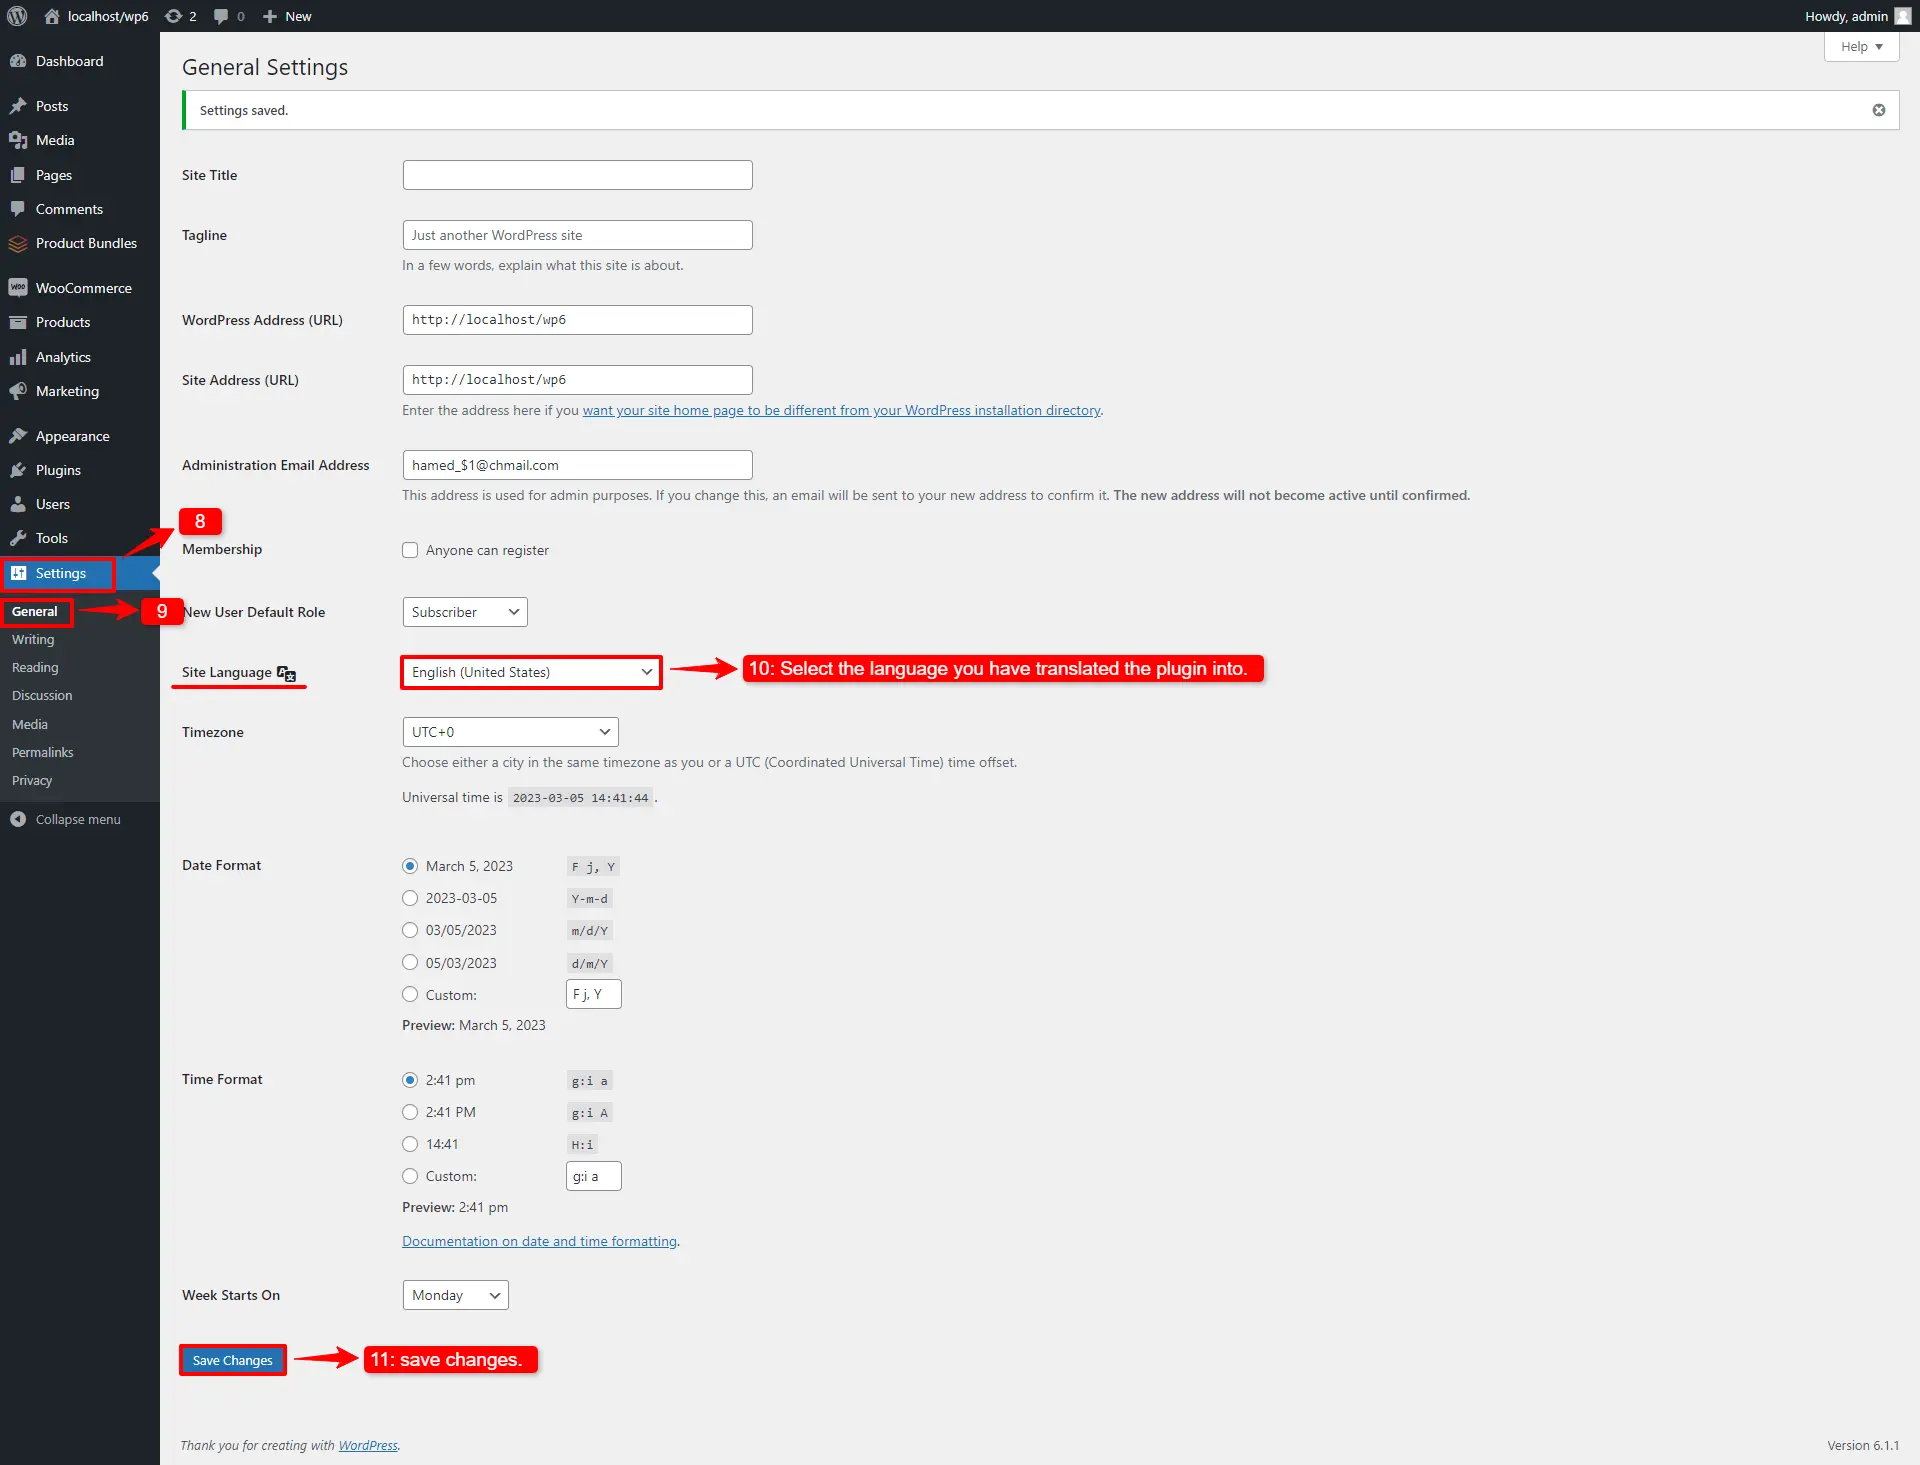
7. Set Your Site Language

  1. Log in to your WordPress admin panel.
  2. Go to Settings → General.
  3. In the Site Language field, select the local language that matches your translation.

8. Save Changes

Click Save Changes at the bottom of the page. This activates your translated language across your site, including the WooCommerce Product Bundles plugin.

woocommerce plugin translate

9. Verify the Translation

  1. Visit your store frontend and check product bundle pages.
  2. Confirm that all translated strings appear correctly.
  3. If any text is missing, double-check the JSON formatting, locale code, and file placement.
  4. Clear any caching plugins or server cache if necessary.

Additional Tips and Best Practices

  • Do not edit the original plugin files; always work on the copy in wp-content/languages/plugins/.
  • Use valid WordPress locale codes.
  • Double-check JSON formatting to prevent errors.
  • Backup your translation files before updating the plugin.
  • Remember: JSON translations are for JavaScript strings. PHP strings might still require PO/MO files or a translation plugin such as Loco Translate.

How to translate the .pot file of the WooCommerce product bundle plugin

This guide walks you through the translation process from start to finish using the WooCommerce product bundle plugin’s POT file.

Step 1: Install Poedit

Poedit is one of the most widely used editors for translating WordPress plugins. You can download and install it on Windows, macOS, or Linux from the official website.

Step 2: Find the Plugin’s POT File

Most WordPress plugins that are translation-ready include a POT (Portable Object Template) file. This file contains all strings marked for translation.

For Easy Product Bundles for WooCommerce, the POT file is usually located in:

translate pot file

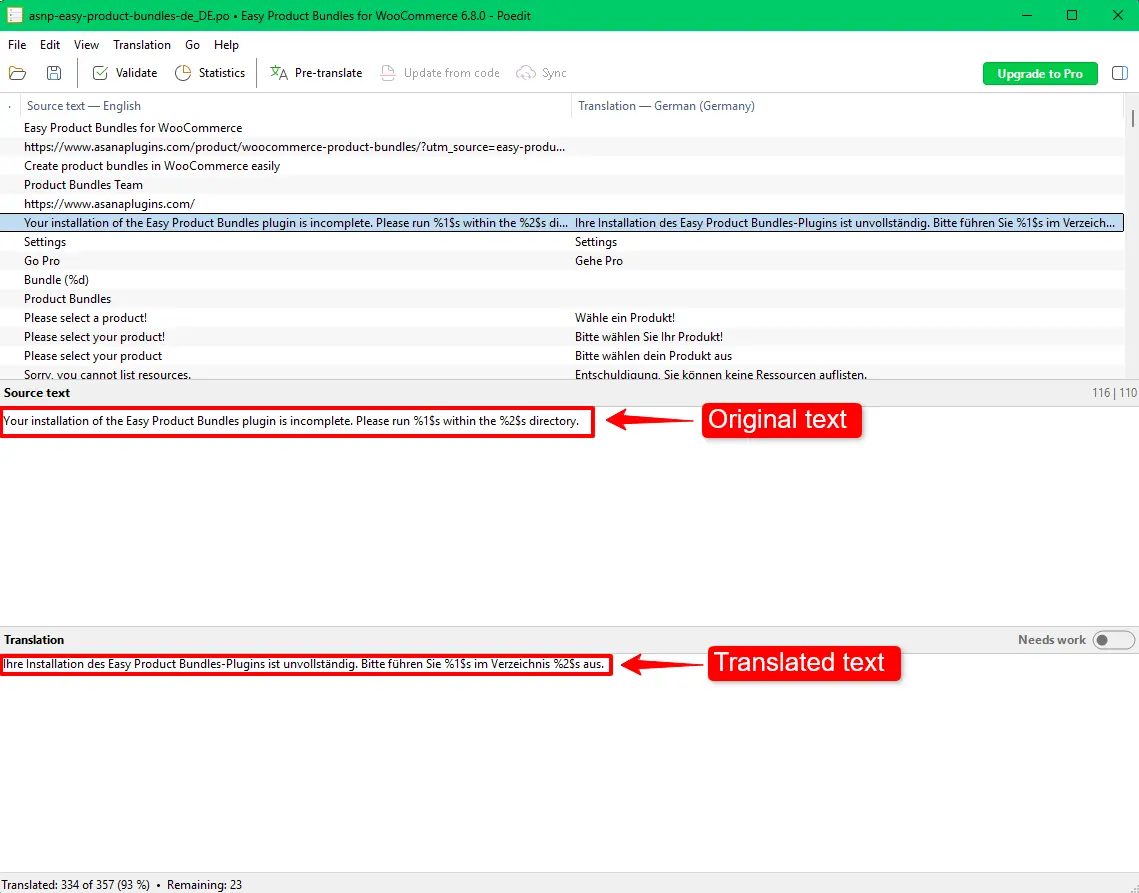
Step 3: Create a New Translation in Poedit

  1. Open Poedit.
  2. Choose “Create New Translation.”
  3. Navigate to the plugin’s POT file and open it.
  4. Select your target language (for example, de_DE for Germany).
  5. Translate each string one by one.
Translate product bundle pot file
  1. At the end of translating the desired texts, save changes.

Poedit automatically saves your translations in two files:

  • asnp-easy-product-bundles-LOCALE.po – editable translation file
  • asnp-easy-product-bundles-LOCALE.mo – compiled file WordPress uses at runtime

Step 4: Place Your Translation Files

After saving, upload your .po and .mo files to one of these locations:

Preferred (safe from plugin updates):

Alternative:

Using the first location helps ensure that translations are not overwritten when the plugin updates.

Step 5: Verify Text Domain and Locale

Make sure the file names match the WordPress locale format. For example:

bundle

Also, confirm that your WordPress site language matches the locale under:

Settings → General → Site Language

Step 6: Clear Cache and Test

If you use a caching plugin or server cache, clear it. Then visit pages where the plugin strings appear. Your translations should now be visible in the site frontend and admin interface.

Best Practices

  • Avoid editing plugin core files directly.
  • Always store translation files in the wp-content/languages/plugins/ directory when possible.
  • Double-check locale codes (en_US, es_ES, fr_FR, etc.).
  • Keep backups of your translation files.

Alternative: Translate in WordPress Dashboard

If you prefer not to use Poedit, you can use plugins like Loco Translate directly inside WordPress:

  • Install and activate the translation plugin.
  • Navigate to Loco Translate → Plugins → Easy Product Bundles for WooCommerce.
  • Create or edit translation files from the admin UI.

This method can be easier for many users, but it requires careful file placement to avoid overwriting during updates.

Conclusion

Translating Easy Product Bundles for WooCommerce using its POT file ensures a professional, update-safe multilingual experience for your WooCommerce store. With Poedit and correct file placement, you can localize every user-facing label and message in the plugin.

Related Resources

Want to learn more about WooCommerce product bundles and related strategies? Explore these helpful guides:

🌐SOCIAL MEDIA LINKS

Updated on — Leave a comment

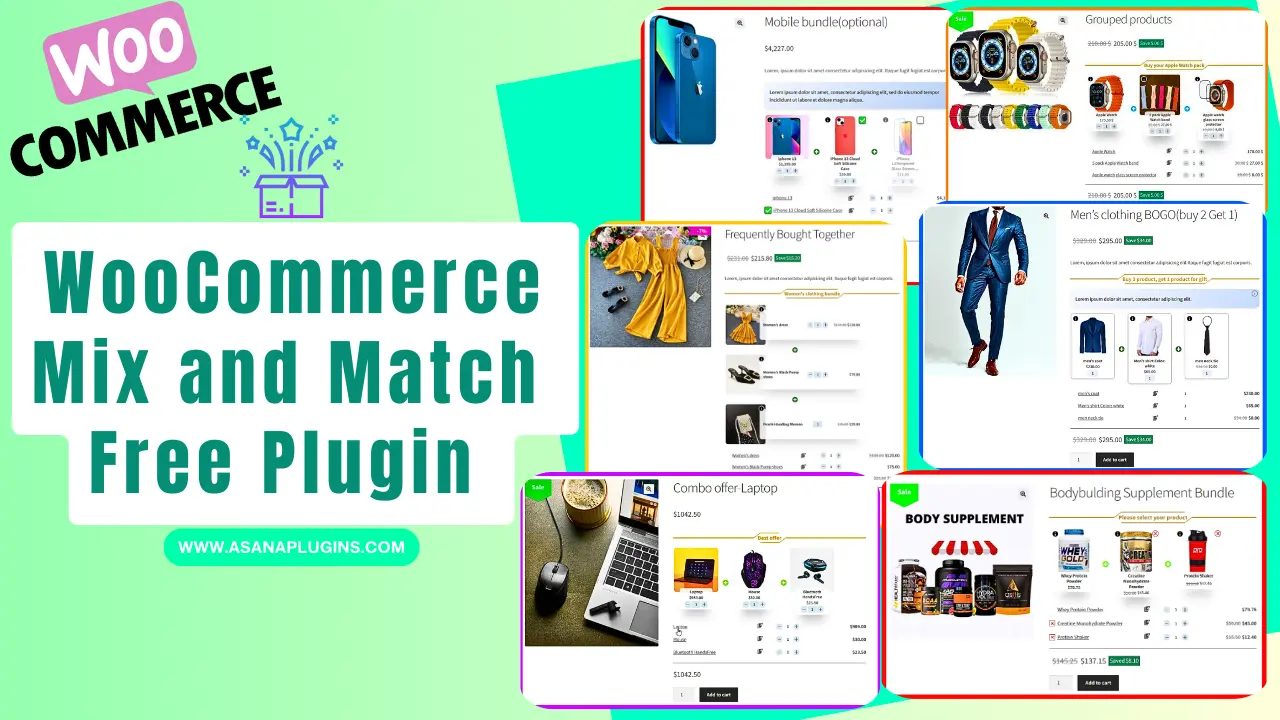
WooCommerce Mix and Match Free Plugin

Mix and match plugin

A WooCommerce Mix and Match Free Plugin lets customers build their own personalized box by selecting items from a set of available products on your store. In this article, we introduce the WooCommerce Mix and Match Free Plugin, which helps you create anything from simple custom boxes to advanced product bundles with flexible options.

If your products can be combined to form attractive bundles, you can easily set them up using the WooCommerce Mix and Match Free Plugin and offer customers a more interactive, customizable shopping experience.

Table of Contents

What is WooCommerce Mix and Match Products?

A WooCommerce Mix and Match product is a product that allows customers to create their own personalized boxes from individual products available on your site. Customers can select different products and set the quantity for each item, then mix them to build a custom bundle.

This type of product helps store owners offer flexible bundles that encourage customers to purchase more items in one order and increase Average Order Value (AOV).

Create WooCommerce Mix and Match Product

To create a WooCommerce Mix and Match products, you can use the Easy Product Bundles for WooCommerce free plugin. This powerful plugin lets you build everything from simple mix-and-match boxes to advanced mix-and-match scenarios with flexible product selection and quantity control.

It’s an easy and reliable solution for creating customizable bundles that improve the shopping experience and help increase your sales.

WooCommerce Mix and Match Free Plugin

Unfortunately, it is not possible to create a mix-and-match product with WooCommerce core. The good news is that Easy Product Bundles for WooCommerce is the best WooCommerce mix-and-match free plugin that allows creating mix and match products easily.

Some of the WooCommerce mix and match plugin features:

  • Bundle item discounts: Apply discounts to individual items inside the mix and match bundle.
  • Fixed-price mix and match products: Sell the entire bundle at a fixed price, regardless of which products the customer selects.
  • Automatic price calculation: Dynamically calculate the bundle price based on selected products and quantities.
  • Optional bundle items: Allow customers to skip optional items while building their custom box.
  • Multiple layout styles: Choose from beautiful Grid and List layouts in small, medium, and large sizes.
  • Rule-based product selection: Force customers to follow a specific structure, such as selecting one product from Category A and another from Category B.
  • Flexible product sources: Offer products based on specific products, categories, or tags.
  • Quantity limits per item: Set minimum and maximum quantity limits for each bundle item.
  • Advanced shipping control: Decide whether shipping costs apply to the whole bundle or to individual bundle items.

Video Tutorial

Examples of WooCommerce Mix and Match Products

Mix and match products work by allowing customers to select individual products they’d like to purchase and add them to a gift hamper, product box, or bundle.

Some of the popular examples of WooCommerce mix and match products are:

  • Bundle Discounts
  • BOGO deals
  • Gift products
  • Customizable products or Product boxes

Bundle Discounts

To increase Average Order Value (AOV), you can combine related products into a mix-and-match bundle and offer them with a discount. Providing a better price for the bundle encourages customers to purchase multiple items together instead of buying a single product.

For example, if you sell mobile phones, you can create a bundle that includes the phone along with a protective case and a screen protector, offered at a discounted price compared to purchasing each item separately.

Gift Products

You can build customer loyalty and encourage customers to buy more by offering gift products with selected purchases. For example, you can automatically add a free product when a customer buys a specific item or qualifies for a special offer.

With WooCommerce Mix and Match, you can also let customers choose their own gift from multiple available products. This flexibility creates a more engaging shopping experience and makes bundled offers more appealing.

Product Boxes

You can allow your customers to build their own boxes using Mix and Match products for WooCommerce.

Customizable foods like sandwiches, pizzas, and salads can be offered as product boxes. Customers can configure products and build their own delicious foods by picking food items.

How to Create WooCommerce Mix and Match Products

In this guide, we’ll show you practical examples of how to create Mix and Match products in WooCommerce.

In this tutorial, you’ll learn how to set up the following examples:

  • Mobile bundle
  • How to create mix-and-match product bundles with variable products.
  • Mobile bundle with optional items
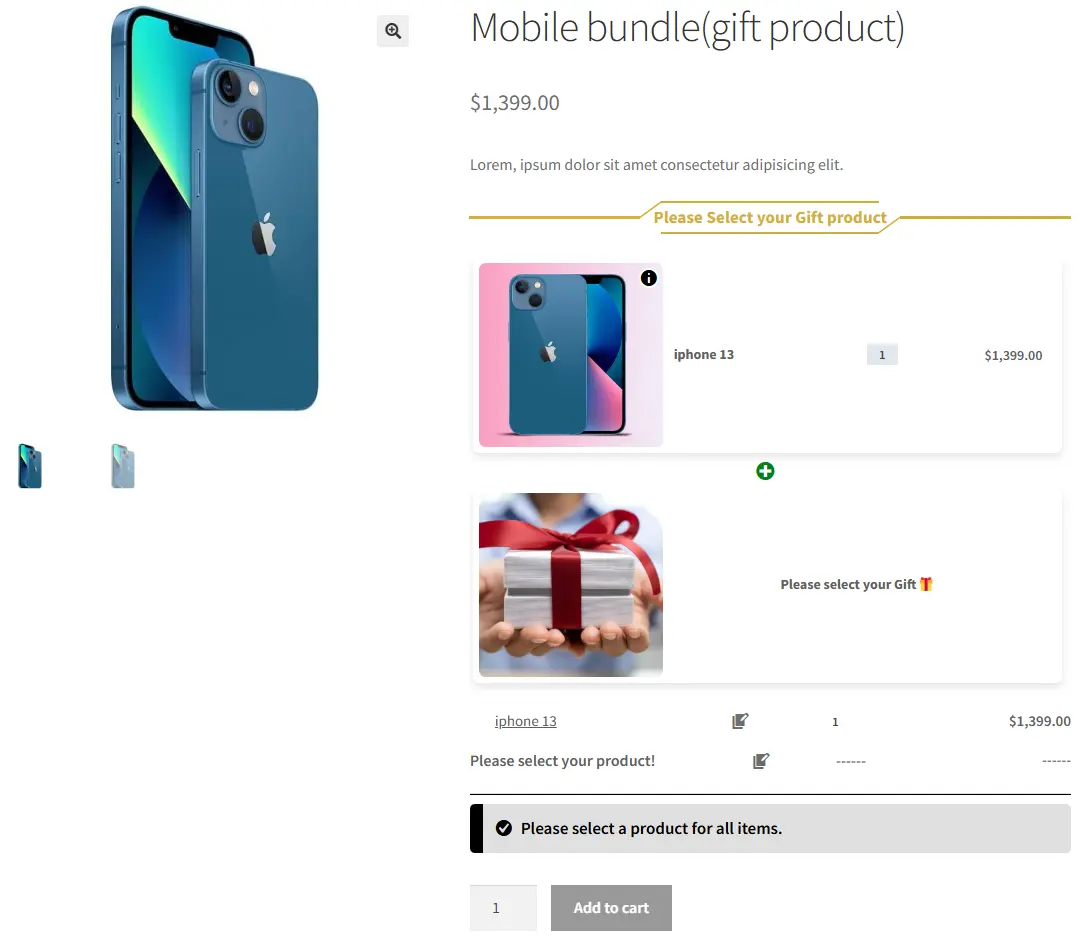
  • Offer a gift product (BOGO deal)
  • Offer multiple gift products
  • Men’s clothes as a configurable or personalized product

Create Mobile Bundle Discount in WooCommerce

If you have a mobile store, then you can increase average order value by creating and offering a mobile bundle discount in WooCommerce.

Follow these steps to create a bundle discount in WooCommerce.

Step 1: Install WooCommerce Product Bundle Free Plugin

To install Easy WooCommerce Product Bundles, follow the below steps.

  1. Navigate to the Plugins >> Add New menu on your WordPress website
  2. Then search for “Product Bundle Builder for WooCommerce“ or “Asanaplugins”
  3. Find the “Product Bundle Builder for WooCommerce”
  4. Install the plugin and activate it.
Installing WooCommerce Mix and Match Free Plugin

Step 2: Create Regular Products

First, you should create regular products in WooCommerce for mobile, mobile cases, and mobile glass covers.

To create a simple product in WooCommerce read this article in addition you can read create variable products in WooCommerce to create a variable product.

Step 3: Create a Product Bundle in WooCommerce

Now you should create a product bundle that bundles mobile, case, and glass covers with a discount or without.

1. Navigate to WooCommerce Products >> Add New product to create a new product.

2. Set a name for the bundle product, for instance, “Mobile Bundle”.

3. Click  “Set product image” from the right sidebar and select an image for your Product Bundle.

4. Now navigate to the Product data panel, and select “Product bundle” as the product type.

Step 4: Add Bundle Items

5. After selecting “Product bundle” as the product type the “Product Bundles” tab will appear in the product data panel.

6. Click on the “Product Bundles” tab.

7. Click the “Add Bundle” button to add a new bundle item to the product bundle.

add item to woocommerce mix and match plugin

8. Now, in the “Default Product” field, search for the mobile and select it.

Step 5: Customising WooCommerce Product Bundle

You can also configure the below settings to your WooCommerce Product Bundle in the item field:

  • Sort products: With this field, you can sort selected products by “ID”, “Title”, “Menu order”,” Date”, “Price”, “popularity” and“Rating”.
  • Quantity: In this field, you can set the default quantity for each product.
  • Edit quantity by user: Check this field to allow the user to change the quantity of product and Set the “min/max quantity” for each item.
  • Discount: In this field, you can set discounts for product bundles by percentage, price or fixed price.
Add item for WooCommerce mix and match plugin

Now you can go to the “display” tab of the item and configure the following sections:

  • Overwrite bundle item title.
  • Overwrite bundle item short description. (Show when the mouse hovers over it)
  • Change the title of the bundle’s empty item.
  • Change the product list product selection title.
  • Change the pop-up header title.
  • Set an image for the empty item.
Display tab of product bundle item

9. Then click on the “Add Item” button to add a new bundle item for the mobile cases.

10. Now, in the “Products” field, search for mobile cases and select them. You can add multiple products in the “Products” field.

11. Click the “Add Item” button to add a new bundle item for the mobile glass covers.

12. In the “Products” field, search for the mobile glass covers and select them. You can include multiple glass covers; therefore, the customer has multiple choices.

Add Bundle item to WooCommerce Mix and Match Free Plugin

13. Now you can publish the Mix and Match product bundle on your website.

Step 6: Set a price for the Bundle Product

The Easy WooCommerce Product Bundles free plugin offers two pricing strategies.

  1. A fixed price for the whole bundle product
  2. Auto-calculate the price based on selected products

1. Fixed Price

If you would like to set a fixed price for the whole bundle product, then check the “Fixed Price” option.

Set fixed price for product bundle in woocommerce
Fixed price product bundle in WooCommerce

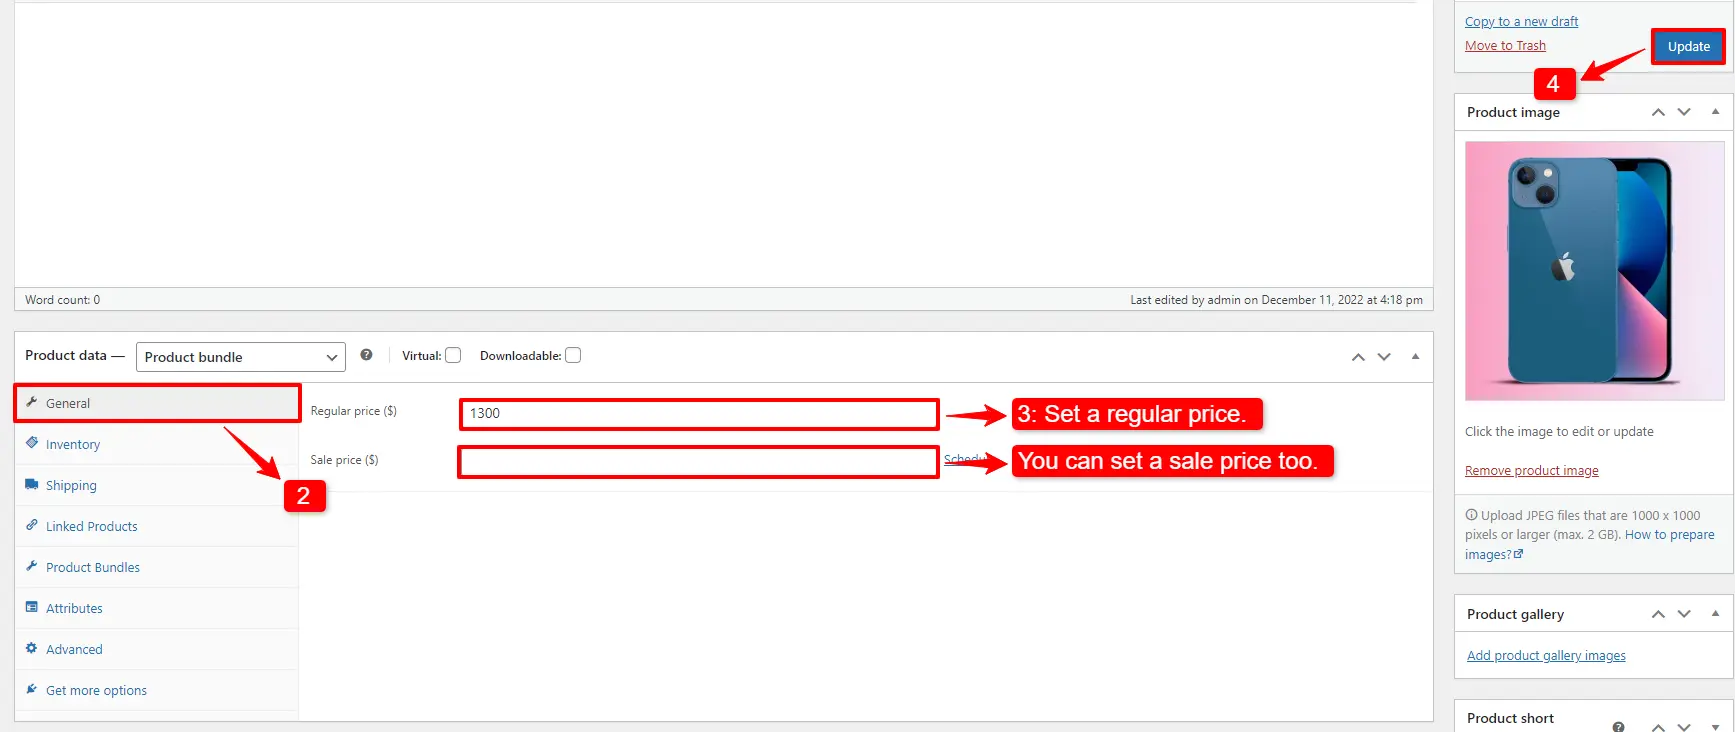
Navigate to the “General” tab and set a regular price for the Product. You can set a Sale price too.

After setting a price, update the product.

Set Fixed Price

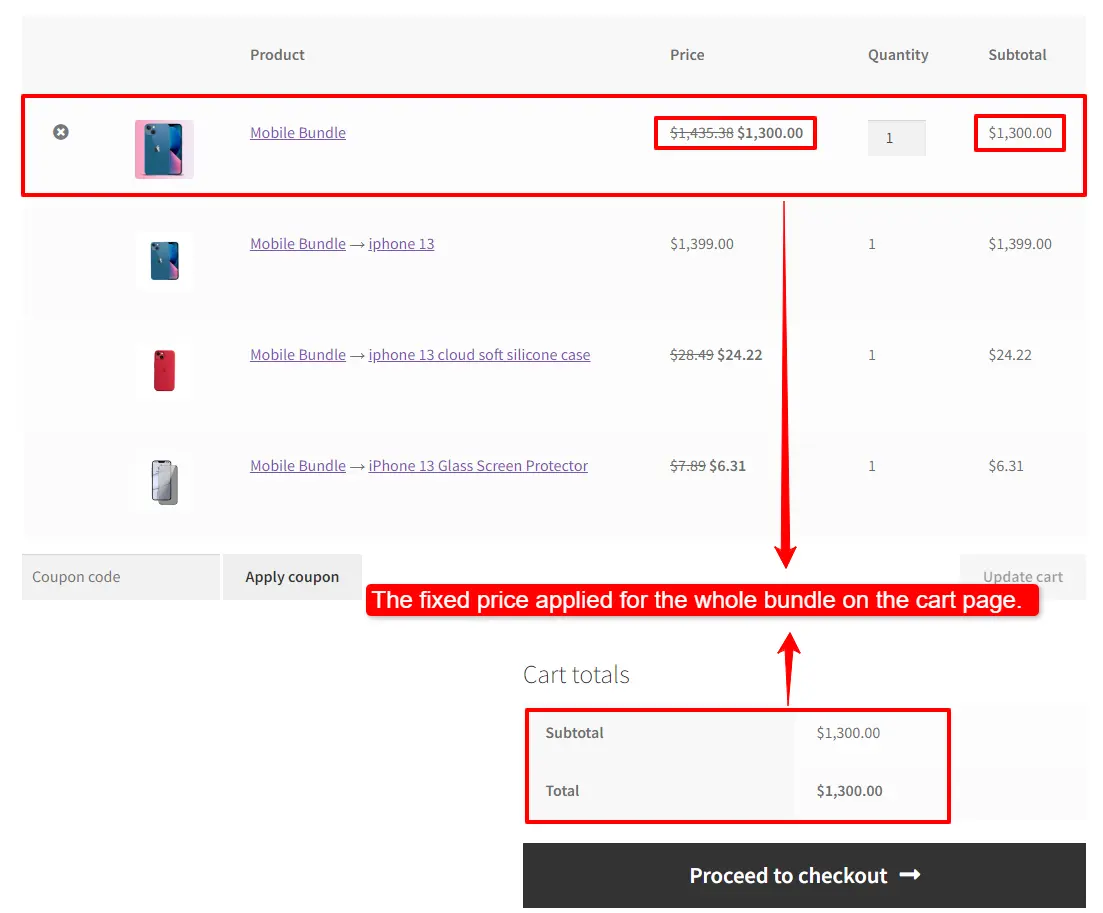
A fixed price product bundle applies to the bundle total price.

An example of WooCommerce mix and match product bundles in the cart.

Applied fixed price in cart

2. Auto Calculate Price

Auto-calculates price helps set a dynamic price for the product bundle based on the selected items.

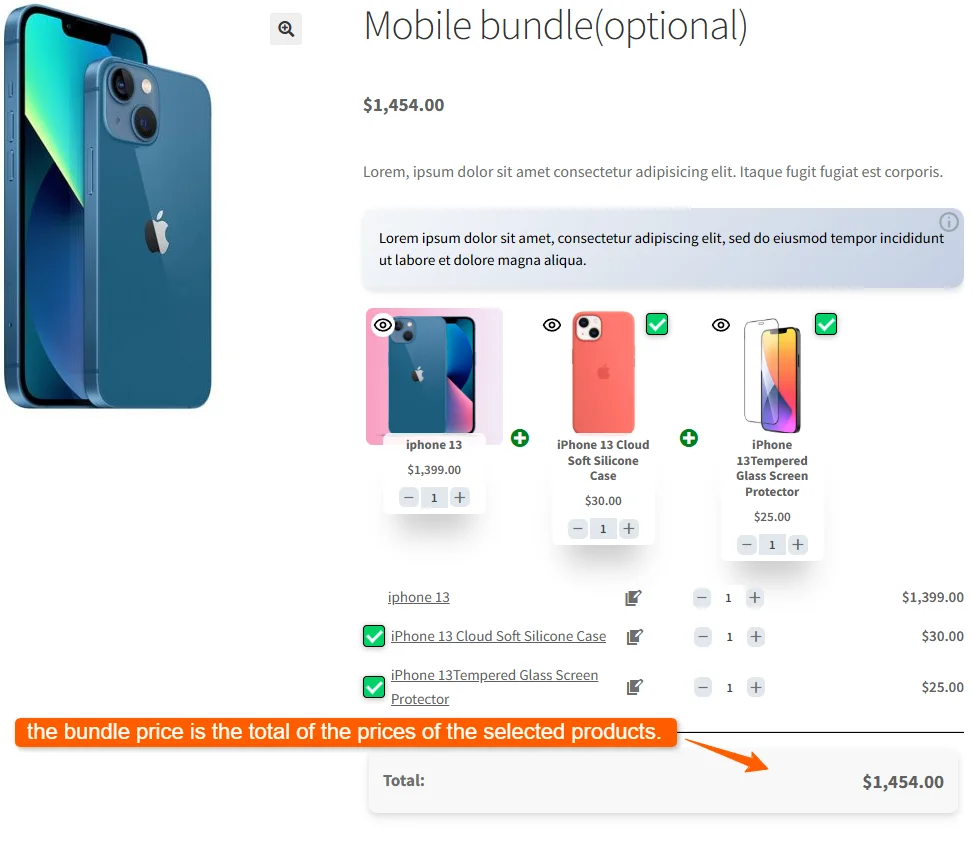
To use the auto-calculate price feature, uncheck the “Fixed Price” option and update the product.

As you can see in the image below, the bundle price is the total of the prices of the selected products.

Auto Calculate Price of product bundles

Step 7: Configure the Plugin Settings

All the plugin settings you need can be found on the “Product Bundles” tab in the WordPress dashboard.

Configure the Product Bundles plugin Settings

Settings and customization are available on this page:

  • Item View:In this section, you can configure various settings, such as displaying stock availability, showing product ratings and descriptions, adding a quantity field on item pages, displaying a plus icon for items, setting the theme and size options, positioning product bundles on the product page, defining custom CSS selectors, specifying the product price selector, and many other customizable options.
  • Change product popup: In this section, you can configure popup settings.
  • Styles: In this section, you can customize the colours of different parts of your bundle and set the product image object-fit CSS.

Final Result for Mix and Match Products in WooCommerce

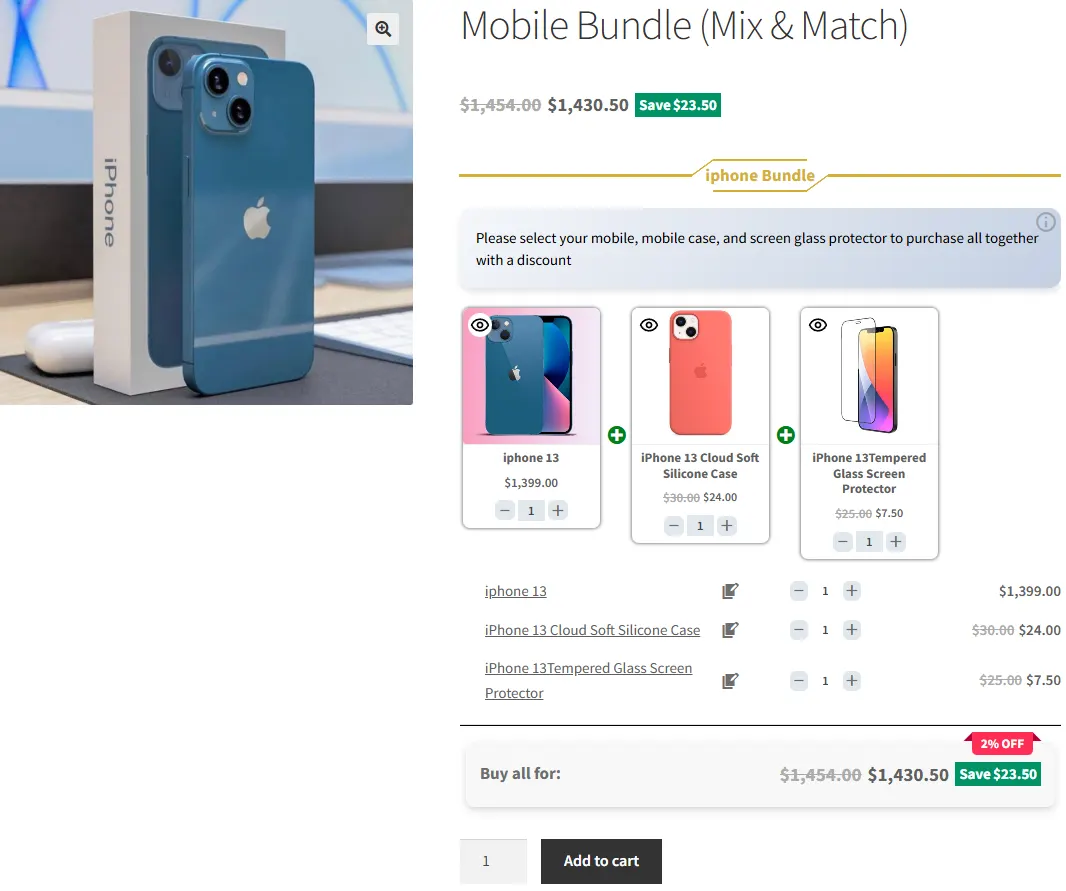
WooCommerce Mix and Match Product will be shown on your site like this

Mix and Match Products in WooCommerce

How to create mix-and-match product bundles with variable products

To create mix-and-match product bundles with variable products, follow the steps below:

📽️Video tutorial

Step 1: Create mix-and-match product bundles with variable products

1. Navigate to the “Products” section in WooCommerce.

2. Click on “Add New” to create a new product.

3. Set a name for the mix-and-match product bundles

4. Click on “Set product image” from the right sidebar and select an image for product bundles.

5. Navigate to the Product data panel, and select “Product bundle” as the product type.

6. After selecting “Product bundle” as the product type the “Product Bundles” tab will appear in the product data panel.

7. Navigate to the “Product Bundles” tab and click on the “Add Item” button to add a new bundle item.

8. Now, in the “default product” field, search and select a variable product. You can also select as many variable products as you want in the products section.

  • Likewise, if you would like to include variable products from a category, you can do it with the “Categories” field of the item. therefore you can search for categories and add them.
  • In addition, you can do the same for the variable product tags and include them in the “Tags” field. 

Step 2: Customising WooCommerce mix-and-match product bundle

You can also configure the below settings to your mix and match Product Bundle in the item field:

  • Sort products: With this field, you can sort selected variable products by “ID”, “Title”, “Menu order”,” Date”, “Price”, “popularity” and“Rating”.
  • Quantity: In this field, you can set the default quantity for each product.
  • Edit quantity by user: Check this field to allow the user to change the quantity of product and Set the “min/max quantity” for each item.
  • Discount: In this field, you can set discounts for product bundles by percentage, price or fixed price.
Add variable products to mix and match product bundles

Now you can navigate to the “display” tab of the item and configure the following sections:

  • Overwrite bundle item title.
  • Overwrite bundle item short description. (Show when the mouse hovers over it)
  • Change the title of the bundle empty item.
  • Change the product list product selection title.
  • Change the pop-up header title.
  • Set an image for the empty item.
Display tab of product bundle item

9. Then you can click on “Add Item” to add a new item to the mix and match product bundles and configure it as in the previous steps. we create one other item and select simple products for this item.

Step 3: Configure the Plugin Settings

To configure the Plugin Settings, you can just read this section of the article for more information.

Final result of Mix and Match With Variable Products

Now open the product page on the frontend to see the mix-and-match product bundles.

mix-and-match product bundles.

Optional Items in WooCommerce Product Bundles

You can make product bundle items optional, so that the customer does not have to select a product for that bundle item.

Step 1: Create optional product bundle item

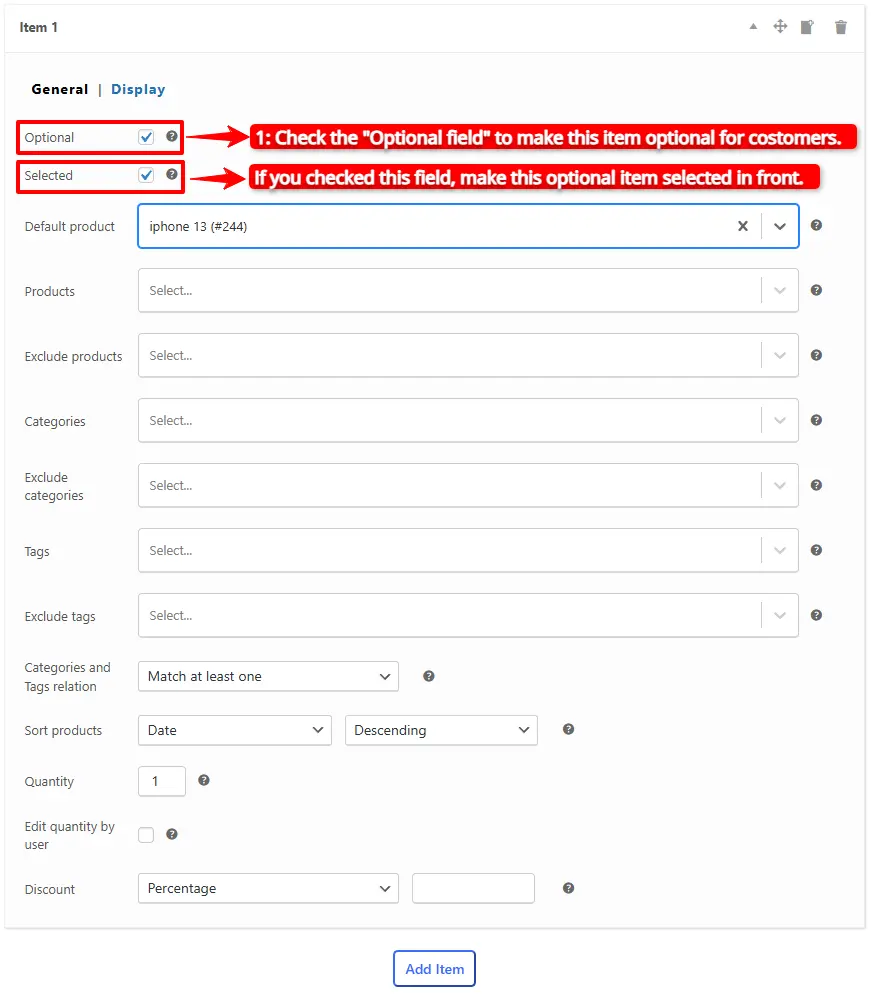
1. To make an item optional, open it and check the “Optional” field. This option is available in the pro version of the Easy Product Bundles for WooCommerce.

2. Check the “Selected” field to make this optional item selected at first time in front.

Optional product bundle items

Step 2:Change the Optional item mode

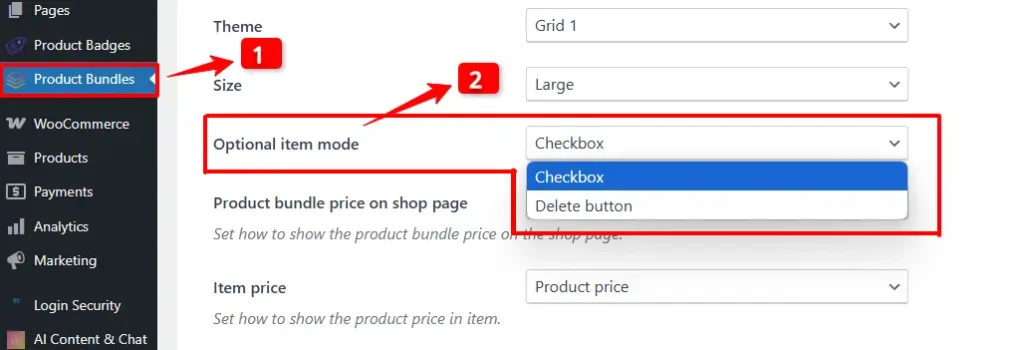
3. Go to the “product bundle” tab in the WordPress dashboard.

4. In the settings, navigate to the “Optional Item Mode” section and change the mode of the optional item to either “Checkbox” or “Delete Button”.

Final Result of Optional Product Bundles

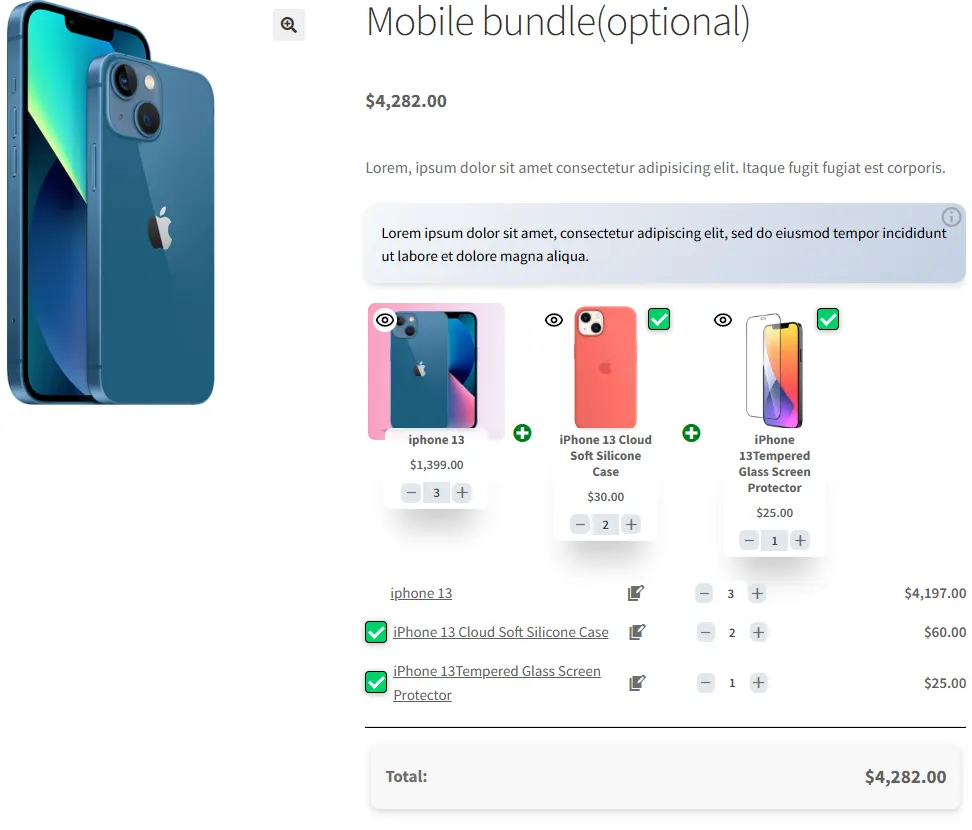
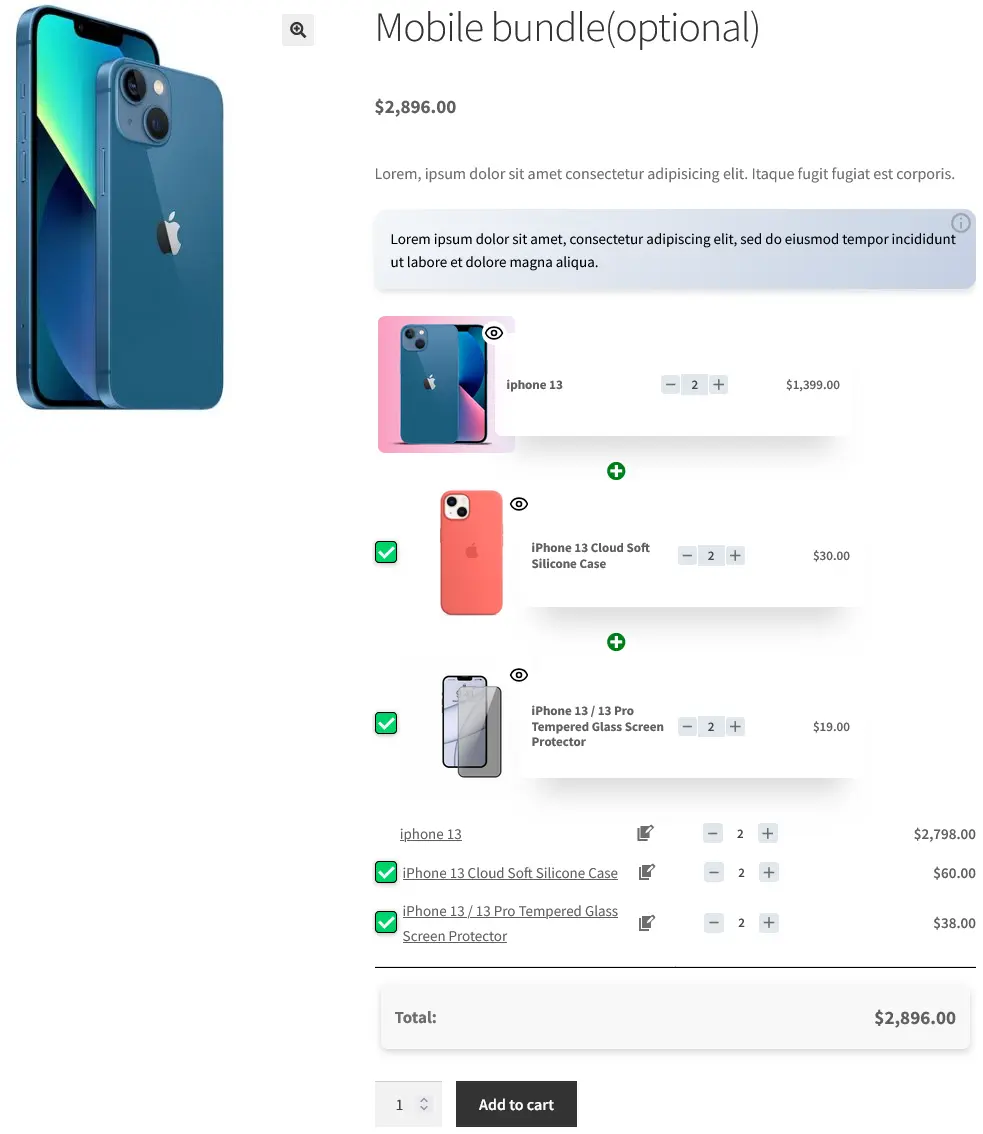
After setting an item as optional, a checkbox or delete button will appear above the bundled item, allowing the customer to choose whether or not to include that product in their purchase.

Optional Mix and Match Product bundles in WooCommerce

Offer BOGO Deals in WooCommerce

BOGO deals are one of the best strategies to make money and build customer loyalty.

In this article, we will use the Easy Product Bundles for WooCommerce to create BOGO deals. If you would like to create advanced BOGO deals, you can check out Discount Rules and Dynamic Pricing for WooCommerce or Auto Add Products to Cart for WooCommerce plugins.

Step 1: Create a Product Bundle

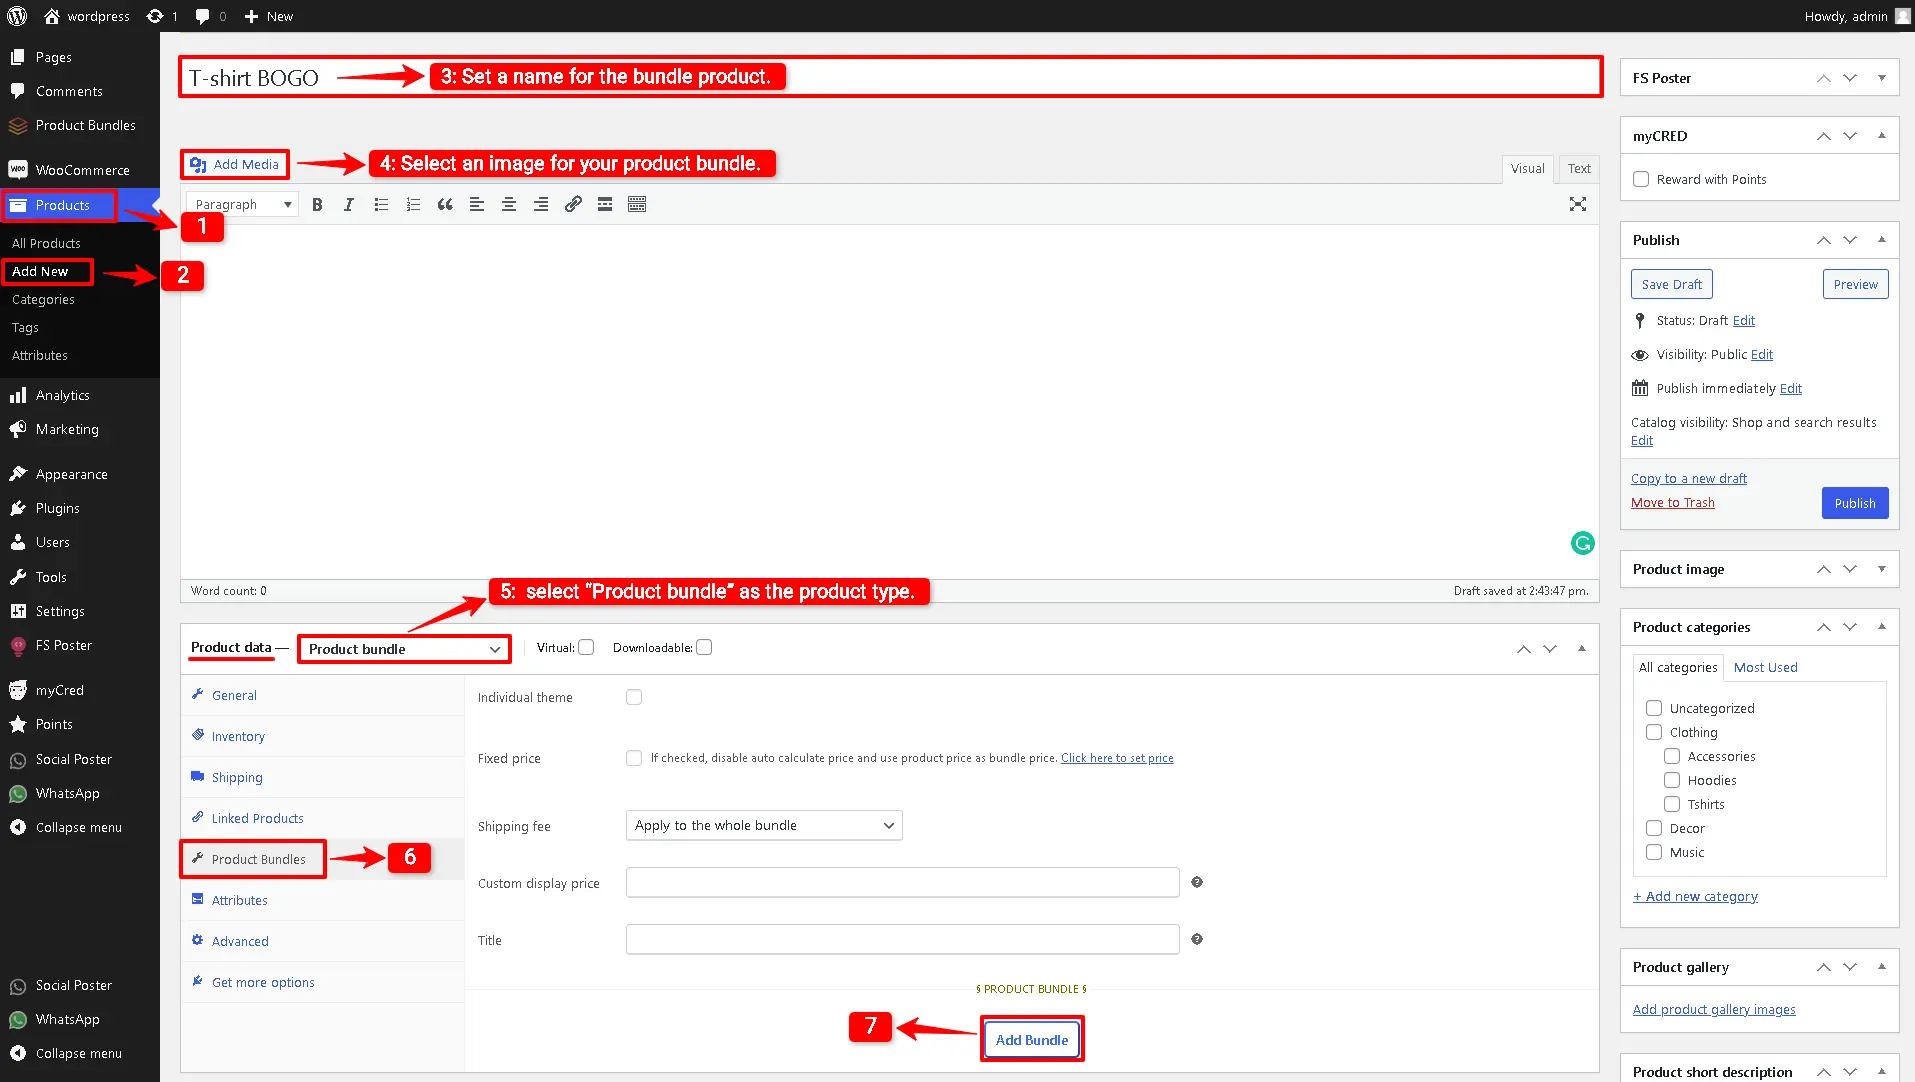
1. To create a BOGO deal in WooCommerce, navigate to WooCommerce Products >> Add New to create a new product.

2. Set a name for the product bundle.

3. Click on “Add Media” and select an image for your product bundle.

4. Now navigate to the Product data panel, and select “Product bundle” as the product type.

5. After selecting “Product bundle” as the product type the “Product Bundles” tab will appear in the product data panel.

Step 2: Add bundle items

6. Navigate to the “Product Bundles” tab

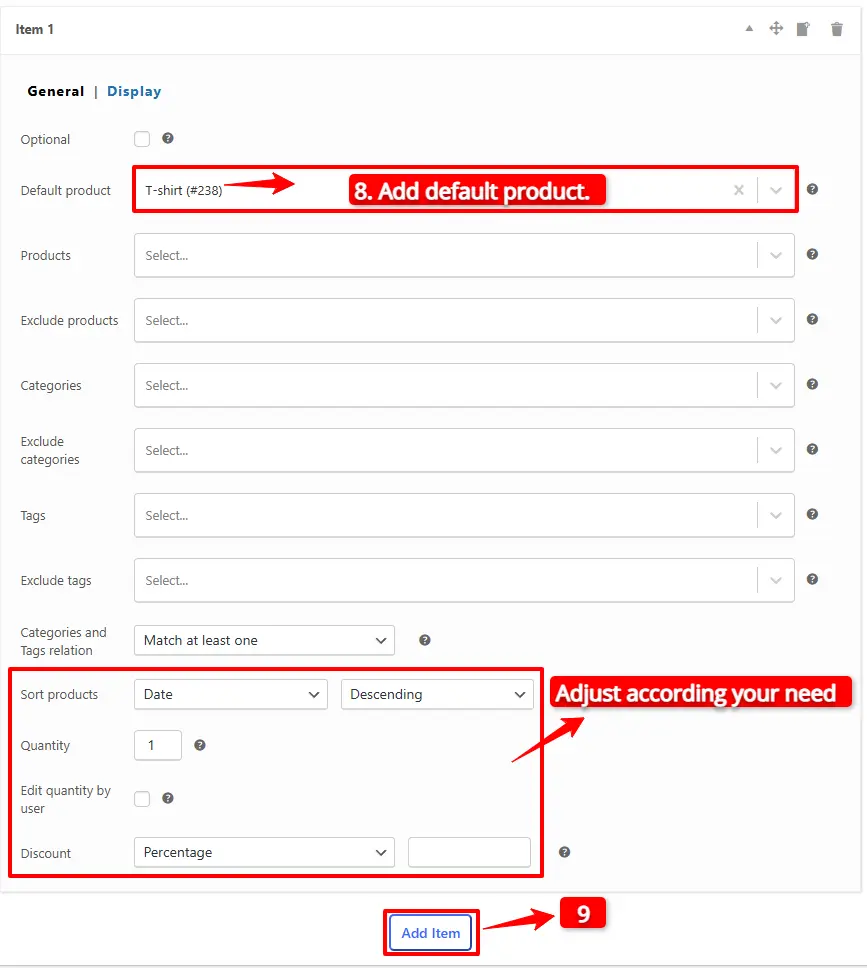
7. Click the “Add Item” button to add a new bundle item to the product bundle.

BOGO Deals Add bundle WooCommerce Mix and Match Free Plugin

8. Now, in the “Default Product” field, search for the product and select it.

9. Click on the “Add Item” button to add a new item for the gift product.

Configure the item of the product bundle plugin

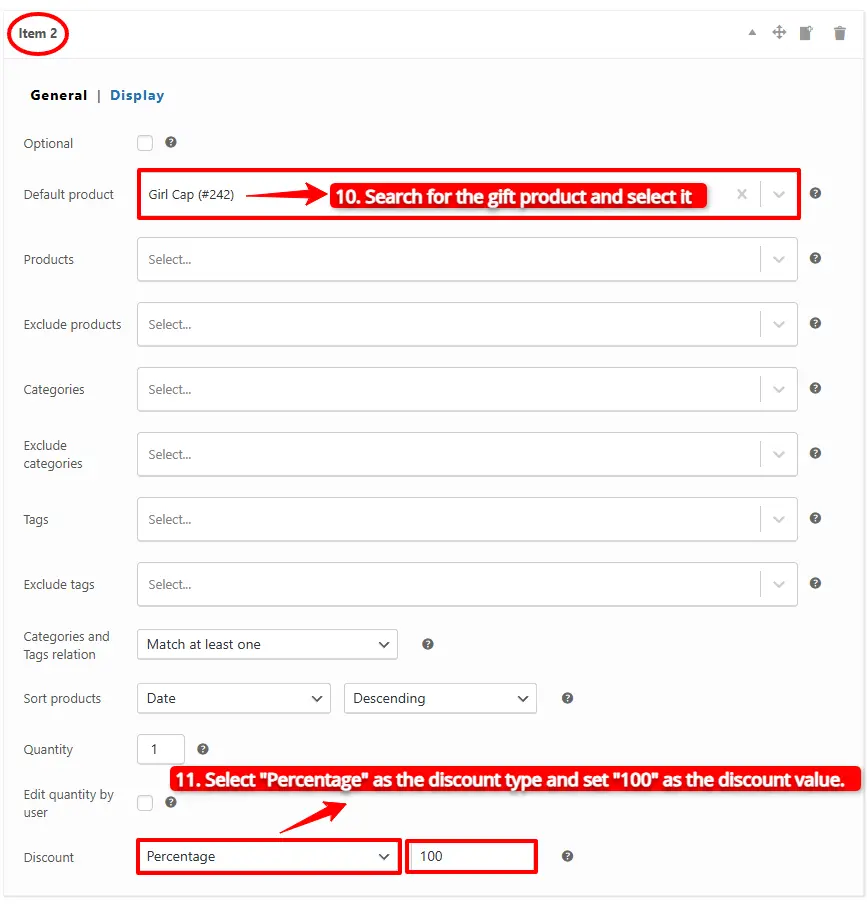
10. In the “Default Product” field, search for the gift product and select it.

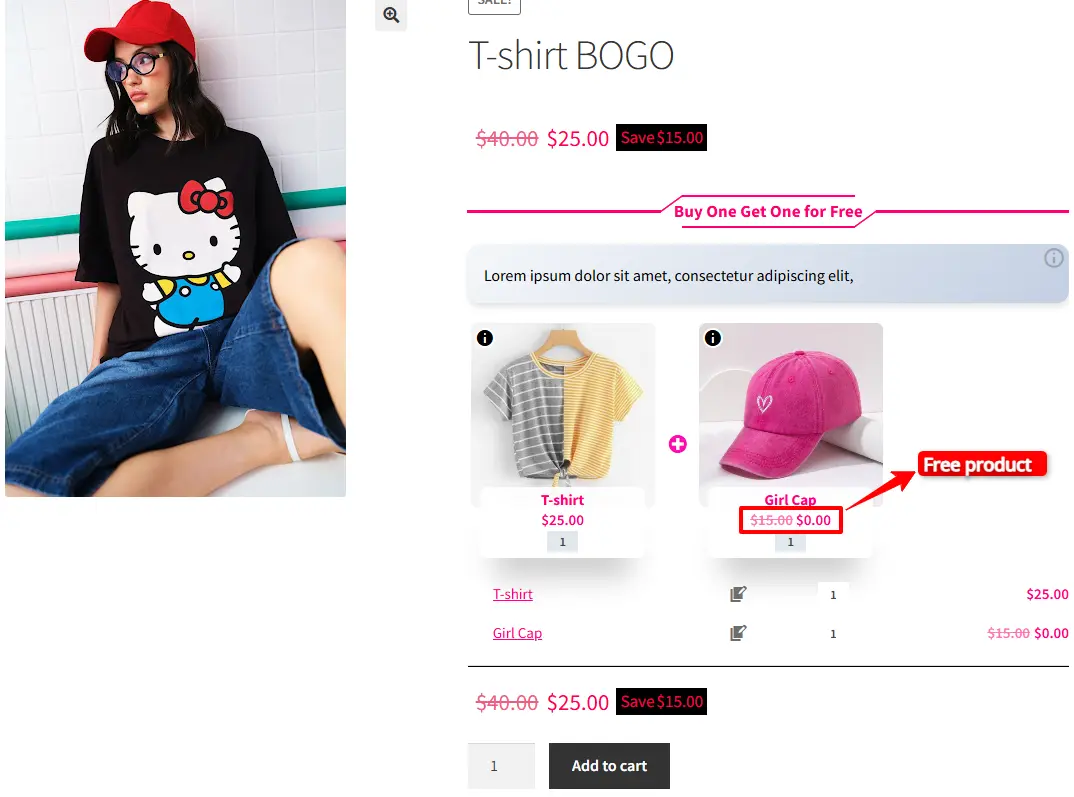
Note: The bundle item has a “Discount” field, and you can use it to apply a discount on the gift product.

11. Select “Percentage” as the discount type and set “100” as the discount value. The gift product will be free.

Set a discount on the Product bundle item

Final Result of BOGO Deals in WooCommerce

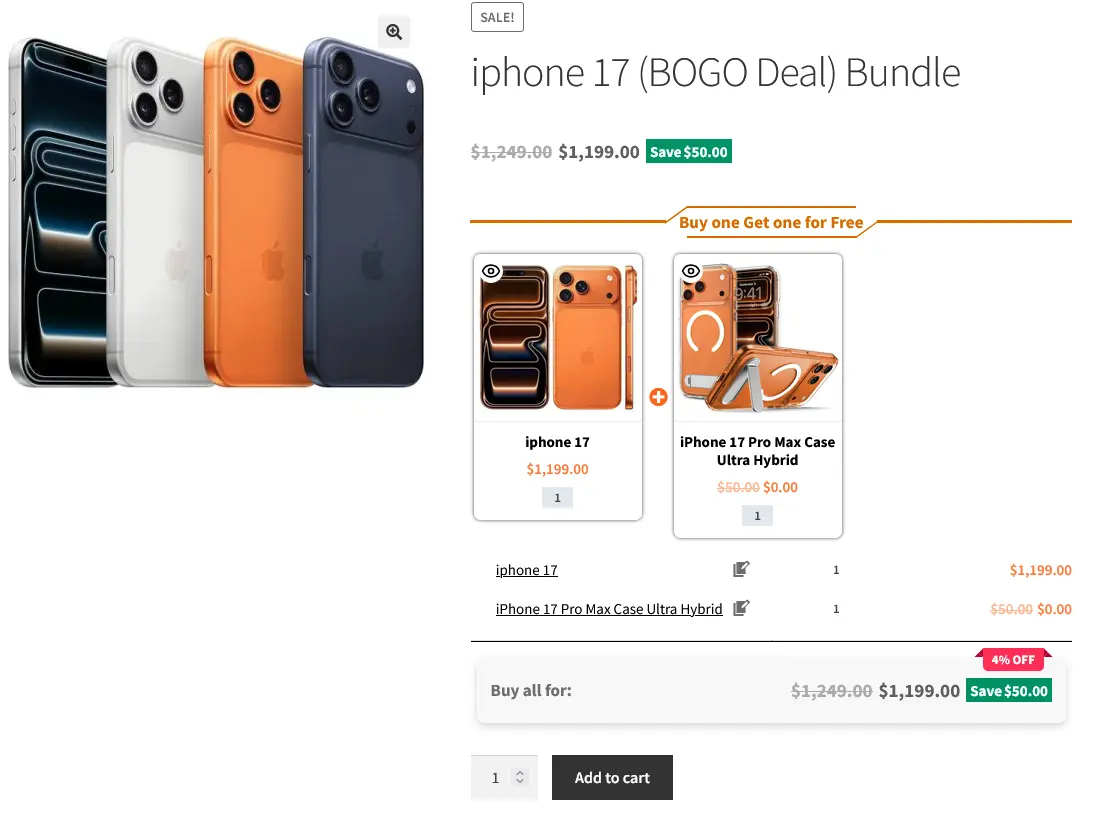
12. Publish the product, and you will see the product in the image below.

Final result of WooCommerce Mix and Match Free Plugin BoGo deal

When the customer purchases it, he will only pay the t-shirt price and will get the gift product for free.

Offer Multiple Gift Products in WooCommerce

You can offer multiple gift products in WooCommerce with the Product Bundles for WooCommerce plugin.

In the BOGO deal offered in the above example, we offered one product as a gift product. So we can edit it to include multiple product items.

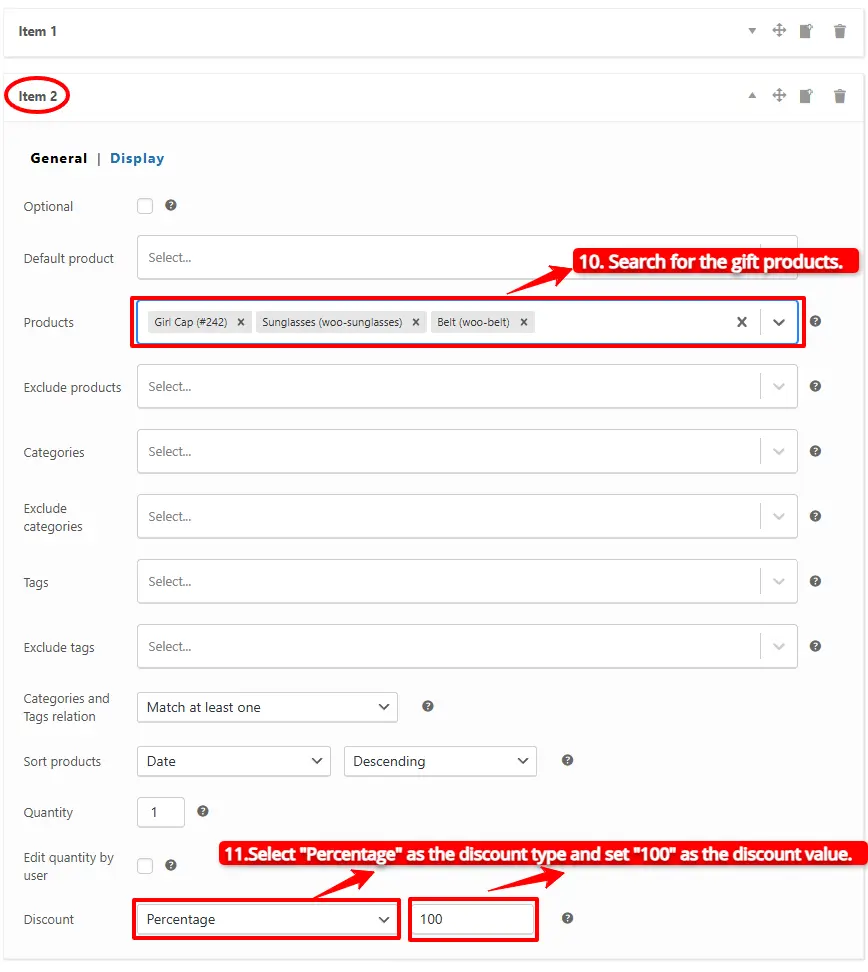
1. To offer multiple products as gifts, edit the “Products” field of the item and include all of the gift products there, so the customer can choose from them.

2. In the “Products” field, search for the gift products and include them as shown in the image below.

Offer Multiple Gift Products in WooCommerce

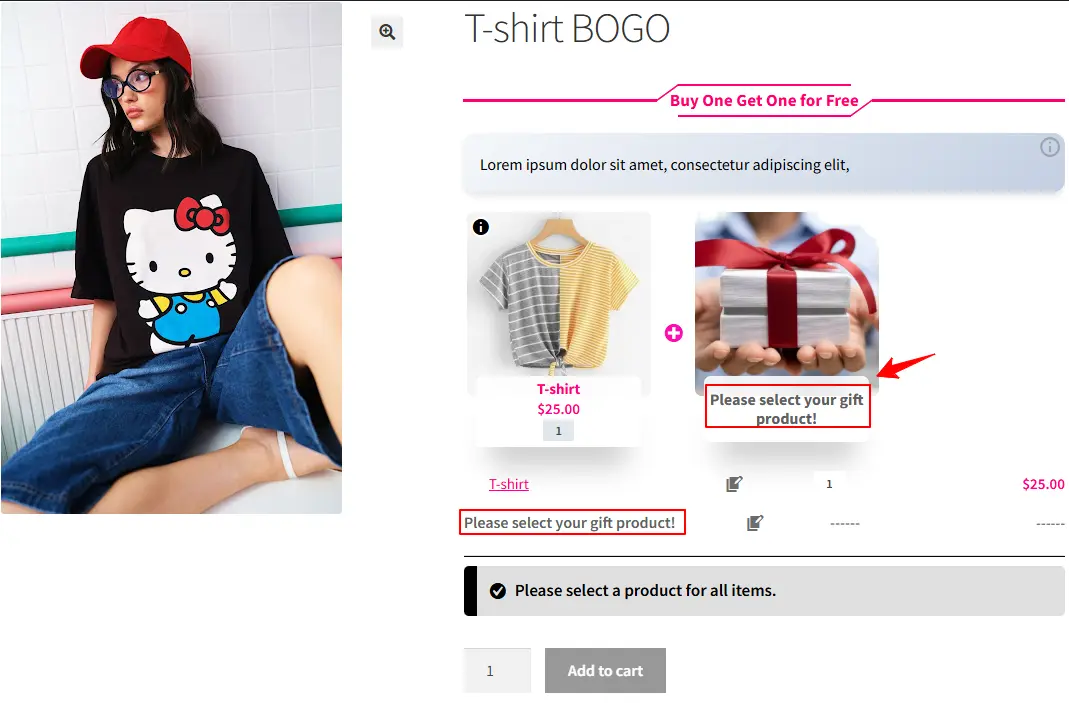
You can use one of the gift products as a default gift product or leave it empty to allow the customer to choose it.

Final result of offering multiple gift products

The product page will be like the image and allows the customer to choose the gift product in a popup.

Final result of offer Multiple Gift Products in WooCommerce

Create Configurable or Personalized Products in WooCommerce

Products like food or clothes sets are examples of configurable or personalized products.

If you want to make your restaurant different from other ones, you can offer configurable foods. It allows customers to make the food as they like it.

Step 1: Create regular products

To create a configurable product, first, you should create simple or variable products that you want to include in the bundle.

Step 2: Create a Product Bundle

1. After creating regular products in WooCommerce, navigate to WooCommerce Products >> Add New to create a new product.

2. Now navigate to the Product data panel, and select “Product bundle” as the product type.

3. After selecting “Product bundle” as the product type the “Product Bundles” tab will appear in the product data panel.

Step 3: Add Items to the Bundle

4. Navigate to the “Product Bundles” tab and click on the “Add Bundle” button to add a new bundle item to the product bundle.

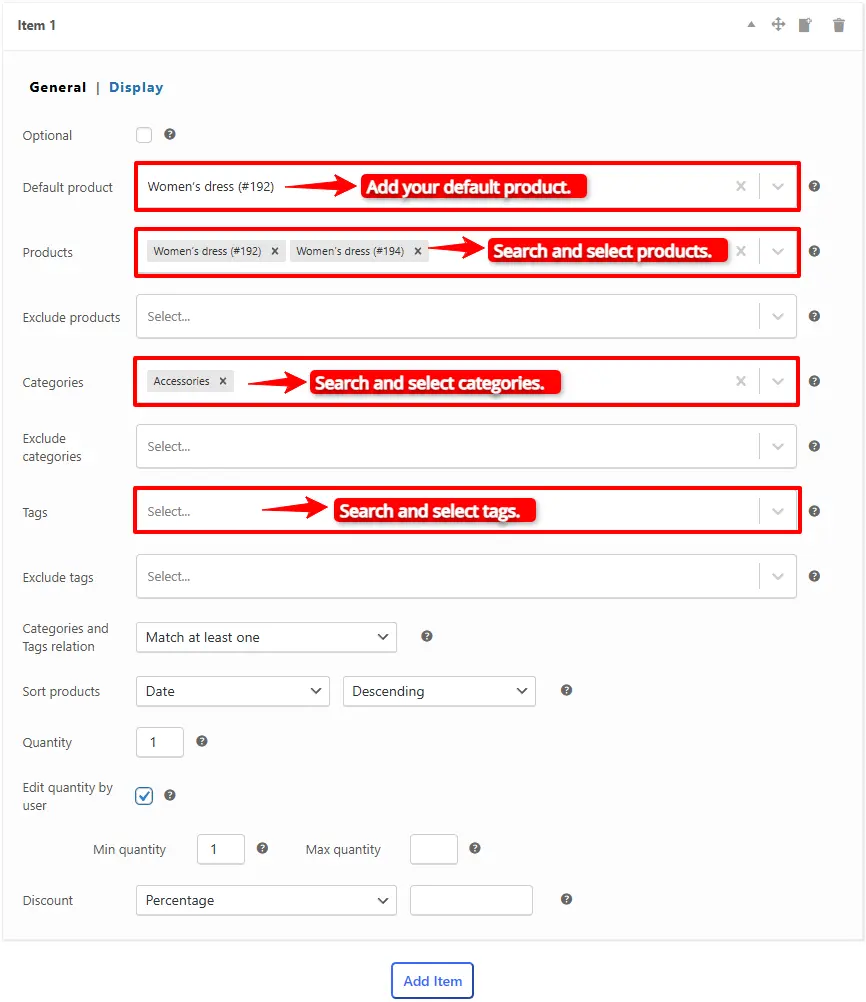
5. You can set a default product for each bundle item by selecting the default product in the “Default product” field.

6. Now you can include other available options for that item in the “Products” field of the item. Search for the products and add them to the “Products” field.

  • Or if you would like to include products from a category, you can do it with the “Categories” field of the item. You can search for categories and add them to the “Categories” field.
  • You can do the same for the product tags and include them in the “Tags” field.
Add products on product bundle items

Now we have added an item to the bundle, and you can repeat the above “Add Items to the Bundle” steps to add other items to the bundle.

Final Result of WooCommerce Mix and Match Free Plugin

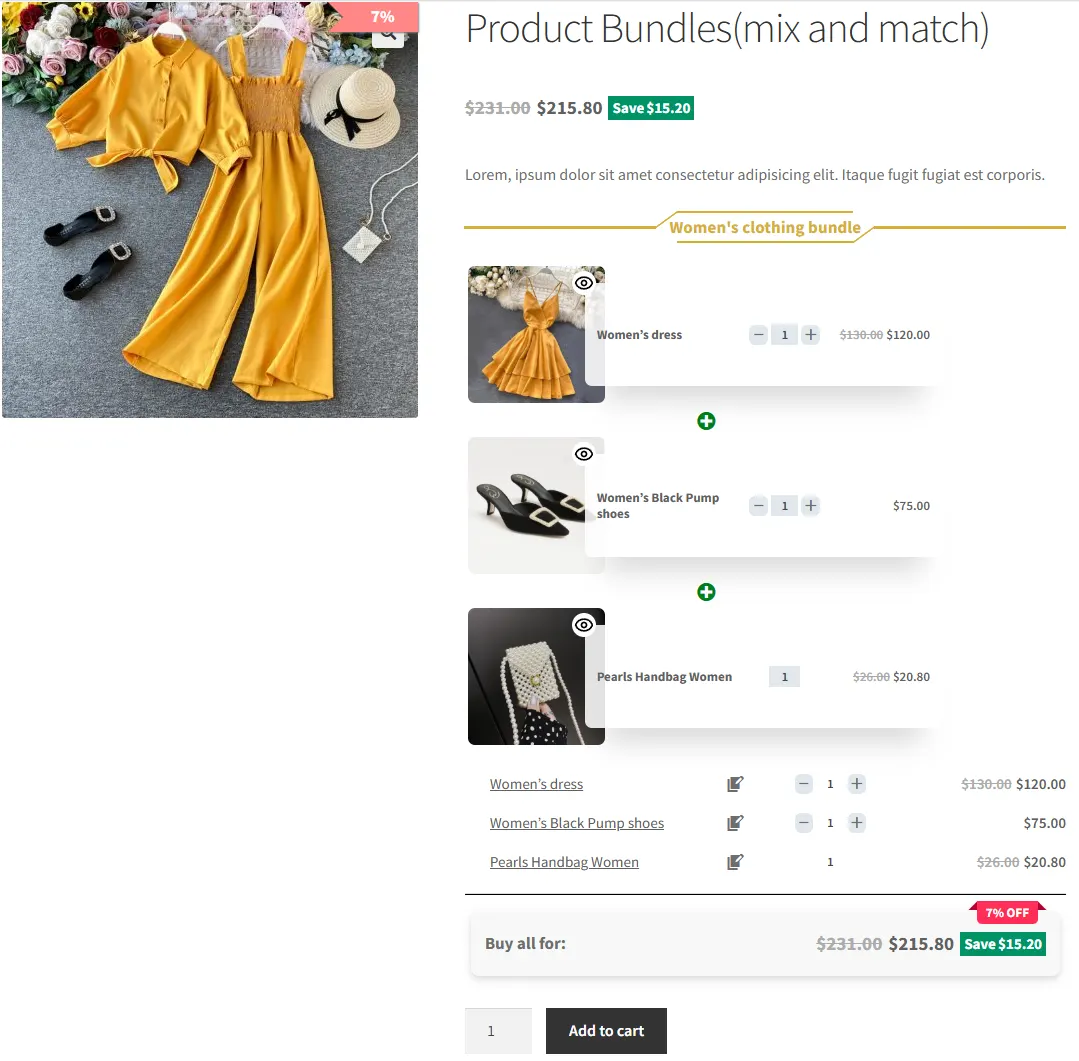
We have created a configurable Women’s clothes set that allows customers to build their own set, like the image below.

WooCommerce Mix and Match product bundles

Shortcodes

The plugin has the below shortcodes and you can use them:

  • [asnp_wepb_product] Use it on the product page to show the bundles.
  • [asnp_wepb_product show_add_to_cart="1"] Use it on the product page to show the bundles + add to cart button.

WooCommerce Mix and Match Free Plugin FAQ

What is a mix and match product?

A mix-and-match product allows customers to create personalized boxes. They can select products and quantities from multiple available products and mix them together to build their own one.

How to create a mix and match product in WooCommerce?

To create a mix and match product you can use the Easy Product Bundles for WooCommerce. The plugin allows creating simple to advanced mix and match products like bundle discounts, BOGO deals, multiple gift products, custom products, and configurable or personalized products easily.

How do I merge two products in WooCommerce?

If you want to merge products and sell them together then you can create a bundle product and sell it. You can use the Easy Product Bundles for WooCommerce plugin to create simple to advanced bundles.

Related Resources

Want to learn more about WooCommerce product bundles and related strategies? Explore these helpful guides:

🌐SOCIAL MEDIA LINKS

Updated on — Leave a comment

WooCommerce Product Bundle with Variations (Free Plugin)

WooCommerce product bundles with variations

Do you want to create powerful WooCommerce Product Bundle with Variations and boost your store’s sales?
In this article, we’ll show you how to build flexible product bundles using variable products and product variations—the smart way.

With product bundles, customers can create their own custom bundles from available products, choose the desired variations, and set the quantity for each item. The result? A fully personalized bundle offered at an attractive discounted price that encourages higher spending.

Product bundles are not just a sales feature—they’re a proven strategy to increase average order value (AOV), improve customer experience, and drive more conversions. When done right, bundles help you sell more products in a single order while giving customers the feeling of control and savings.

In this guide, you’ll learn how to create professional WooCommerce bundles with variations that are easy to manage, visually appealing, and optimized for higher revenue.

What is WooCommerce Product Bundle?

A WooCommerce Product Bundle is a product type that combines multiple related products into a single package. Instead of buying items separately, customers can purchase them together as one bundle—often at a discounted price.

For example, an iPhone bundle may include an iPhone 14, a protective case, and a screen protector, all in one convenient offer. Product bundles help improve the shopping experience and increase average order value (AOV) by encouraging customers to purchase more in a single order.

What is the goal of the WooCommerce Product Bundle?

The main goal of a WooCommerce Product Bundle is to increase your store’s sales by encouraging customers to purchase multiple products in a single order. By offering attractive bundles with a discounted price, customers are more likely to buy related products together instead of purchasing them separately.
Product bundles also improve the shopping experience by making it easier and more convenient for customers to get everything they need in one package.

Benefits of Creating Product Bundles in WooCommerce

Some of the important benefits of creating product bundles in WooCommerce are:

Video Tutorial

How to Create a WooCommerce Product Bundle with Variable Products

To create a WooCommerce Product Bundle with variable products, we will use the Easy Product Bundles for WooCommerce, which is a free plugin.

Step 1: Install WooCommerce Product Bundle Free Plugin

To install Easy WooCommerce Product Bundles, follow the steps below.

  1. Navigate to the Plugins >> Add New menu on your WordPress website
  2. Then search for “Product Bundle Builder for WooCommerce“ or “Asanaplugins”
  3. Find the “Product Bundle Builder for WooCommerce”
  4. Install the plugin and activate it.
Installing Product Bundle Free Plugin

Step 2: Create Product Bundle in WooCommerce

To include variable products in the bundle items, follow the steps below:

1. Navigate to WooCommerce Products >> Add new product to create a new product.

2. Set a name for the product bundle.

3. Click  “Set product image” from the right sidebar and select an image for your Product Bundle.

4. Now navigate to the Product data panel, and select “Product bundle” as the product type.

5. After selecting “Product bundle” as the product type, the “Product Bundles” tab will appear in the product data panel.

Step 3: Add Bundle Items

6. Click on the “Product Bundles” tab.

7. Click the “Add Bundle” button to add a new bundle item to the product bundle.

8. Now in the “Products” field of the bundle item, search for a variable product and select it.

  • In the Pro version of plugin, you are able to select variation products in the products field.
  • If you are using the Pro version of the Easy Product Bundles for WooCommerce, then you can set one of the variations as the default selected variation.
  • To set a default product for the item, in the “Default Product” field, search for a variation and select it. Selecting variation products is only available in the Pro version.

Step 4: Customising WooCommerce Product Bundle

You can also configure the below settings to your WooCommerce Product Bundle in the item field:

  • Sort products: With this field, you can sort selected products by “ID”, “Title”, “Menu order”,” Date”, “Price”, “popularity” and“Rating”.
  • Quantity: In this field, you can set the default quantity for each product.
  • Edit quantity by user: Check this field to allow the user to change the quantity of product and Set the “min/max quantity” for each item.
  • Discount: In this field, you can set discounts for product bundles by percentage, price or fixed price.
Add item for product bundle

Now you can go to the “display” tab of the item and configure the following sections:

  • Overwrite bundle item title.
  • Overwrite bundle item short description. (Show when the mouse hovers over it)
  • Change the title of the bundle empty item.
  • Change the product list product selection title.
  • Change the pop-up header title.
  • Set an image for the empty item.
Display tab of an item

9. Then you can click on “Add item” to add a new item to the bundle and select a default product for it. We have created two bundle items .

Step 5: Set price for Product Bundle

The plugin allows two types of pricing for product bundles.

  • Fixed Price: Sets a fixed price for the whole bundle product.
  • Auto Calculate Bundle Price: Allow the plugin to calculate the bundle product price using the selected products for the bundle items.

If you want to set a fixed price for the product bundle, enable the “Fixed price” option and navigate to the “General” tab, and set a price for the “Regular price” field. You can set a “Sale price” too.

fixed price for product bundle

To use the “Auto Calculate Bundle Price” disable the “Fixed price” option.

10. Finally, publish the Product Bundle with Variations on your website.

Step 6: Configure the Plugin Settings

All the plugin settings you need can be found on the “Product Bundles” tab in the WordPress dashboard.

Configure the Product Bundles plugin Settings

Settings and customization are available on this page:

  • Item View: In this section, you can configure various settings, such as displaying stock availability, showing product ratings and descriptions, adding a quantity field on item pages, displaying a plus icon for items, setting the theme and size options, positioning product bundles on the product page, defining custom CSS selectors, specifying the product price selector, and many other customizable options.
  • Change product popup: In this section, you can configure popup settings.
  • Styles: In this section, you can customize the colours of different parts of your bundle and set the product image object-fit CSS.

Final Result

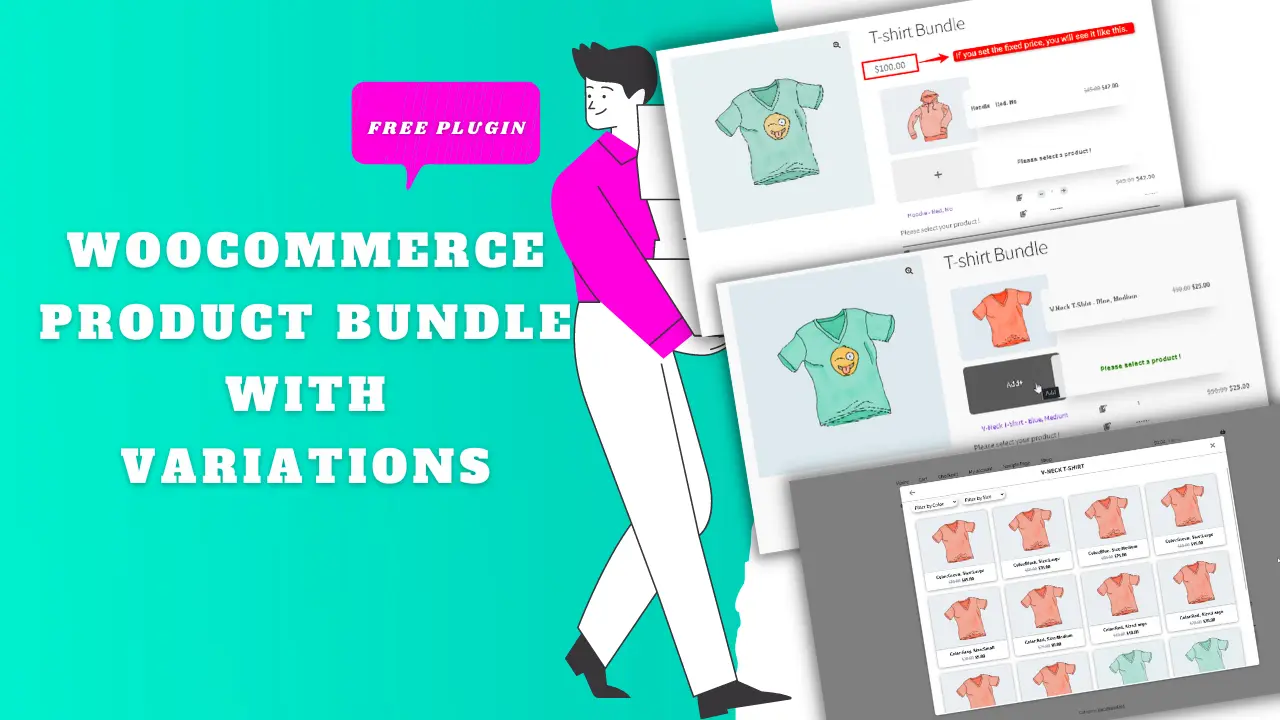
WooCommerce product bundle with variations will be shown in front like this image.

Product Bundle with Variations

The customer can choose other available variations from the popup.

How to Create a WooCommerce Product Bundle with Variations

If you want to create a WooCommerce product bundle with variations, then you can use the WooCommerce Product Bundles pro version. You have the ability to include specific variations in the product bundle.

Step 1: Install WooCommerce Product Bundles Pro Plugin

To create a WooCommerce Product Bundle with Variations, you should install and activate the WooCommerce Product Bundles Pro plugin.

WooCommerce Product Bundles Pro Version

Step 2: Create a Bundle Product in WooCommerce

To include variation products in the bundle items follow the below steps.

1. Navigate to WooCommerce Products >> Add New product to create a new product.

2. Set a name for the product bundle.

3. Click  “Set product image” from the right sidebar and select an image for your Product Bundle.

4. Now navigate to the Product data panel, and select “Product bundle” as the product type.

6. After selecting “Product bundle” as the product type, the “Product Bundles” tab will appear in the product data panel.

Step3: Add Bundle Items

7. Navigate to the “Product Bundles” tab and click on the “Add item” button to add a new bundle item to the product bundle.

Add bundle item

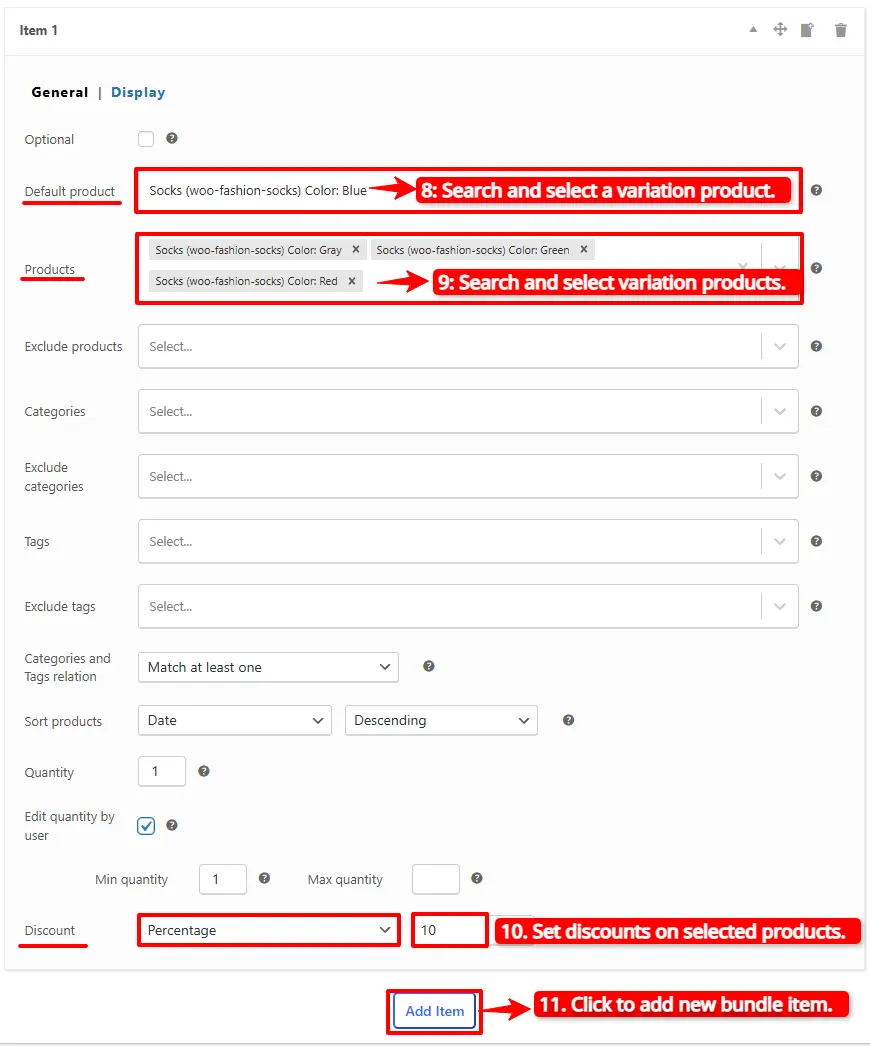
8. Search and select a variation product in the “default product” field.

9. To add other variations to the item, in the “Products” field search for variations and select them.

10. You can set a “percentage, price, or fixed price” discount on the bundle item by using the “Discount” field of the item.

Configurate Bundle Items

11. If you want to add other bundle items, you can click on the “Add item” button to add another bundle item. Follow the steps “Add bundle items“. We created two bundle items.

Step 4: Set price for Product Bundle

The plugin allows two types of pricing for product bundles.

  1. Fixed Price: Sets a fixed price for the whole bundle product.
  2. Auto Calculate Bundle Price: Allow the plugin to calculate the bundle product price using the selected products for the bundle items.

If you want to set a fixed price for the product bundle, enable the “Fixed price” option and navigate to the “General tab”, and enter a price in the “Regular price” field. You can set a “Sale price” too.

fixed price of product bundle in woocommerce

To use the “Auto Calculate Bundle Price” disable the “Fixed price” option.

Final Result

12. Now you can publish the product on your website.

The WooCommerce product bundle with variations is like the image.

The customer can choose other available variations from the pop-up.

Shortcodes

The plugin has the below shortcodes, and you can use them:

  • [asnp_wepb_product] Use it on the product page to show the bundles.
  • [asnp_wepb_product show_add_to_cart="1"] Use it on the product page to show the bundles + add to cart button.

Related Resources

Want to learn more about WooCommerce product bundles and related strategies? Explore these helpful guides:

🌐SOCIAL MEDIA LINKS

Updated on — 1 Comment

How to Create WooCommerce Product Bundles (2026 Tutorial)

WooCommerce product bundles allow you to combine multiple products into a single offer and sell them together as one bundle. You can use bundles to group complementary products, create special offers, encourage customers to buy related products, or offer multiple products at a combined price.

For example, a clothing store could create a bundle that includes a shirt, pants, and shoes. Instead of purchasing each product separately, customers can purchase the complete bundle from a single product page.

In this guide, you’ll learn how to create WooCommerce product bundles step by step using the Product Bundle Builder for WooCommerce plugin. We’ll start with a simple product bundle and then look at other bundle types, pricing methods, shipping, and advanced options.

What Are WooCommerce Product Bundles?

A WooCommerce product bundle is a product that combines multiple individual products into one package.

You can create bundles with fixed products or, depending on your configuration, allow customers to choose products, quantities, or variations within the bundle.

For example, you could create:

  • A clothing bundle with a shirt, pants, and shoes
  • A computer bundle with a laptop, mouse, and keyboard
  • A skincare bundle with cleanser, serum, and moisturizer
  • A gift bundle containing several complementary products

Product bundles can be configured in different ways depending on the products you sell and how you want customers to purchase them.

Why Create Product Bundles in WooCommerce?

Product bundles can help you offer related products together and create more flexible purchasing options for your customers.

Here are some common reasons to create product bundles in WooCommerce:

  • Increase average order value: Encourage customers to purchase multiple related products together.
  • Promote complementary products: Group products that are commonly used or purchased together.
  • Create special offers: Sell several products as a package with a fixed price or discount.
  • Simplify the buying process: Let customers purchase multiple products from a single product page.
  • Create customizable offers: Allow customers to choose products, quantities, or variations when needed.

How to Create a WooCommerce Product Bundle

The easiest way to create a WooCommerce product bundle is to use a product bundle plugin that integrates with WooCommerce.

In the following steps, we’ll use Product Bundle Builder for WooCommerce to create a simple product bundle.

Step 1: Install Product Bundle Builder for WooCommerce

To install Product Bundle Builder for WooCommerce, follow these steps:

  1. Go to Plugins → Add New in your WordPress dashboard.
  2. Search for “Product Bundle Builder for WooCommerce” or “AsanaPlugins.”
  3. Find Product Bundle Builder for WooCommerce in the search results.
  4. Click Install Now, then click Activate.

Get Product Bundle Builder for WooCommerce

Installing Product Bundle Free Plugin

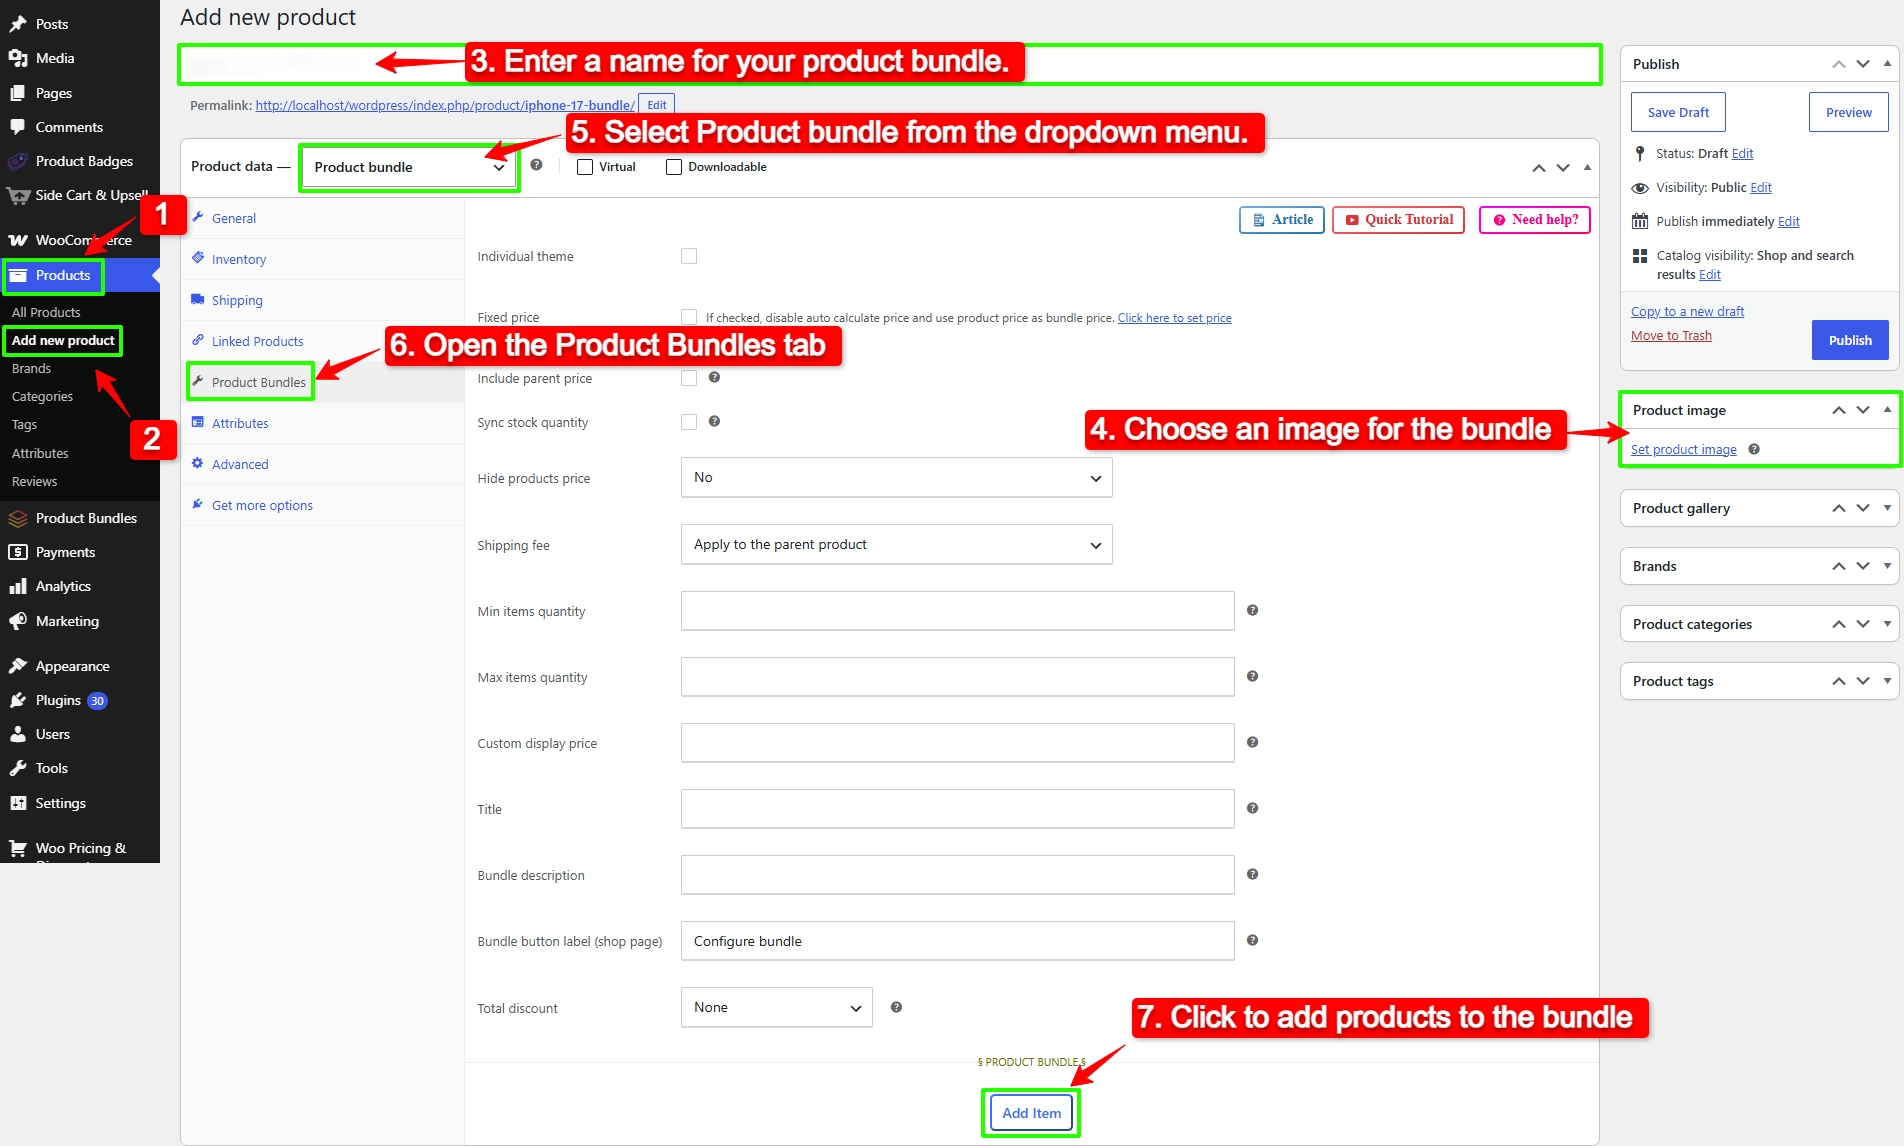
Step 2: Create a New Product Bundle

To create a WooCommerce Product Bundle, follow these steps:

  1. Go to “WooCommerce” → “Products” in your WordPress dashboard.
  2. Click “Add New” to create a new product.
  3. Enter a name for your product bundle.
  4. In the right sidebar, click “Set product image” and choose an image for your bundle.
  5. In the “Product data” section, select “Product bundle” from the product type dropdown.
  6. After selecting “Product bundle,” the “Product Bundles” tab will appear in the product data panel.
  7. Go to the “Product Bundles” tab and click “Add Item” to add products to your bundle.
Create Product Bundle

Step 3: Add and Configure Bundle Items

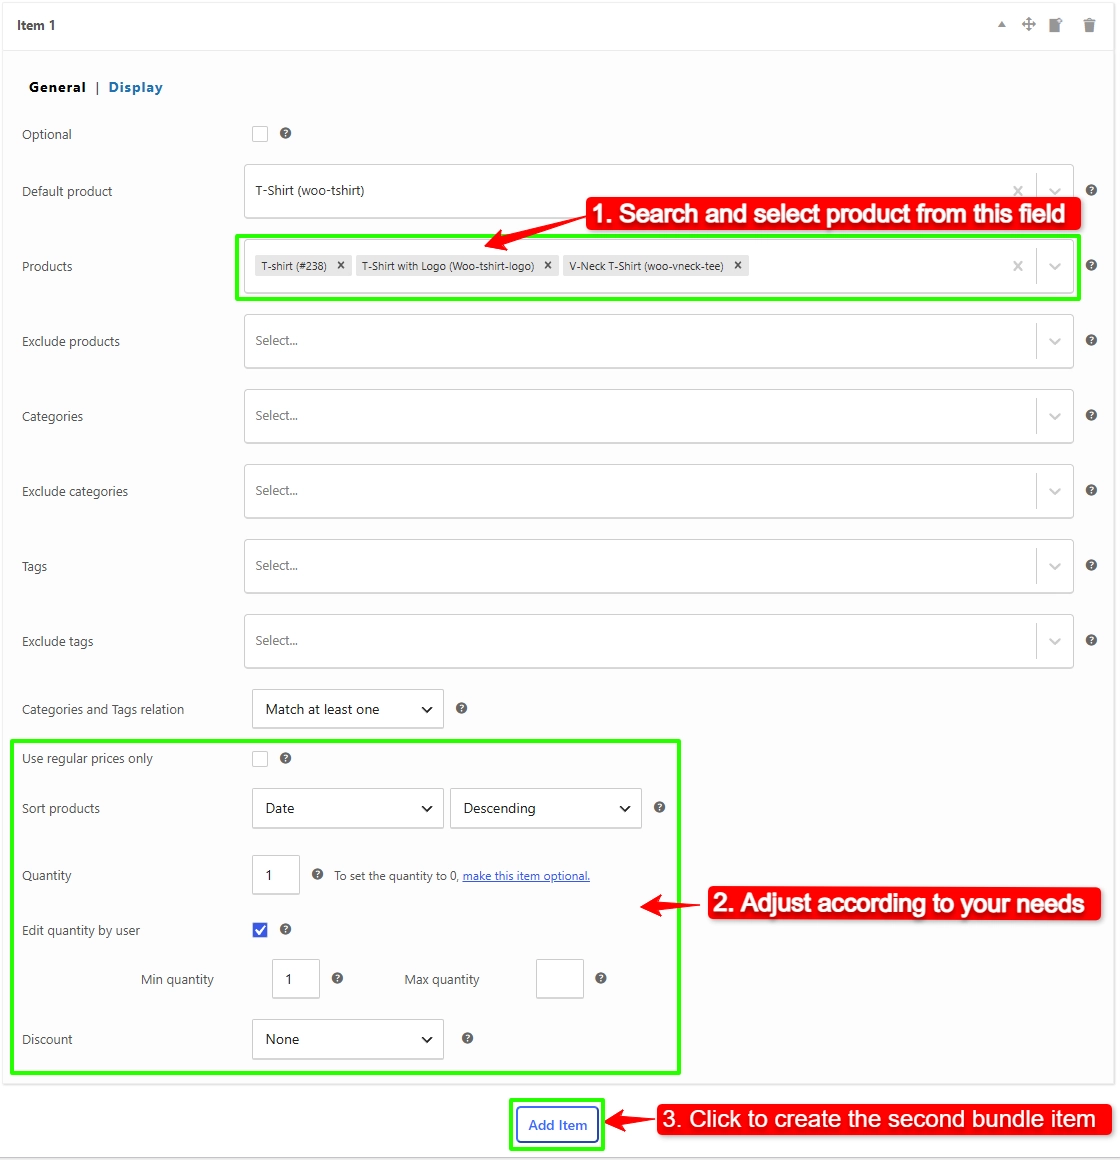
After clicking on “Add Item”, configure the first bundle item using the available options:

  1. In the “Products” field, search for and select the product you want to add to the bundle.
  2. Set the “Quantity” for the selected product.
  3. Configure the available quantity options according to your requirements.
  4. Configure any other available options for the bundle item.
  5. Review the item settings and make sure they are configured as needed.

For example, if you are creating a clothing bundle, you can add a T-Shirt as the first bundle item and configure its quantity and other available options.

  1. Once you have finished configuring the first item, click “Add Item” to create the second bundle item.
Configure Bundle Items

Select another product, such as Jeans, and configure its quantity and available options.

Repeat the same process to add and configure the remaining bundle items, such as Shoes.

Your bundle can now contain:

  • Item 1: T-Shirt
  • Item 2: Jeans
  • Item 3: Shoes

Each bundle item can be configured separately according to your requirements.

Step 4: Configure the Bundle Price

After adding and configuring all the bundle items, configure the pricing method for your bundle.

In the “Product Bundles” tab, configure the bundle price according to your requirements.

The plugin provides two pricing methods:

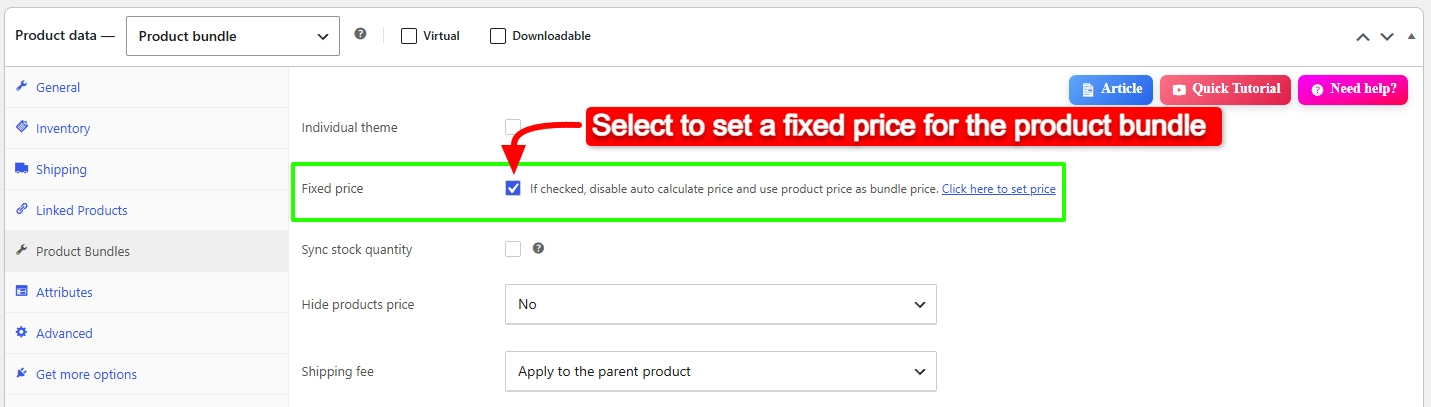
1. Fixed Price

Select the fixed pricing option if you want to set one specific price for the entire bundle.

Set Fixed Price for product bundle

For example, if the products in your bundle have a combined regular price of $100, you can sell the complete bundle for $85.

2. Automatically Calculated Price

The Auto Calculate Price option dynamically calculates the price of the product bundle based on the selected items.

To use the automatic pricing feature, uncheck the “Fixed Price” option and update the product.

This option is useful when the products in your bundle have different prices or when you want the bundle price to change based on the products selected by the customer.

Step 5: Configure Additional Bundle Options

After configuring the bundle items and pricing, review the available bundle options and configure them according to your requirements.

Depending on your bundle configuration, you can customize options such as product selection, quantities, discounts, and other available settings.

For more advanced bundle configurations, such as product variations, Mix and Match, categories, tags, optional products, and dynamic product selection, you can follow the dedicated guides linked in this article.

Step 6: Publish the Bundle

Once you have finished configuring your bundle, click “Publish” to publish the product.

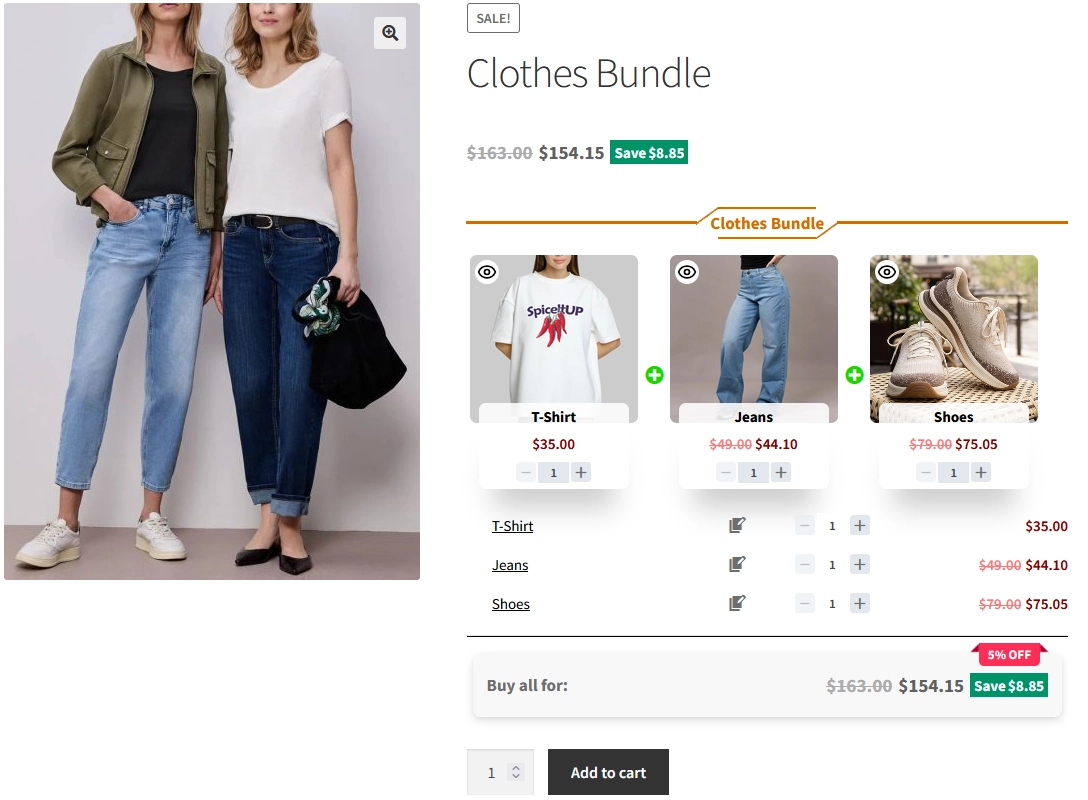
Your WooCommerce product bundle is now ready to be displayed in your store.

Open the product page and make sure that the bundle works as expected before making it available to your customers.

Check that:

  • All bundle items are displayed correctly.
  • The selected products are correct.
  • Quantities work as expected.
  • The bundle price is correct.
  • Any configured discounts are applied correctly.
  • The bundle can be added to the cart successfully.
Clothes Product Bundle

Different Types of WooCommerce Product Bundles

WooCommerce product bundles can be created in different ways depending on how you want customers to select and purchase products. With Product Bundle Builder for WooCommerce, you can create simple fixed bundles as well as more flexible bundle configurations.

Simple Product Bundles

A simple product bundle combines specific products into one package. The store owner selects the products included in the bundle, and customers purchase them together.

For example, you can create a bundle containing a T-shirt, jeans, and shoes and sell them as one package.

This is the simplest way to create a WooCommerce product bundle and is covered in the step-by-step tutorial above.

Product Bundles with Variations

You can also include variable products in your WooCommerce bundles and allow customers to select the variation they want.

For example, if a bundle contains a T-shirt, customers can choose its size and color before adding the bundle to the cart.

Learn more about WooCommerce Product Bundles with Variations.

Product Bundles with Variations

Mix and Match Product Bundles

Mix and Match bundles allow customers to choose products from a selection of available items.

For example, you can let customers choose any 3 products from a selection of 10 products to create their own bundle.

Learn how to create WooCommerce Mix and Match bundles.

Mix and Match Product Bundles

Dynamic Product Bundles

Dynamic bundles allow you to create more flexible product selections and configure bundle items based on your store’s requirements.

They can be useful when you want customers to build a bundle by selecting products from different options.

Learn more about creating dynamic WooCommerce product bundles.

Category-Based Product Bundles

With category-based bundles, you can allow products to be selected from specific WooCommerce product categories.

For example, you could create a bundle where customers choose one product from the Shirts category and another from the Shoes category.

Learn how to create WooCommerce product bundles with categories.

Category-Based Product Bundles

Composite Products

Composite products allow you to create bundles with multiple configurable components.

For example, you can create a computer bundle where customers select a processor, memory, storage, and other components.

Learn more about creating WooCommerce composite products.

Composite Products

Optional Product Bundles

Optional bundle items allow customers to choose whether they want to include certain products in their bundle.

For example, you can make an additional product optional so customers can choose whether to add it to their bundle.

Learn how to create optional product bundles in WooCommerce.

Optional Product Bundles

BOGO Product Bundles

BOGO (Buy One Get One) bundles allow you to offer a free or discounted product when a customer purchases another product.

For example, you can offer a free T-shirt when a customer purchases a specific product.

Learn how to create BOGO deals with WooCommerce Product Bundles.

BOGO Product Bundles

Gift Product Bundles

Gift product bundles allow you to offer one or more products as gifts when customers purchase a specific product or bundle.

For example, you can give customers a free product as an incentive to purchase a bundle.

Learn how to offer gift products with WooCommerce Product Bundles.

Gift Product Bundles

Assembled Product Bundles

Assembled product bundles combine multiple individual products or components into one complete product offering.

For example, you can create an assembled computer bundle containing a monitor, keyboard, mouse, and other components.

Learn how to create assembled products in WooCommerce.

Assembled Product Bundles

Subscription Bundles

You can also use product bundles with subscription products to create recurring product offers.

For example, a store can combine several products into a subscription bundle and allow customers to receive the products on a recurring basis.

For a complete guide, see How to Create Subscription Bundles in WooCommerce.

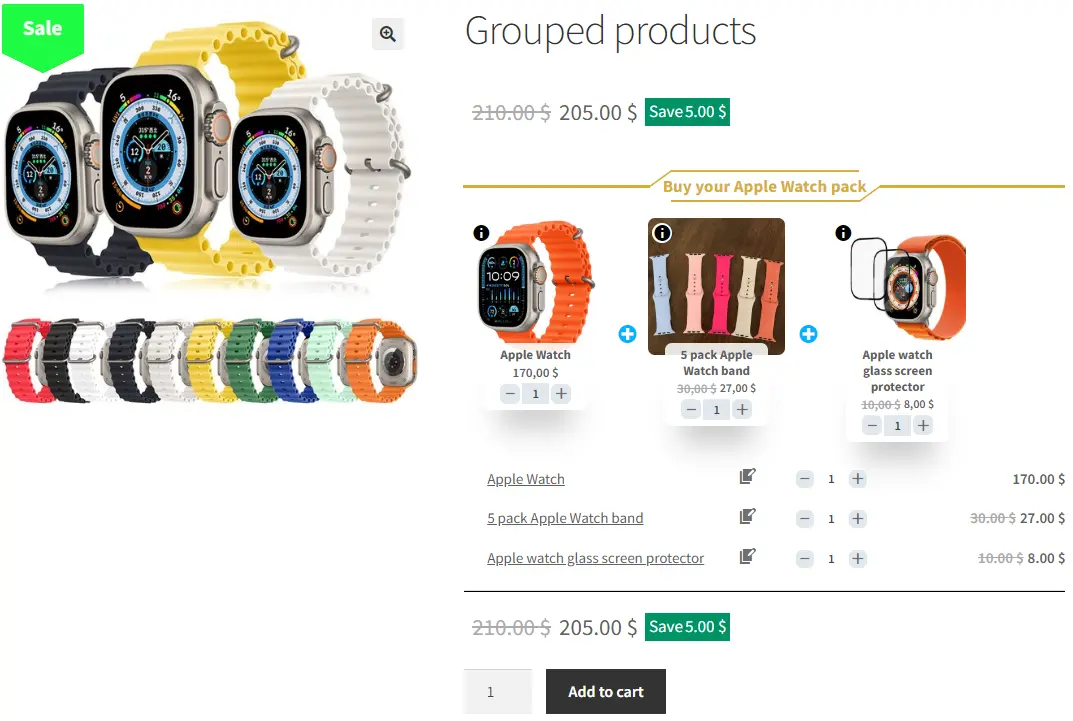
Grouped Products

Grouped Products provide another way to present multiple related WooCommerce products together on a single product page.

This can be useful when you want customers to view and purchase several related products together without creating them as a single bundled product.

For more information, see How to Create WooCommerce Grouped Products.

WooCommerce Grouped Products

Combo Offers

Combo offers allow you to combine complementary products and present them as a special offer.

For example, you can combine several related products and offer them together at a special price.

See How to Create WooCommerce Combo Offers for more information.

Add Discounts to Your Product Bundles

Product Bundle Builder for WooCommerce allows you to apply discounts to both the entire product bundle and individual bundle items when using the Auto Calculate Price option.

Discount on the Entire Bundle

You can apply a discount to the total price of the product bundle. The discount can be configured as either a percentage or a price discount.

Discount on the Entire Bundle

This allows you to offer a discount on the complete bundle rather than applying a separate discount to each product.

Discount on Individual Bundle Items

You can also apply a discount to individual products included in the bundle.

Each bundle item can have its own discount, allowing you to apply different discounts to different products within the same bundle.

Discount on Individual Bundle Items

This is useful when you want to offer specific discounts on selected products while keeping other bundle items at their regular prices.

Shipping Fee Calculation

Product Bundle Builder for WooCommerce allows you to choose how the shipping fee is calculated for a product bundle.

You can choose to apply the shipping fee for the whole bundle or each bundle item, or the parent product.

Shipping Fee Calculation for product bundles

How to Configure Plugin Settings

The main plugin settings are available in the “Product Bundles” tab in your WordPress dashboard.

From there, you can configure the general options that control how product bundles work and are displayed in your store.

Settings and customization are available on this page:

  • Item View: In this section, you can configure various settings, such as displaying stock availability, showing product ratings and descriptions, enabling modal quick views, adding a quantity field on item pages, displaying a plus icon for items, setting the theme and size options, positioning product bundles on the product page, defining custom CSS selectors, specifying the product price selector, and many other customizable options.
  • Change product model: In this section, you can configure the number of products per pop-up page.
  • Styles: In this section, you can customize the colours of different parts of your bundle and set the product image object-fit CSS.
Configure the Product Bundles plugin Settings

Themes and Sizes

Product Bundle Builder for WooCommerce includes multiple grid and list themes for displaying bundle items on your product pages.

You can also choose the item size for your product bundle, with Small, Medium, and Large size options.

These settings allow you to customize how bundle items are displayed and choose a layout and size that best fits your store’s design.

Themes and Sizes

Coupon Apply Method

You can also control how WooCommerce coupons are applied to a product bundle.

The plugin provides the following options:

  • Both Bundle and Bundle Items
  • Only Bundle
  • On Bundle Items
  • None

Choose the coupon application method that best fits your bundle pricing and discount strategy

Coupon Apply Method of bundled product

Shortcodes

The Product Bundle Builder plugin provides shortcodes that you can use to display product bundles on your product pages.

These shortcodes are especially useful when you want to manually place the bundle output in a specific location or use it with page builders such as Elementor.

Available Shortcodes

Display Product Bundles

Use the following shortcode to display product bundles:

[asnp_wepb_product]

Display Product Bundles with Add to Cart

Use the following shortcode to display product bundles with an Add to Cart button:

[asnp_wepb_product show_add_to_cart="1"]

Using Shortcodes with Elementor

To use a shortcode with Elementor:

  1. Edit your page with Elementor.
  2. Add the Shortcode widget.
  3. Enter one of the Product Bundle Builder shortcodes.
  4. Save or update the page.

For example:

[asnp_wepb_product show_add_to_cart="1"]

The product bundles will be displayed where the shortcode is placed.

How to translate WooCommerce product bundles

Translating your WooCommerce product bundles can help you provide a better shopping experience for customers who speak different languages. It allows you to display bundle-related text and product information in your customers’ preferred language.

For a step-by-step guide, see How to Translate WooCommerce Product Bundles.

Best WooCommerce Product Bundle Examples

Product bundles can be used in many different ways depending on your products and business model. Here are some common examples:

Clothing Bundle

Combine products such as a T-Shirt, Jeans, and Shoes into a complete outfit and offer them together as one bundle.

Computer Bundle

Create a bundle containing products such as a computer, monitor, keyboard, mouse, and other accessories.

Skincare Bundle

Combine complementary products such as cleanser, moisturizer, and serum into one skincare package.

Gift Bundle

Create a package containing several related products and offer it as a ready-made gift.

BOGO Offer

Offer a free or discounted product when a customer purchases a qualifying product.

Build Your Own Bundle

Allow customers to choose products from a predefined selection and create their own personalized bundle.

These examples show how WooCommerce product bundles can be adapted to different products, offers, and customer needs.

WooCommerce Product Bundles Free vs Pro

Product Bundle Builder for WooCommerce is available in both Free and Pro versions.

The free version provides the essential features needed to create and sell product bundles, while the Pro version adds more advanced bundle types, customization options, and additional features.

With the Pro version, you can create advanced bundle offers such as Mix and Match, Dynamic Bundles, Category-Based Bundles, Optional Products, and Assembled Products, along with additional display and customization options.

For a complete list of Pro features, pricing, and available options, see the Product Bundle Builder for WooCommerce Pro page.

Frequently Asked Questions

Can I create WooCommerce product bundles for free?

Yes. You can create basic product bundles using the free version of Product Bundle Builder for WooCommerce.

Can customers choose products in a WooCommerce bundle?

Yes. Depending on how you configure the bundle, you can allow customers to select products, quantities, or variations.

Can I create a bundle with variable products?

Yes. You can include variable products in a bundle and allow customers to select the available variations.

Can I set a fixed price for a WooCommerce product bundle?

Yes. You can enable the Fixed Price option and set a specific price for the entire bundle.

Can WooCommerce bundle prices be calculated automatically?

Yes. By disabling the Fixed Price option, you can use Auto Calculate Price to calculate the bundle price based on the selected products.

Can I create BOGO offers in WooCommerce?

Yes. Product Bundle Builder for WooCommerce can be used to create Buy One Get One offers where customers receive a free or discounted product.

Can I offer a free gift with a WooCommerce product?

Yes. You can configure a bundle to include a free gift product with a qualifying purchase.

Can customers choose product variations in a bundle?

Yes. Variable products can be included in bundles, allowing customers to select available variations according to your configuration.

Conclusion

WooCommerce product bundles allow you to combine related products, create special offers, and give customers a more convenient way to purchase multiple products together.

With Product Bundle Builder for WooCommerce, you can start with simple product bundles and create more advanced offers such as Mix and Match bundles, Dynamic Bundles, Optional Products, BOGO offers, Gift Products, Category-Based Bundles, and Assembled Products.

Whether you want to increase the value of each order, promote complementary products, or create customizable product offers, product bundles can be adapted to different types of WooCommerce stores.

Start with a simple bundle using the step-by-step tutorial above, or explore the dedicated guides throughout this article to create more advanced WooCommerce product bundle offers.

Related Resources

Want to learn more about WooCommerce product bundles and related strategies? Explore these helpful guides:

🌐SOCIAL MEDIA LINKS

Posted on — Leave a comment

How to Add Discounts on WooCommerce Products?

How to Add Discounts on WooCommerce Products

WooCommerce is the number one eCommerce platform for WordPress users. It has huge functionality and a big impact on your online business improvement and sales. And as an online shop owner sometimes you may want to place discounts on your sale items. If you are a WordPress beginner then you may discover new plugins, themes, many tips, and tutorials on WPGlob WordPress Tutorials. So, in this article, we will teach you how to add discounts on WooCommerce products.

What Can You Do with The WooCommerce Dynamic Pricing and Discounts Plugin?

Best WooCommmerce Bulk Discount Free Plugin

The plugin is represented by the Asana Plugins. And it has more than 5.000 active installations and a 4.8 out of 5-star rating.

As we mentioned above, the plugin has plenty of effective options that will help you to manage your WooCommerce shop. At this point, you will encounter all the essential functions that are provided by the plugin’s developers.

So with the WooCommerce Dynamic Pricing and Discounts plugin, you may create these discounts:

  • Cart Discounts
  • Bulk Discounts
  • Advanced Discounts
  • Percentage Discounts
  • Dynamic Pricing
  • Product Quantity Discounts
  • Automatic Discounts

In addition to the mentioned ones, you may also create dynamic and advanced shipping methods, and the best sale offers for your WooCommerce platform. Moreover, it can be highly significant not only for professional users but also for beginners due to its simple usage rules.

The suggested discount ways are mentioned below:

  • Buy two, Get one free
  • Member pricing
  • Deals of the day
  • Individual pricing 
  • Buy 1, get 1 free
  • Bogo deals
  • WooCommerce buy 1, get 1 free
  • Category Discount
  • WooCommerce Countdown timer, etc.

Besides including the products into the list of discounted items, you may also exclude them from the set pricing rules.

Some Special Options of The Plugin

At this point, we shall discuss the unique options offered by the plugin for your WooCommerce platform.

Discount by Simple Pricing: This is the case when you set a discount on a certain condition. For example, one item will be discounted in the case that all the bought item’s subtotal price is greater than £X.

Product subtotal discount for WooCommerce

Countdown timer: This function will help you to set a precise expiration date of the discount.

Countdown timer for WooCommerce

Bulk Pricing: This option decreases the item’s cost according to the quantity that the customer buys.

Quantity based discounts for WooCommerce

Set discounts according to the product groups: This option adjusts the item group’s cost.

Products bundle discounts in WooCommerce

Buy X product, Get X1 free: This is a way of promoting one product due to another one. Also, it works, based on the quantity. This means that if you buy, for example, 4 caps you will get 1 free, etc.

Add BOGO discounts on WooCommerce products

Advanced WooCommerce shipping methods: The plugin offers 2 variants of the WooCommerce shipping methods:

  • An additional $10 is added to the total cost if the weight is equal to or greater than 10.
  • The other variant is free of charge. This is available in the case your bought item’s total cost is $50.

Live Price: This displays the product’s price on its page. Besides, you may set specific fees and extra amounts according to this or that type or category of the products (for example, an additional $3 for the heavy package, etc.).

Add discounts on WooCommerce products

As you may see, the plugin offers you almost all the features that you would like to have when setting discounts on your WooCommerce platform.

Along with the mentioned advantages the plugin is famous for its powerful conditional logic which includes:

  • Cart: Products in carts, total prices including or excluding the taxes, item categories, etc.
  • Purchase history: This part includes the bought items, variation, categories, etc.
  • Customers: This section is about the specific or logged-in customers as well as the order numbers, amount, and money spent on them.
  • Roles: This part refers to the specific roles.

If you do not have an idea of what discount offers you may place on your product page then you will highly benefit from the list of the discount scenarios presented by the plugin developers.

How to Add Discounts on WooCommerce Products via This Plugin?

So, it is very easy to add a discount to your WooCommerce store products. But in order to work with this plugin, you need to have WooCommerce activated and added some products to your shop.

Here are the main sections of this plugin:

WooCommerce Dynamic Pricing and Discounts

So let us review all these sections one by one.

  • The first section is Discounts which is used to create automatic cart coupons.
Automatic coupons for WooCommer5ce
  • The next section is the pricing rules which is used to apply a discount or fee on the product price based on conditions, and we will exlain this section in more details in this article.
  • Moving forward, the next section is Shipping Methods which is used to create advanced and dynamic shipping methods.
How to created dynamic shipping methods in WooCommerce
  • The next is Checkout Fee that can helps to created advanced and conditional checkout fees in WooCommerce.
Dynamic shipping methods for WooCommerce
  • The next section is Auto Add Products for WooCommerce, that is available as addon. You can use it to give gift products to your customers. E.g: Customers who spent at least 200$ will get a t-shirt for free.
Gift products for WooCommerce
  • The next one is the Shipping Discounts which is available as an addon. You can use it to discount shipping methods amount.
Advanced shipping methods discount for WooCommerce
  • Next is the Products section which is used to list specific products in your WooCommerce store. E.g: create a page and list products that is on sale.

Let’s start to add discounts on WooCommerce products.

Navigate to the Woo Pricing & Discounts >> Pricing tab and add a new pricing rule like the below image.

How to Add Discounts on WooCommerce Products?

Open the product page to see the applied discount on the product.

How to Add Discounts on WooCommerce Products?

Here is another example that adds different discounts for different products.

How to Add Discounts on WooCommerce Products?

Discount on the product page.

How to Add Discounts on WooCommerce Products?

Pricing Strategy

The plugin offers a free version. Yet, if you want to get advanced features, too then you need to purchase the payable Pro version. Currently, there is a big 50% sale on the Pro plans. So the pricing is presented below:

  • 1 Site– $60 $30
  • 5 Sites– $120 $59
  • 25 Sites– $180 $89

One more important note is that the subscription provides you a year of full support and update notification.

Wrapping Up

So, we have already discussed one of the most engaging things on Ecommerce websites. As in all the shops, also in the case of an online store, the discounts are very demanded and attract the customers very effectively.

For online shop owners, WordPress offers one of the best eCommerce platforms that is WooCommerce. And as it is very popular among WP users plugin developers tend to create more plugins that can be too useful for WooCommerce store owners.

So, in our article, we have reviewed the WooCommerce Dynamic Pricing and Discounts Plugin. It can be an irreplaceable choice for the users who tend to set different types of discounts on their websites. Due to its advanced features, the plugin contains almost all the tools to set engaging and attractive discounts that will be preferable both for the site owner and the consumers.

And now all you need to do is install the plugin and enjoy one of the best user experiences that you may not even imagine. In this article, we taught you how to add discounts on WooCommerce products while the plugin offers more extra discounts features that you can implement in your store.

Updated on — Leave a comment

How to Create WooCommerce Category Discounts? (2024 Tutorial)

How to create category discounts in WooCommerce

Category-based discounts in WooCommerce are one of the best strategies that can help you to increase sales and revenue. You can offer various types of discounts on categories like price discounts on categories, percentage discounts on categories, fixed price discounts, user role-based category discounts, bulk discounts on categories, BOGO deals on categories, Buy from a category, and get products from another category, and etc. In this article, we will learn you how to create WooCommerce category discounts.

What is a WooCommerce Category Discount?

WooCommerce category discount is a type of discount that you can use it to offer a discount on all products of a specific category or multiple categories. For example, you can discount all t-shirts inside the t-shirt category. Also, you can offer a bulk discount on category level for wholesale buyers.

Why You Might Want to Create a WooCommerce Category Discount

Offering all products of a WooCommerce category with a discount is a better strategy than offering individual coupons. When you offer a discount on a top seller category it might urge your customers to buy more, and as well will increase your store revenue.

Also you can use this strategy to clear unwanted inventory, for example offering a discount on summer clothes at the end of the season is a good move. By using this strategy you can clear unwanted inventory faster and open place for the new products.

How To Create a WooCommerce Category Discount?

Benefits of WooCommerce category discounts encourage us to create one. This blog post is a complete guide to create WooCommerce discounts by category.

To create discounts based on the category in WooCommerce we will use the Discount Rules and Dynamic Pricing for WooCommerce plugin, which offers multiple types of discounts for categories.

In this article we will create below type of discounts for categories.

  • Category based price discounts in WooCommerce
  • Category based percentage discounts in WooCommerce
  • Different percentage discount for different categories
  • Scheduled WooCommerce Category Discounts
  • User Role based discounts for categories in WooCommerce
  • Category based bulk discount in WooCommerce
  • BOGO deals and discounts for categories in WooCommerce
  • Buy from a category and get a discount on another category in WooCommerce
  • Bundle discounts based on a category in WooCommerce (Buy 4 t-shirts for 100$ or Buy 2 clothing for 50$)
  • Category based price coupon in WooCommerce
  • Category based percentage coupon in WooCommerce
  • Category discount based on cart subtotal in WooCommerce
  • Buy from multiple categories and get a discount (Buy at least one item from category t-shirts and hoodies and get a 20% discount)

Video Tutorial

Category based price discounts in WooCommerce

Category-based price discounts in WooCommerce apply a price discount like 10$ discount on a specific category. For example, you want to give a 10$ discount offer on the t-shirts categories.

This type of discount will discount all products in the specific category and will show the discounted price and the original price as a strike-out price on the product page.

In this example, we will give a 10$ discount on the t-shirts and hoodies categories.

To create a price discount for a category in WooCommerce go to the Woo Pricing & Discounts >> Pricing tab and add a new pricing rule like the below image.

Create a WooCommerce Pricing Rule
Create a WooCommerce Price Rule

Now create a pricing rule like the below image to give a 10$ price discount on a specific category in WooCommerce.

Price discount rule for a category in WooCommerce
Price discount rule for a category

The above rule will apply a 10$ discount on all t-shirts and hoodies products. If you visit a t-shirt product you will see applied discount on it like the below images.

price discount applied on all of category products in WooCommerce
price discount applied on all of category products
Price discount on categories in WooCommerce cart

As you can see in the above images, a 10$ price discount applied on all of the products in the category in product and cart pages.

Category based percentage discounts in WooCommerce

Category-based percentage discounts in WooCommerce apply a price discount like a 30% discount on specific categories. For example, discounting all products of the Hoodies category by 30%.

By using a percentage discount for categories in WooCommerce, you will discount all products of the category by a percentage value. It will show the discounted prices on the product page and strike out the product’s original price.

To create a percentage discount for a category in WooCommerce go to the Woo Pricing & Discounts >> Pricing tab and add a new pricing rule like the below image.

percentage discount rule for category

The above rule will apply a 30% percentage discount on the Accessories and Music categories like the below images.

Percentage discount applied on category product

Now if you add some products from the discounted categories to the cart, you will see applied discount on the categories in WooCommerce cart.

Discounting category products in WooCommerce

Different percentage discount for different categories

It is possible to set different percentage discounts for different categories. For example, t-shirts will get a 10% discount, Hoodies will get a 15% discount, Accessories will get a 20% discount.

To create different discount percentage for different categories, you can use a rule for each of categories. A rule for t-shirts, another rule for Hoodies and one for Accessories.

Navigate to the Woo Pricing & Discounts >> Pricing and create a pricing rule for each of the categories that have different discounts like the below image.

Different discount for different categories in WooCommerce

As you can see in the below image different categories has different discounts.

Different discount percentage for categories in WooCommerce
Different discount percentage for categories

Now if you add a product from different categories to the cart, you will see that each category will get its own discount.

Different percentage discount for different categories in WooCommerce
Different percentage discount for different categories

Scheduled WooCommerce Category Discounts

Scheduled WooCommerce category discounts helps you to schedule a category for discount on specific dates or times. You can use scheduled discounts for categories to sale them on end of seasons or on special days like Black Friday discounts, Cyber Monday Discounts.

Navigate to the Woo Pricing & Discounts >> Pricing and add a new price rule to create a scheduled WooCommerce category discounts.

Schedule category discount rule in WooCommerce

To schedule categories for sale in WooCommerce, we used a pricing rule and adding a date condition for it. It is possible to use various types of date conditions like Date, Date-Time, Time, Days, Specific Days to schedule categories for sale.

In this example, we scheduled t-shirt category for sale on June in WooCommerce.

Category scheduled for sale in WooCommerce

User Role based discounts for categories in WooCommerce

Offering category discounts based on user role or for specific users can be done by the WooCommerce Discount Rules plugin. To offer a category discount for your wholesale customers you can create a pricing or cart discount rule in the plugin. It is possible to offer discounts for any user role.

In this example, we will create a discount rule that will discounts t-shirts and hoodies by 30% for wholesale customers.

Navigate to the Woo Pricing & Discounts >> Pricing tab and add a rule like the below image to create a category discount for wholesale customers in WooCommerce.

user role based discount for categories

Now if you login with a wholesale customer, you will see applied discount on the products like the below image.

Category discount based on user role in WooCommerce
Category discount based on user role

Category based bulk discount in WooCommerce

Category-based bulk discounts in WooCommerce can help to create quantity-based discounts for all products of a category. WooCommerce category-based bulk discounts can also be named quantity-based category discounts or category-based tiered discounts. You can learn more about bulk discounts here.

WooCommerce Bulk Discount Rule For A Category Example:

  • Buy 2-5 quantities to get a 5% percentage discount
  • Buy 6-10 quantities to get a 10% percentage discount
  • Buy 11-15 quantities to get a 15% percentage discount
  • Buy 16 or more quantities to get a 20% percentage discount

Navigate to the Woo Pricing & Discounts >> Pricing tab and add a rule like the below image to create bulk discount for categories in WooCommerce.

Bulk discount rule for a category in WooCommerce

The above rule will apply a quantity based discount on a category.

In the rule we set the “Quantity based on” field to the “Sum of all products quantities” and when calculating the quantities inside the cart, it will consider all of category products quantities. If you would like to calculate quantity separately for each product you can use “Single product” or “Single product variation” or “Cart line item”..

Category based bulk discount in WooCommerce

In the above image, there are 16 items of the “Clothing” category in the cart, and based on the bulk discount rule each item will get a 20% percent discount.

BOGO deals and discounts for categories in WooCommerce

BOGO deals for categories in WooCommerce is a way to apply a discount on a category item when the customer purchases certain quantities from that category. For example, Buy 1 Get 1 Free, Buy 2 Get 1 for Free, or Buy 3 Get 1 Free.

I this example we will give 1 quantity for free if customer buy 2 items from the category in other words buy 2 get 1 for free.

Navigate to the Woo Pricing & Discounts >> Pricing tab and add a rule like the below image to create a BOGO discount for categories in WooCommerce.

Category BOGO deal rule in WooCommerce
Category BOGO deal rule

Based on the above rule, if the customer has 3 items of t-shirt category in the cart the cheapest t-shirt will be for free.

BOGO discount for a category in WooCommerce

Buy from a category and get a discount on another category in WooCommerce

You can create BOGO deals that will discount a category when customer purchase certain quantities from a specific category. For example buy 2 t-shirts and get 1 product from Accessories category with a 50% discount, or buy 2 t-shirts and get a Cap product for free.

Navigate to the Woo Pricing & Discounts >> Pricing and add a rule like the below image.

BOGO deal rule for different categories in WooCommerce
BOGO deal rule for different categories

Now if the customer buys 2 t-shirts he will get an accessory with a 50% discount

Different categories BOGO deal in WooCommerce

Bundle discounts based on a category in WooCommerce

By a bundle discount based on a category in WooCommerce, customers can build custom bundles with categories to get them all with a discount. This type of discount is interesting for customers because they can build their own custom bundles and will increase your sales. Read Bundle discounts in WooComerce for more information.

Navigate to the Woo Pricing & Discounts >> Pricing and add a rule like the below image, to create a bundle discount for categories in WooCommerce.

Category bundle discount in WooCommerce
Category bundle discount rule in WooCommerce

In this example, we sell 2 items from t-shirts or hoodies or both of them for 50$.

Bundle discount for categories in WooCommerce

In the above image because customer purchased two items from t-shirts and hoodies category then the bundle is created and its price set to 50$.

Category bundle discount in WooCommerce

In the above image, because there are 2 t-shirt item then bundle created and its price set to 50$.

Category based price coupon in WooCommerce

Category-based price coupon in WooCommerce applies a price discount per item of the category. For example 1$ price discount per category item, if the customer has 2 items of the discounted category in the cart then he will get 1$ discount per item that will be a 2$ total discount on the category. Based on the number of category items in the cart discount can increase.

Category-based price coupon in WooCommerce is like WooCommerce basic coupon but only applies to the specific category products and also will automatically apply to the cart without the need to enter coupon code by the customer.

First please make sure that WooCommerce Coupons are enabled on your site. Then navigate to the Woo Pricing & Discounts >> Discounts tab to add a new cart discount rule like the below image.

WooCommerce discounts tab
Discounts tab

Now create a rule like the below image to add a 1$ discount per item of the category.

Price coupon discount rule for the category in WooCommerce

If you add products of the discounted category to the cart, then a category coupon will apply on them like the below image.

WooCommerce category coupon discount in cart

As you can see in the above image, the category coupon only applied to the t-shirts products and other products does not get the discount.

Category based percentage coupon in WooCommerce

Category based percentage coupon in WooCommerce, will apply a percentage discount per item of the category inside the cart. For example if you create a 10% discount per category item, then each category items will be discounted by 10%.

Category-based percentage coupon in WooCommerce is like WooCommerce basic coupon but only applies to the specific category products and also will automatically apply to the cart without the need to enter coupon code by the customer.

First please make sure that WooCommerce Coupons are enabled on your site. Then navigate to the Woo Pricing & Discounts >> Discounts tab to add a new cart discount rule like the below image.

Category percentage coupon code rule

The above category percentage coupon discount, will apply a 10% discount per Accessories category products like the below image.

Category percentage coupon discount in WooCommerce cart

Category discount based on cart subtotal in WooCommerce

WooCommerce category discount based on subtotal can help you to give a discount based on cart subtotal to encourage customers to purchase more from your store. You can create a price discount for products or a cart discount based on cart subtotal.

In this scenario we will create a category discount based on cart subtotal in WooCommerce which discounts a specific category items when cart subtotal is greater than 100$.

First please make sure that WooCommerce Coupons are enabled on your site. Then navigate to the Woo Pricing & Discounts >> Discounts tab to add a new cart discount rule like the below image.

Category discount rule based on cart subtotal in WooCommerce

A 20% coupon discount applied on the Hoodies category items when cart subtotal is greater or equal to 100$.

Category discount based on cart subtotal in WooCommerce

Buy from multiple categories and get a discount

Buy multiple categories or combination category discounts helps to apply a discount to the cart when a customer buys at least one item from the selected categories.

First please make sure that WooCommerce Coupons are enabled on your site. Then navigate to the Woo Pricing & Discounts >> Discounts tab to add a new cart discount rule like the below image.

multiple categories or combination category discounts rule in WooCommerce
multiple categories or combination category discounts rule

Now if the customer has at least one item of the Hoodies and T-shirts in the cart he will get a 30% discount.

multiple categories or combination category coupon discounts in WooCommerce
multiple categories or combination category coupon discounts

How to Enable WooCommerce Coupons?

To create coupons for categories in WooCommerce, you need to enable WooCommerce coupon so please follow the below steps.

  • Go to the WooCommerce settings page on your site admin.
  • In the “General” tab of the WooCommerce settings page, there is “Enable coupons” and you can enable it and save the settings.

Add Sale Badges

If you want to create eye-catching sale badges for your pricing rules, read these articles :

How to Create WooCommerce Category Discounts Conclusion

Creating a WooCommerce discount by category is one of the effective ways to increase your store sales by attracting new customers or selling to your existing customers.

Types of WooCommece discount by categories:

  • Conditional discounts for categories
  • BOGO deals and discounts for categories
  • Bundle price for categories
  • Bundle discount for categories
  • Bulk price for categories
  • Bulk discount for categories
  • Percentage discount for categories
  • Percentage coupons for categories
  • User role-based category discount
  • Wholesale customers category discount

If you would like to create simple to advanced category discounts, we recommend you to use the Discount Rules and Dynamic Pricing for WooCommerce which supports any type of category discounts in WooCommerce.

FAQ

What are WooCommerce Category discounts?

Category discounts in WooCommerce, applies a price or percentage discount to all products of a specific category. You can create different discount rules for different categories. For example 10% discount for t-shirts, 5$ discount on Hoodies and etc.

How to add WooCommerce discount per category?

To add a WooCommerce discount per category, you can use the Discount Rules and Dynamic Pricing for WooCommerce which supports simple to advanced category discounts.

What is the best WooCommerce category discount plugin?

In this article, we introduced the Discount Rules and Dynamic Pricing for WooCommerce plugin that enables you to create any type of category discount rules. Category Discounts for WooCommerce, It also named as Easy WooCommerce Discounts, WooCommerce Dynamic Pricing and Discounts, WooCommerce Advanced Coupons, and WooCommerce Advanced Discounts.

Updated on — Leave a comment

WooCommerce Free Shipping Based On Cart Subtotal

How to create a free shipping method when the subtotal reaches a certain amount?

In this tutorial, we are going to create WooCommerce free shipping based on cart subtotal using Easy WooCommerce Discounts Pro – WooCommerce Dynamic Pricing & Shipping plugin.

Our Advanced WooCommerce Shipping plugin has advanced rules to create dynamic shipping methods in WooCommerce in a easy way and in this tutorial we are going to create a free shipping method when cart subtotal becomes at least 50$

Making a free shipping method when cart subtotal reaches certain amount

Step 1: Create a shipping method rule

  • First, navigate to Woo Pricing & Discounts Menu
  • Then open the Shipping Methods tab
  • Click on the Add New button to create a new Shipping Method.

Step 2: Add a base shipping method when cart subtotal is less than our certain amount

In this step we will create a base shipping method that will be added when the cart subtotal is less than our desired certain amount that is 50$ in this tutorial. You can skip this step if you don’t like to create a base shipping method for less amounts.

  • As like the below image you can set a name for your base shipping method which is “Base Shipping” in our example
  • Set Apply Mode of the rule to “Apply with other applicable rules” to apply this rule with other applicable shipping rules created in the plugin.
  • Set a cost for your base shipping rule. We set it to 10 in our example.
  • Click on the save button to save the rule.

Step 3: Create a free shipping method rule to apply when cart subtotal reaches certain amount.

  • Go to the Shipping Methods tab as you did in Step 1.
  • Click on the add new rule to create a new shipping method rule in the plugin.
  • As the below image you can set a name for your free shipping method which is “Free Shipping” in our example.
  • Set Apply Mode of the rule to “Apply with other applicable rules” to apply this rule with other applicable shipping rules created in the plugin. Also, you can set the Apply Mode to “Apply this rule and disregard other rules” to apply only this rule when there is more than one applicable rule.
  • Set its cost to 0 to make it a free shipping method.
  • Add a subtotal condition to the rule like the below image, you can use “Subtotal Including Tax” or “Subtotal Excluding Tax” condition.
  • Click on the save button to save the rule.

Now if you navigate to the “Shipping Methods” tab you can see two shipping rules as like the below attached image.

Step 4: Hide shipping rules when a free shipping rule available

  • Navigate to the Woo Pricing & Discounts plugin Settings Menu.
  • Go to the General tab – Shipping section.
  • Set “Hide On Free Shipping” option to “Yes” and save the settings.

Video tutorial of how WooCommerce Free Shipping Based On Cart Subtotal

WooCommerce Advanced Shipping Plugin

With our WooCommerce Advanced Shipping Plugin, you can create multiple advanced shipping methods with a combination of advanced conditions available in the plugin and as you saw we created a free shipping method and a base shipping method that works together in our website.